2013 MERCEDES-BENZ G-CLASS SUV display
[x] Cancel search: displayPage 152 of 364
gearshift program appears in the
multifunction display.
i Only change from automatic drive
program E or S to manual drive program
M when the vehicle is stationary. Steering wheel paddle shifters
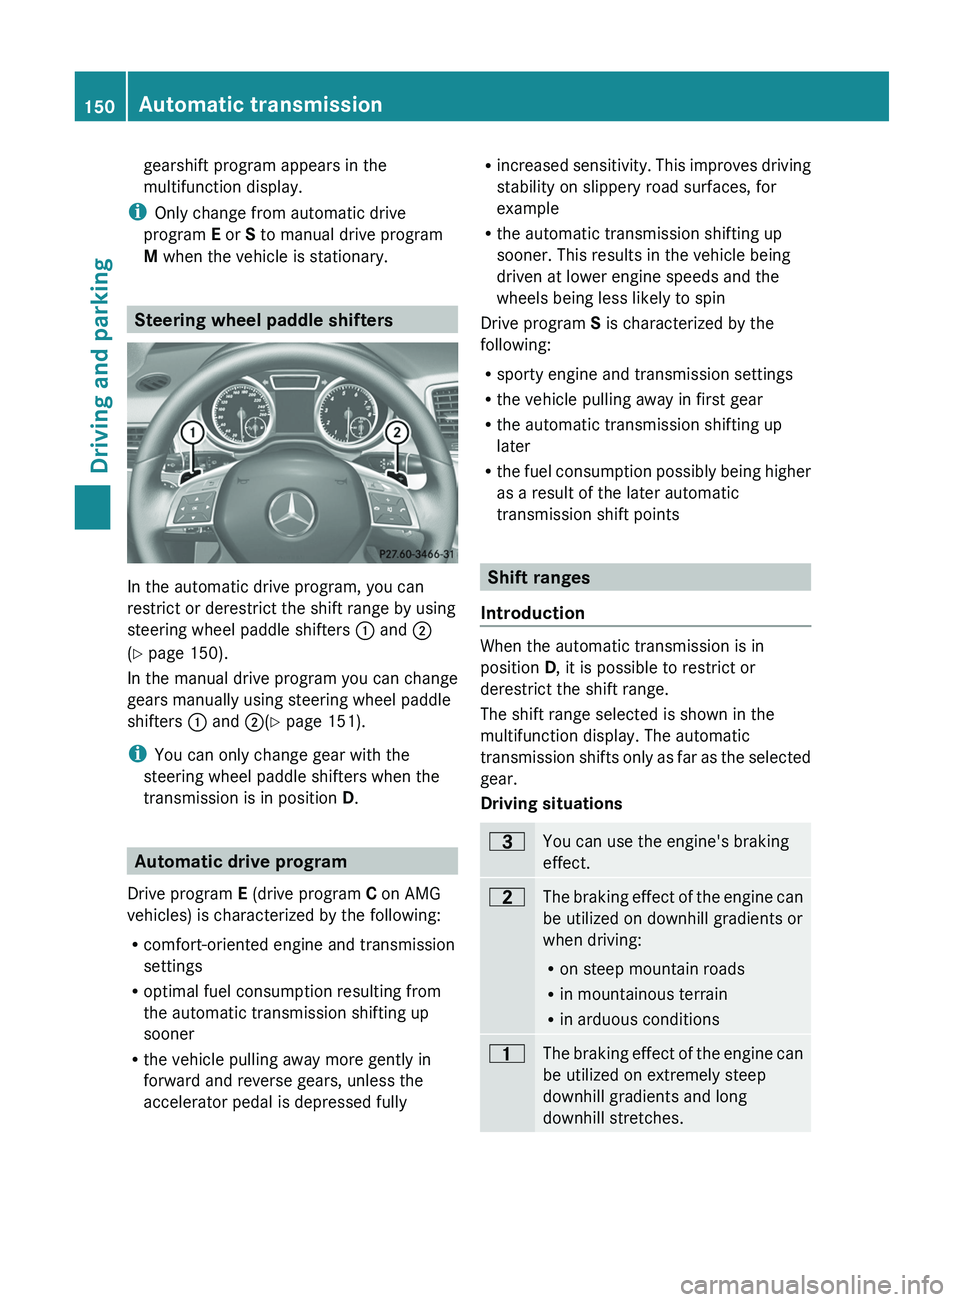
In the automatic drive program, you can
restrict or derestrict the shift range by using
steering wheel paddle shifters
0043 and 0044
(Y page 150).
In the manual drive program you can change
gears manually using steering wheel paddle
shifters 0043 and 0044(Y page 151).
i You can only change gear with the
steering wheel paddle shifters when the
transmission is in position D. Automatic drive program
Drive program E (drive program C on AMG
vehicles) is characterized by the following:
R comfort-oriented engine and transmission
settings
R optimal fuel consumption resulting from
the automatic transmission shifting up
sooner
R the vehicle pulling away more gently in
forward and reverse gears, unless the
accelerator pedal is depressed fully R
increased sensitivity. This improves
driving
stability on slippery road surfaces, for
example
R the automatic transmission shifting up
sooner. This results in the vehicle being
driven at lower engine speeds and the
wheels being less likely to spin
Drive program S is characterized by the
following:
R sporty engine and transmission settings
R the vehicle pulling away in first gear
R the automatic transmission shifting up
later
R the fuel consumption possibly being higher
as a result of the later automatic
transmission shift points Shift ranges
Introduction When the automatic transmission is in
position D, it is possible to restrict or
derestrict the shift range.
The shift range selected is shown in the
multifunction display. The automatic
transmission shifts only as
far as the selected
gear.
Driving situations 0040
You can use the engine's braking
effect.
0038
The braking effect of the engine can
be utilized on downhill gradients or
when driving:
R
on steep mountain roads
R in mountainous terrain
R in arduous conditions 0037
The braking effect of the engine can
be utilized on extremely steep
downhill gradients and long
downhill stretches.150
Automatic transmission
Driving and parking
Page 153 of 364
Restricting the shift range
X
Pull the left-hand steering wheel paddle
shifter (Y page 150).
The automatic transmission shifts down
one gear and restricts
the shift range to the
relevant gear.
i If the engine exceeds the maximum
engine speed when shifting down, the
automatic transmission protects against
engine damage by not shifting down.
i If the maximum engine
speed for the shift
range is reached and you continue to
accelerate, the automatic transmission
shifts up in order to prevent the engine
from overrevving, even if the shift range is
restricted.
Derestricting the shift range X
Pull the right-hand steering wheel paddle
shifter (Y page 150).
The automatic transmission shifts up one
gear and restricts the shift range to the
relevant gear.
Clearing the shift range restriction X
Pull and hold the right-hand steering wheel
paddle shifter ( Y
page 150) until D is shown
again in the multifunction display.
The automatic transmission shifts from the
current shift range directly to D.
Selecting the ideal shift range X
Pull the left-hand steering wheel paddle
shifter ( Y page
150) and hold it in position.
The automatic transmission shifts to the
gear which allows optimum acceleration
and deceleration. To do this, the automatic
transmission shifts down one or more
gears.
i The automatic transmission cannot shift
down beyond second gear. To shift to first
gear, you have to pull the left steering
wheel paddle shifter. Manual drive program
Introduction In drive program M, you can change gear
manually using the steering wheel paddle
shifters. For this,
the
transmission must be in
position D. The gear currently selected and
engaged is shown in the multifunction
display.
Manual drive program M differs from drive
programs E and S with regard to spontaneity,
responsiveness and smoothness of gear
changes.
Switching on the manual drive program X
Press the program selector button
(Y page 149) repeatedly
until M appears in
the multifunction display.
Upshifting (except AMG vehicles) X
Pull the right-hand paddle ( Y page 150).
The automatic transmission shifts
up to the
next gear.
Shifting up (AMG vehicles) !
In manual drive program M
, the automatic
transmission does not shift up
automatically even when the engine
limiting speed for the current gear is
reached. When the engine limiting speed is
reached, the fuel supply is cut to prevent
the engine from overrevving. Always make
sure that the engine speed does not reach
the red area of the tachometer. There is
otherwise a risk of engine damage.
X Pull the right-hand paddle ( Y page 150).
The automatic transmission shifts
up to the
next gear.
Before the engine speed reaches the red area,
an upshift indicator will be shown in the
multifunction display.
X If the color in the speedometer
multifunction display changes to red and Automatic transmission
151
Driving and parking Z
Page 154 of 364
the UP display message is shown, shift up
a gear.
Downshifting X
Pull the left-hand paddle ( Y page 150).
The automatic transmission
shifts
down to
the next gear.
i If you slow down or stop without shifting
down, the automatic transmission
automatically shifts down.
Selecting the optimal gear for
maximum acceleration X
Pull the left-hand steering wheel paddle
shifter until the transmission selects the
optimum gear for the current speed.
Kickdown You can also use kickdown for maximum
acceleration in manual drive program
M.
X Depress the accelerator pedal beyond the
pressure point.
The transmission shifts to a lower gear
depending on the engine speed.
X Shift back up once the desired speed is
reached.
i Vehicles with an AMG engine: it is not
possible to use kickdown in manual drive
program M.
i Vehicles without an AMG
engine: if you
apply full throttle, the automatic
transmission shifts up to the next gear
when the maximum engine speed is
reached. This prevents the engine from
overrevving.
Switching off the manual drive program X
Press the program selector button
(Y page 149) repeatedly until E (C in AMG
vehicles) or S appears in the multifunction
display. 152
Automatic transmission
Driving and parking
Page 156 of 364
For further information on fuel and fuel quality
(Y page 350).
Refueling
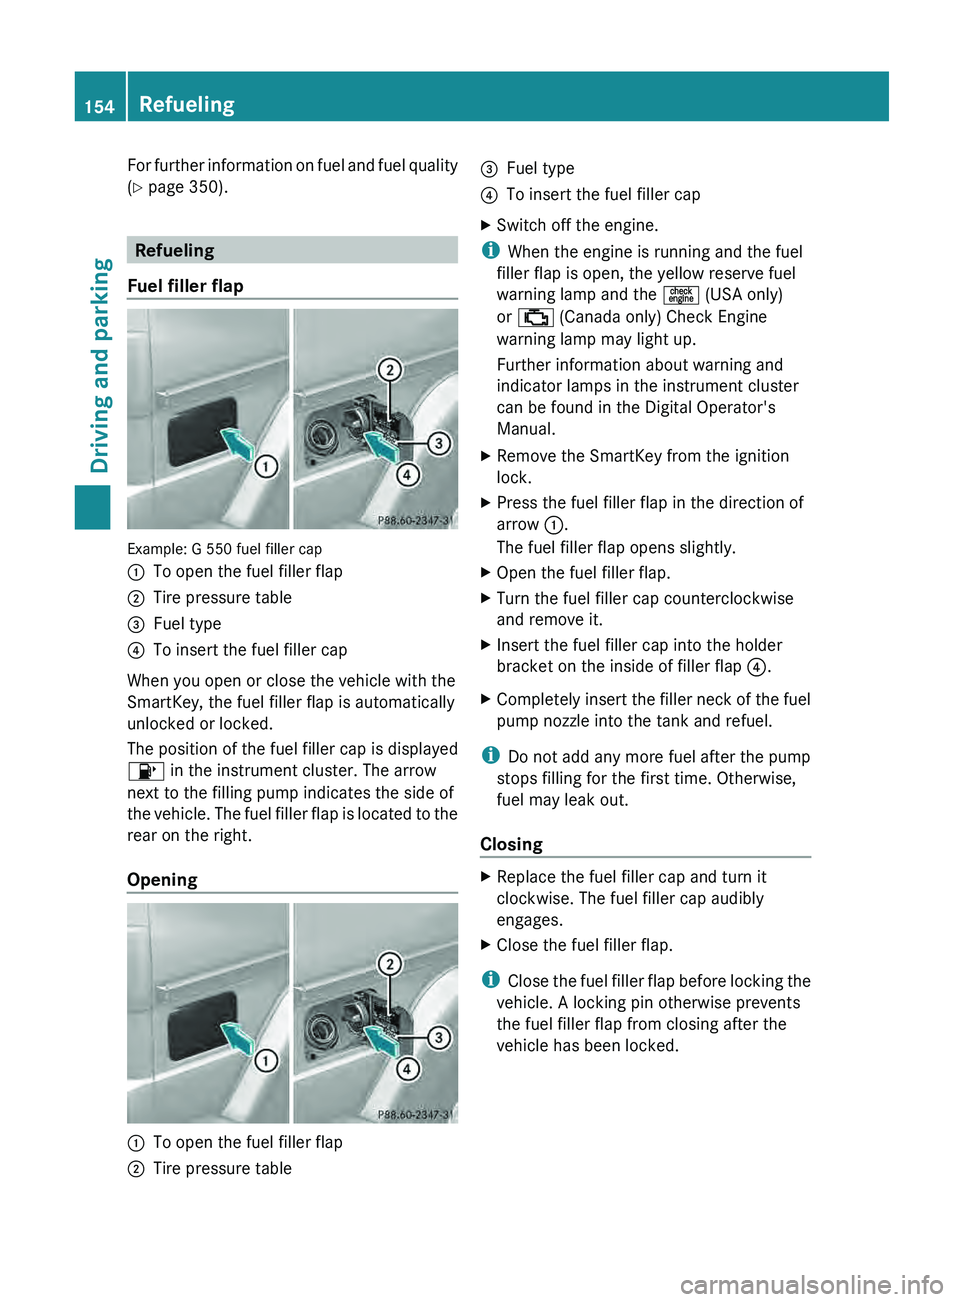
Fuel filler flap Example: G 550 fuel filler cap
0043
To open the fuel filler flap
0044 Tire pressure table
0087 Fuel type
0085 To insert the fuel filler cap
When you open or close the vehicle with the
SmartKey, the fuel filler flap is automatically
unlocked or locked.
The position of the fuel filler cap is displayed
00B6 in the instrument cluster. The arrow
next to the filling pump indicates the side of
the vehicle. The
fuel
filler flap is located to the
rear on the right.
Opening 0043
To open the fuel filler flap
0044 Tire pressure table 0087
Fuel type
0085 To insert the fuel filler cap
X Switch off the engine.
i When the engine is running and the fuel
filler flap is open, the yellow reserve fuel
warning lamp and the 00AD (USA only)
or 00B9 (Canada only) Check Engine
warning lamp may light up.
Further information about warning and
indicator lamps in the instrument cluster
can be found in the Digital Operator's
Manual.
X Remove the SmartKey from the ignition
lock.
X Press the fuel filler flap in the direction of
arrow 0043.
The fuel filler flap opens slightly.
X Open the fuel filler flap.
X Turn the fuel filler cap counterclockwise
and remove it.
X Insert the fuel filler cap into the holder
bracket on the inside of filler flap 0085.
X Completely insert the filler neck of the fuel
pump nozzle into the tank and refuel.
i Do not add any more fuel after the pump
stops filling for the first time. Otherwise,
fuel may leak out.
Closing X
Replace the fuel filler cap and turn it
clockwise. The fuel filler cap audibly
engages.
X Close the fuel filler flap.
i Close the fuel filler
flap before locking the
vehicle. A locking pin otherwise prevents
the fuel filler flap from closing after the
vehicle has been locked. 154
Refueling
Driving and parking
Page 162 of 364
Never activate the LOW off-road gear while
driving on a slippery road surface.
Downhill gradients !
On long and steep gradients, you must
reduce the load on the brakes by shifting
early to a lower
gear. This allows you to take
advantage of the engine braking effect and
helps avoid overheating and excessive
wear of the brakes.
When you take advantage of the engine
braking effect, a drive wheel may not turn
for some time, e.g. on a slippery road
surface. This could cause damage to the
drive train. This type of damage is not
covered by the Mercedes-Benz warranty.
Heavy and light loads G
WARNING
If you rest your foot on the brake pedal while
driving, the braking system
can overheat. This
increases the stopping distance and can even
cause the braking system to fail. There is a
risk of an accident.
Never use the brake pedal as a footrest. Never
depress the brake pedal and the accelerator
pedal at the same time.
! Depressing the brake pedal constantly
results in excessive and premature wear to
the brake pads.
If the brakes have been subjected to a heavy
load, do not stop the vehicle immediately, but
drive on for a short while. This allows the
airflow to cool the brakes more quickly.
Wet roads If driving in heavy rain for a prolonged period
of time without braking, there may be a
delayed reaction from the brakes when
braking for the
first
time. This may also occur
after the vehicle has been washed. You have to depress the brake pedal more
firmly. Maintain a greater distance from the
vehicle in front.
After driving on a wet road or having the
vehicle washed, brake firmly while paying
attention to the traffic conditions. This will
warm up the brake
discs, thereby drying them
more quickly and protecting them against
corrosion.
Limited braking performance on salt-
treated roads If you drive on salted roads, a layer of salt
residue may form on the brake discs and
brake pads. This can result in a significantly
longer braking distance.
R
Brake occasionally to remove
any possible
salt residue. Make sure that you do not
endanger other road users when doing so.
R Carefully depress the brake pedal and the
beginning and end of a journey.
R Maintain a greater distance to the vehicle
ahead.
Servicing the brakes !
If the brake warning
lamp lights up in the
instrument cluster and you hear a warning
tone even though the parking brake has
been released, the brake fluid level may be
too low. Observe additional warning
messages in the multifunction display.
The brake fluid level may be too low due to
brake pad wear or leaking brake lines.
Have the brake system checked
immediately. This work should be carried
out at a qualified specialist workshop.
! A function or performance test should
only be carried out on a 2-axle
dynamometer. If you are planning to have
the vehicle tested on such a dynamometer,
contact an authorized Mercedes-Benz
Center to obtain further information first.
Otherwise, you could damage the drive
train or the brake system. 160
Driving tips
Driving and parking
Page 163 of 364
!
As the ESP ®
system operates
automatically, the engine and the ignition
must be switched off (the SmartKey must
be in position 0 or 1 in the ignition lock) if
the parking brake is tested on a brake
dynamometer (for a maximum of ten
seconds).
Braking applications triggered
automatically by ESP ®
may otherwise
seriously damage the brake system.
Mercedes-Benz recommends that you only
have brake pads/linings installed on your
vehicle which have been approved for
Mercedes-Benz vehicles or
which
correspond
to an equivalent quality standard. Brake
pads/linings which have not been approved
for Mercedes-Benz vehicles or which are not
of an equivalent quality could affect your
vehicle's operating safety.
Mercedes-Benz recommends that you only
use brake fluid that has been specially
approved for your vehicle by Mercedes-Benz,
or which corresponds to an equivalent quality
standard. Brake fluid which has not been
approved for Mercedes-Benz vehicles or
which is not of an equivalent quality could
affect your vehicle's operating safety.
All checks and maintenance work on the
brake system must be carried out at a
qualified specialist workshop.
Have brake pads installed and brake fluid
replaced at a qualified specialist workshop.
If your brake system is subject only to
moderate loads, you should test the
functionality of your brakes at regular
intervals by pressing firmly on the brake pedal
at high speeds. This improves the grip of the
brake pads.
You can find a description of Brake Assist
(BAS) on ( Y page 61).
High-performance brake system for
AMG vehicles The high-performance brake system is only
installed on the
G
63 AMG and the G 65 AMG. The high-performance brake system is
designed for heavy loads. This may lead to
noise when braking. This will depend on:
R
Speed
R Braking force
R Environmental conditions, such as
temperature and humidity
The wear of individual components of the
brake system, such as
the brake pads/linings
or brake discs, depends on the individual
driving style and operating conditions.
For this reason, it is impossible to state a
mileage that will be valid under all
circumstances. An aggressive driving style
will lead to high wear. You can obtain further
information about this from your authorized
Mercedes-Benz Center.
New and replaced brake pads and discs only
reach their optimum braking effect after
several hundred kilometers of driving.
Compensate for this by applying greater force
to the brake pedal. Keep this in mind, and
adapt your driving and braking accordingly
during this break-in period.
Excessive heavy braking results in
correspondingly high brake wear. Observe
the brake system warning lamp in the
instrument cluster and note any brake status
messages in the multifunction display. For
high-performance driving in particular, it is
important to maintain and have the brake
system checked regularly.
Parking brake G
WARNING
If you must brake the vehicle with the parking
brake, the braking distance is considerably
longer and the wheels
could lock. There is an
increased danger of skidding and accidents.
Only use the parking brake to brake the
vehicle when the service brake is faulty. Do
not apply the parking brake too firmly. If the
wheels lock, release the parking brake until
the wheels begin turning again. Driving tips
161
Driving and parking Z
Page 167 of 364
The following driving systems are specially
adapted to off-road driving:
R
4ETS ( Y page 62)
R Transfer case (Y page 198)
R Differential locks ( Y page 201)
Observe the following notes:
R stop your vehicle and,
if necessary, shift the
transfer case to LOW
RANGE(Y page 199) before driving off-
road.
R AMG vehicles: to shift the transfer case to
LOW RANGE, deactivate the ECO start/
stop function (Y page 142).
R engage the differential locks, if necessary
(Y page 201)
i ABS, 4ETS, ESP ®
and BAS are deactivated
when the differential locks are activated.
This allows the front wheels to lock briefly,
so that these can dig into a loose surface.
However, please note that locked wheels
skid and can no longer steer.
R Check that items of luggage and loads are
stowed safely and are well secured
(Y page 267).
R To avoid damaging the vehicle, make sure
there is always sufficient ground clearance.
R Always keep the engine running and in gear
when driving on a downhill gradient.
R Always keep the engine running and in gear
when driving on a slope.
R Drive slowly and evenly, if necessary at a
walking pace.
R Ensure that the wheels are in contact with
the ground at all times.
R Drive with extreme care on unknown off-
road routes where visibility is poor. For
safety reasons, get out of the vehicle first
and survey the off-road route.
R Check the depth of water before fording
rivers and streams.
R When fording, do not stop and do not
switch off the engine. R
Look out for obstacles
such as rocks, holes,
tree stumps and furrows.
R Always keep the doors, rear door, side
windows and the sliding sunroof closed
while the vehicle is in motion.
R Switch off cruise control.
R Do not stray from marked routes or paths.
R Adapt your speed to the terrain. The
rougher, steeper or more ruts on the
terrain, the slower your speed should be.
R Drive slowly and at an even speed through
the water. Ensure that a bow wave does not
form as you drive.
R On sand, drive quickly to overcome the
rolling resistance. Otherwise, the vehicle
could dig itself into the sand.
R Do not jump with the vehicle as this will
interrupt the vehicle's propulsion.
R Avoid high engine speeds. Drive at
appropriate engine speeds (maximum
3,000 rpm).
R Do not shift the automatic transmission to
transmission position N.
R Always check the vehicle for damage after
off-road driving.
i Information about retrofitting special all-
terrain tires is available from any qualified
specialist workshop.
i Do not use the HOLD function when
driving off-road, on steep uphill or downhill
gradients or on slippery or loose surfaces.
The HOLD function cannot hold the vehicle
on such surfaces.
Checklist before driving off-road !
If the engine oil warning lamp lights up
while the vehicle is in motion, stop the
vehicle in a safe
place as soon as possible.
Check the engine oil level. The engine oil
warning lamp warning must not be ignored.
Continuing the journey while the symbol is
displayed could lead to engine damage. Driving tips
165
Driving and parking Z
Page 172 of 364
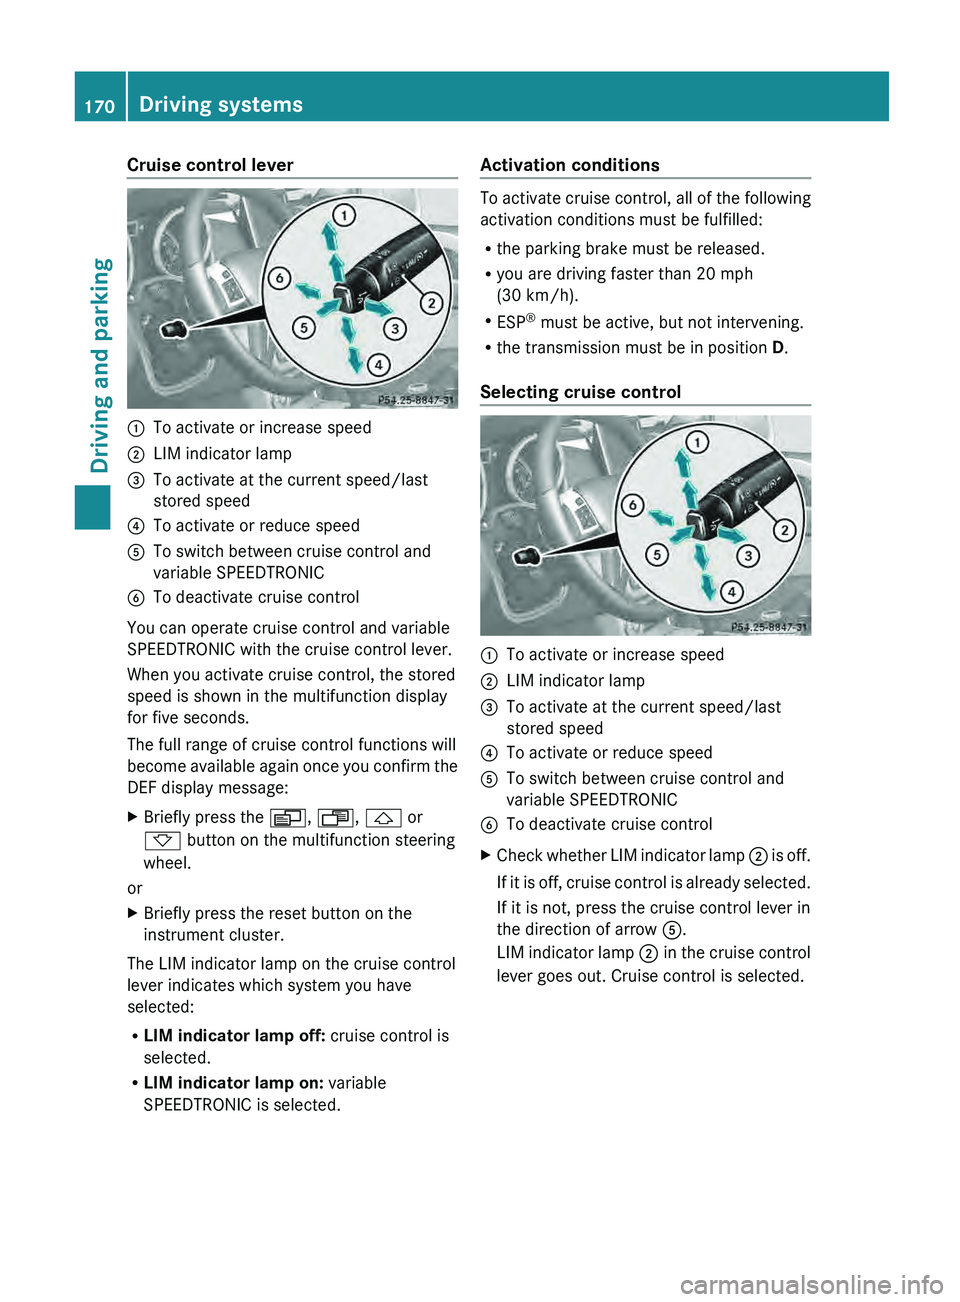
Cruise control lever
0043
To activate or increase speed
0044 LIM indicator lamp
0087 To activate at the current speed/last
stored speed
0085 To activate or reduce speed
0083 To switch between cruise control and
variable SPEEDTRONIC
0084 To deactivate cruise control
You can operate cruise control and variable
SPEEDTRONIC with the cruise control lever.
When you activate cruise control, the stored
speed is shown in the multifunction display
for five seconds.
The full range of cruise control functions will
become available again
once
you confirm the
DEF display message:
X Briefly press the 0080, 007F, 0041 or
0068 button on the multifunction steering
wheel.
or
X Briefly press the reset button on the
instrument cluster.
The LIM indicator lamp on the cruise control
lever indicates which system you have
selected:
R LIM indicator lamp off: cruise control is
selected.
R LIM indicator lamp on: variable
SPEEDTRONIC is selected. Activation conditions To activate cruise control, all of the following
activation conditions must be fulfilled:
R
the parking brake must be released.
R you are driving faster than 20 mph
(30 km/h).
R ESP ®
must be active, but not intervening.
R the transmission must be in position D.
Selecting cruise control 0043
To activate or increase speed
0044 LIM indicator lamp
0087 To activate at the current speed/last
stored speed
0085 To activate or reduce speed
0083 To switch between cruise control and
variable SPEEDTRONIC
0084 To deactivate cruise control
X Check whether LIM indicator lamp 0044 is off.
If it
is off, cruise control is already selected.
If it is not, press the cruise control lever in
the direction of arrow 0083.
LIM indicator lamp 0044 in the cruise control
lever goes out. Cruise control is selected. 170
Driving systems
Driving and parking