2013 MERCEDES-BENZ G-CLASS SUV towing
[x] Cancel search: towingPage 207 of 364
R
The bumpers of your vehicle are not
suitable for installing detachable trailer
couplings.
R Do not install hired trailer couplings or
other detachable trailer couplings on the
bumpers of your vehicle.
R If you do not
need the ball coupling, remove
the ball coupling from the ball coupling
recess. This reduces the risk of damage to
the ball coupling.
i When towing a trailer, set the tire
pressure on the rear axle of the towing
vehicle for a maximum load; see the tire
pressure table in the fuel filler flap
(Y page 322).
You will find installation dimensions and loads
in the technical data (Y page 358).
The maximum permissible trailer drawbar
noseweight on the ball coupling for up to 3
persons is 562 lbs (255 kg). The maximum
permissible trailer drawbar noseweight for
more than 3 persons and the maximum load
in the trunk can be found in the trailer
drawbar noseweight table ( Y page 358).
However, the actual noseweight must not
exceed the value given on the trailer tow hitch
or trailer identification plates. The lowest
weight applies.
i When towing a trailer, set the tire
pressure on the rear axle of the towing
vehicle for a maximum load; see the tire
pressure table in the fuel filler flap
(Y page 322).
Please note that when towing a trailer,
PARKTRONIC ( Y page 194) and Blind Spot
Assist (Y page 186) are only available with
limitations, or not at all.
i On vehicles without level control, the
height of the ball coupling will alter
according to the load placed on the vehicle.
If necessary, use a trailer with a height-
adjustable drawbar. Driving tips X
On long and steep downhill gradients,
select shift range 1, 2
or 3 (Y page 150) in
good time.
i This also applies if you have activated
cruise control or SPEEDTRONIC.
X If necessary, shift the transfer case to LOW
RANGE(Y page 199).
This will use the braking effect of the
engine, so that less
braking will be required
to maintain the speed. which relieves the
load on the brake system and prevents the
brakes from overheating and wearing too
quickly. If you need additional braking,
depress the brake pedal repeatedly rather
than continuously.
The maximum permissible speed for vehicle/
trailer combinations depends on the type of
trailer. Before beginning the journey, check
the trailer's documents to see what the
maximum permitted speed is. Observe the
legally prescribed maximum speed in the
relevant country.
For certain Mercedes-Benz vehicles, the
maximum permissible rear axle load is
increased when towing a trailer. Refer to the
"Technical data" section to find out whether
this applies to your vehicle. If you utilize any
of the added maximum rear axle load when
towing a trailer, the vehicle/trailer
combination may not exceed a maximum
speed of 60 mph (100 km/h) for reasons
concerning the operating permit. This also
applies in countries in which the permissible
maximum speed for vehicle/trailer
combinations is above 60 mph (100 km/h).
When towing a trailer,
your vehicle's handling
characteristics will be different in comparison
to when driving without a trailer and it will
consume more fuel.
On long and steep downhill gradients, you
must select shift range 1, 2 or 3 in good time.
i This also applies if you have activated
cruise control or DISTRONIC PLUS. Towing a trailer
205
Driving and parking Z
Page 208 of 364
This will use the braking effect of the engine,
so that less braking will be required to
maintain the speed. which relieves the load
on the brake
system
and prevents the brakes
from overheating and wearing too quickly. If
you need additional braking, depress the
brake pedal repeatedly rather than
continuously.
Driving tips If the trailer swings from side to side:
X
Do not accelerate.
X Do not counter-steer.
X Brake if necessary.
R Maintain a greater distance from the
vehicle in front than
when driving without a
trailer.
R Avoid braking abruptly. If possible, brake
gently at first to allow the trailer to run on.
Then, increase the braking force rapidly.
R The values given for gradient-climbing
capabilities from a standstill refer to sea
level. When driving in mountainous areas,
note that the power output of the engine,
and consequently the vehicle's gradient-
climbing capability, decrease with
increasing altitude. Trailer power supply
! You can connect accessories with a
maximum power consumption
of
180 W to
the permanent power supply.
You must not charge a trailer battery using
the power supply.
The trailer socket of your vehicle is equipped
at the factory with a permanent power supply.
The permanent power supply is supplied via
trailer socket pin 9.
A qualified specialist workshop can provide
more information about installing the trailer
electrics. Trailer with 7-pin connector
General notes You can make a connection to the 13-pin
socket on the ball coupling using an adapter
or, if necessary, an adapter cable. Both can
be obtained in a qualified specialist
workshop.
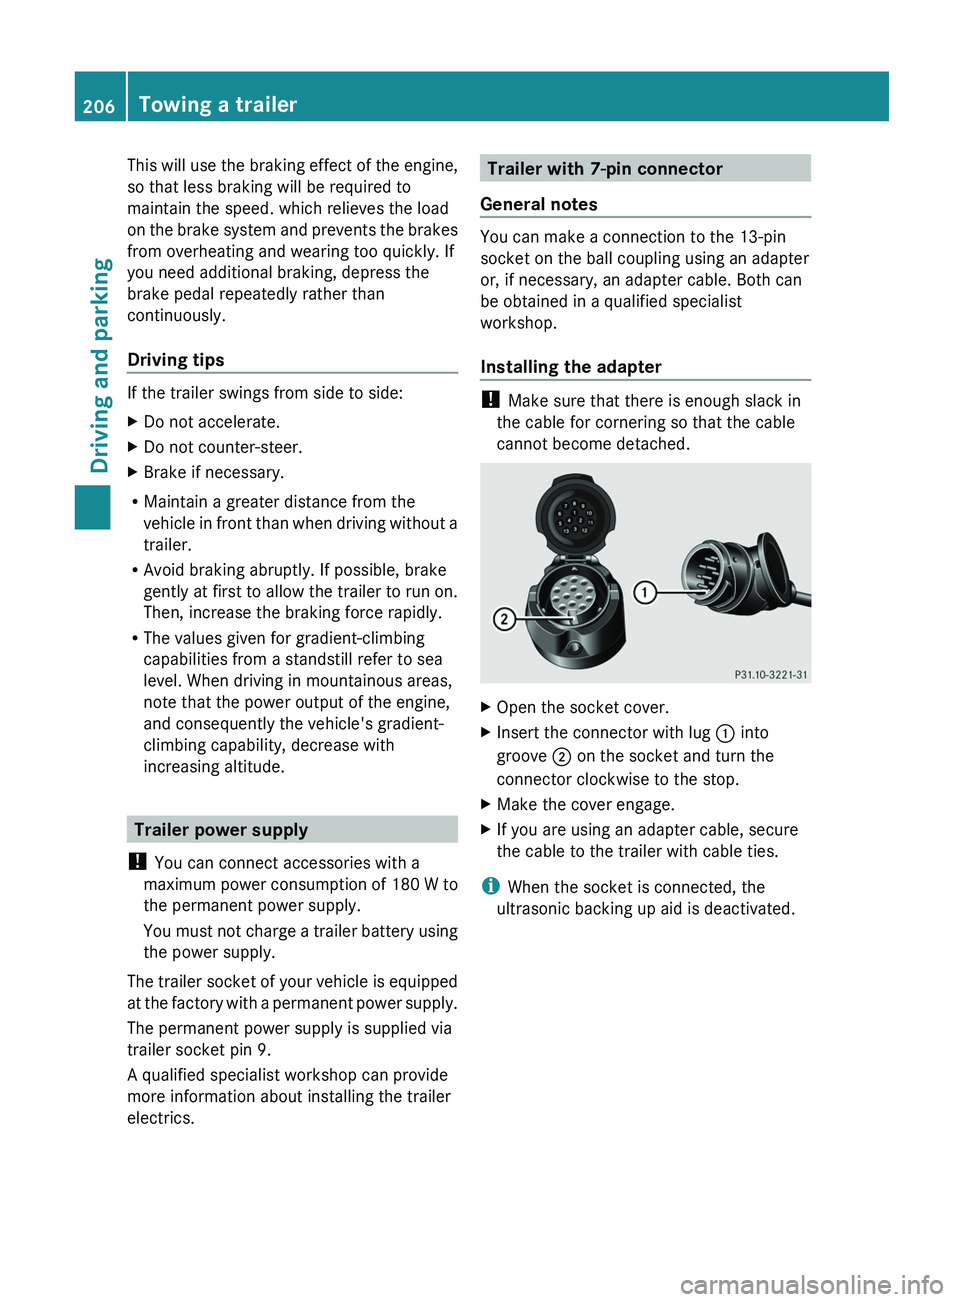
Installing the adapter
!
Make sure that there is enough slack in
the cable for cornering so that the cable
cannot become detached. X
Open the socket cover.
X Insert the connector with lug 0043 into
groove 0044 on the socket and turn the
connector clockwise to the stop.
X Make the cover engage.
X If you are using an adapter cable, secure
the cable to the trailer with cable ties.
i When the socket is connected, the
ultrasonic backing up aid is deactivated. 206
Towing a trailer
Driving and parking
Page 242 of 364

Display messages Possible causes/consequences and
0050 SolutionsBlind Spot Assist
Currently
Unavailable See
Operator's Manual
or
Active Blind Spot
Assist Currently
Unavailable See
Operator's Manual Blind Spot Assist or Active Blind Spot Assist is temporarily
inoperative. Possible causes are:
R
you have established the electrical connection between the
trailer and your vehicle.
R the sensors are dirty.
R function is impaired due to heavy rain or snow.
R the radar sensor system is outside the operating temperature
range.
R the radar sensor system is temporarily inoperative, e.g. due to
electromagnetic radiation emitted by nearby TV or radio
stations or other sources of electromagnetic radiation.
The yellow 0063 indicator lamps also light up in the exterior
mirrors.
X When towing a trailer, confirm the display message with 0076.
If you are driving without a trailer and the display message does
not disappear:
X Pull over and stop the vehicle safely as soon as possible, paying
attention to road and traffic conditions.
X Apply the parking brake.
X Clean the sensors ( Y page 297).
X Restart the engine.
If the system detects that the sensors are fully operational, the
display message disappears.
Blind Spot Assist or Active Blind Spot Assist is operational again. Blind Spot Assist
Inoperativeor
Active Blind Spot
Assist Inoperative Blind Spot Assist or Active Blind Spot Assist is defective.
The yellow
0063 indicator lamps also light up in the exterior
mirrors.
X Visit a qualified specialist workshop. DISTRONIC PLUS
Off DISTRONIC PLUS has been deactivated (
Y page 177).
If it was deactivated automatically, a warning tone also sounds. DISTRONIC PLUS
Now Available DISTRONIC PLUS is operational again after having been
temporarily unavailable. You
can
now reactivate DISTRONIC PLUS
(Y page 177). 240
Display messages
On-board computer and displays
Page 277 of 364
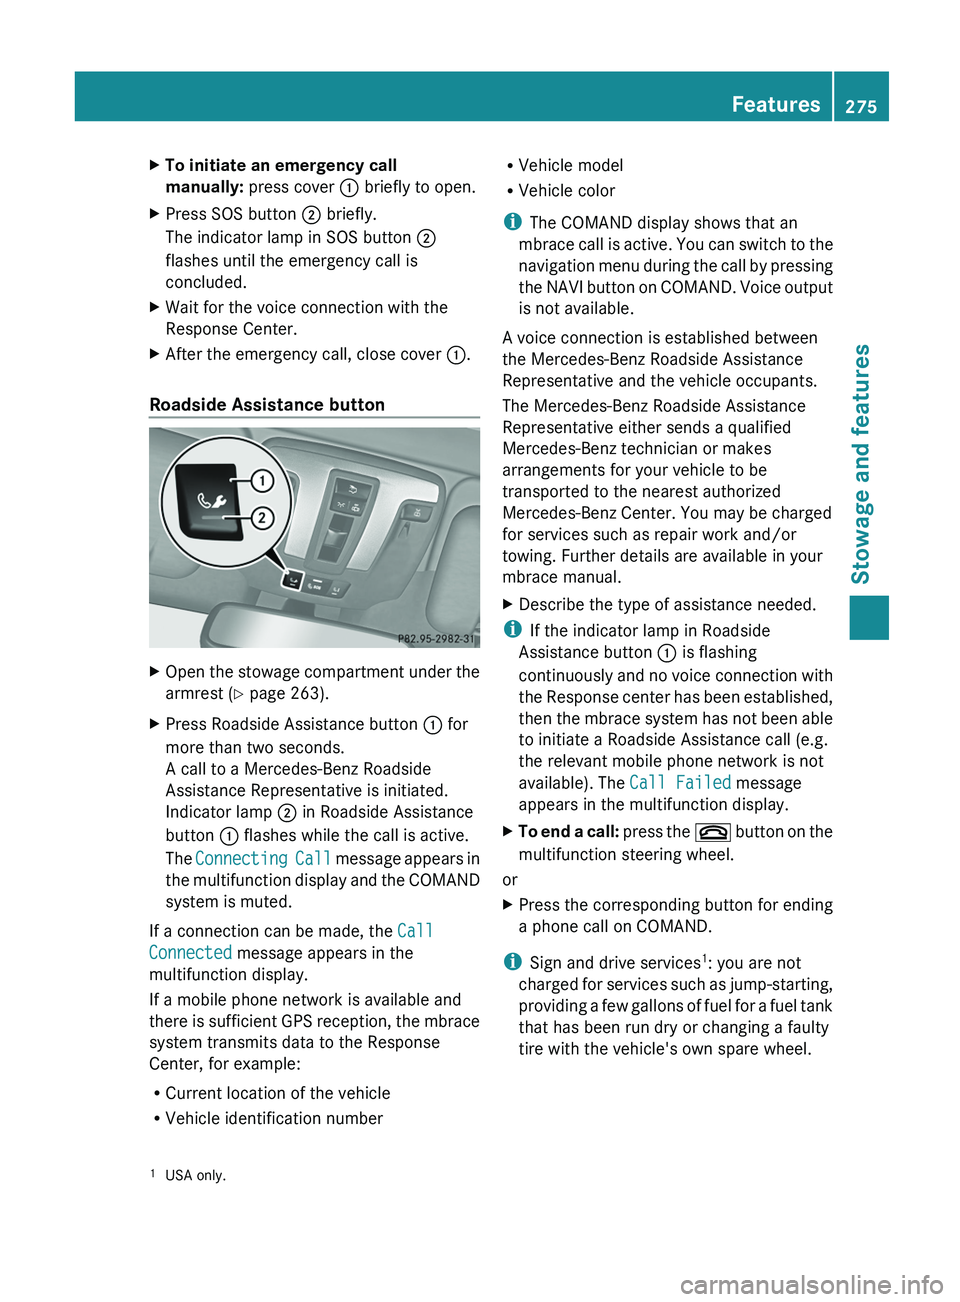
X
To initiate an emergency call
manually: press cover 0043 briefly to open.
X Press SOS button 0044 briefly.
The indicator lamp in SOS button 0044
flashes until the emergency call is
concluded.
X Wait for the voice connection with the
Response Center.
X After the emergency call, close cover 0043.
Roadside Assistance button X
Open the stowage compartment under the
armrest (Y page 263).
X Press Roadside Assistance button 0043 for
more than two seconds.
A call to a Mercedes-Benz Roadside
Assistance Representative is initiated.
Indicator lamp 0044 in Roadside Assistance
button 0043 flashes while the call is active.
The Connecting Call message
appears in
the multifunction display and the COMAND
system is muted.
If a connection can be made, the Call
Connected message appears in the
multifunction display.
If a mobile phone network is available and
there is sufficient
GPS
reception, the mbrace
system transmits data to the Response
Center, for example:
R Current location of the vehicle
R Vehicle identification number R
Vehicle model
R Vehicle color
i The COMAND display shows that an
mbrace call is
active.
You can switch to the
navigation menu during the call by pressing
the NAVI button on COMAND. Voice output
is not available.
A voice connection is established between
the Mercedes-Benz Roadside Assistance
Representative and the vehicle occupants.
The Mercedes-Benz Roadside Assistance
Representative either sends a qualified
Mercedes-Benz technician or makes
arrangements for your vehicle to be
transported to the nearest authorized
Mercedes-Benz Center. You may be charged
for services such as repair work and/or
towing. Further details are available in your
mbrace manual.
X Describe the type of assistance needed.
i If the indicator lamp in Roadside
Assistance button 0043 is flashing
continuously and no voice
connection with
the Response center has been established,
then the mbrace system has not been able
to initiate a Roadside Assistance call (e.g.
the relevant mobile phone network is not
available). The Call Failed message
appears in the multifunction display.
X To end a call: press the
007F
button on the
multifunction steering wheel.
or
X Press the corresponding button for ending
a phone call on COMAND.
i Sign and drive services 1
: you are not
charged for services such
as jump-starting,
providing a few gallons of fuel for a fuel tank
that has been run dry or changing a faulty
tire with the vehicle's own spare wheel.
1 USA only. Features
275
Stowage and features Z
Page 303 of 364
Useful information ............................
302
Where will I find...? ........................... 302
Flat tire .............................................. 304
Battery (vehicle) ................................ 305
Jump-starting .................................... 308
Towing and tow-starting .................. 310
Fuses .................................................. 313 301Breakdown assistance
Page 312 of 364
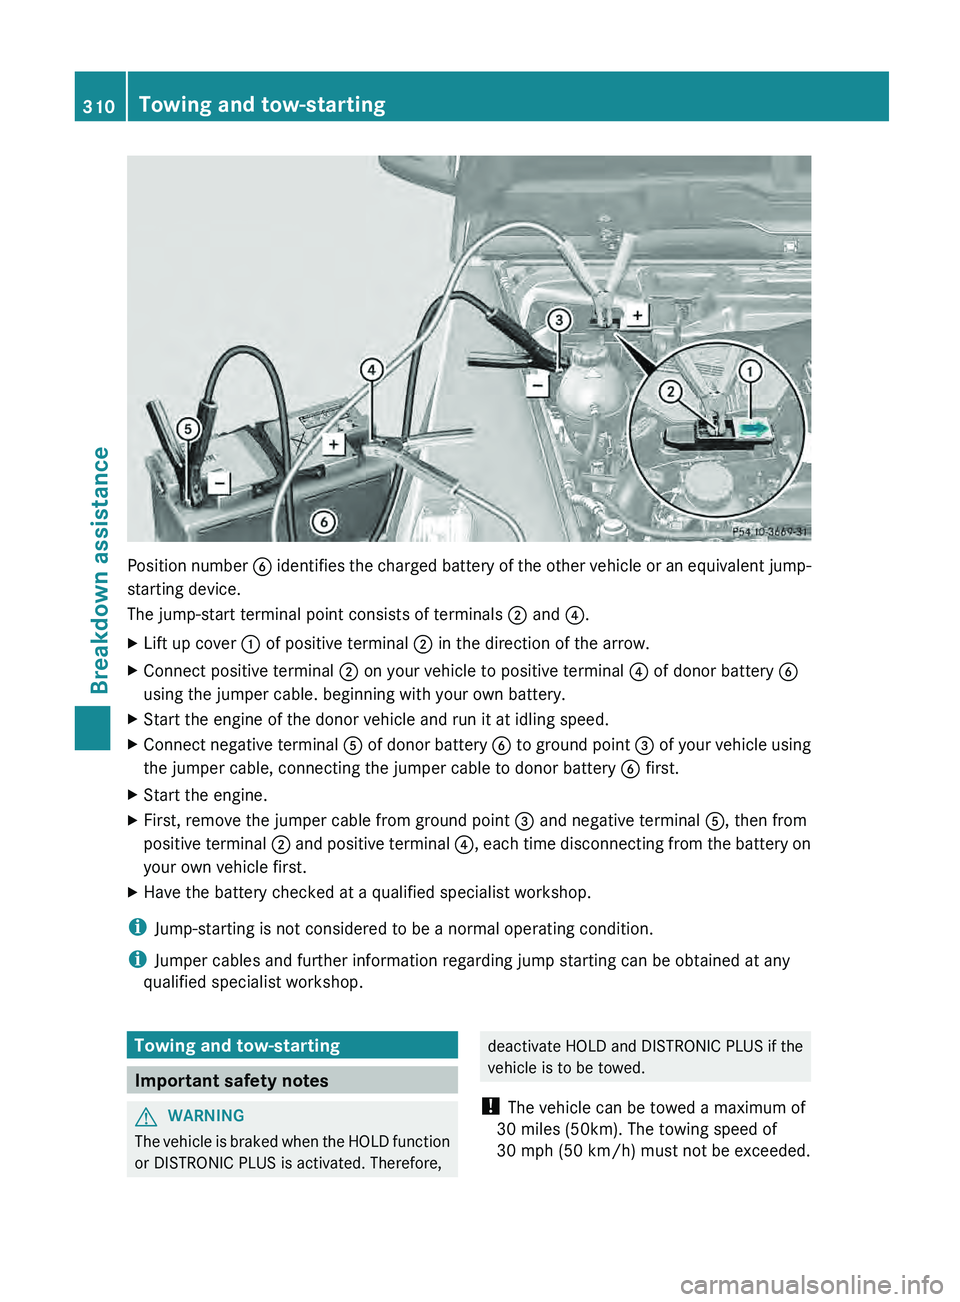
Position number
0084 identifies the charged battery of the other vehicle or an equivalent jump-
starting device.
The jump-start terminal point consists of terminals 0044 and 0085.
X Lift up cover 0043 of positive terminal 0044 in the direction of the arrow.
X Connect positive terminal 0044 on your vehicle to positive terminal 0085 of donor battery 0084
using the jumper cable. beginning with your own battery.
X Start the engine of the donor vehicle and run it at idling speed.
X Connect negative terminal 0083 of
donor battery
0084
to ground point 0087 of your vehicle using
the jumper cable, connecting the jumper cable to donor battery 0084 first.
X Start the engine.
X First, remove the jumper cable from ground point 0087 and negative terminal 0083, then from
positive terminal
0044 and
positive terminal 0085, each time disconnecting from the battery on
your own vehicle first.
X Have the battery checked at a qualified specialist workshop.
i Jump-starting is not considered to be a normal operating condition.
i Jumper cables and further information regarding jump starting can be obtained at any
qualified specialist workshop. Towing and tow-starting
Important safety notes
G
WARNING
The vehicle is braked when the HOLD function
or DISTRONIC PLUS is activated. Therefore, deactivate HOLD and DISTRONIC PLUS if the
vehicle is to be towed.
! The vehicle can be towed a maximum of
30 miles (50km). The towing speed of
30 mph (50 km/h) must not be exceeded. 310
Towing and tow-starting
Breakdown assistance
Page 313 of 364
If the vehicle has to be towed more than
30 miles (
50km),
the entire vehicle must be
raised and transported.
! Only secure the tow cable or tow bar to
the towing eyes. You could otherwise
damage the vehicle.
! Do not tow with sling-type equipment.
This could damage the vehicle.
! Do not use the towing eyes for recovery
purposes as this could damage the vehicle.
If in doubt, recover the vehicle with a crane.
! When towing, pull away slowly and
smoothly. If the tractive power is too high,
the vehicles could be damaged.
! Your vehicles is equipped with an
automatic transmission. Therefore, you
must not have the vehicle tow-started. The
transmission may otherwise be damaged. G
WARNING
If the weight of the vehicle to be towed or tow-
started is greater than the permissible gross
weight of your vehicle:
R the towing eye could detach itself
R the vehicle/trailer combination could
rollover.
There is a risk of an accident.
When towing or tow-starting another vehicle,
its weight should not be greater than the
permissible gross weight of your vehicle.
Information on your vehicle's gross vehicle
weight rating can be found on the vehicle
identification plate ( Y page 349).
It is better to have the vehicle transported
than to have it towed.
If the transfer case
can be shifted into neutral
N, you can tow the vehicle. If the transfer case cannot be shifted into
neutral N, you can tow the vehicle with one
axle raised. Please
bear
the following in mind:
R remove the propeller shaft between the
transfer case and the rolling axle.
R turn the SmartKey to position 1 in the
ignition lock (Y page 139).
The battery must be connected and charged.
Otherwise, you:
R cannot turn the SmartKey in the ignition
lock to position 2(Y page 139)
R cannot shift the automatic transmission to
position N
i Deactivate the automatic locking feature
(Y page 75). You could otherwise be locked
out when pushing or towing the vehicle. Towing eyes
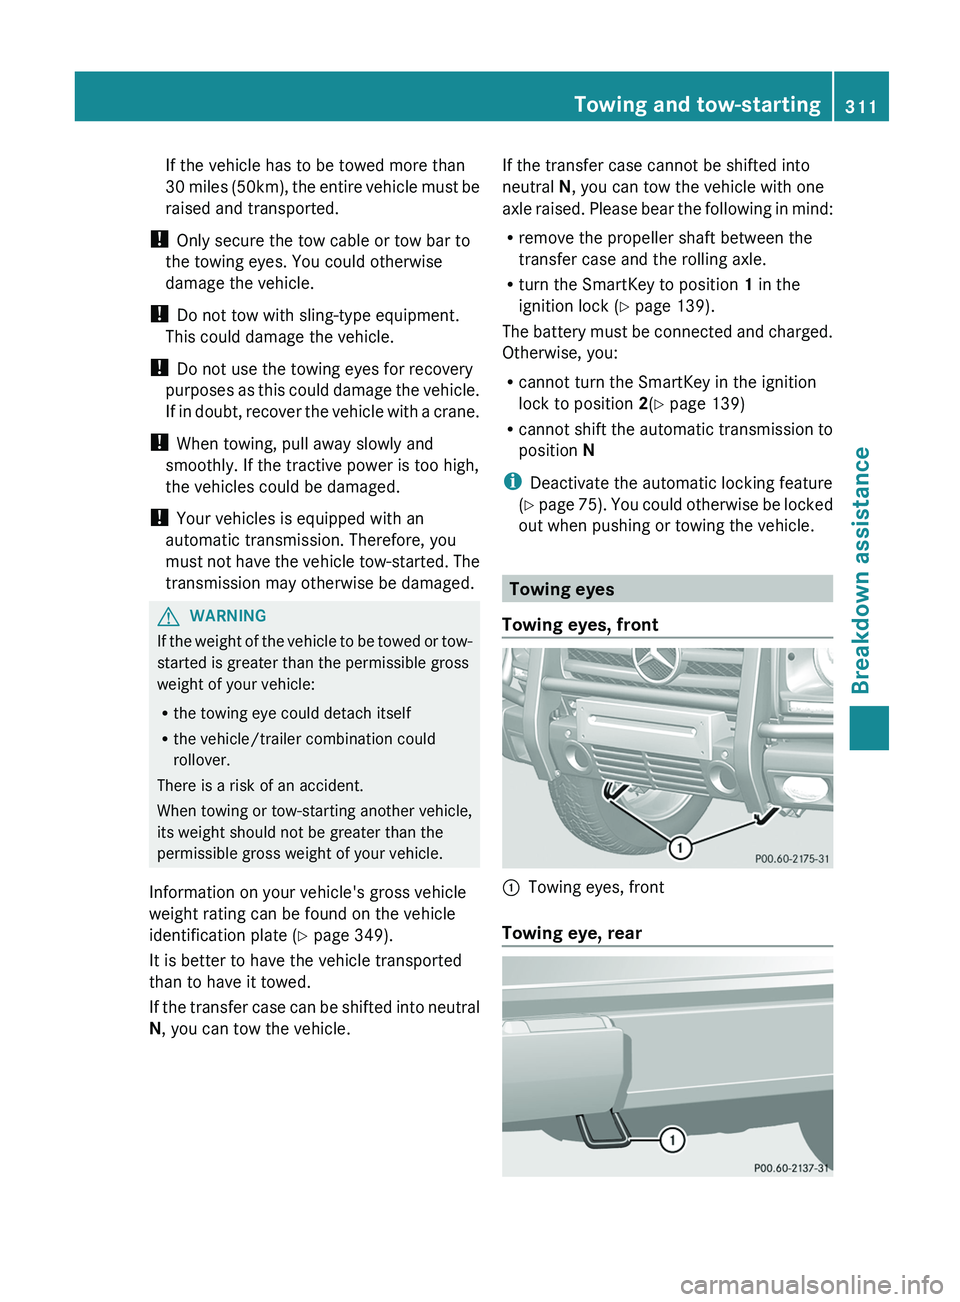
Towing eyes, front 0043
Towing eyes, front
Towing eye, rear Towing and tow-starting
311
Breakdown assistance Z
Page 314 of 364
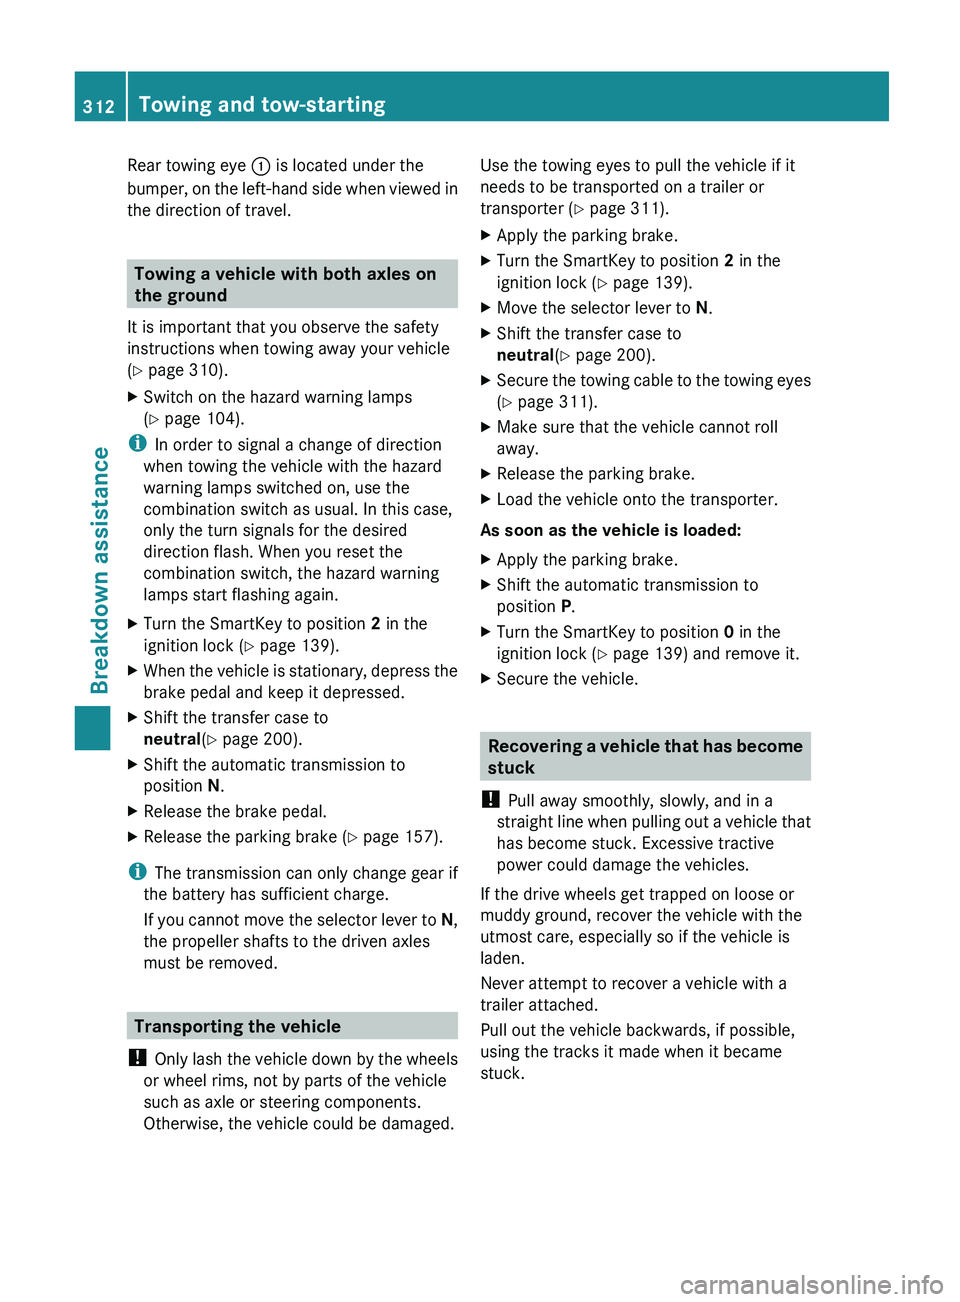
Rear towing eye
0043 is located under the
bumper, on the left-hand
side when viewed in
the direction of travel. Towing a vehicle with both axles on
the ground
It is important that you observe the safety
instructions when towing away your vehicle
(Y page 310).
X Switch on the hazard warning lamps
(Y page 104).
i In order to signal a change of direction
when towing the vehicle with the hazard
warning lamps switched on, use the
combination switch as usual. In this case,
only the turn signals for the desired
direction flash. When you reset the
combination switch, the hazard warning
lamps start flashing again.
X Turn the SmartKey to position 2 in the
ignition lock (Y page 139).
X When the vehicle is stationary, depress the
brake pedal and keep it depressed.
X Shift the transfer case to
neutral (Y page 200).
X Shift the automatic transmission to
position N.
X Release the brake pedal.
X Release the parking brake ( Y page 157).
i The transmission can only change gear if
the battery has sufficient charge.
If you cannot move
the selector lever to N,
the propeller shafts to the driven axles
must be removed. Transporting the vehicle
! Only lash the vehicle
down by the wheels
or wheel rims, not by parts of the vehicle
such as axle or steering components.
Otherwise, the vehicle could be damaged. Use the towing eyes to pull the vehicle if it
needs to be transported on a trailer or
transporter (
Y page 311).
X Apply the parking brake.
X Turn the SmartKey to position 2 in the
ignition lock (Y page 139).
X Move the selector lever to N.
X Shift the transfer case to
neutral (Y page 200).
X Secure the towing cable to the towing eyes
(Y page 311).
X Make sure that the vehicle cannot roll
away.
X Release the parking brake.
X Load the vehicle onto the transporter.
As soon as the vehicle is loaded:
X Apply the parking brake.
X Shift the automatic transmission to
position P.
X Turn the SmartKey to position 0 in the
ignition lock (Y page 139) and remove it.
X Secure the vehicle. Recovering a vehicle that has become
stuck
! Pull away smoothly, slowly, and in a
straight line when pulling
out a vehicle that
has become stuck. Excessive tractive
power could damage the vehicles.
If the drive wheels get trapped on loose or
muddy ground, recover the vehicle with the
utmost care, especially so if the vehicle is
laden.
Never attempt to recover a vehicle with a
trailer attached.
Pull out the vehicle backwards, if possible,
using the tracks it made when it became
stuck. 312
Towing and tow-starting
Breakdown assistance