2013 MERCEDES-BENZ CLA COUPE brakes
[x] Cancel search: brakesPage 197 of 373
35 km/h. While in operation, the system inde-
pendently locates and measures parking
spaces on both sides of the vehicle.
Active Parking Assist will only detect parking
spaces:
R that are parallel or at right angles to the
direction of travel
R that are parallel to the direction of travel
and are at least 1.5 m wide
R that are parallel to the direction of travel
and at least 1.0 mlonger than your vehicle
R that are at right angles to the direction of
travel and at least 1.0 m wider than your
vehicle
i In the case of parking spaces that are at
right angles to the direction of travel,
please ensure that the parking space is
long enough to accommodate your vehicle.
When driving at speeds below 30 km/h, you
will see parking symbol ;as a status indi-
cator in the instrument cluster. When a park-
ing space has been detected, an arrow
towards the right or the left also appears.
Active Parking Assist only displays parking
spaces on the front-passenger side as stand- ard. Parking spaces on the driver's side are
displayed as soon as the turn signal on the
driver's side is activated. When parking on the driver's side, this must remain switched on
until you acknowledge the use of Active Park-
ing Assist by pressing the abutton on the
multifunction steering wheel.
The system automatically determines
whether the parking space is parallel or at
right angles to the direction of travel.
A parking space is displayed while you are
driving past it, and until you are approx-
imately 15 m away from it.
Parking G
WARNING
Active Parking Assist merely aids you by inter- vening actively in the steering. There is a risk of accident if you do not apply the brakes
yourself.
Always apply the brakes yourself when park-
ing and manoeuvring.
X Stop the vehicle when the parking symbol
shows the desired parking space in the
instrument cluster.
X Vehicles with manual transmission: shift to
reverse gear.
Vehicles with automatic transmission: shift into position R.
The Start Park Assist? Yes: OK No: Start Park Assist? Yes: OK No:
% message appears in the multifunction
display.
X To cancel the procedure: press the%
button on the multifunction steering wheel or pull away.
or
X To park using Active Parking Assist:
press the abutton on the multifunction
steering wheel.
The Park Assist active Accelerate Park Assist active Accelerate
and
and brake
brake Observe
Observe surroundings
surroundings mes-
sage appears in the multifunction display.
X Release the multifunction steering wheel.
X Reverse the vehicle, being ready to brake at
all times. Do not exceed a maximum speed of approximately 10 km/hw hen reversing.
Otherwise, Active Parking Assist will be
cancelled.
i In tight parking spaces, you will achieve
the best parking results by backing up as
far as possible. When doing so, also
observe the PARKTRONIC messages.
X Stop as soon as PARKTRONIC sounds the
continuous warning tone, if not before.
Manoeuvring may be required in tight park-
ing spaces.
Vehicles with manual transmission: the
Park Assist active Engage forward
Park Assist active Engage forward
gear Observe surroundings gear Observe surroundings message
appears in the multifunction display.
Vehicles with automatic transmission: the
Park
Park Assist
Assist active
activeSelect
SelectD
DObserve
Observe 194
Driving systemsDriving and parking
Page 209 of 373
can warn you before you leave your lane unin-
tentionally.
This function is available in the range between
60 km/h and 200 km/h.
A warning may be given if a front wheel
passes over a lane marking. It will warn you by means of intermittent vibration through the
steering wheel for up to 1.5 seconds.
Important safety notes G
WARNING
Lane Keeping Assist cannot always clearly
identify lane markings.
In these cases, Lane Keeping Assist may:
R give an unnecessary warning
R not give a warning
There is a risk of an accident.
Always pay particular attention to the traffic
situation and keep in lane, especially if Lane
Keeping Assist alerts you. G
WARNING
The Lane Keeping Assist warning does not
return the vehicle to the original lane. There is a risk of an accident.
Always steer, apply the brakes or accelerate
the vehicle yourself, especially if Lane Keep-
ing Assist alerts you.
If you fail to adapt your driving style, Lane
Keeping Assist can neither reduce the risk of
an accident nor override the laws of physics. Lane Keeping Assist cannot take into account
road, weather or traffic conditions. Lane
Keeping Assist is only an aid. You are respon- sible for the distance to the vehicle in front,
for vehicle speed, for braking in good time,
and for staying in lane.
Lane Keeping Assist does not keep your vehi-
cle in its lane. The system may be impaired or may not func-
tion if:
R there is poor visibility, e.g. due to insuffi-
cient illumination of the road, or due to
snow, rain, fog or spray
R there is glare, e.g. from oncoming traffic,
the sun or reflection from other vehicles
(e.g. if the road surface is wet)
R the windscreen is dirty, misted up, dam-
aged or covered, for instance by a sticker,
in the vicinity of the camera
R no, or several, unclear lane markings are
present for one lane, e.g. in a construction
area
R the lane markings are worn away, dark or
covered up, e.g. by dirt or snow
R the distance to the vehicle in front is too
small and the lane markings thus cannot be
detected
R the lane markings change quickly, e.g.
lanes branch off, cross one another or
merge
R the road is narrow and winding
R there are highly variable shade conditions
on the road
Activating Lane Keeping Assist X Activate Lane Keeping Assist using the on-
board computer; to do so, select Standard Standard
or Adaptive
Adaptive (Ypage 225).
If you drive at speeds above 60 km/h and
lane markings are detected, the lane mark-
ings in the assistance graphics display
(Y page 223) are shown in green.
When Standard is selected, no warning vibra-
tion occurs if:
R you have switched on the turn signals. In
this event, the warnings are suppressed for
a certain period of time.
R a driving safety system intervenes, such as
ABS, BAS or ESP ®
. 206
Driving systemsDriving and parking
Page 212 of 373
prescribed maximum speed in the relevant
country.
For certain Mercedes-Benz vehicles, the max-
imum permissible rear axle load is increased
when towing a trailer. Refer to the "Technical
data" section to find out whether this applies to your vehicle. If you utilise any of the added
maximum rear axle load when towing a trailer, the vehicle/trailer combination may not
exceed a maximum speed of 100 km/ hfor
reasons concerning the operating permit.
This also applies in countries in which the
permissible maximum speed for vehicle/
trailer combinations is above 100 km/h.
When towing a trailer, your vehicle's handling
characteristics will be different in comparison
to when driving without a trailer and it will
consume more fuel.
Change into a lower gear in good time on long
and steep downhill gradients. For vehicles
with automatic transmission, you need to
have selected manual drive program M
(Y page 160).
i This also applies if you have activated
cruise control, SPEEDTRONIC or DIS-
TRONIC PLUS.
This will use the braking effect of the engine,
so less braking will be required to maintain
vehicle speed. This relieves the load on the
brake system and prevents the brakes from
overheating and wearing too quickly. If you
need additional braking, depress the brake
pedal repeatedly rather than continuously.
i Briefly depressing the accelerator pedal
on downhill gradients while the manual
drive program Mis temporarily activated
(vehicles with automatic transmission): the automatic transmission may switch back to
the last active automatic drive program Eor
S. The automatic transmission may shift to
a higher gear. This can reduce the engine's braking effect. Driving tips If the trailer swings from side to side:
X Do not accelerate.
X Do not countersteer.
X Brake if necessary.
R Maintain a greater distance from the vehi-
cle in front than when driving without a
trailer.
R Avoid braking abruptly. If possible, brake
gently at first to allow the trailer to run on.
Then, increase the braking force rapidly.
R The values given for gradient-climbing
capabilities from a standstill refer to sea
level. When driving in mountainous areas,
note that the power output of the engine,
and consequently the vehicle's gradient-
climbing capability, decrease with increas-
ing altitude. Folding out the ball coupling
G
WARNING
If you release the ball coupling or it does not
engage correctly when folding in, it will swing out. Within pivoting range of the ball coupling,
there is an increased risk of an accident and
injury.
Only release the ball coupling if the pivoting
range is unobstructed. Always make sure that the ball coupling engages when folding in.
Before you can tow a trailer with your vehicle, you must fold out the ball coupling.
The release wheel is located behind the left-
hand side trim panel in the boot. Towing a trailer
209Driving and parking Z
Page 300 of 373
ple, changed more frequently. The tyres must
be checked more frequently if the vehicle is
operated under increased loads. Further
information can be obtained at a qualified
specialist workshop, e.g. a Mercedes-Benz
Service Centre.
Driving abroad
An extensive Mercedes-Benz Service network is also available in other countries. You can
obtain further information from any
Mercedes-Benz Service Centre. Care
General notes
H
Environmental note
Dispose of empty packaging and cleaning
cloths in an environmentally responsible man- ner.
! For cleaning your vehicle, do not use any
of the following:
R dry, rough or hard cloths
R abrasive cleaning agents
R solvents
R cleaning agents containing solvents
Do not scrub.
Do not touch the surfaces or protective
films with hard objects, e.g. a ring or ice
scraper. You could otherwise scratch or
damage the surfaces and protective film.
! Do not park up the vehicle for an extended
period straight after cleaning it, particularly after having cleaned the wheels with wheel
cleaner. Wheel cleaners could cause
increased corrosion of the brake discs and
brake pads/linings. For this reason, you
should drive for a few minutes after clean-
ing. Braking heats the brake discs and the
brake pads/linings, thus drying them. The
vehicle can then be parked up.
Regular care of your vehicle is a condition for
retaining the quality in the long term. Use care products and cleaning agents rec-
ommended and approved by Mercedes-Benz. Care of the exterior
Automatic car wash G
WARNING
Braking efficiency is reduced after the vehicle has been washed. There is a risk of an acci-
dent.
After washing the vehicle, brake carefully
while paying attention to the traffic conditions in order to restore full braking efficiency.
! If DISTRONIC PLUS or the HOLD function
is activated, the vehicle brakes automati-
cally in certain situations. To prevent dam-
age to the vehicle, deactivate DISTRONIC
PLUS and the HOLD function in the follow-
ing or other similar situations:
R when towing the vehicle
R in the car wash
! Make sure that the automatic transmis-
sion is in position Nwhen washing your
vehicle in a tow-through car wash. The vehi-
cle could be damaged if the transmission is
in another position.
! Make sure that:
R the side windows and sliding sunroof are
closed completely.
R the blower for the ventilation/heating is
switched off (OFF button is depressed/
airflow control is turned to position 0).
R the windscreen wiper switch is at posi-
tion 0.
The vehicle could otherwise be damaged.
You can wash the vehicle in an automatic car
wash from the very start.
Wash off excess dirt before cleaning the vehi-
cle in an automatic car wash.
After using an automatic car wash, wipe off
wax from the windscreen and the wiper
blades. This will prevent smears and reduce Care
297Maintenance and care Z
Page 322 of 373
!
When COLLISION PREVENTION ASSIST
PLUS, DISTRONIC PLUS or the HOLD func- tion is activated, the vehicle brakes auto-
matically in certain situations. To avoid
damage to the vehicle, deactivate these
systems in the following or similar situa-
tions:
R when towing away
R in a car wash
! Only secure the tow cable or tow bar to
the towing eyes or, if available, to the trailer
tow hitch. You could otherwise damage the
vehicle.
! Observe the following points when towing
with a tow rope:
R Secure the tow rope on the same side on
both vehicles.
R Make sure that the tow rope is not longer
than legally permitted. Mark the tow rope
in the middle, e.g. with a white cloth
(30 x 30 cm). This will make other road
users aware that a vehicle is being
towed.
R Only secure the tow cable to the towing
eyes or, if available, to the trailer tow
hitch.
R Observe the brake lamps of the towing
vehicle while driving. Always maintain a
distance a distance so that the tow rope
does not sag.
R Do not use steel cables or chains to tow
your vehicle. You could otherwise dam-
age the vehicle.
! Do not use the towing eyes for recovery
purposes as this could damage the vehicle.
If in doubt, recover the vehicle with a crane.
! Pull away smoothly when towing away or
tow-starting a vehicle. If the tractive power
is too high, the vehicles could be damaged.
! You may tow the vehicle for a maximum of
50km. A towing speed of 50 km/h must not be exceeded. For towing distances over 50 km, the front
axle or the entire vehicle must be raised
and transported.
! If you tow or tow-start another vehicle, its
weight must not exceed the maximum per- missible gross vehicle weight of your vehi-
cle.
! Vehicles with automatic transmission
must not be tow-started. The transmission
may otherwise be damaged.
Observe the legal requirements for the rele-
vant countries when towing and tow-starting.
It is better to have the vehicle transported
than to have it towed.
Vehicles with automatic transmission:
when towing a vehicle, the transmission must be in position N.
The battery must be connected and charged.
Otherwise, you:
R cannot turn the key in the ignition lock to
position 2
R cannot shift the transmission to position N
on vehicles with automatic transmis-
sion
i Deactivate the automatic locking feature
before the vehicle is towed (Y page 229).
You could otherwise be locked out when
pushing or towing the vehicle.
Deactivate tow-away protection
(Y page 73) before the vehicle is towed. Towing and tow-starting
319Breakdown assistance Z
Page 329 of 373
Useful information
i This Owner's Manual describes all mod-
els, series and optional equipment for your
vehicle that were available at the time of
going to press. National variations are pos- sible. Note that your vehicle may not be
equipped with all of the functions descri-
bed. This is also the case for systems and
functions relevant to safety.
i Read the information on qualified special-
ist workshops: (Y page 24). Important safety notes
G
WARNING
If wheels and tyres of the wrong size are used, the wheel brakes or suspension components
may be damaged. There is a risk of an acci-
dent.
Always replace wheels and tyres with those
that fulfil the specifications of the original
part.
When replacing wheels, make sure to fit the
correct:
R designation
R type
When replacing tyres, make sure to fit the
correct:
R designation
R manufacturer
R type G
WARNING
A flat tyre severely impairs the driving, steer-
ing and braking characteristics of the vehicle.
There is a risk of accident.
Tyres without run-flat characteristics:
R do not drive with a flat tyre.
R immediately replace the flat tyre with your
emergency spare wheel or spare wheel, or
consult a qualified specialist workshop. Tyres with run-flat characteristics:
R pay attention to the information and warn-
ing notices on MOExtended tyres (tyres
with run-flat characteristics).
Accessories that are not approved for your
vehicle by Mercedes-Benz or that are not
being used correctly can impair operating
safety.
Before purchasing and using non-approved
accessories, visit a qualified specialist work-
shop and enquire about:
R suitability
R legal stipulations
R factory recommendations
Information on dimensions and types of
wheels and tyres for your vehicle can be
found under: (Y page 340).
Information on air pressure for the tyres on
your vehicle can be found:
R on the tyre pressure label on the fuel filler
flap (Y page 164)
R under "Tyre pressure" (Y page 330)
Modification work on the brake system and
wheels is not permitted. The use of wheel
spacers or brake dust shields is not permit-
ted. This invalidates the general operating
permit for the vehicle.
i Further information on wheels and tyres
can be obtained at any qualified specialist
workshop. Operation
Information on driving
R Check the tyre pressures when the vehicle
is heavily laden and, if necessary, adjust.
R While driving, pay attention to vibrations,
noises and unusual handling characteris-
tics, e.g. pulling to one side. This may indi-
cate that the wheels or tyres are damaged. If you suspect that a tyre is defective,
reduce your speed immediately. Stop the
vehicle as soon as possible to check the 326
OperationWheels and tyres
Page 338 of 373
Radio type approval for the tyre pres-
sure monitor Country Radio type approval number
Brazil 1489-10-4415
Model: MRXMERCTX1
Dubai TRA, Registered NO
0016161/08
TRA, Registered NO
ER0076990/11
Dealer-NO: DA0047074/10
Morocco MR5526 ANRT 2010/
27/04/2010
MR6706 ANRT 2011/
17/11/2011
Philip-
pines ESD-1105558C
Serbia И 011 12
Singa-
pore Compliance with IDA Standard
N0140-09
South
Africa TA-2008/1068
TA-2011/1370
Changing a wheel
Flat tyre
You can find information on what to do in the event of flat tyre in the "Flat tyre" section
(Y page 308). Information on driving with
MOExtended tyres in the event of a flat tyre
can be found under "Breakdown assistance"
(Y page 308).
Vehicles with an emergency spare wheel: in the event of a flat tyre, the emergency
spare wheel is fitted according to the descrip-
tion under "Fitting a wheel" (Y page 336). Interchanging the wheels
G
WARNING
Interchanging the front and rear wheels may
severely impair the driving characteristics if
the wheels or tyres have different dimensions. The wheel brakes or suspension components may also be damaged. There is a risk of acci-
dent.
Interchange front and rear wheels only if the
wheels and tyres are of the same dimensions.
! On vehicles fitted with a tyre pressure
monitor, electronic components are loca-
ted in the wheel.
Tyre-fitting tools should not be applied in
the area of the valve, as this could damage
the electronic components.
Only have tyres changed at a qualified spe- cialist workshop.
Interchanging the front and rear wheels of
differing dimensions can render the general
operating permit invalid.
Always pay attention to the instructions and
safety notes when changing a wheel
(Y page 335).
The wear patterns on the front and rear tyres differ, depending on the operating conditions.
Interchange the wheels before a clear wear
pattern has formed on the tyres. Front tyres
typically wear more on the shoulders and the
rear tyres in the centre.
On vehicles that have the same size front and rear wheels, you can interchange the wheels
every 5,000 to 10,000 km depending on the
degree of tyre wear. Ensure that the direction of rotation is maintained.
Clean the contact surfaces of the wheel and
the brake disc thoroughly every time a wheel
is interchanged. Check the tyre pressure and, if necessary, restart the tyre pressure loss
warning system or the tyre pressure monitor. Changing a wheel
335Wheels and tyres Z
Page 363 of 373
Model Replacement
amount AMG vehicles
5.5 l
All other models
5.8 l
Additives
!
Do not use any additives with the engine
oil. This could damage the engine.
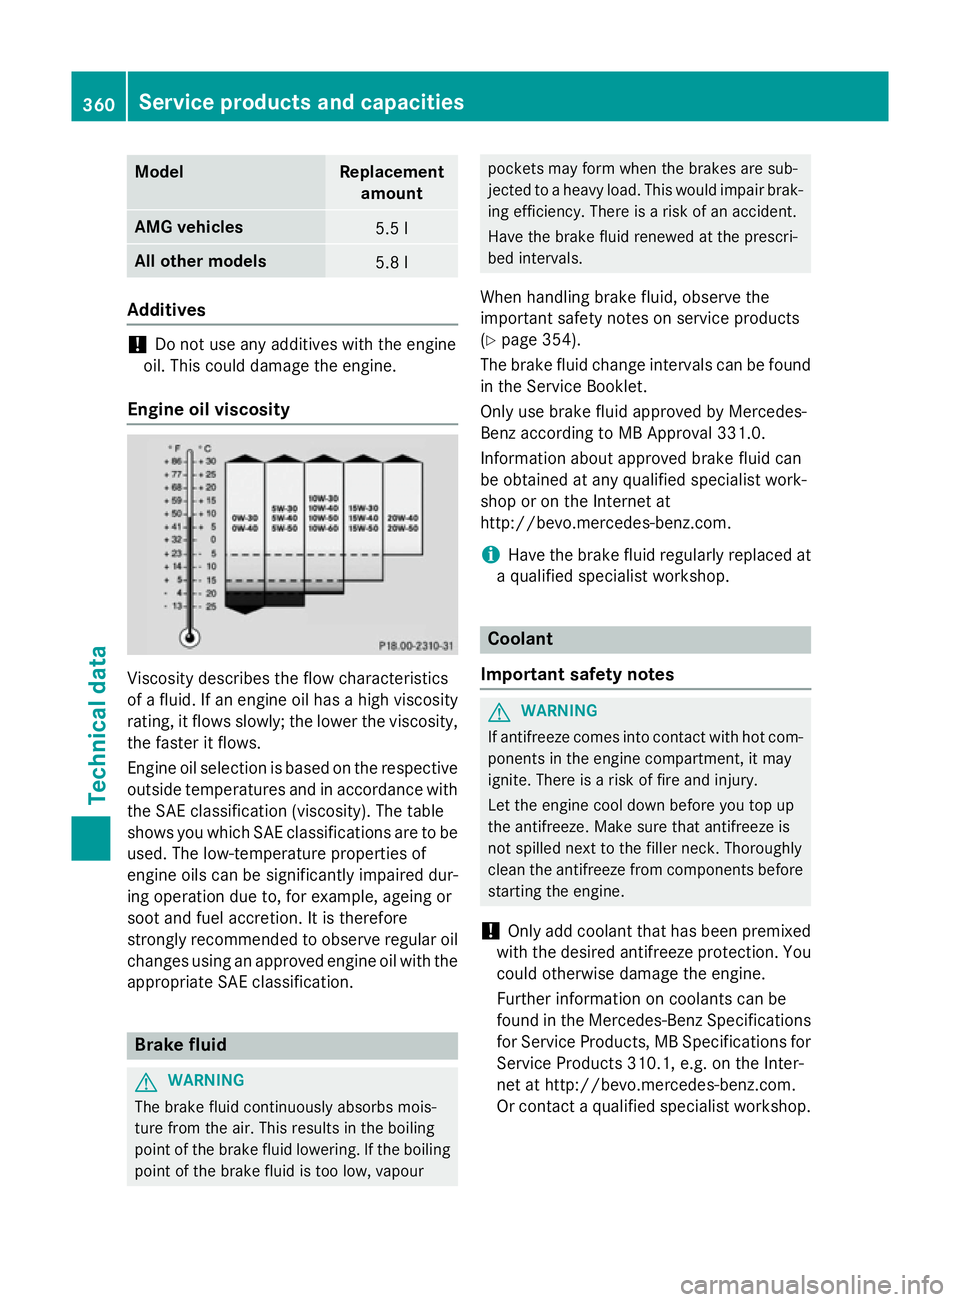
Engine oil viscosity Viscosity describes the flow characteristics
of a fluid. If an engine oil has a high viscosity
rating, it flows slowly; the lower the viscosity,
the faster it flows.
Engine oil selection is based on the respective outside temperatures and in accordance with
the SAE classification (viscosity). The table
shows you which SAE classifications are to be
used. The low-temperature properties of
engine oils can be significantly impaired dur-
ing operation due to, for example, ageing or
soot and fuel accretion. It is therefore
strongly recommended to observe regular oil changes using an approved engine oil with the
appropriate SAE classification. Brake fluid
G
WARNING
The brake fluid continuously absorbs mois-
ture from the air. This results in the boiling
point of the brake fluid lowering. If the boiling
point of the brake fluid is too low, vapour pockets may form when the brakes are sub-
jected to a heavy load. This would impair brak-
ing efficiency. There is a risk of an accident.
Have the brake fluid renewed at the prescri-
bed intervals.
When handling brake fluid, observe the
important safety notes on service products
(Y page 354).
The brake fluid change intervals can be found
in the Service Booklet.
Only use brake fluid approved by Mercedes-
Benz according to MB Approval 331.0.
Information about approved brake fluid can
be obtained at any qualified specialist work-
shop or on the Internet at
http://bevo.mercedes-benz.com.
i Have the brake fluid regularly replaced at
a qualified specialist workshop. Coolant
Important safety notes G
WARNING
If antifreeze comes into contact with hot com- ponents in the engine compartment, it may
ignite. There is a risk of fire and injury.
Let the engine cool down before you top up
the antifreeze. Make sure that antifreeze is
not spilled next to the filler neck. Thoroughly
clean the antifreeze from components before
starting the engine.
! Only add coolant that has been premixed
with the desired antifreeze protection. You
could otherwise damage the engine.
Further information on coolants can be
found in the Mercedes-Benz Specifications for Service Products, MB Specifications for Service Products 310.1, e.g. on the Inter-
net at http://bevo.mercedes-benz.com.
Or contact a qualified specialist workshop. 360
Service products and capacitiesTechnical data