2013 MERCEDES-BENZ CLA COUPE turn signal
[x] Cancel search: turn signalPage 121 of 373
Bulbs and lamps are an important aspect of
vehicle safety. You must therefore make sure that these function correctly at all times.
Have the headlamp setting checked regularly.
Other bulbs G
WARNING
Bulbs, lamps and plug connectors can
become very hot during use. When replacing a bulb, you could burn yourself on these com-
ponents. There is a risk of injury.
Allow these components to cool down before replacing the bulb.
Do not use a bulb that has been dropped or if
its glass tube has been scratched.
The bulb may explode if:
R you touch it
R it is hot
R you drop it
R you scratch it
Only operate bulbs in enclosed lamps
designed for that purpose. Only fit spare
bulbs of the same type and the specified volt- age.
Marks on the glass tube reduce the service
life of the bulbs. Do not touch the glass tube
with your bare hands. If necessary, clean the
glass tube when cold with alcohol or spirit and
rub it off with a lint-free cloth.
Protect bulbs from moisture during opera-
tion. Do not allow bulbs to come into contact
with liquids.
There are bulbs other than the xenon bulbs
that you cannot replace yourself. Replace
only the bulbs listed (Y page 118). Have the
bulbs that you cannot replace yourself
replaced at a qualified specialist workshop.
If you require assistance replacing bulbs, con- sult a qualified specialist workshop.
If the new bulb still does not light up, consult
a qualified specialist workshop.
Bulbs and lamps are an important aspect of
vehicle safety. You must therefore make sure that these function correctly at all times.
Have the headlamp setting checked regularly. Overview of bulb replacement – bulbs
You can replace the following bulbs. The
details for the bulb type can be found in the
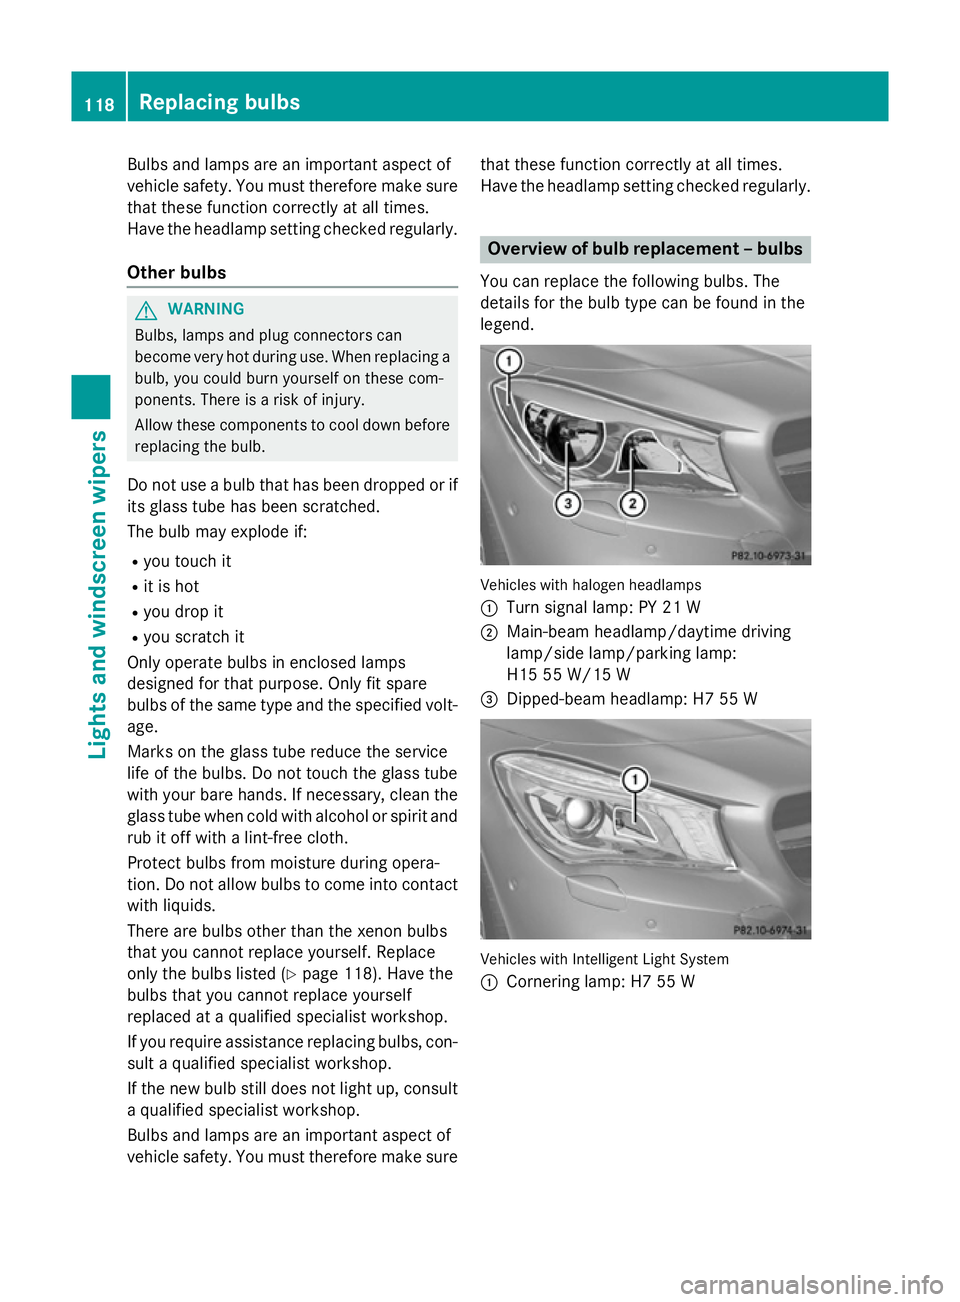
legend. Vehicles with halogen headlamps
:
Turn signal lamp: PY 21 W
; Main-beam headlamp/daytime driving
lamp/side lamp/parking lamp:
H15 55 W/15 W
= Dipped-beam headlamp: H7 55 W Vehicles with Intelligent Light System
:
Cornering lamp: H7 55 W 118
Replacing bulbsLights and windscreen wipers
Page 122 of 373
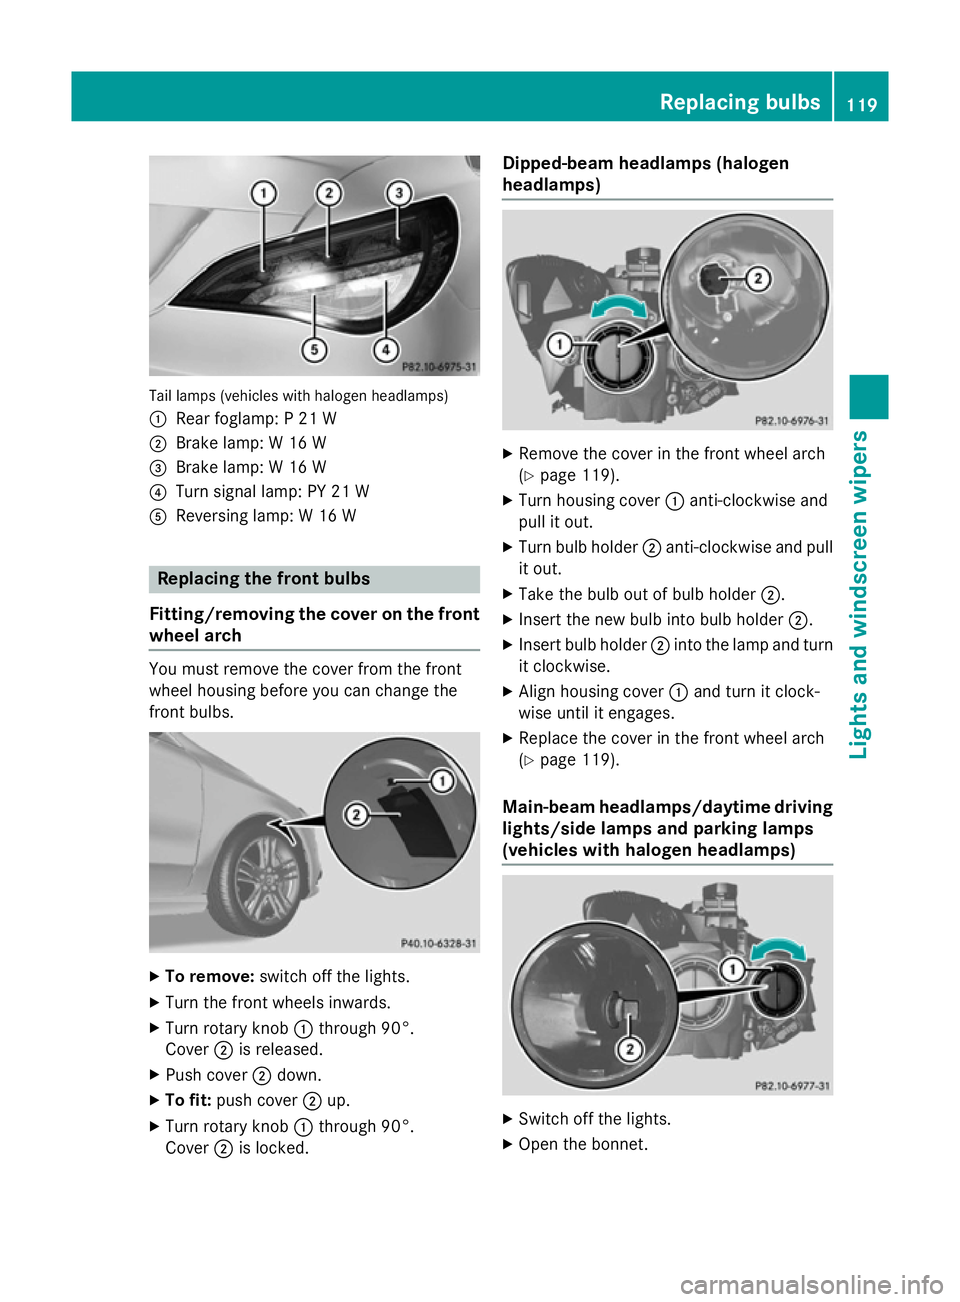
Tail lamps (vehicles with halogen headlamps)
: Rear foglamp: P 21 W
; Brake lamp: W 16 W
= Brake lamp: W 16 W
? Turn signal lamp: PY 21 W
A Reversing lamp: W 16 W Replacing the front bulbs
Fitting/removing the cover on the front wheel arch You must remove the cover from the front
wheel housing before you can change the
front bulbs. X
To remove: switch off the lights.
X Turn the front wheels inwards.
X Turn rotary knob :through 90°.
Cover ;is released.
X Push cover ;down.
X To fit: push cover ;up.
X Turn rotary knob :through 90°.
Cover ;is locked. Dipped-beam headlamps (halogen
headlamps) X
Remove the cover in the front wheel arch
(Y page 119).
X Turn housing cover :anti-clockwise and
pull it out.
X Turn bulb holder ;anti-clockwise and pull
it out.
X Take the bulb out of bulb holder ;.
X Insert the new bulb into bulb holder ;.
X Insert bulb holder ;into the lamp and turn
it clockwise.
X Align housing cover :and turn it clock-
wise until it engages.
X Replace the cover in the front wheel arch
(Y page 119).
Main-beam headlamps/daytime driving lights/side lamps and parking lamps
(vehicles with halogen headlamps) X
Switch off the lights.
X Open the bonnet. Replacing bulbs
119Lights and windscreen wipers Z
Page 123 of 373
X
Turn housing cover :anti-clockwise and
pull it out.
X Turn bulb ;anti-clockwise and pull it out.
X Insert the new bulb and engage it to the
stop.
X Align housing cover :and turn it clock-
wise until it engages.
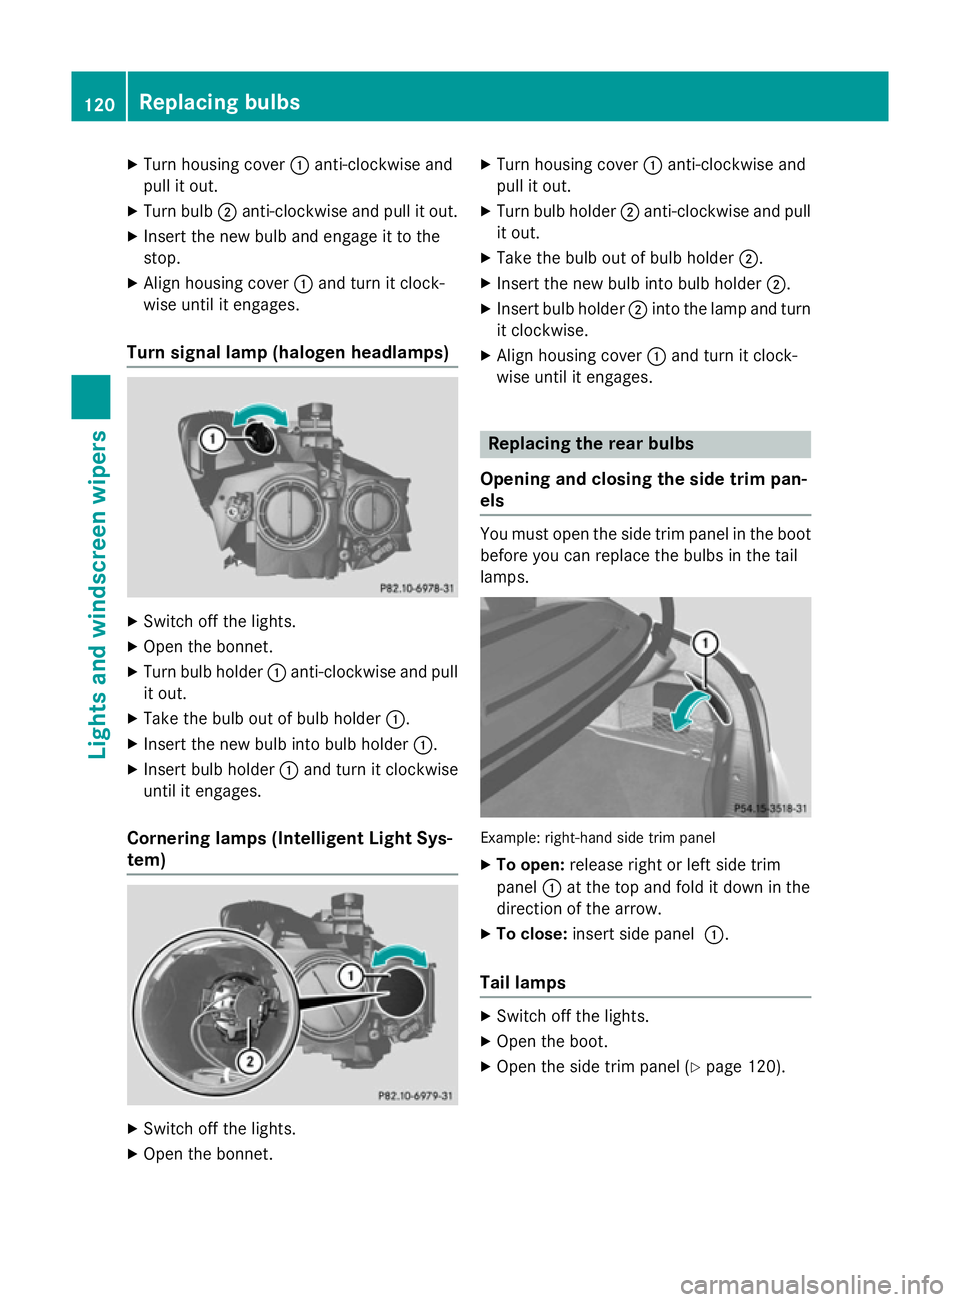
Turn signal lamp (halogen headlamps) X
Switch off the lights.
X Open the bonnet.
X Turn bulb holder :anti-clockwise and pull
it out.
X Take the bulb out of bulb holder :.
X Insert the new bulb into bulb holder :.
X Insert bulb holder :and turn it clockwise
until it engages.
Cornering lamps (Intelligent Light Sys-
tem) X
Switch off the lights.
X Open the bonnet. X
Turn housing cover :anti-clockwise and
pull it out.
X Turn bulb holder ;anti-clockwise and pull
it out.
X Take the bulb out of bulb holder ;.
X Insert the new bulb into bulb holder ;.
X Insert bulb holder ;into the lamp and turn
it clockwise.
X Align housing cover :and turn it clock-
wise until it engages. Replacing the rear bulbs
Opening and closing the side trim pan-
els You must open the side trim panel in the boot
before you can replace the bulbs in the tail
lamps. Example: right-hand side trim panel
X To open: release right or left side trim
panel :at the top and fold it down in the
direction of the arrow.
X To close: insert side panel :.
Tail lamps X
Switch off the lights.
X Open the boot.
X Open the side trim panel (Y page 120).120
Replacing bulbsLights and windscreen wipers
Page 124 of 373
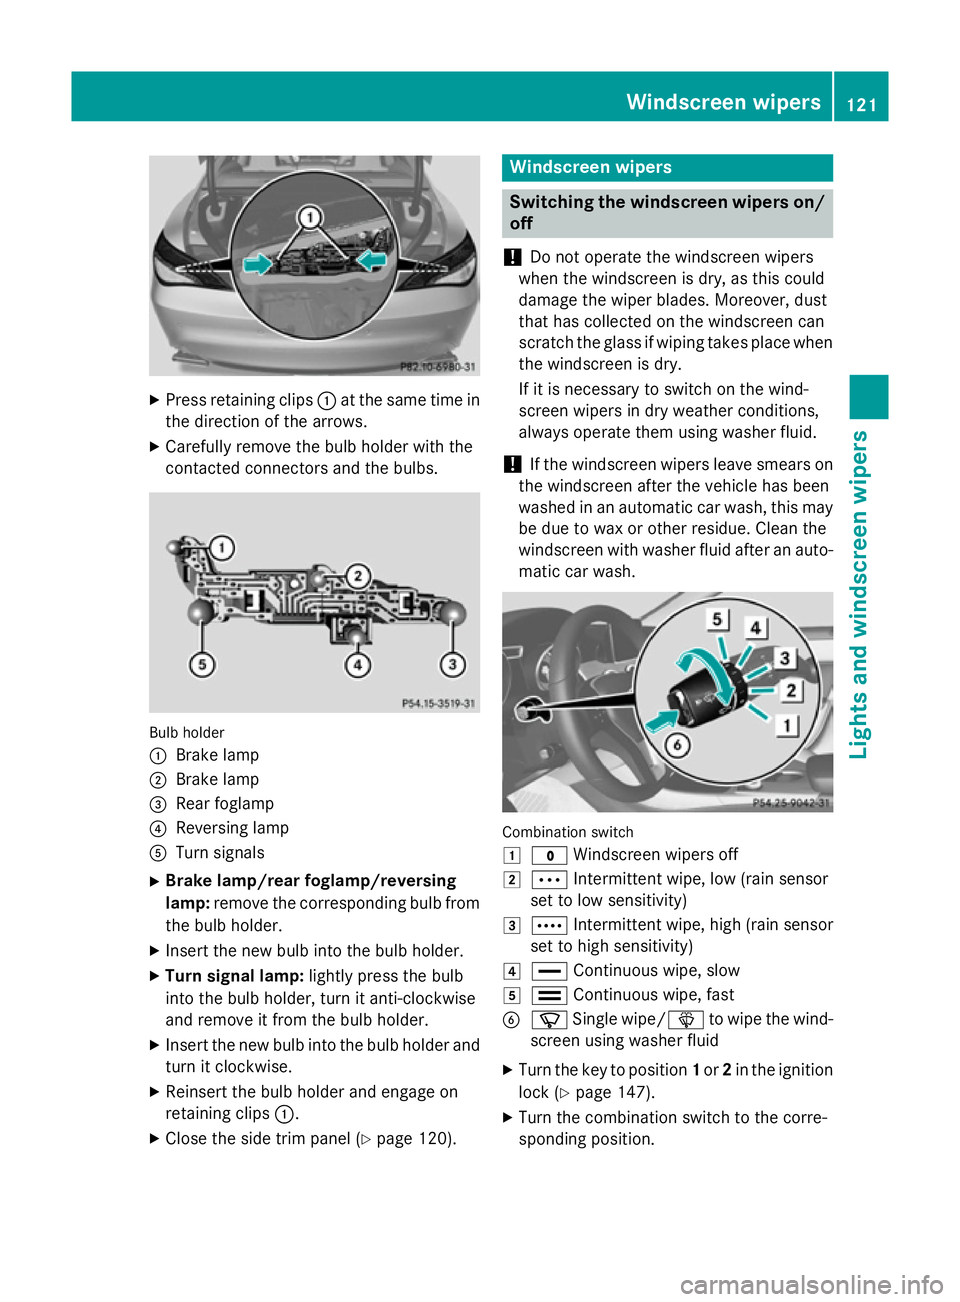
X
Press retaining clips :at the same time in
the direction of the arrows.
X Carefully remove the bulb holder with the
contacted connectors and the bulbs. Bulb holder
:
Brake lamp
; Brake lamp
= Rear foglamp
? Reversing lamp
A Turn signals
X Brake lamp/rear foglamp/reversing
lamp: remove the corresponding bulb from
the bulb holder.
X Insert the new bulb into the bulb holder.
X Turn signal lamp: lightly press the bulb
into the bulb holder, turn it anti-clockwise
and remove it from the bulb holder.
X Insert the new bulb into the bulb holder and
turn it clockwise.
X Reinsert the bulb holder and engage on
retaining clips :.
X Close the side trim panel (Y page 120). Windscreen wipers
Switching the windscreen wipers on/
off
! Do not operate the windscreen wipers
when the windscreen is dry, as this could
damage the wiper blades. Moreover, dust
that has collected on the windscreen can
scratch the glass if wiping takes place when the windscreen is dry.
If it is necessary to switch on the wind-
screen wipers in dry weather conditions,
always operate them using washer fluid.
! If the windscreen wipers leave smears on
the windscreen after the vehicle has been
washed in an automatic car wash, this may
be due to wax or other residue. Clean the
windscreen with washer fluid after an auto- matic car wash. Combination switch
1
$ Windscreen wipers off
2 Ä Intermittent wipe, low (rain sensor
set to low sensitivity)
3 Å Intermittent wipe, high (rain sensor
set to high sensitivity)
4 ° Continuous wipe, slow
5 ¯ Continuous wipe, fast
B í Single wipe/ îto wipe the wind-
screen using washer fluid
X Turn the key to position 1or 2in the ignition
lock (Y page 147).
X Turn the combination switch to the corre-
sponding position. Windscreen wipers
121Lights and windscreen wipers Z
Page 184 of 373
DISTRONIC PLUS is deactivated when you
depress the brake, except when the vehicle is
stationary.
X If you want to pull away with DIS-
TRONIC PLUS: remove your foot from the
brake pedal.
X Briefly pull the cruise control lever
(Y page 179) towards you ?.
or
X Accelerate briefly.
Your vehicle pulls away and adapts its
speed to that of the vehicle in front.
If no vehicle is detected in front, your vehi-
cle accelerates to the set speed.
If there is no vehicle in front, DISTRONIC
PLUS operates in the same way as cruise
control.
If DISTRONIC PLUS detects that the vehicle in front has slowed down, it brakes your vehicle.
In this way, the distance you have selected is maintained.
If DISTRONIC PLUS detects a faster-moving
vehicle in front, it increases the driving speed.
The vehicle is only accelerated up to the
speed you have stored.
Selecting the drive program
DISTRONIC Plus supports a sporty driving
style when you have selected the S or M driv-
ing program (Y page 159). Acceleration
behind the vehicle in front or to the set speed is then noticeably more dynamic. If you have
selected the E driving program, the vehicle
accelerates more gently. This setting is rec-
ommended in stop-and-start traffic.
Changing lanes
If you change to the overtaking lane, DIS-
TRONIC PLUS supports you if:
R you are driving faster than 70 km/h
R DISTRONIC PLUS is maintaining the dis-
tance to a vehicle in front
R you switch on the respective turn signal
R DISTRONIC PLUS does not detect a danger
of collision If these conditions are met, your vehicle is
accelerated. Acceleration will be interrupted
if changing lanes takes too long or if the dis-
tance between your vehicle and the vehicle in
front becomes too small.
i When you change lanes, DISTRONIC
PLUS monitors the left lane (on left-hand-
drive vehicles) or the right lane (on right-
hand-drive vehicles).
Stopping G
WARNING
When leaving the vehicle, even if it is braked
only by DISTRONIC PLUS, it could roll away if:
R there is a malfunction in the system or in
the voltage supply.
R DISTRONIC PLUS has been deactivated
with the cruise control lever, e.g. by a vehi-
cle occupant or from outside the vehicle.
R the electrical system in the engine com-
partment, the battery or the fuses have
been tampered with.
R the battery is disconnected.
R the accelerator pedal has been depressed,
e.g. by a vehicle occupant.
There is a risk of an accident.
If you wish to exit the vehicle, always turn off
DISTRONIC PLUS and secure the vehicle
against rolling away.
For further information on deactivating DIS-
TRONIC PLUS (Y page 183).
If DISTRONIC PLUS detects that the vehicle in front is stopping, it brakes your vehicle until it is stationary.
Once your vehicle is stationary, it remains
stationary and you do not need to depress the
brake.
i After a short period, the vehicle is secured
by the electric parking brake, thus relieving
the service brake.
i Depending on the specified minimum dis-
tance, your vehicle will come to a standstill
at a sufficient distance behind the vehicle in Driving systems
181Driving and parking Z
Page 197 of 373
35 km/h. While in operation, the system inde-
pendently locates and measures parking
spaces on both sides of the vehicle.
Active Parking Assist will only detect parking
spaces:
R that are parallel or at right angles to the
direction of travel
R that are parallel to the direction of travel
and are at least 1.5 m wide
R that are parallel to the direction of travel
and at least 1.0 mlonger than your vehicle
R that are at right angles to the direction of
travel and at least 1.0 m wider than your
vehicle
i In the case of parking spaces that are at
right angles to the direction of travel,
please ensure that the parking space is
long enough to accommodate your vehicle.
When driving at speeds below 30 km/h, you
will see parking symbol ;as a status indi-
cator in the instrument cluster. When a park-
ing space has been detected, an arrow
towards the right or the left also appears.
Active Parking Assist only displays parking
spaces on the front-passenger side as stand- ard. Parking spaces on the driver's side are
displayed as soon as the turn signal on the
driver's side is activated. When parking on the driver's side, this must remain switched on
until you acknowledge the use of Active Park-
ing Assist by pressing the abutton on the
multifunction steering wheel.
The system automatically determines
whether the parking space is parallel or at
right angles to the direction of travel.
A parking space is displayed while you are
driving past it, and until you are approx-
imately 15 m away from it.
Parking G
WARNING
Active Parking Assist merely aids you by inter- vening actively in the steering. There is a risk of accident if you do not apply the brakes
yourself.
Always apply the brakes yourself when park-
ing and manoeuvring.
X Stop the vehicle when the parking symbol
shows the desired parking space in the
instrument cluster.
X Vehicles with manual transmission: shift to
reverse gear.
Vehicles with automatic transmission: shift into position R.
The Start Park Assist? Yes: OK No: Start Park Assist? Yes: OK No:
% message appears in the multifunction
display.
X To cancel the procedure: press the%
button on the multifunction steering wheel or pull away.
or
X To park using Active Parking Assist:
press the abutton on the multifunction
steering wheel.
The Park Assist active Accelerate Park Assist active Accelerate
and
and brake
brake Observe
Observe surroundings
surroundings mes-
sage appears in the multifunction display.
X Release the multifunction steering wheel.
X Reverse the vehicle, being ready to brake at
all times. Do not exceed a maximum speed of approximately 10 km/hw hen reversing.
Otherwise, Active Parking Assist will be
cancelled.
i In tight parking spaces, you will achieve
the best parking results by backing up as
far as possible. When doing so, also
observe the PARKTRONIC messages.
X Stop as soon as PARKTRONIC sounds the
continuous warning tone, if not before.
Manoeuvring may be required in tight park-
ing spaces.
Vehicles with manual transmission: the
Park Assist active Engage forward
Park Assist active Engage forward
gear Observe surroundings gear Observe surroundings message
appears in the multifunction display.
Vehicles with automatic transmission: the
Park
Park Assist
Assist active
activeSelect
SelectD
DObserve
Observe 194
Driving systemsDriving and parking
Page 198 of 373
surroundings
surroundings
message appears in the mul-
tifunction display.
X Vehicles with manual transmission:
shift to first gear while the vehicle is sta-
tionary.
Vehicles with automatic transmission:
select transmission position Dwhile the
vehicle is stationary.
Active Parking Assist immediately steers in the other direction.
The Park Assist active Accelerate
Park Assist active Accelerate
and and brake
brake Observe
Observe surroundings
surroundings mes-
sage appears in the multifunction display.
i You will achieve the best results by wait-
ing for the steering procedure to complete before pulling away.
X Drive forwards and be ready to brake at all
times.
X Stop as soon as PARKTRONIC sounds the
continuous warning tone, if not before.
Vehicles with manual transmission: the
Park Assist active Engage reverse
Park Assist active Engage reverse
gear Observe surroundings gear Observe surroundings message
appears in the multifunction display.
Vehicles with automatic transmission: the
Park Park Assist
Assist active
active Select
SelectR
RObserve
Observe
surroundings
surroundings message appears in the mul-
tifunction display.
Additional transmission shifts may be neces-
sary.
As soon as the parking procedure is com-
plete, the Park ParkAssist
Assist switched
switched off
offmes-
sage appears and a warning tone sounds.
Active Parking Assist is then deactivated.
PARKTRONIC is still available.
Active Parking Assist no longer supports you
with steering interventions. When Active
Parking Assist is finished, you must steer
again yourself. PARKTRONIC is still available.
X Manoeuvre if necessary.
X Always observe the warning messages dis-
played by PARKTRONIC (Y page 190).Parking tips:
R The way your vehicle is positioned in the
parking space after parking is dependent
on various factors. These include the posi-
tion and shape of the vehicles parked in
front and behind it and the conditions of the
location. It may be the case that Active
Parking Assist guides you too far into a
parking space, or not far enough into it. In
some cases, it may also lead you across or
onto the kerb. If necessary, you should can-
cel the parking procedure with Active Park- ing Assist.
R You can also engage forward gear prema-
turely. The vehicle redirects and does not
drive as far into the parking space. Should a
gear be changed too early, the parking pro- cedure will be cancelled. A sensible parkingposition can no longer be achieved from
this position.
Exiting a parking space In order that Active Parking Assist can sup-
port you when you exit the parking space:
R the border of the parking space must be
high enough. A kerb stone is too small, for
example.
R the border of the parking space must not be
too wide, as the position of the vehicle must
not exceed an angle of 45° to the starting
position as it is manoeuvred into the park-
ing space.
R a manoeuvring distance of at least 1.0 m
must be available.
Active Parking Assist can only assist you with exiting a parking space if you have parked thevehicle parallel to the direction of travel using
Active Parking Assist.
X Start the engine.
X Switch on the turn signal in the direction
you are pulling away.
X Vehicles with manual transmission:
engage first or reverse gear. Driving systems
195Driving and parking Z
Page 206 of 373
R
the traffic signs are poorly illuminated
R there are ambiguous traffic signs, for
instance near roadworks or on multi-lane
roads
Information in the multifunction display Briefly showing detected traffic signs in
the multifunction display
X Activate the Speed Limit Assist warning
function using the on-board computer
(Y page 223).
A traffic sign indicating a speed limit or the
end of a speed limit appears in the multi-
function display for around five seconds as
soon as it is detected. Any other informa-
tion in the multifunction display is hidden
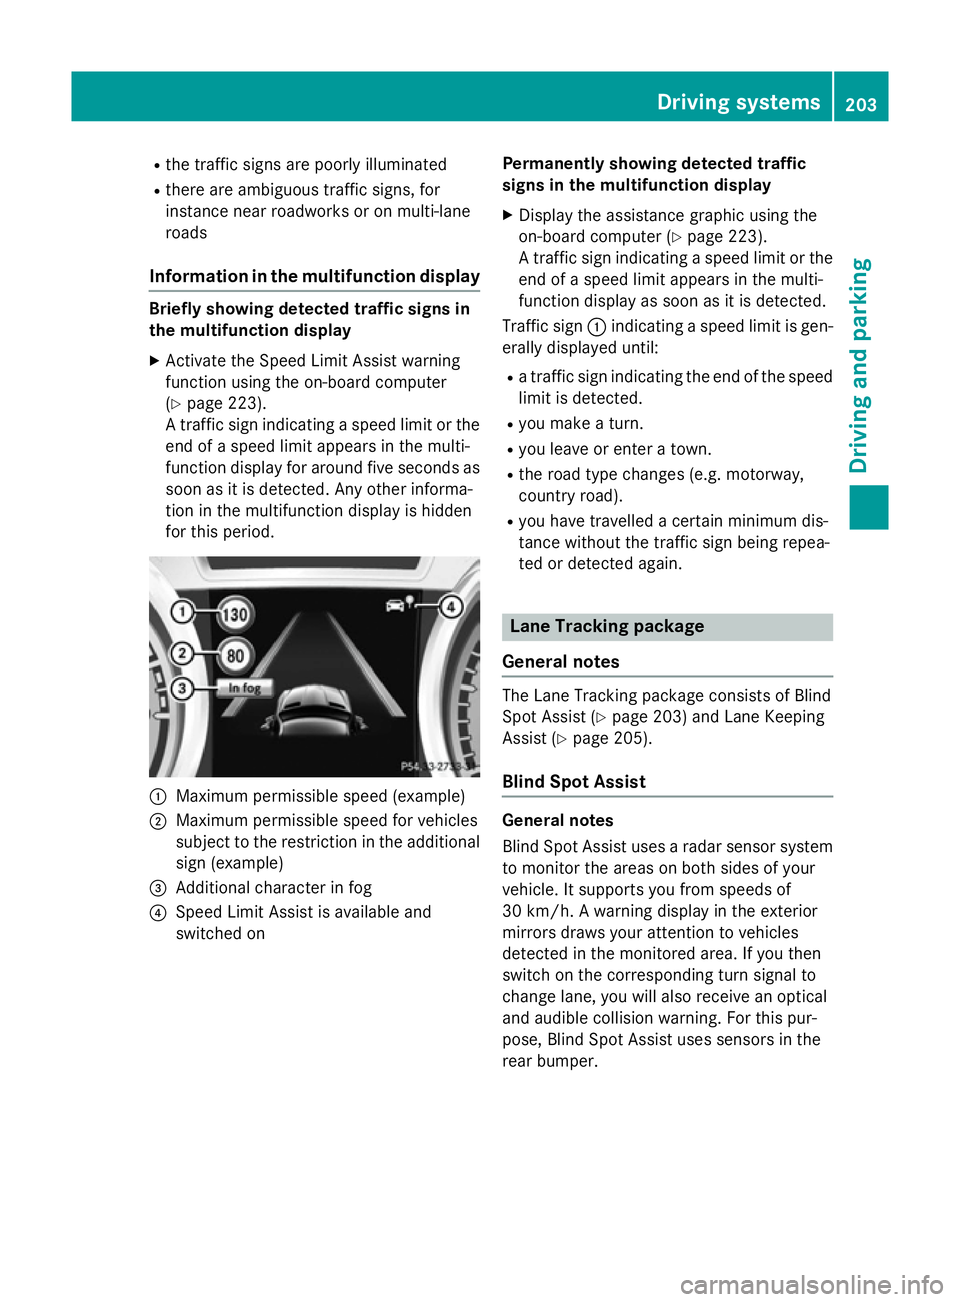
for this period. :
Maximum permissible speed (example)
; Maximum permissible speed for vehicles
subject to the restriction in the additional
sign (example)
= Additional character in fog
? Speed Limit Assist is available and
switched on Permanently showing detected traffic
signs in the multifunction display
X Display the assistance graphic using the
on-board computer (Y page 223).
A traffic sign indicating a speed limit or the
end of a speed limit appears in the multi-
function display as soon as it is detected.
Traffic sign :indicating a speed limit is gen-
erally displayed until:
R a traffic sign indicating the end of the speed
limit is detected.
R you make a turn.
R you leave or enter a town.
R the road type changes (e.g. motorway,
country road).
R you have travelled a certain minimum dis-
tance without the traffic sign being repea-
ted or detected again. Lane Tracking package
General notes The Lane Tracking package consists of Blind
Spot Assist (Y page 203) and Lane Keeping
Assist (Y page 205).
Blind Spot Assist General notes
Blind Spot Assist uses a radar sensor system
to monitor the areas on both sides of your
vehicle. It supports you from speeds of
30 km/h. A warning display in the exterior
mirrors draws your attention to vehicles
detected in the monitored area. If you then
switch on the corresponding turn signal to
change lane, you will also receive an optical
and audible collision warning. For this pur-
pose, Blind Spot Assist uses sensors in the
rear bumper. Driving systems
203Driving and parking Z