2013 MERCEDES-BENZ CLA COUPE mirror
[x] Cancel search: mirrorPage 77 of 373
Tow-away protection remains deactivated
until:
R the vehicle is unlocked again
R a door is opened and closed again
R the vehicle is locked again
To prevent a false alarm, deactivate the tow-
away protection if you lock your vehicle and it:
R is being transported
R is being loaded onto a ferry or car trans-
porter, for example
R is parked on a movable surface, e.g. in a
split-level garage Interior motion sensor
Function When the interior motion sensor is primed, a
visual and audible alarm is triggered if move- ment is detected in the vehicle interior. This
can occur if someone reaches into the vehicle
interior, for example.
Priming X
Make sure that:
R the side windows are closed
R the panorama sliding sunroof is closed
R there are no objects, e.g. mascots, hang-
ing on the rear-view mirror or on the grab handles on the roof trim
This will prevent false alarms.
X Make sure that:
R the doors are closed
R the panorama sliding sunroof is closed
R the boot lid is closed
Only then is the interior motion sensor
primed.
X Lock the vehicle with the key.
The interior motion sensor is primed after
approximately 30 seconds. Deactivating X
Unlock the vehicle with the key.
or X Insert the key into the ignition lock.
The interior motion sensor is automatically
deactivated.
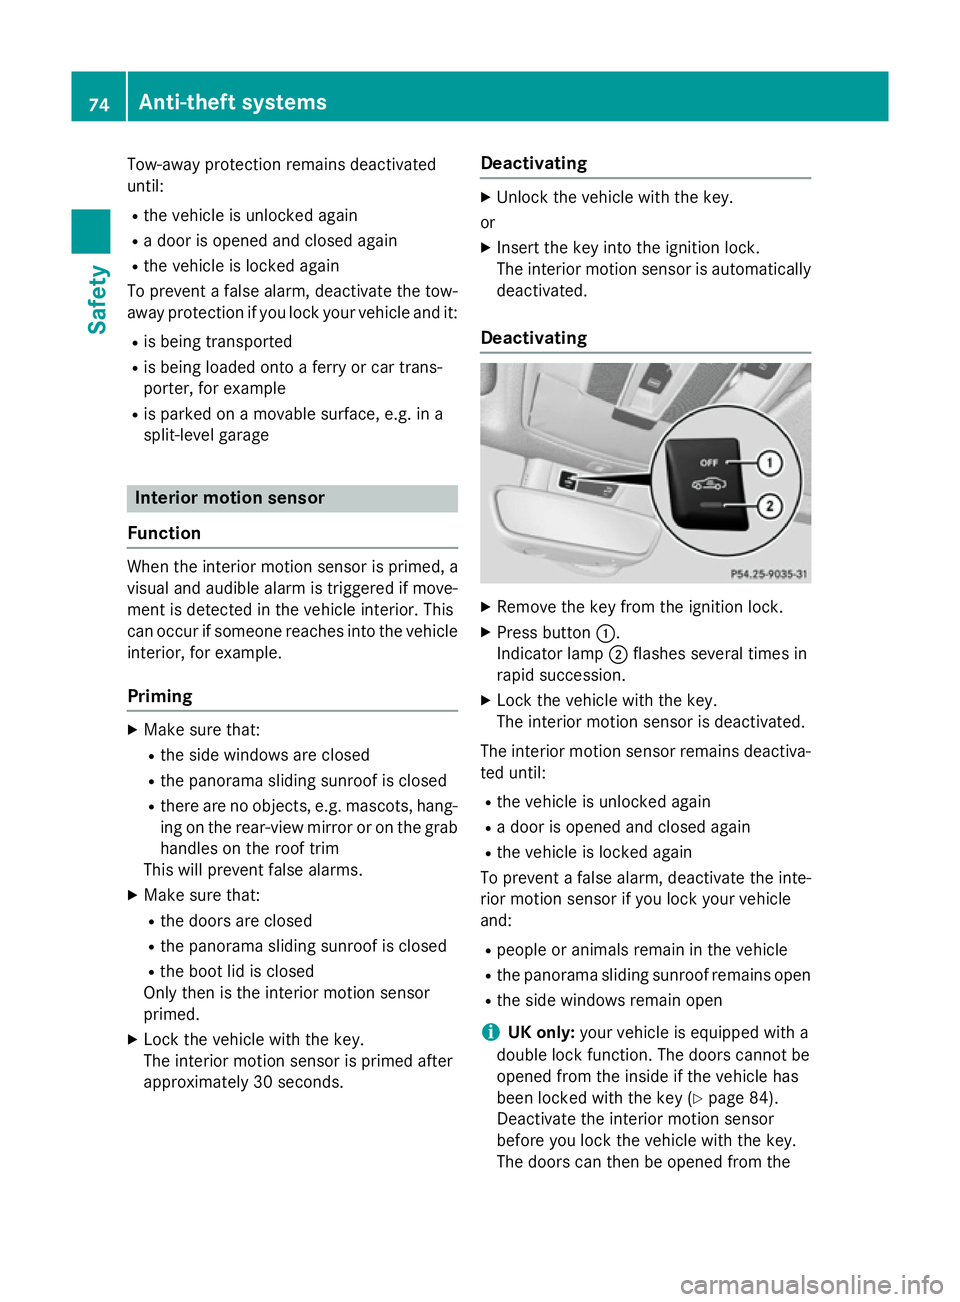
Deactivating X
Remove the key from the ignition lock.
X Press button :.
Indicator lamp ;flashes several times in
rapid succession.
X Lock the vehicle with the key.
The interior motion sensor is deactivated.
The interior motion sensor remains deactiva-
ted until:
R the vehicle is unlocked again
R a door is opened and closed again
R the vehicle is locked again
To prevent a false alarm, deactivate the inte-
rior motion sensor if you lock your vehicle
and:
R people or animals remain in the vehicle
R the panorama sliding sunroof remains open
R the side windows remain open
i UK only:
your vehicle is equipped with a
double lock function. The doors cannot be
opened from the inside if the vehicle has
been locked with the key (Y page 84).
Deactivate the interior motion sensor
before you lock the vehicle with the key.
The doors can then be opened from the 74
Anti-theft systemsSafety
Page 100 of 373
Useful information
..............................98
Correct driver's seat position ............98
Seats .................................................... 99
Steering wheel .................................. 104
Mirrors ............................................... 105
Memory functions .............................107 97Seats, steering wheel and mirrors
Page 101 of 373
Useful information
i This Owner's Manual describes all mod-
els, series and optional equipment for your
vehicle that were available at the time of
going to press. National variations are pos- sible. Note that your vehicle may not be
equipped with all of the functions descri-
bed. This is also the case for systems and
functions relevant to safety.
i Read the information on qualified special-
ist workshops: (Y page 24). Correct driver's seat position
G
WARNING
You could lose control of the vehicle while
driving if you:
R adjust the driver's seat, steering wheel or
mirrors
R fasten the seat belt
There is a risk of an accident.
Adjust the driver's seat, head restraint, steer-
ing wheel and mirrors and fasten your seat
belt before starting the engine. Observe the safety notes on seat adjustment
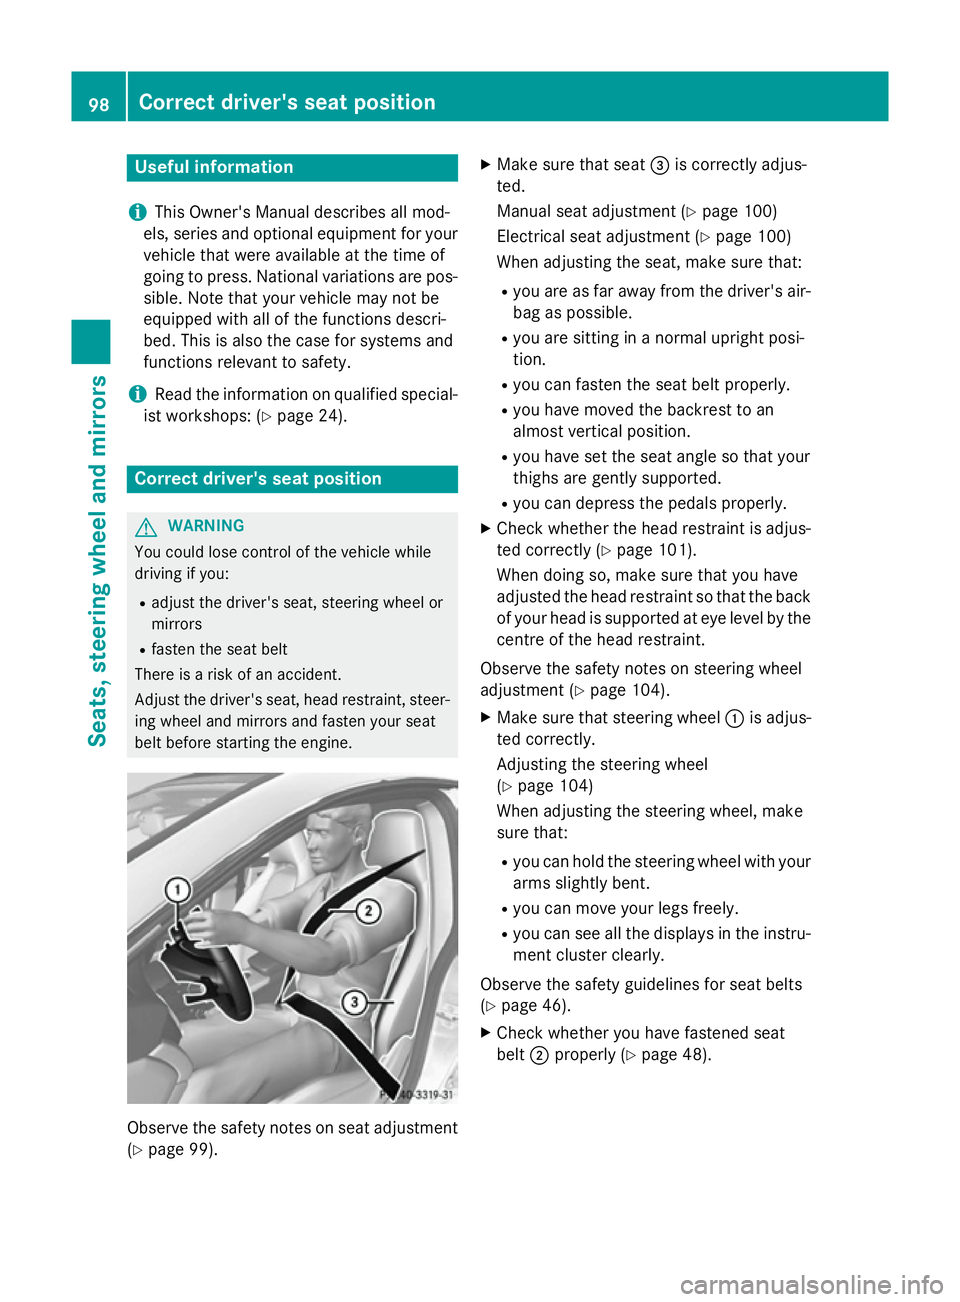
(Y page 99). X
Make sure that seat =is correctly adjus-
ted.
Manual seat adjustment (Y page 100)
Electrical seat adjustment (Y page 100)
When adjusting the seat, make sure that:
R you are as far away from the driver's air-
bag as possible.
R you are sitting in a normal upright posi-
tion.
R you can fasten the seat belt properly.
R you have moved the backrest to an
almost vertical position.
R you have set the seat angle so that your
thighs are gently supported.
R you can depress the pedals properly.
X Check whether the head restraint is adjus-
ted correctly (Y page 101).
When doing so, make sure that you have
adjusted the head restraint so that the back of your head is supported at eye level by the
centre of the head restraint.
Observe the safety notes on steering wheel
adjustment (Y page 104).
X Make sure that steering wheel :is adjus-
ted correctly.
Adjusting the steering wheel
(Y page 104)
When adjusting the steering wheel, make
sure that:
R you can hold the steering wheel with your
arms slightly bent.
R you can move your legs freely.
R you can see all the displays in the instru-
ment cluster clearly.
Observe the safety guidelines for seat belts
(Y page 46).
X Check whether you have fastened seat
belt ;properly (Y page 48). 98
Correct driver's seat positionSeats, steering wheel and mirrors
Page 102 of 373
The seat belt should:
R fit snugly across your body.
R be routed across the middle of your
shoulder.
R be routed across your hips in the pelvic
area.
X Before starting off, adjust the rear-view mir-
ror and the exterior mirrors (Y page 105)
so that you have a good view of road and
traffic conditions.
X Vehicles with a memory function: save
the seat and exterior mirror settings
(Y page 107). Seats
Important safety notes
G
WARNING
If children adjust the seats, they could
become trapped, especially if they are unat-
tended. There is a risk of injury.
When leaving the vehicle, always take the key with you and lock the vehicle. Never leave
children unattended in the vehicle. G
WARNING
You could lose control of the vehicle while
driving if you:
R adjust the driver's seat, steering wheel or
mirrors
R fasten the seat belt
There is a risk of an accident.
Adjust the driver's seat, head restraint, steer-
ing wheel and mirrors and fasten your seat
belt before starting the engine. G
WARNING
If you adjust the seat height carelessly, you or other vehicle occupants could be trapped andthereby injured. Children in particular could
accidentally press the electrical seat adjust-
ment buttons and become trapped. There is a
risk of injury. While moving the seats, make sure that your
hands or other body parts do not get under the
lever assembly of the seat adjustment sys-
tem. G
WARNING
When adjusting a seat, you or another vehicle occupant could become trapped by the guiderail of the seat, for instance. There is a risk of
injury.
Make sure that no one has any part of their
body within the sweep of the seat when
adjusting it. G
WARNING
The seat belt does not offer the intended level of protection if you have not moved the back-
rest to an almost vertical position. When brak-
ing or in the event of an accident, you could
slide underneath the seat belt and sustain
abdomen or neck injuries, for example. This
poses an increased risk of injury or even fatal injury.
Adjust the seat properly before beginning
your journey. Always ensure that the backrest
is in an almost vertical position and that the
shoulder section of your seatbelt is routed
across the centre of your shoulder. G
WARNING
The head restraints cannot provide the inten-
ded protection unless they are fitted and
adjusted correctly. There is an increased risk of injury to the head and neck in the event of
an accident or sudden braking, for example.
Always drive with the head restraints fitted.
Ensure that the centre of the head restraints
support the back of each vehicle occupant's
head at eye level before driving off. Seats
99Seats, steering wheel and mirrors Z
Page 103 of 373
!
To avoid damage to the seats and the seat
heating, observe the following information:
R do not spill any liquids on the seats. If
liquid is spilled on the seats, dry them as soon as possible.
R if the seat covers are damp or wet, do not
switch on the seat heating. The seat
heating should also not be used to dry
the seats.
R clean the seat covers as recommended;
see the "Interior care" section.
R do not transport heavy loads on the
seats. Do not place sharp objects on the seat cushions, e.g. knives, nails or tools.
The seats should only be occupied by
passengers, if possible.
R when the seat heating is in operation, do
not cover the seats with insulating mate- rials, e.g. blankets, coats, bags, seat cov-
ers, child seats or booster seats.
! Make sure that there are no objects in the
footwell under or behind the seats when
moving the seats back. There is a risk that
the seats and/or the objects could be dam-
aged.
i Further related subjects:
R Luggage compartment enlargement
(folding down the rear seats)
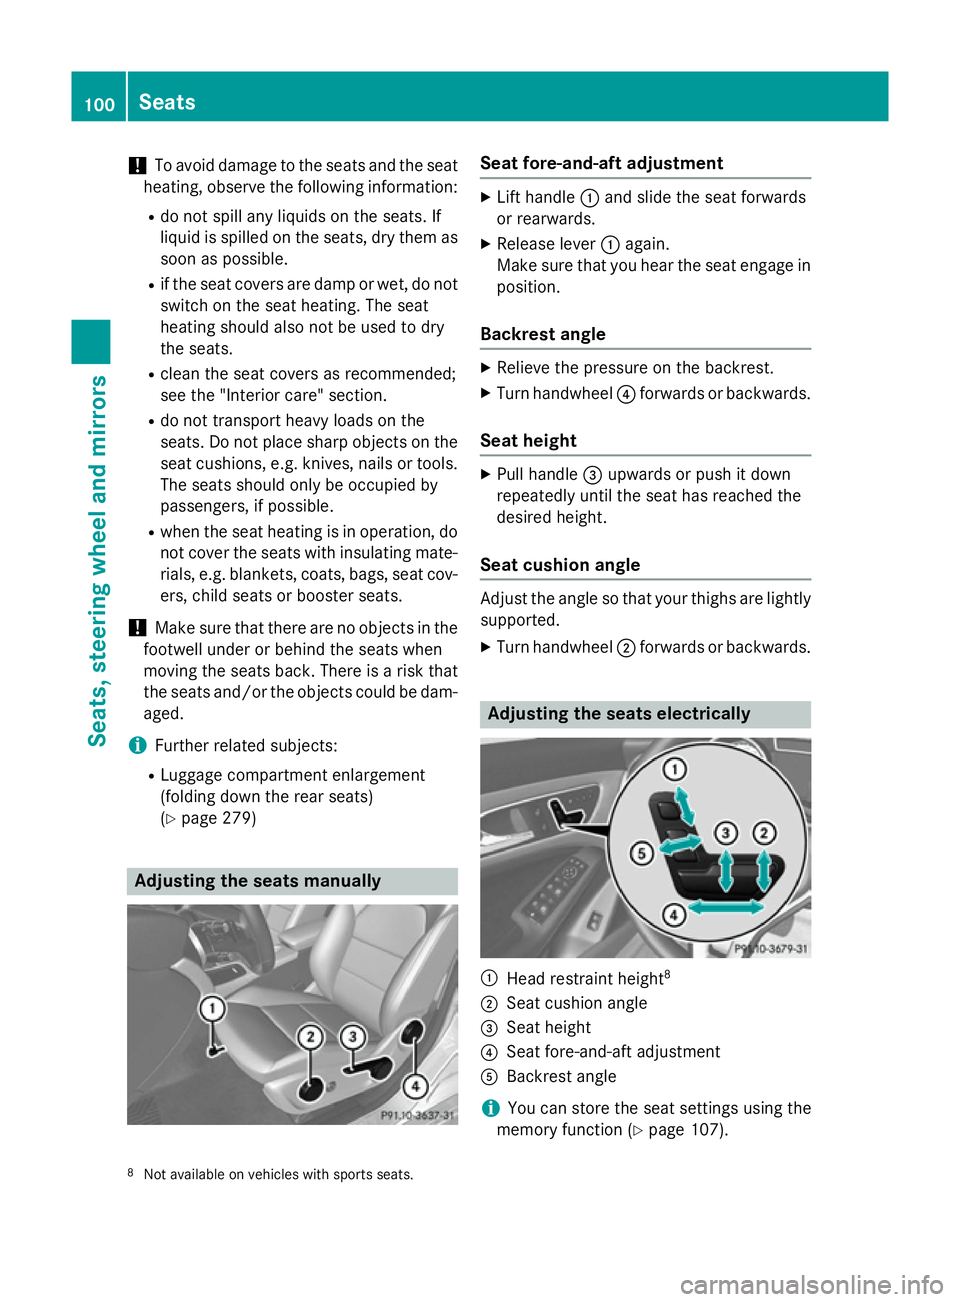
(Y page 279) Adjusting the seats manually Seat fore-and-aft adjustment
X
Lift handle :and slide the seat forwards
or rearwards.
X Release lever :again.
Make sure that you hear the seat engage in
position.
Backrest angle X
Relieve the pressure on the backrest.
X Turn handwheel ?forwards or backwards.
Seat height X
Pull handle =upwards or push it down
repeatedly until the seat has reached the
desired height.
Seat cushion angle Adjust the angle so that your thighs are lightly
supported.
X Turn handwheel ;forwards or backwards. Adjusting the seats electrically
:
Head restraint height 8
; Seat cushion angle
= Seat height
? Seat fore-and-aft adjustment
A Backrest angle
i You can store the seat settings using the
memory function (Y page 107).
8 Not available on vehicles with sports seats. 100
SeatsSeats, steering wheel and mirrors
Page 104 of 373
Adjusting the head restraints
G
WARNING
You could lose control of the vehicle while
driving if you:
R adjust the driver's seat, steering wheel or
mirrors
R fasten the seat belt
There is a risk of an accident.
Adjust the driver's seat, head restraint, steer-
ing wheel and mirrors and fasten your seat
belt before starting the engine. G
WARNING
The head restraints cannot provide the inten-
ded protection unless they are fitted and
adjusted correctly. There is an increased risk of injury to the head and neck in the event of
an accident or sudden braking, for example.
Always drive with the head restraints fitted.
Ensure that the centre of the head restraints
support the back of each vehicle occupant's
head at eye level before driving off.
General notes For vehicles with sports seats you cannot
adjust the front head restraints or the outer
rear head restraints.
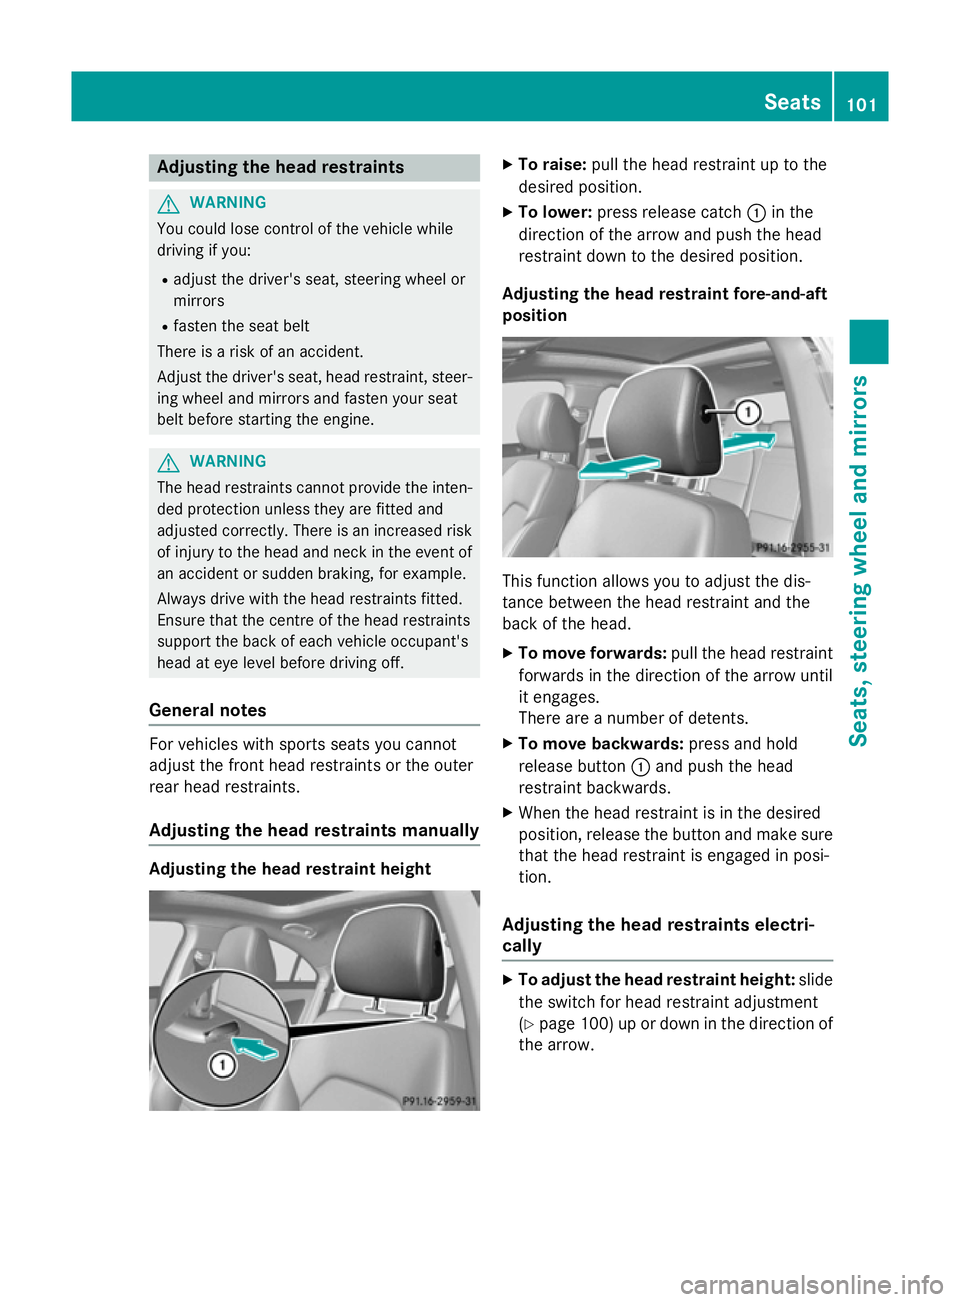
Adjusting the head restraints manually Adjusting the head restraint height X
To raise: pull the head restraint up to the
desired position.
X To lower: press release catch :in the
direction of the arrow and push the head
restraint down to the desired position.
Adjusting the head restraint fore-and-aft
position This function allows you to adjust the dis-
tance between the head restraint and the
back of the head.
X To move forwards: pull the head restraint
forwards in the direction of the arrow until
it engages.
There are a number of detents.
X To move backwards: press and hold
release button :and push the head
restraint backwards.
X When the head restraint is in the desired
position, release the button and make sure
that the head restraint is engaged in posi-
tion.
Adjusting the head restraints electri-
cally X
To adjust the head restraint height: slide
the switch for head restraint adjustment
(Y page 100) up or down in the direction of
the arrow. Seats
101Seats, steering wheel and mirrors Z
Page 105 of 373
Rear seat head restraints
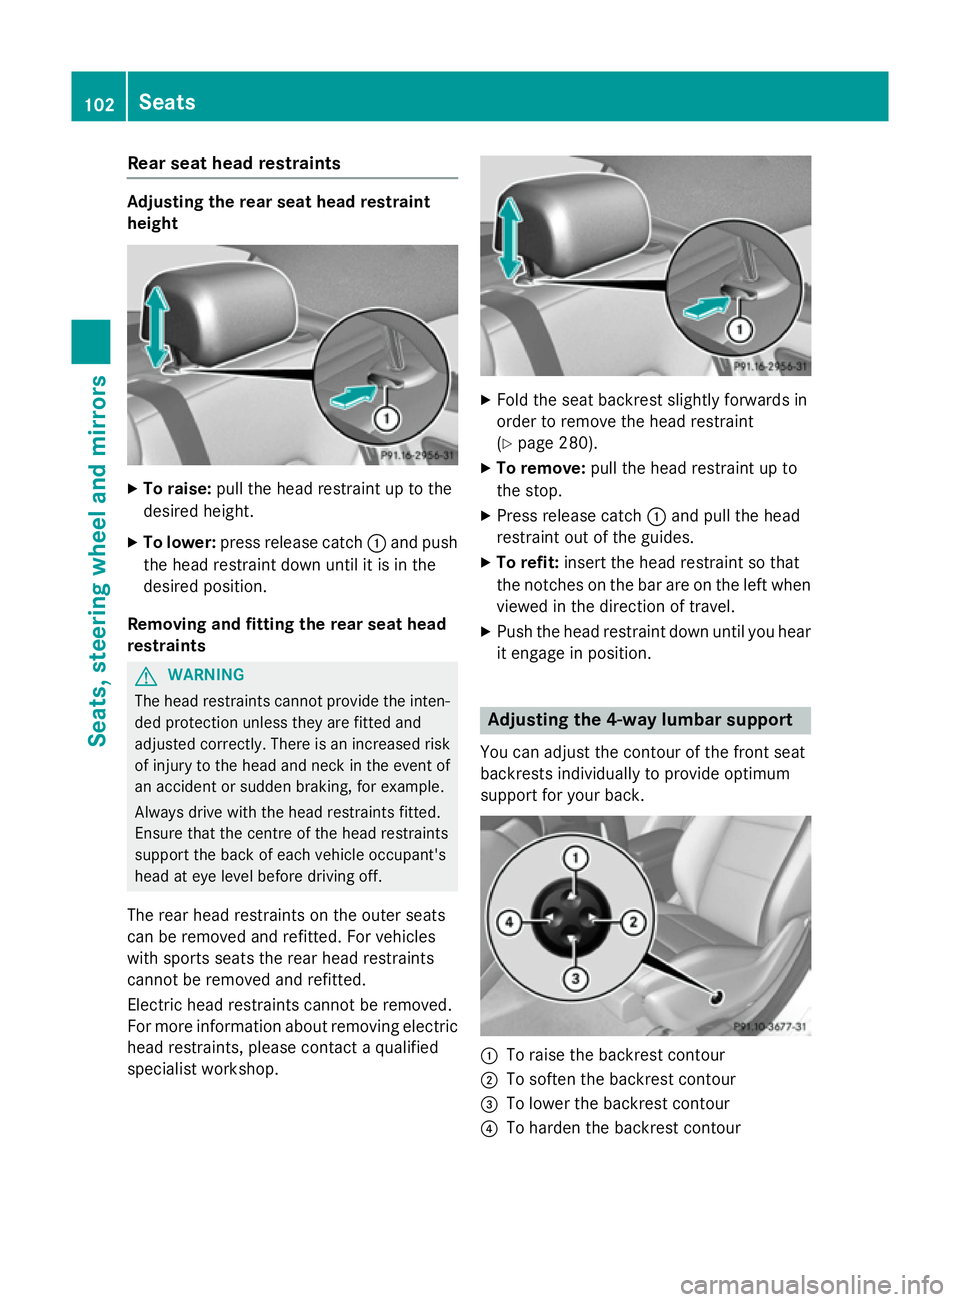
Adjusting the rear seat head restraint
height
X
To raise: pull the head restraint up to the
desired height.
X To lower: press release catch :and push
the head restraint down until it is in the
desired position.
Removing and fitting the rear seat head
restraints G
WARNING
The head restraints cannot provide the inten-
ded protection unless they are fitted and
adjusted correctly. There is an increased risk of injury to the head and neck in the event of
an accident or sudden braking, for example.
Always drive with the head restraints fitted.
Ensure that the centre of the head restraints
support the back of each vehicle occupant's
head at eye level before driving off.
The rear head restraints on the outer seats
can be removed and refitted. For vehicles
with sports seats the rear head restraints
cannot be removed and refitted.
Electric head restraints cannot be removed.
For more information about removing electric head restraints, please contact a qualified
specialist workshop. X
Fold the seat backrest slightly forwards in
order to remove the head restraint
(Y page 280).
X To remove: pull the head restraint up to
the stop.
X Press release catch :and pull the head
restraint out of the guides.
X To refit: insert the head restraint so that
the notches on the bar are on the left when viewed in the direction of travel.
X Push the head restraint down until you hear
it engage in position. Adjusting the 4-way lumbar support
You can adjust the contour of the front seat
backrests individually to provide optimum
support for your back. :
To raise the backrest contour
; To soften the backrest contour
= To lower the backrest contour
? To harden the backrest contour 102
SeatsSeats, steering wheel and mirrors
Page 106 of 373
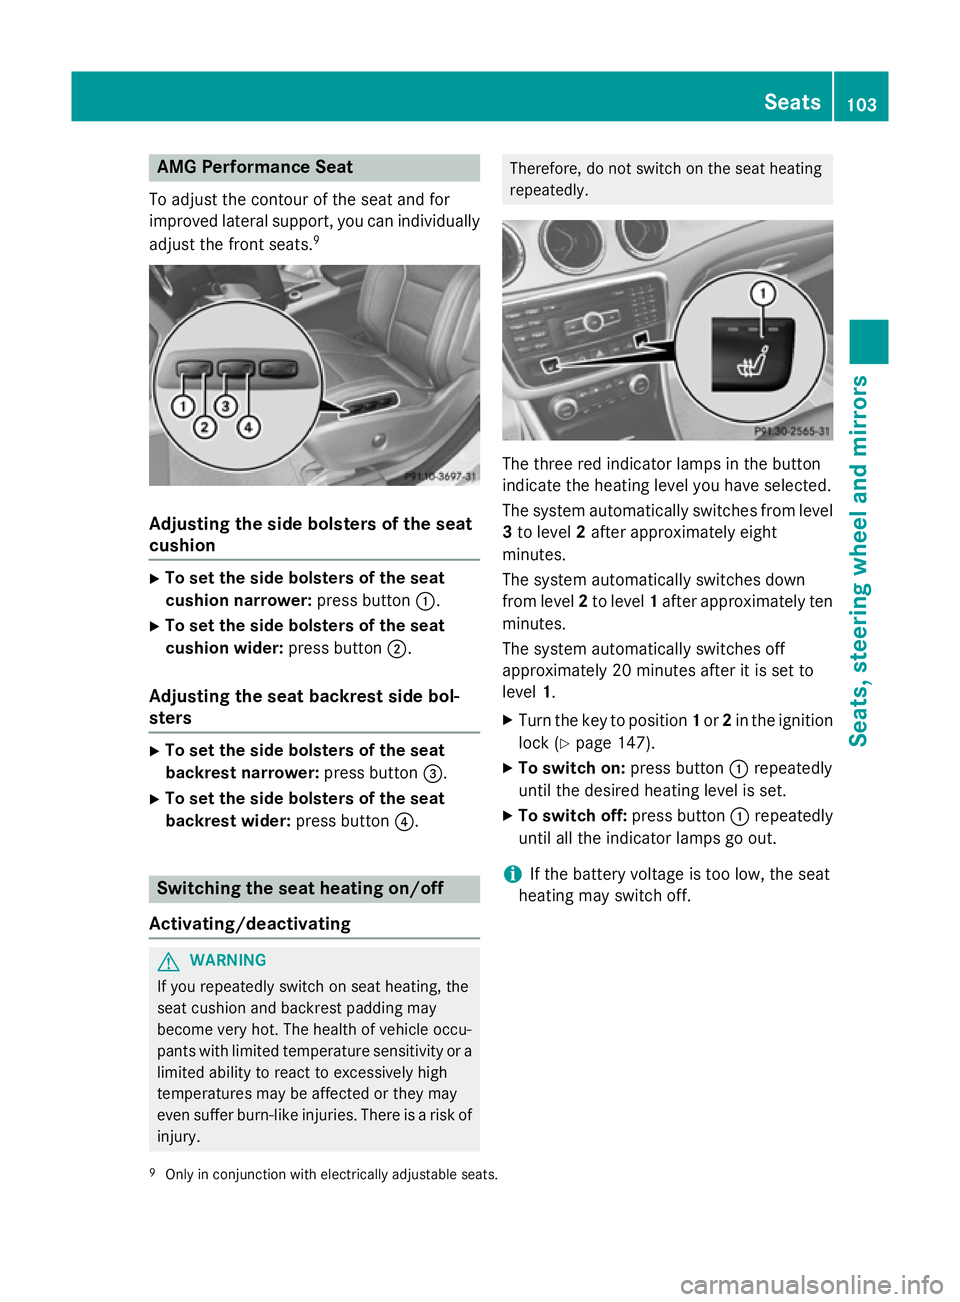
AMG Performance Seat
To adjust the contour of the seat and for
improved lateral support, you can individually adjust the front seats. 9Adjusting the side bolsters of the seat
cushion X
To set the side bolsters of the seat
cushion narrower: press button:.
X To set the side bolsters of the seat
cushion wider: press button;.
Adjusting the seat backrest side bol-
sters X
To set the side bolsters of the seat
backrest narrower: press button=.
X To set the side bolsters of the seat
backrest wider: press button?. Switching the seat heating on/off
Activating/deactivating G
WARNING
If you repeatedly switch on seat heating, the
seat cushion and backrest padding may
become very hot. The health of vehicle occu-
pants with limited temperature sensitivity or a limited ability to react to excessively high
temperatures may be affected or they may
even suffer burn-like injuries. There is a risk of
injury. Therefore, do not switch on the seat heating
repeatedly.
The three red indicator lamps in the button
indicate the heating level you have selected.
The system automatically switches from level
3 to level 2after approximately eight
minutes.
The system automatically switches down
from level 2to level 1after approximately ten
minutes.
The system automatically switches off
approximately 20 minutes after it is set to
level 1.
X Turn the key to position 1or 2in the ignition
lock (Y page 147).
X To switch on: press button:repeatedly
until the desired heating level is set.
X To switch off: press button:repeatedly
until all the indicator lamps go out.
i If the battery voltage is too low, the seat
heating may switch off.
9 Only in conjunction with electrically adjustable seats. Seats
103Seats, steering wheel and mirrors Z