2013 MERCEDES-BENZ CLA-CLASS weight
[x] Cancel search: weightPage 63 of 352
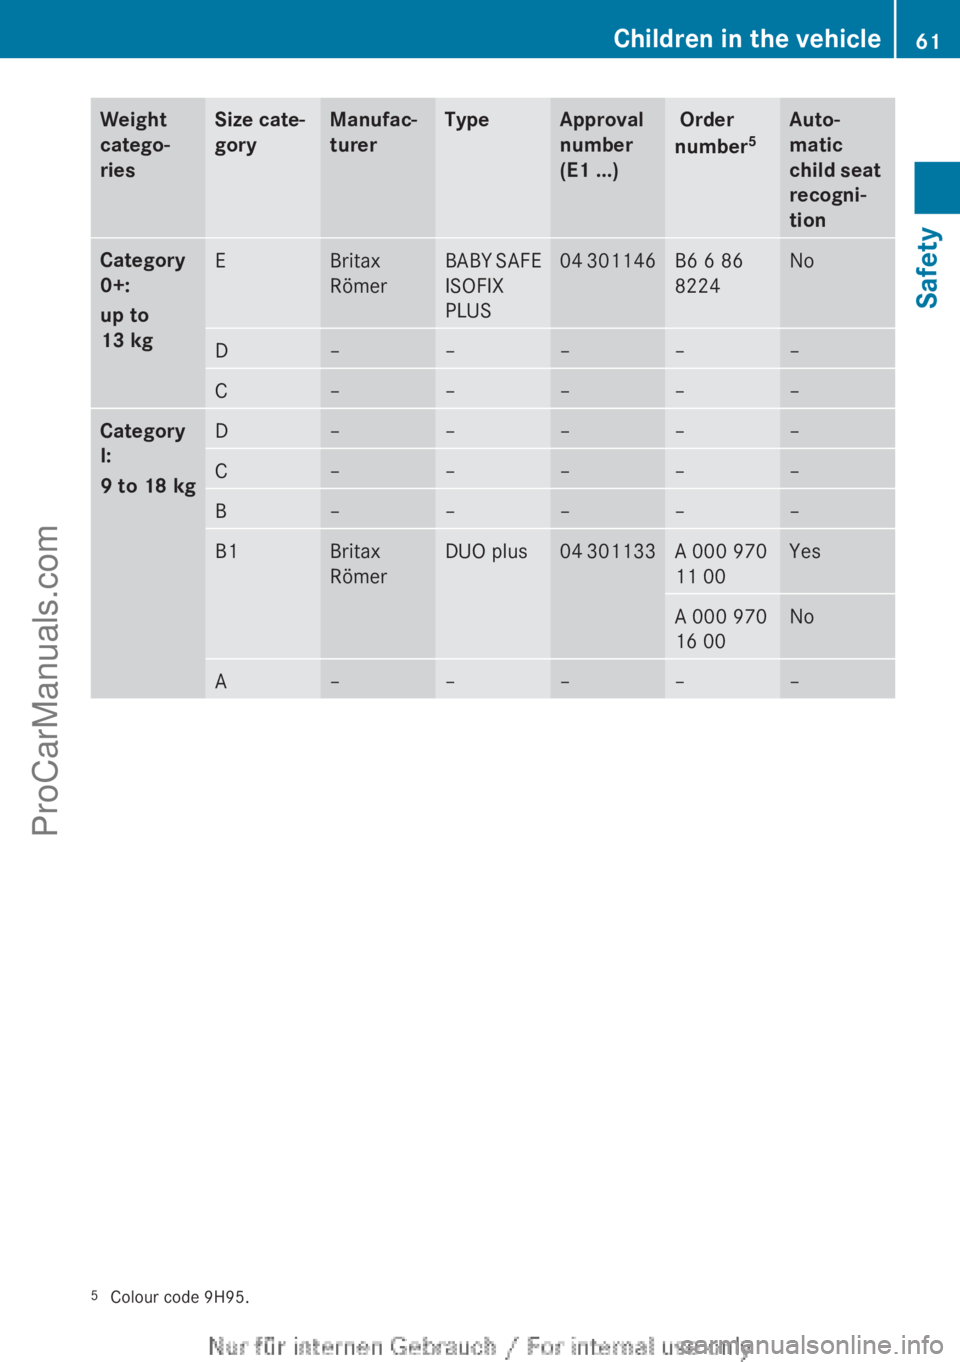
Weight
catego-
riesSize cate-
goryManufac-
turerTypeApproval
number
(E1 ...) Order
number 5Auto-
matic
child seat
recogni-
tionCategory
0+:
up to
13 kgEBritax
RömerBABY SAFE
ISOFIX
PLUS04 301146B6 6 86
8224NoD–––––C–––––Category
I:
9 to 18 kgD–––––C–––––B–––––B1Britax
RömerDUO plus04 301133A 000 970
11 00YesA 000 970
16 00NoA–––––5 Colour code 9H95.Children in the vehicle61SafetyZProCarManuals.com
Page 203 of 352
When Standard is selected, no warning vibra-
tion occurs if:
R you have switched on the turn signals. In
this event, the warnings are suppressed for
a certain period of time.
R a driving safety system intervenes, such as
ABS, BAS or ESP ®
.
When Adaptive is selected, no warning vibra-
tion occurs if:
R you have switched on the turn signals. In
this case, the warnings are suppressed for
a certain period of time.
R a driving safety system intervenes, such as
ABS, BAS or ESP ®
.
R you accelerate hard, e.g. kickdown.
R you brake hard.
R you steer actively, e.g. swerve to avoid an
obstacle or change lane quickly.
R you cut the corner on a sharp bend.
In order that you are warned only when nec-
essary and in good time if you cross the lane
marking, the system recognises certain con-
ditions and warns you accordingly.
The warning vibration occurs earlier if:
R you approach the outer lane marking on a
bend.
R the road has very wide lanes, e.g. a motor-
way.
R the system recognises solid lane markings.
The warning vibration occurs later if:
R the road has narrow lanes.
R you cut the corner on a bend.
Towing a trailer
Notes on towing a trailer
Important safety notes
GWARNING
The braking system can overheat if you leave
your foot on the brake pedal while driving.
This increases the braking distance and could
even cause the braking system to fail. There
is a risk of an accident.
Never use the brake pedal as a footrest. Do
not simultaneously depress both the brake
pedal and the accelerator pedal while driving.GWARNING
You could lose control of the vehicle/trailer
combination if it begins to swerve. The vehi-
cle/trailer combination could even overturn.
There is a risk of an accident.
On no account should you attempt to
straighten out the vehicle/trailer combina-
tion by increasing speed. Decrease your
speed and do not countersteer. Brake if nec-
essary.
GWARNING
If you exceed the permissible noseweight
while carrying a load, the carrier system could
detach from the vehicle and fall on the road.
There is a risk of an accident and injury.
Always maintain the permissible noseweight
when carrying loads.
! Depressing the brake pedal constantly
results in excessive and premature wear to
the brake pads.
If you exceed the maximum permissible nose-
weight of the trailer drawbar on the ball cou-
pling, the following may become damaged:
R your vehicle
R the trailer
R the ball coupling
R trailer tow hitch
The vehicle/trailer combination could
become unstable.
If the noseweight used is lower than the min-
imum permissible noseweight, the vehicle/
trailer combination could also become unsta-
ble.
Towing a trailer201Driving and parkingZProCarManuals.com
Page 204 of 352

To avoid hazardous situations:
R make sure to check the noseweight before
each journey.
R use a drawbar noseweight as close as pos-
sible to the maximum noseweight.
R do not exceed the maximum permissible
noseweight.
R do not use a noseweight lower than the
minimum permissible trailer drawbar nose-
weight.
You can use carrier systems, e.g. bicycle
racks or load-bearing implements, on the ball
coupling. The maximum noseweight of
75 kg applies when using carrier systems on
the ball coupling.
When reversing the vehicle towards the
trailer, make sure there is nobody between
the trailer and the vehicle.
Couple and uncouple the trailer carefully. If
you do not couple the trailer to the towing
vehicle correctly, the trailer could become
detached.
Make sure that the following values are not
exceeded:
R the permissible trailer drawbar noseweight
R the permissible trailer load
R the permissible rear axle load of the towing
vehicle
R the maximum permissible gross vehicle
weight of both the towing vehicle and the
trailer
The applicable permissible values, which
must not be exceeded, can be found:
R in your vehicle documents
R on the identification plates of the trailer tow
hitch and the trailer
R on the vehicle identification plate
If the values differ, the lowest value applies.
You will find the values approved by the man-
ufacturer on the vehicle identification plates
and those for the towing vehicle in the "Tech-
nical data" section.When towing a trailer, your vehicle's handling
characteristics will be different in comparison
to when driving without a trailer.
The vehicle/trailer combination:
R is heavier
R is restricted in its acceleration and gradi-
ent-climbing capability
R has an increased braking distance
R is affected more by strong crosswinds
R demands more sensitive steering
R has a larger turning circle
This can impair the vehicle's handling char-
acteristics. Adapt your style of driving accord-
ingly. Maintain a safe distance. Drive care-
fully.
When towing a trailer, always adjust your
speed to the current road and weather con-
ditions. Do not exceed the maximum permis-
sible speed for your vehicle/trailer combina-
tion.
General notes
! Use a drawbar noseweight as close as
possible to the maximum permissible nose-
weight. Do not use a noseweight of less
than 50 kg, otherwise the trailer may come
loose.
Note that the payload and the rear axle load
are reduced by the actual payload.
XWhen towing a trailer, set the tyre pressure
on the rear axle of the towing vehicle for a
maximum load; see the tyre pressure table
in the fuel filler flap ( Y page 319).
You will find fitting dimensions and loads in
the "Technical data" section ( Y page 344).
The actual noseweight may not though be
higher than the value which is given:
R on the type plate of the trailer tow hitch and
R on the type plate of the trailer
The lowest weight applies.
Please note that when towing a trailer, PARK-
TRONIC ( Y page 182) and Blind Spot Assist
202Towing a trailerDriving and parking
ProCarManuals.com
Page 270 of 352
Useful information
i This Owner's Manual describes all mod-
els, series and optional equipment for your
vehicle that were available at the time of
going to press. National variations are pos-
sible. Note that your vehicle may not be
equipped with all of the functions descri-
bed. This is also the case for systems and
functions relevant to safety.
i Read the information on qualified special-
ist workshops: ( Y page 24).
Loading guidelines
GWARNING
If objects, luggage or loads are not secured or
not secured sufficiently, they could slip, tip
over or be flung around and thereby hit vehicle
occupants. There is a risk of injury, especially
when braking or abruptly changing directions.
Always store objects so that they cannot be
flung around. Secure objects, luggage or
loads against slipping or tipping before the
journey.
GWARNING
Combustion engines emit poisonous exhaust
gases such as carbon monoxide. Exhaust
gases can enter the vehicle interior if the boot
lid is open when the engine is running, espe-
cially if the vehicle is in motion. There is a risk
of poisoning.
Always switch off the engine before opening
the boot lid. Never drive with the boot lid
open.
The handling characteristics of a laden vehi-
cle are dependent on the distribution of the
load within the vehicle. For this reason, you
should observe the following notes when
transporting a load:
R when transporting a load, never exceed the
maximum permissible gross vehicle weight
or the permissible axle loads for the vehicle
(including occupants).
R the boot is the preferred place to carry
objects.
R position heavy loads as far forwards as pos-
sible and as low down in the boot as pos-
sible.
R the load must not protrude above the upper
edge of the seat backrests.
R always place the load against the rear or
front seat backrests. Make sure that the
seat backrests are securely locked into
place.
R always place the load behind unoccupied
seats if possible.
R use the lashing eyelets and the luggage
nets to transport loads and luggage.
R only use lashing eyelets and fastening com-
ponents that are suitable for the weight and
size of the load.
R secure the load with sufficiently strong and
wear-resistant lashing material. Pad sharp
edges for protection.
i Lashing material is available at any quali-
fied specialist workshop.
Stowage areas
Stowage spaces
Important safety notes
GWARNING
If you do not correctly store objects in the
vehicle interior, they can slip or be flung
around, thus striking vehicle occupants.
There is a risk of injury, especially when brak-
ing or abruptly changing directions.
R Always store objects so that they cannot be
flung around in these or in similar situa-
tions.
R Always make sure that objects do not pro-
trude from stowage compartments, lug-
gage nets or stowage nets.
268Stowage areasStowing and features
ProCarManuals.com
Page 277 of 352
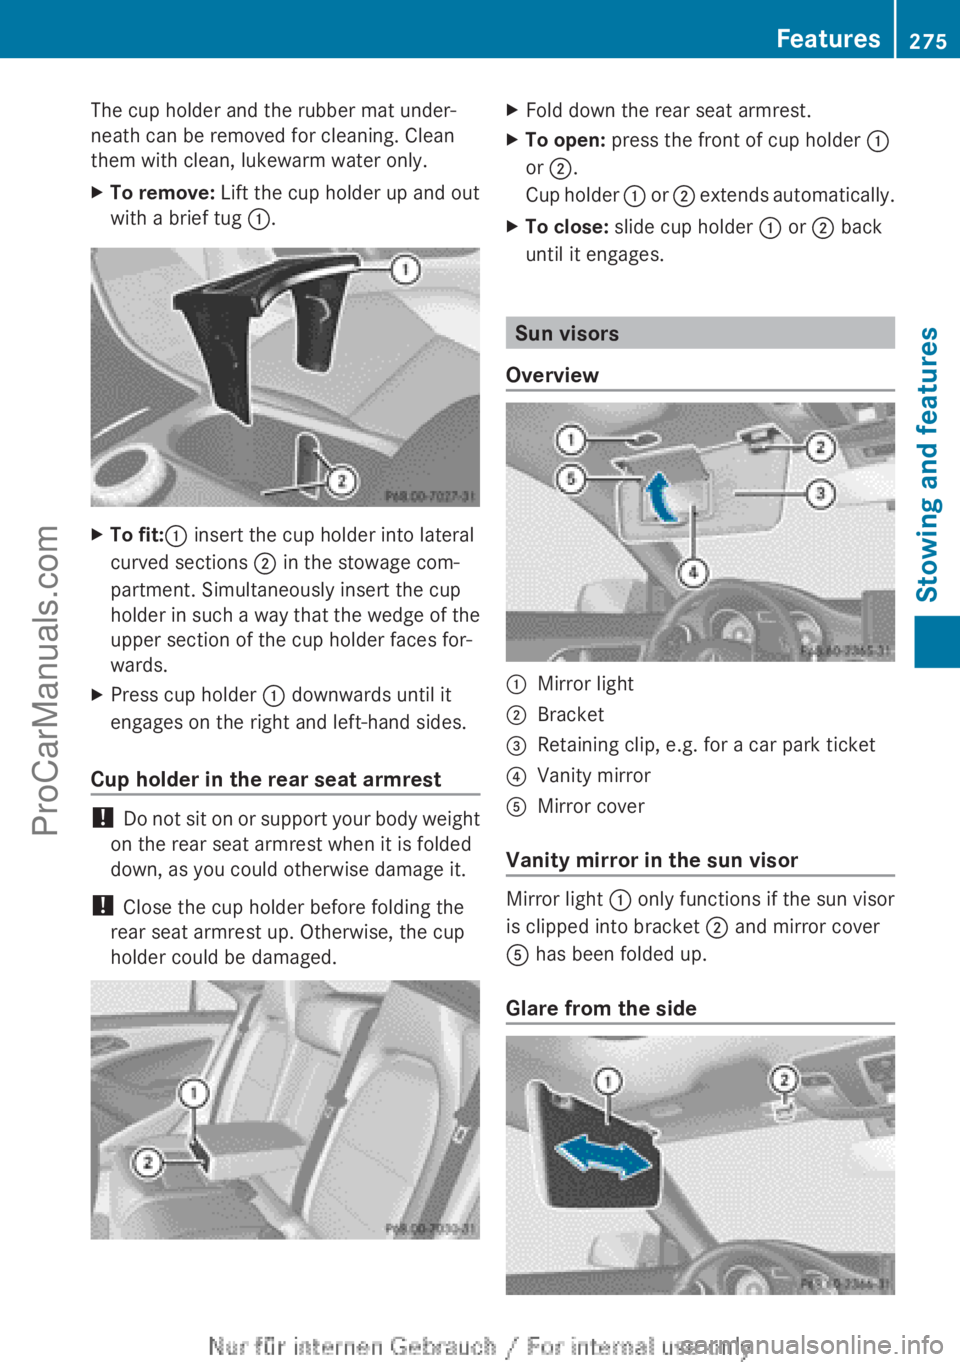
The cup holder and the rubber mat under-
neath can be removed for cleaning. Clean
them with clean, lukewarm water only.XTo remove: Lift the cup holder up and out
with a brief tug :.XTo fit: : insert the cup holder into lateral
curved sections ; in the stowage com-
partment. Simultaneously insert the cup
holder in such a way that the wedge of the
upper section of the cup holder faces for-
wards.XPress cup holder : downwards until it
engages on the right and left-hand sides.
Cup holder in the rear seat armrest
! Do not sit on or support your body weight
on the rear seat armrest when it is folded
down, as you could otherwise damage it.
! Close the cup holder before folding the
rear seat armrest up. Otherwise, the cup
holder could be damaged.
XFold down the rear seat armrest.XTo open: press the front of cup holder :
or ; .
Cup holder : or ; extends automatically.XTo close: slide cup holder : or ; back
until it engages.
Sun visors
Overview
:Mirror light;Bracket=Retaining clip, e.g. for a car park ticket?Vanity mirrorAMirror cover
Vanity mirror in the sun visor
Mirror light : only functions if the sun visor
is clipped into bracket ; and mirror cover
A has been folded up.
Glare from the side
Features275Stowing and featuresZProCarManuals.com
Page 310 of 352
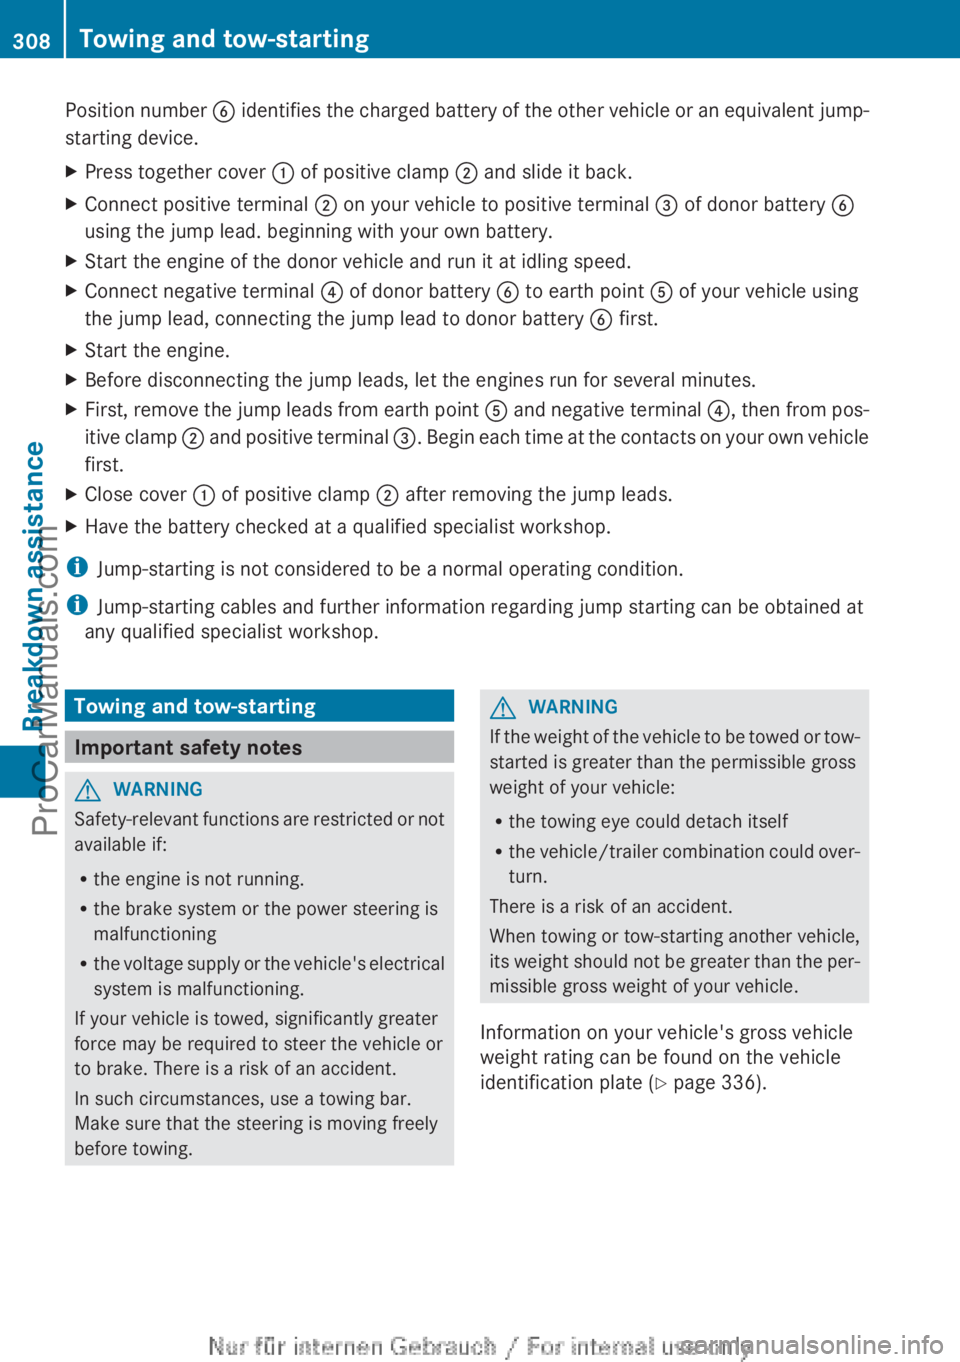
Position number B identifies the charged battery of the other vehicle or an equivalent jump-
starting device.XPress together cover : of positive clamp ; and slide it back.XConnect positive terminal ; on your vehicle to positive terminal = of donor battery B
using the jump lead. beginning with your own battery.XStart the engine of the donor vehicle and run it at idling speed.XConnect negative terminal ? of donor battery B to earth point A of your vehicle using
the jump lead, connecting the jump lead to donor battery B first.XStart the engine.XBefore disconnecting the jump leads, let the engines run for several minutes.XFirst, remove the jump leads from earth point A and negative terminal ?, then from pos-
itive clamp ; and positive terminal =. Begin each time at the contacts on your own vehicle
first.XClose cover : of positive clamp ; after removing the jump leads.XHave the battery checked at a qualified specialist workshop.
i
Jump-starting is not considered to be a normal operating condition.
i Jump-starting cables and further information regarding jump starting can be obtained at
any qualified specialist workshop.
Towing and tow-starting
Important safety notes
GWARNING
Safety-relevant functions are restricted or not
available if:
R the engine is not running.
R the brake system or the power steering is
malfunctioning
R the voltage supply or the vehicle's electrical
system is malfunctioning.
If your vehicle is towed, significantly greater
force may be required to steer the vehicle or
to brake. There is a risk of an accident.
In such circumstances, use a towing bar.
Make sure that the steering is moving freely
before towing.
GWARNING
If the weight of the vehicle to be towed or tow-
started is greater than the permissible gross
weight of your vehicle:
R the towing eye could detach itself
R the vehicle/trailer combination could over-
turn.
There is a risk of an accident.
When towing or tow-starting another vehicle,
its weight should not be greater than the per-
missible gross weight of your vehicle.
Information on your vehicle's gross vehicle
weight rating can be found on the vehicle
identification plate ( Y page 336).
308Towing and tow-startingBreakdown assistance
ProCarManuals.com
Page 338 of 352

Identification plates
Vehicle identification plate with vehi-
cle identification number (VIN)
XOpen the front right-hand door.
You will see vehicle identification plate :.
Example: vehicle identification plate
:Vehicle identification plate;Vehicle manufacturer (Daimler AG)=EU type approval number (only for certain
countries)?VINAMaximum permissible gross vehicle
weight (kg)BMaximum permissible mass of vehicle/
trailer combination (kg)CMaximum permissible front axle load (kg)DMaximum permissible rear axle load (kg)EPaint code
i The data shown on the vehicle identifica-
tion plate is example data. This data is dif-
ferent for every vehicle and can deviate
from the data shown here. You can find the
data applicable to your vehicle on the vehi-
cle's identification plate.
VIN
XSlide the right-hand front seat to its rear-
most position.XFold up floor covering : in front of the
right-hand front seat.
You will see VIN ;.
The VIN can also be found on the vehicle
identification plate ( Y page 336).
Engine number
The engine number is stamped onto the
crankcase. More information can be obtained
from any Mercedes-Benz Service Centre.
Service products and capacities
Important safety notes
GWARNING
Service product can be poisonous and haz-
ardous to health. There is a risk of injury.
Observe the instructions on the respective
original container when using, storing and dis-
posing off service products. Always store
service products in the sealed original con-
tainer. Always keep service products out of
the reach of children.
336Service products and capacitiesTechnical data
ProCarManuals.com
Page 345 of 352

At temperatures below freezing:XFill the washer fluid reservoir with a mixture
of water and washer fluid, e.g. MB Winter-
Fit.
Adapt the mixing ratio to the outside temper-
ature.
R Down to Ò10 † : mix 1 part MB WinterFit to
2 parts water.
R Down to Ò20 † : mix 1 part MB WinterFit to
1 part water.
R Down to Ò29 †: mix 2 parts MB WinterFit
to 1 part water.
i Add washer fluid concentrate, e.g. MB
SummerFit or MB WinterFit, to the washer
fluid all year round.
Vehicle data
General notes
Please note that for the specified vehicle
data:
R the heights specified may vary as a result
of:
- tyres
- load
- condition of the suspension
- optional equipment
R items of optional equipment increase the
unladen weight and reduce the maximum
payload. The unladen weight is specified in
accordance with EC directives and
includes:
- driver (68 kg)
- luggage (7 kg)
- all fluids (fuel tank 90% full)
R vehicle-specific weight information can be
found on the vehicle identification plate
( Y page 336).
R only for certain countries: you can find vehi-
cle-specific vehicle data in the COC docu-
ments (CERTIFICATE OF CONFORMITY).
These documents are delivered with your
vehicle.
Dimensions and weightsModel: Opening
heightCLA 180
CLA 200
CLA 220 CDI1745 mmCLA 2501749 mm
Missing values were not available at the time
of going to print.
All modelsVehicle length4630 mmVehicle width
including exterior
mirrors2032 mmVehicle width
excluding exterior
mirrors1777 mmWheelbase2699 mmMaximum roof loadMaximum boot load100 kgVehicle data343Technical dataZProCarManuals.com