2013 MERCEDES-BENZ CLA-CLASS light
[x] Cancel search: lightPage 266 of 352
ProblemPossible causes/consequences and M SolutionsXLeave the vehicle and keep a safe distance from the vehicle until
the engine has cooled down.XCheck the coolant level and top up the coolant ( Y page 285).
Observe the warning notes as you do so.XIf you have to top up the coolant frequently, have the engine
cooling system checked.XMake sure that the air supply to the engine radiator is not
blocked, e.g. by frozen slush.XIf the coolant temperature is below 120 †, you can continue
driving to the nearest qualified specialist workshop.XAvoid heavy loads on the engine as you do so, e.g. driving in
mountainous terrain and stop-start traffic.
Driving systems
ProblemPossible causes/consequences and M Solutions·
The red distance warn-
ing lamp lights up while
the vehicle is in motion.The distance to the vehicle in front is too small for the speed
selected.XIncrease the distance.·
The red distance warn-
ing lamp lights up while
the vehicle is in motion.
A warning tone also
sounds.You are approaching a vehicle or a stationary obstacle in your line
of travel at too high a speed.XBe prepared to brake immediately.XPay careful attention to the traffic situation. You may have to
brake or take evasive action.
For further information about the distance warning function of
COLLISION PREVENTION ASSIST ( Y page 65).
For further information about COLLISION PREVENTION ASSIST
PLUS ( Y page 67).
264Warning and indicator lamps in the instrument clusterOn-board computer and displays
ProCarManuals.com
Page 271 of 352
RClose lockable stowage compartments
while driving.
R Stow and secure objects that are heavy,
hard, pointy, sharp-edged, fragile or too
large in the boot.
Observe the loading guidelines (Y page 268).
Front stowage compartments
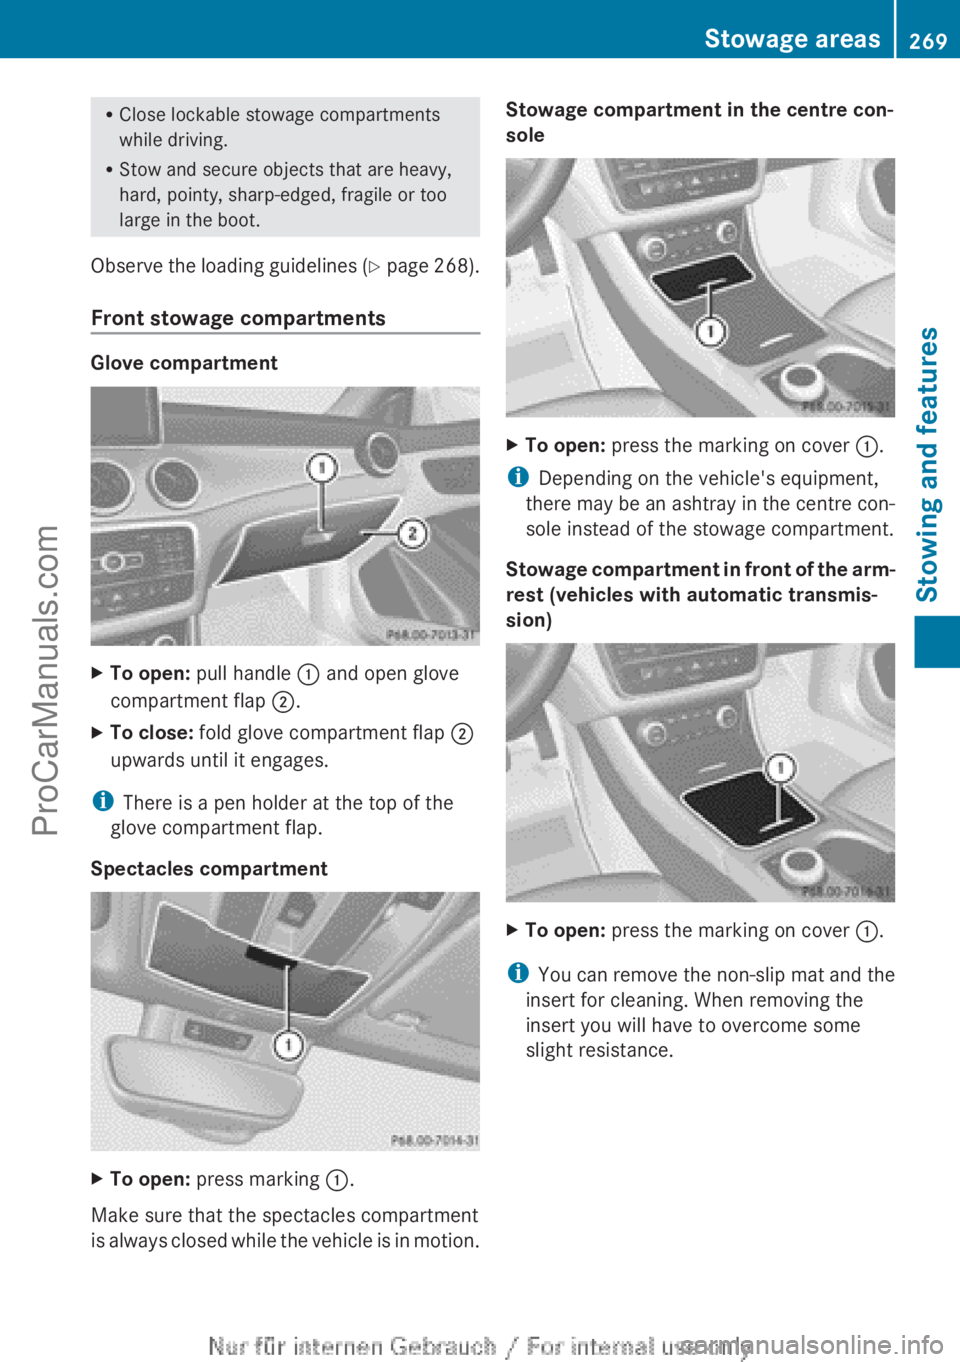
Glove compartment
XTo open: pull handle : and open glove
compartment flap ;.XTo close: fold glove compartment flap ;
upwards until it engages.
i There is a pen holder at the top of the
glove compartment flap.
Spectacles compartment
XTo open: press marking :.
Make sure that the spectacles compartment
is always closed while the vehicle is in motion.
Stowage compartment in the centre con-
soleXTo open: press the marking on cover :.
i
Depending on the vehicle's equipment,
there may be an ashtray in the centre con-
sole instead of the stowage compartment.
Stowage compartment in front of the arm-
rest (vehicles with automatic transmis-
sion)
XTo open: press the marking on cover :.
i
You can remove the non-slip mat and the
insert for cleaning. When removing the
insert you will have to overcome some
slight resistance.
Stowage areas269Stowing and featuresZProCarManuals.com
Page 274 of 352
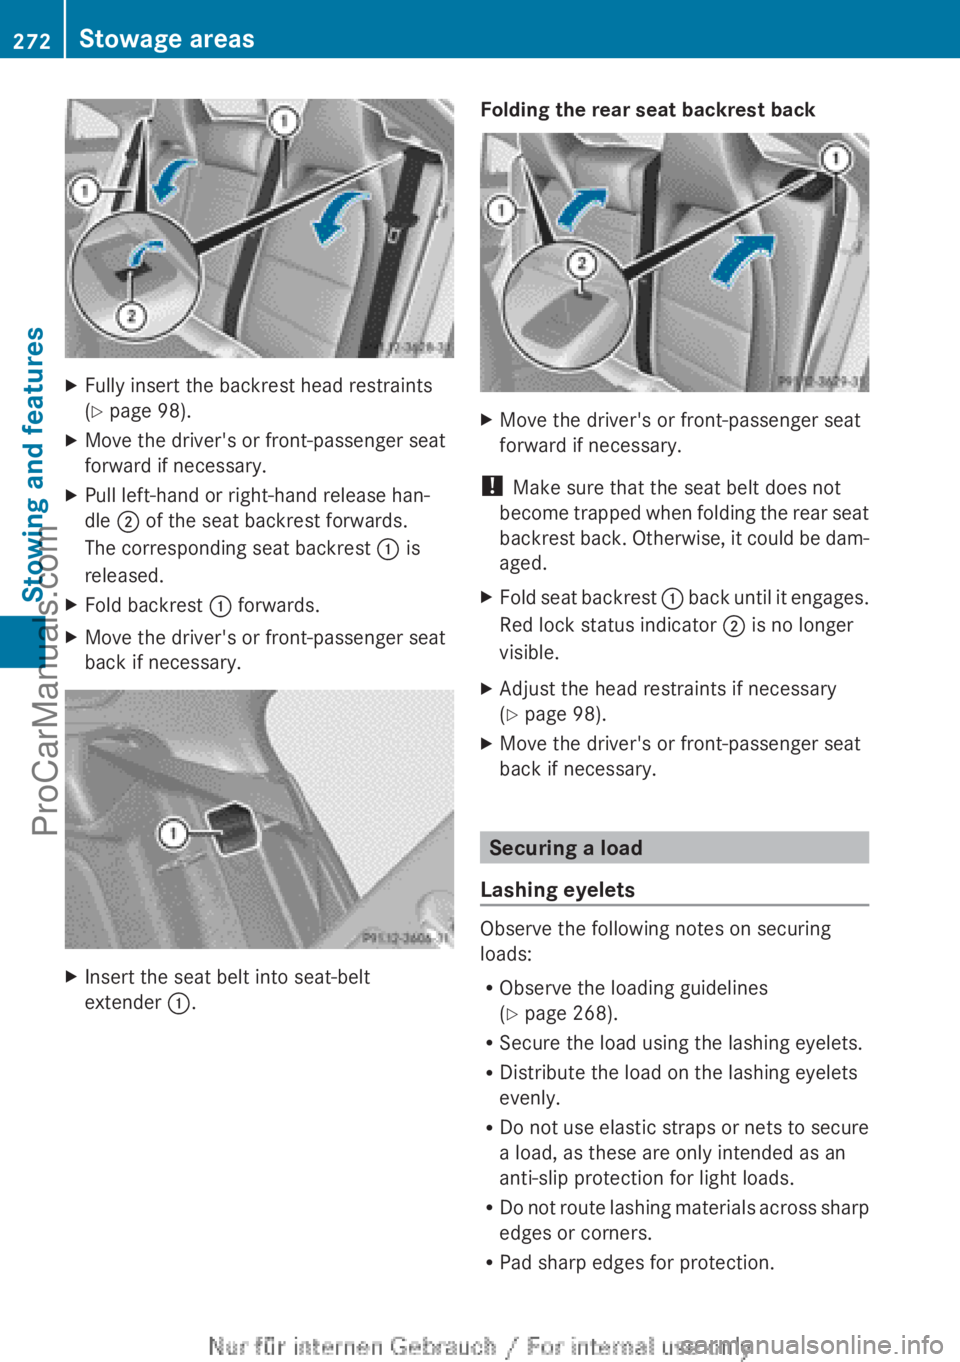
XFully insert the backrest head restraints
( Y page 98).XMove the driver's or front-passenger seat
forward if necessary.XPull left-hand or right-hand release han-
dle ; of the seat backrest forwards.
The corresponding seat backrest : is
released.XFold backrest : forwards.XMove the driver's or front-passenger seat
back if necessary.XInsert the seat belt into seat-belt
extender :.Folding the rear seat backrest backXMove the driver's or front-passenger seat
forward if necessary.
! Make sure that the seat belt does not
become trapped when folding the rear seat
backrest back. Otherwise, it could be dam-
aged.
XFold seat backrest : back until it engages.
Red lock status indicator ; is no longer
visible.XAdjust the head restraints if necessary
( Y page 98).XMove the driver's or front-passenger seat
back if necessary.
Securing a load
Lashing eyelets
Observe the following notes on securing
loads:
R Observe the loading guidelines
( Y page 268).
R Secure the load using the lashing eyelets.
R Distribute the load on the lashing eyelets
evenly.
R Do not use elastic straps or nets to secure
a load, as these are only intended as an
anti-slip protection for light loads.
R Do not route lashing materials across sharp
edges or corners.
R Pad sharp edges for protection.
272Stowage areasStowing and features
ProCarManuals.com
Page 277 of 352
The cup holder and the rubber mat under-
neath can be removed for cleaning. Clean
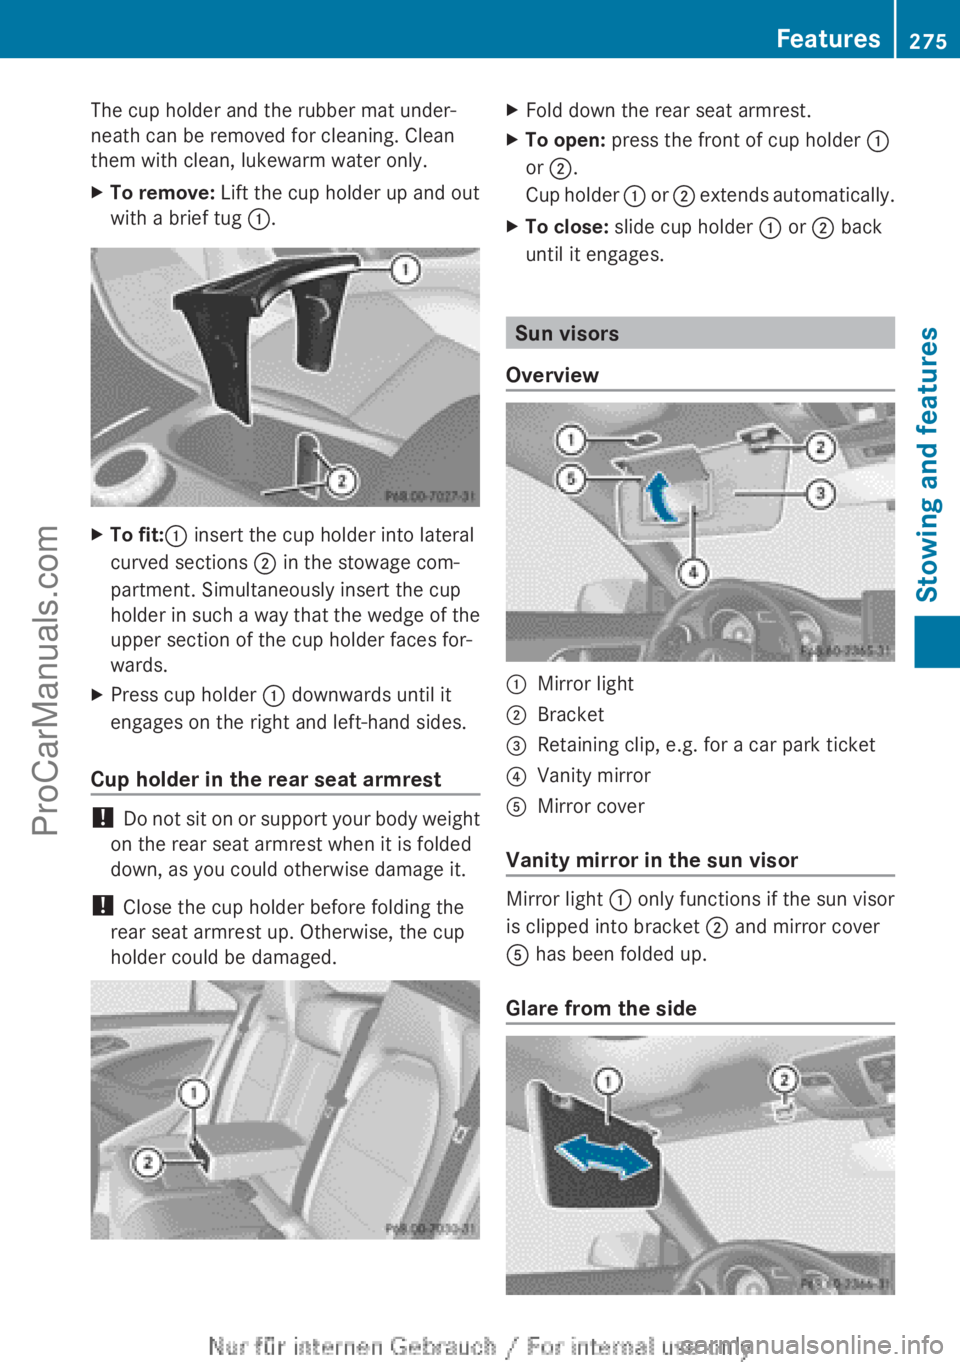
them with clean, lukewarm water only.XTo remove: Lift the cup holder up and out
with a brief tug :.XTo fit: : insert the cup holder into lateral
curved sections ; in the stowage com-
partment. Simultaneously insert the cup
holder in such a way that the wedge of the
upper section of the cup holder faces for-
wards.XPress cup holder : downwards until it
engages on the right and left-hand sides.
Cup holder in the rear seat armrest
! Do not sit on or support your body weight
on the rear seat armrest when it is folded
down, as you could otherwise damage it.
! Close the cup holder before folding the
rear seat armrest up. Otherwise, the cup
holder could be damaged.
XFold down the rear seat armrest.XTo open: press the front of cup holder :
or ; .
Cup holder : or ; extends automatically.XTo close: slide cup holder : or ; back
until it engages.
Sun visors
Overview
:Mirror light;Bracket=Retaining clip, e.g. for a car park ticket?Vanity mirrorAMirror cover
Vanity mirror in the sun visor
Mirror light : only functions if the sun visor
is clipped into bracket ; and mirror cover
A has been folded up.
Glare from the side
Features275Stowing and featuresZProCarManuals.com
Page 278 of 352
XFold down sun visor :.XPull sun visor : out of bracket ;.XSwing sun visor : to the side.XVehicles with mirror lights: slide sun
visor : horizontally as desired.
Ashtray
Front ashtray
! The stowage space under the ashtray is
not heat resistant. Before placing lit ciga-
rettes in the ashtray, make sure that the
ashtray is properly engaged. Otherwise, the
stowage space could be damaged.
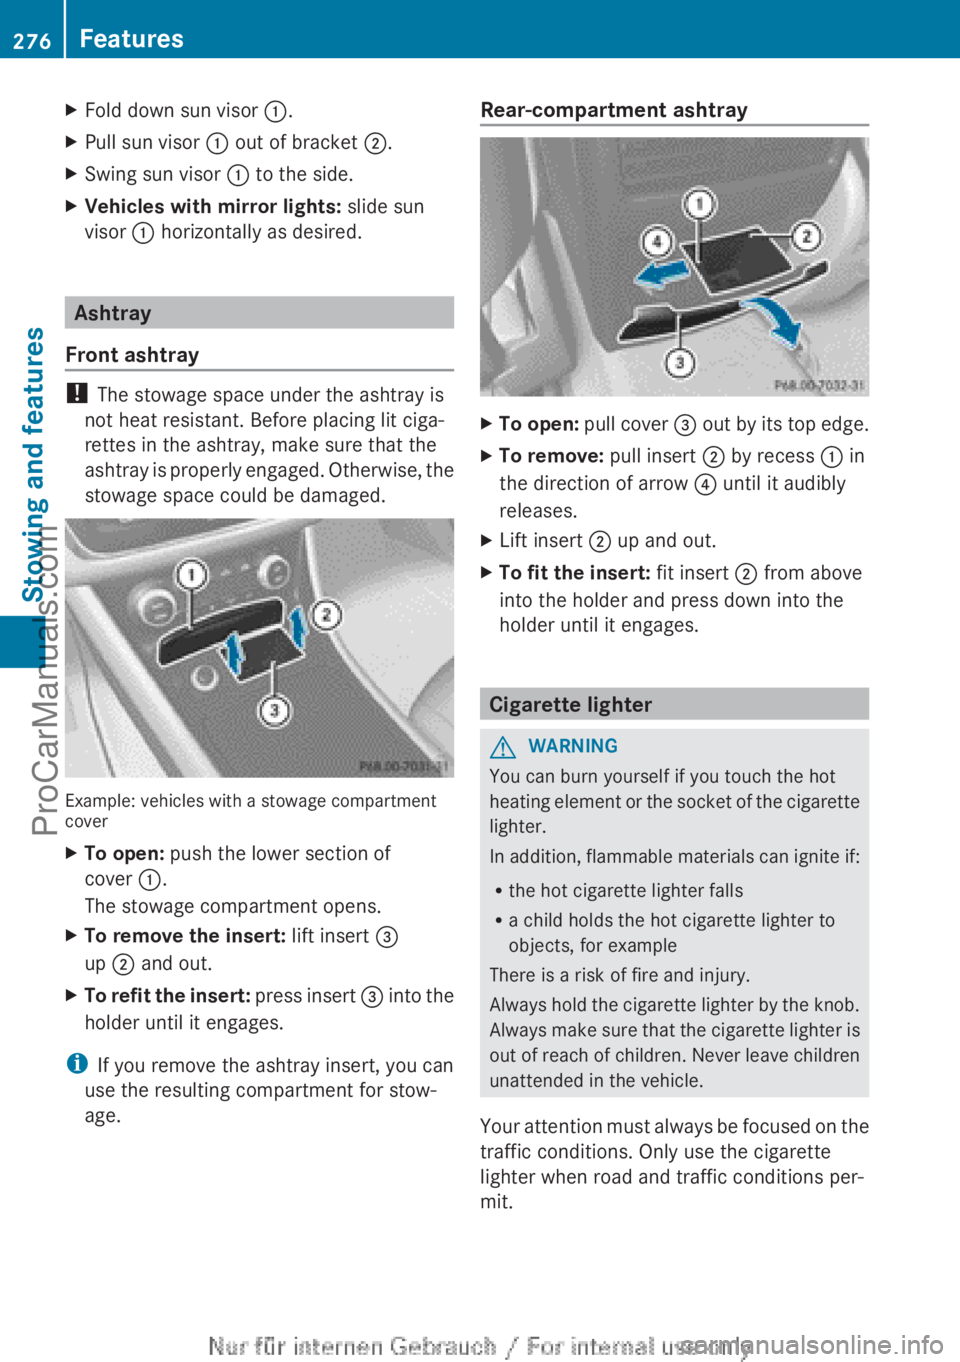
Example: vehicles with a stowage compartment
cover
XTo open: push the lower section of
cover :.
The stowage compartment opens.XTo remove the insert: lift insert =
up ; and out.XTo refit the insert: press insert = into the
holder until it engages.
i If you remove the ashtray insert, you can
use the resulting compartment for stow-
age.
Rear-compartment ashtrayXTo open: pull cover = out by its top edge.XTo remove: pull insert ; by recess : in
the direction of arrow ? until it audibly
releases.XLift insert ; up and out.XTo fit the insert: fit insert ; from above
into the holder and press down into the
holder until it engages.
Cigarette lighter
GWARNING
You can burn yourself if you touch the hot
heating element or the socket of the cigarette
lighter.
In addition, flammable materials can ignite if:
R the hot cigarette lighter falls
R a child holds the hot cigarette lighter to
objects, for example
There is a risk of fire and injury.
Always hold the cigarette lighter by the knob.
Always make sure that the cigarette lighter is
out of reach of children. Never leave children
unattended in the vehicle.
Your attention must always be focused on the
traffic conditions. Only use the cigarette
lighter when road and traffic conditions per-
mit.
276FeaturesStowing and features
ProCarManuals.com
Page 279 of 352
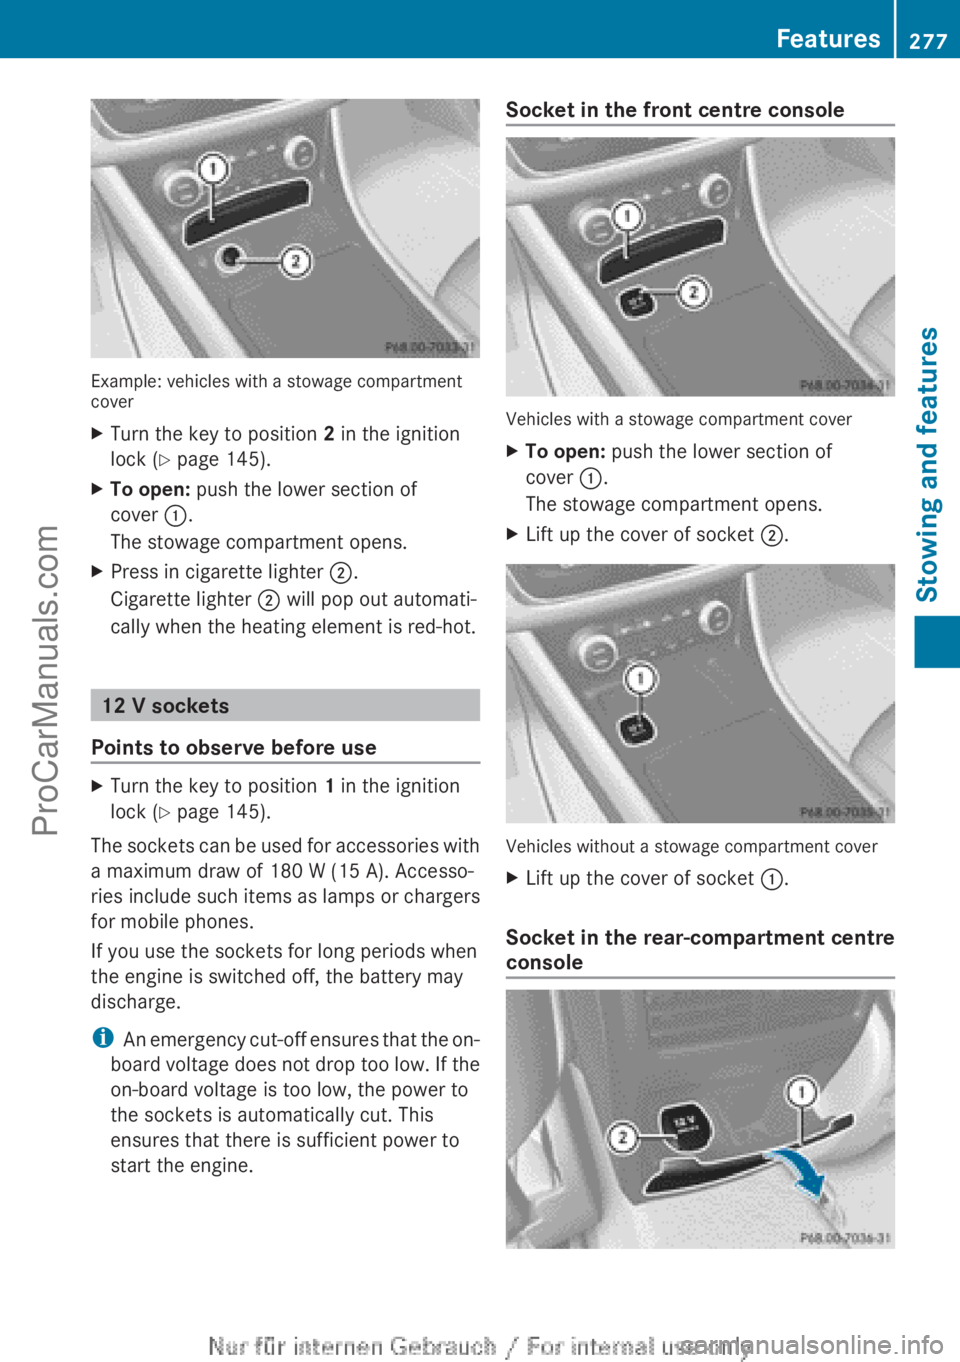
Example: vehicles with a stowage compartment
cover
XTurn the key to position 2 in the ignition
lock ( Y page 145).XTo open: push the lower section of
cover :.
The stowage compartment opens.XPress in cigarette lighter ;.
Cigarette lighter ; will pop out automati-
cally when the heating element is red-hot.
12 V sockets
Points to observe before use
XTurn the key to position 1 in the ignition
lock ( Y page 145).
The sockets can be used for accessories with
a maximum draw of 180 W (15 A). Accesso-
ries include such items as lamps or chargers
for mobile phones.
If you use the sockets for long periods when
the engine is switched off, the battery may
discharge.
i An emergency cut-off ensures that the on-
board voltage does not drop too low. If the
on-board voltage is too low, the power to
the sockets is automatically cut. This
ensures that there is sufficient power to
start the engine.
Socket in the front centre console
Vehicles with a stowage compartment cover
XTo open: push the lower section of
cover :.
The stowage compartment opens.XLift up the cover of socket ;.
Vehicles without a stowage compartment cover
XLift up the cover of socket :.
Socket in the rear-compartment centre
console
Features277Stowing and featuresZProCarManuals.com
Page 285 of 352
Raising the active bonnet increases the clear-
ance to hard components, such as the engine.
If the active bonnet has been triggered, it is
raised at the rear in the area around the hinge
by approximately 60 mm.
For the drive to the workshop, reset the trig-
gered active bonnet yourself. If the active
bonnet has been triggered, pedestrian pro-
tection may be limited.
ResettingGWARNING
Certain components in the engine compart-
ment could be very hot, e.g. the engine, the
radiator and parts of the exhaust system.
There is a risk of injury when accessing the
engine compartment.
As far as possible, allow the engine to cool
down and only touch the following compo-
nents.
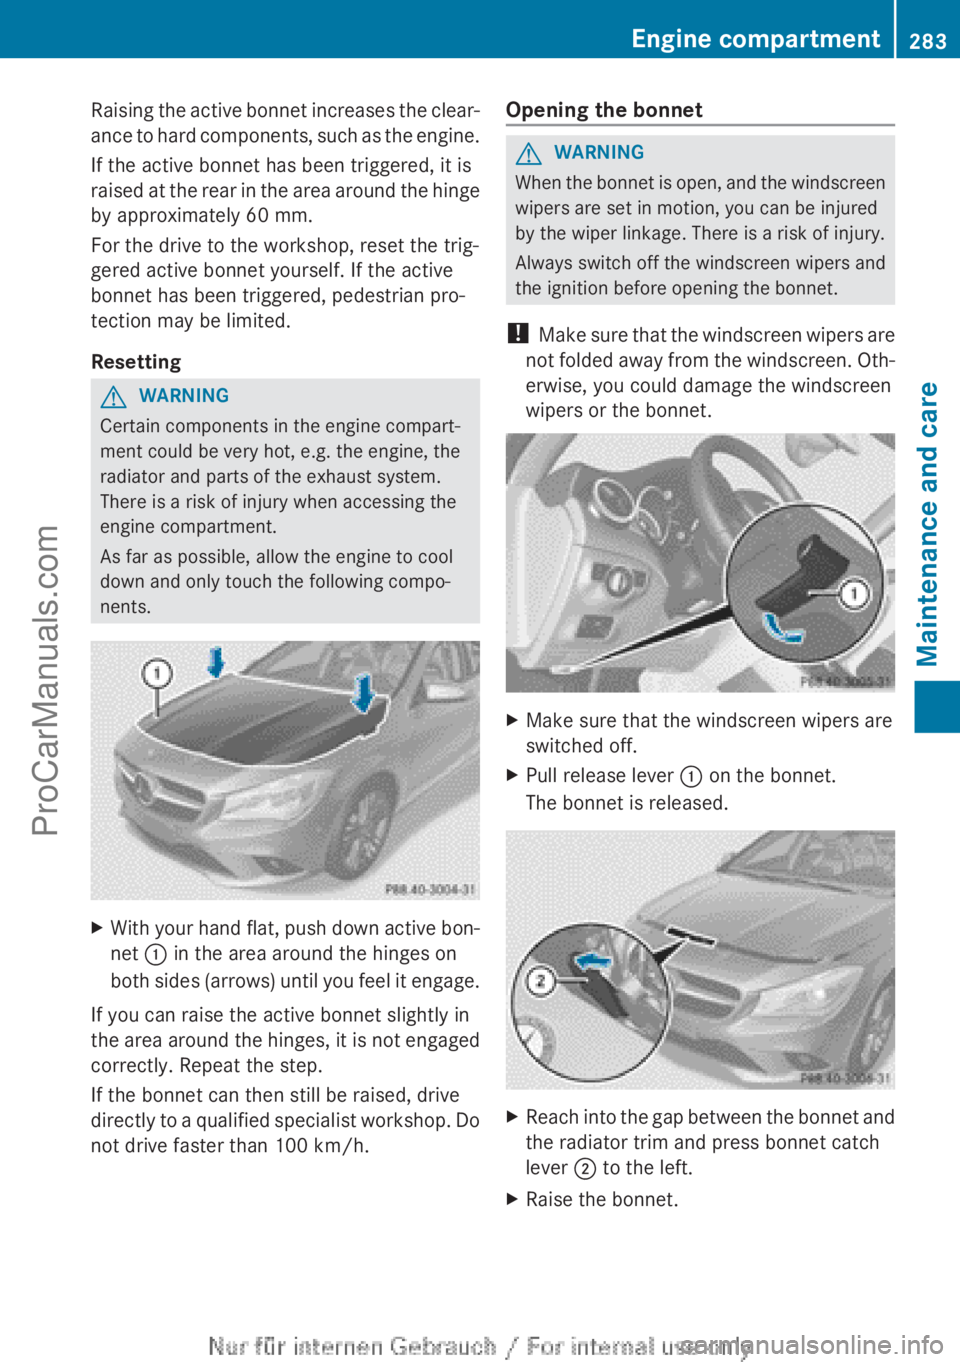
XWith your hand flat, push down active bon-
net : in the area around the hinges on
both sides (arrows) until you feel it engage.
If you can raise the active bonnet slightly in
the area around the hinges, it is not engaged
correctly. Repeat the step.
If the bonnet can then still be raised, drive
directly to a qualified specialist workshop. Do
not drive faster than 100 km/h.
Opening the bonnetGWARNING
When the bonnet is open, and the windscreen
wipers are set in motion, you can be injured
by the wiper linkage. There is a risk of injury.
Always switch off the windscreen wipers and
the ignition before opening the bonnet.
! Make sure that the windscreen wipers are
not folded away from the windscreen. Oth-
erwise, you could damage the windscreen
wipers or the bonnet.
XMake sure that the windscreen wipers are
switched off.XPull release lever : on the bonnet.
The bonnet is released.XReach into the gap between the bonnet and
the radiator trim and press bonnet catch
lever ; to the left.XRaise the bonnet.Engine compartment283Maintenance and careZProCarManuals.com
Page 286 of 352
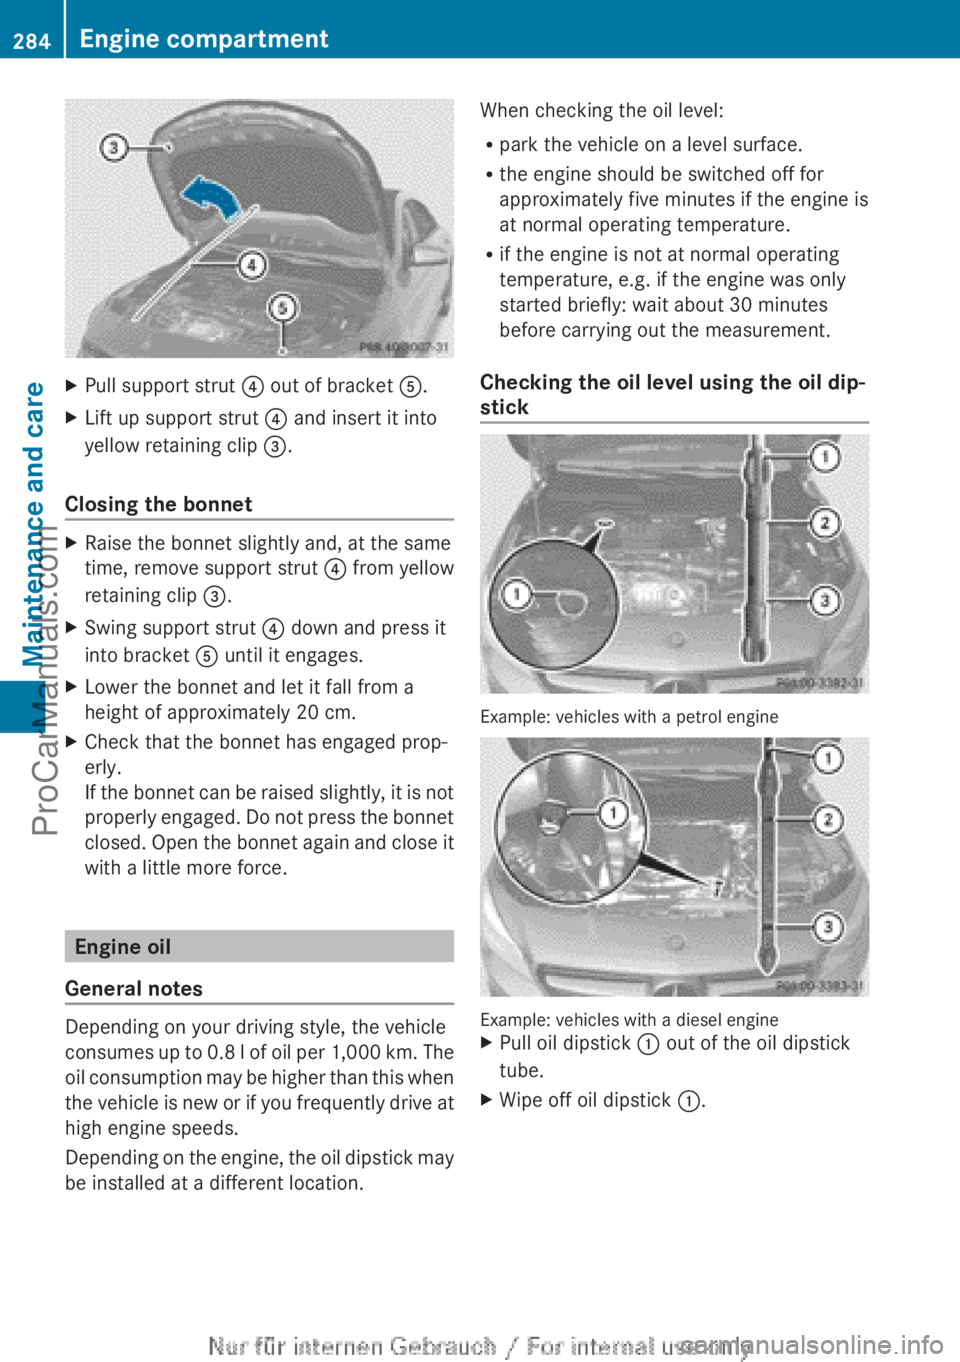
XPull support strut ? out of bracket A.XLift up support strut ? and insert it into
yellow retaining clip =.
Closing the bonnet
XRaise the bonnet slightly and, at the same
time, remove support strut ? from yellow
retaining clip =.XSwing support strut ? down and press it
into bracket A until it engages.XLower the bonnet and let it fall from a
height of approximately 20 cm.XCheck that the bonnet has engaged prop-
erly.
If the bonnet can be raised slightly, it is not
properly engaged. Do not press the bonnet
closed. Open the bonnet again and close it
with a little more force.
Engine oil
General notes
Depending on your driving style, the vehicle
consumes up to 0.8 l of oil per 1,000 km. The
oil consumption may be higher than this when
the vehicle is new or if you frequently drive at
high engine speeds.
Depending on the engine, the oil dipstick may
be installed at a different location.
When checking the oil level:
R park the vehicle on a level surface.
R the engine should be switched off for
approximately five minutes if the engine is
at normal operating temperature.
R if the engine is not at normal operating
temperature, e.g. if the engine was only
started briefly: wait about 30 minutes
before carrying out the measurement.
Checking the oil level using the oil dip-
stick
Example: vehicles with a petrol engine
Example: vehicles with a diesel engine
XPull oil dipstick : out of the oil dipstick
tube.XWipe off oil dipstick :.284Engine compartmentMaintenance and care
ProCarManuals.com