Page 268 of 611
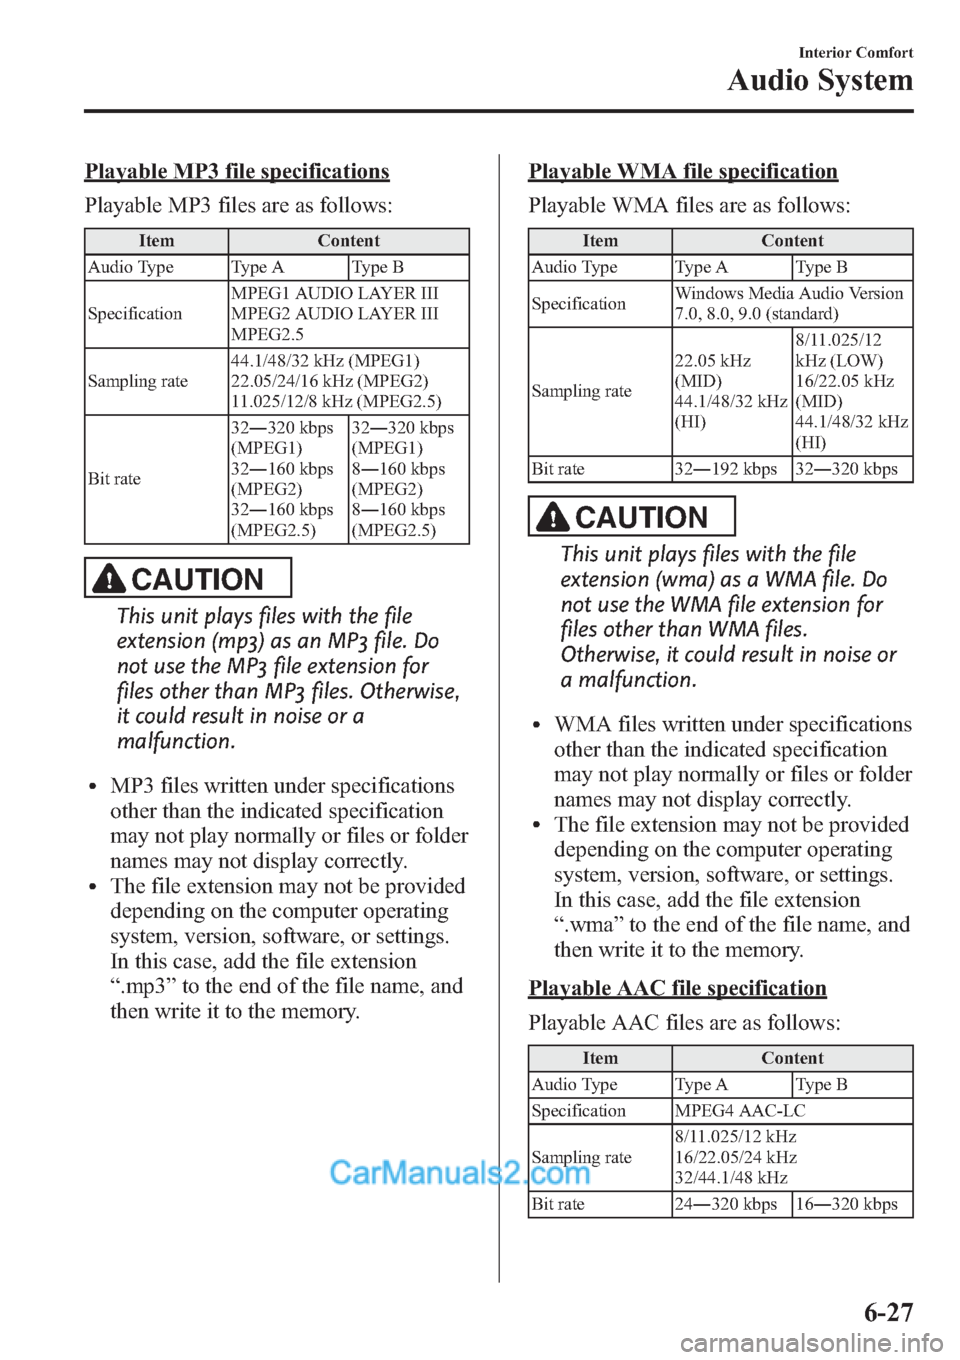
Playable MP3 file specifications
Playable MP3 files are as follows:
Item Content
Audio Type Type A Type B
SpecificationMPEG1 AUDIO LAYER III
MPEG2 AUDIO LAYER III
MPEG2.5
Sampling rate44.1/48/32 kHz (MPEG1)
22.05/24/16 kHz (MPEG2)
11.025/12/8 kHz (MPEG2.5)
Bit rate32―320 kbps
(MPEG1)
32―160 kbps
(MPEG2)
32―160 kbps
(MPEG2.5)32―320 kbps
(MPEG1)
8―160 kbps
(MPEG2)
8―160 kbps
(MPEG2.5)
CAUTION
This unit plays files with the file
extension (mp3) as an MP3 file. Do
not use the MP3 file extension for
files other than MP3 files. Otherwise,
it could result in noise or a
malfunction.
lMP3 files written under specifications
other than the indicated specification
may not play normally or files or folder
names may not display correctly.
lThe file extension may not be provided
depending on the computer operating
system, version, software, or settings.
In this case, add the file extension
“.mp3”to the end of the file name, and
then write it to the memory.
Playable WMA file specification
Playable WMA files are as follows:
Item Content
Audio Type Type A Type B
SpecificationWindows Media Audio Version
7.0, 8.0, 9.0 (standard)
Sampling rate22.05 kHz
(MID)
44.1/48/32 kHz
(HI)8/11.025/12
kHz (LOW)
16/22.05 kHz
(MID)
44.1/48/32 kHz
(HI)
Bit rate 32―192 kbps 32―320 kbps
CAUTION
This unit plays files with the file
extension (wma) as a WMA file. Do
not use the WMA file extension for
files other than WMA files.
Otherwise, it could result in noise or
a malfunction.
lWMA files written under specifications
other than the indicated specification
may not play normally or files or folder
names may not display correctly.
lThe file extension may not be provided
depending on the computer operating
system, version, software, or settings.
In this case, add the file extension
“.wma”to the end of the file name, and
then write it to the memory.
Playable AAC file specification
Playable AAC files are as follows:
Item Content
Audio Type Type A Type B
Specification MPEG4 AAC-LC
Sampling rate8/11.025/12 kHz
16/22.05/24 kHz
32/44.1/48 kHz
Bit rate 24―320 kbps 16―320 kbps
Interior Comfort
Audio System
6-27
Page 269 of 611
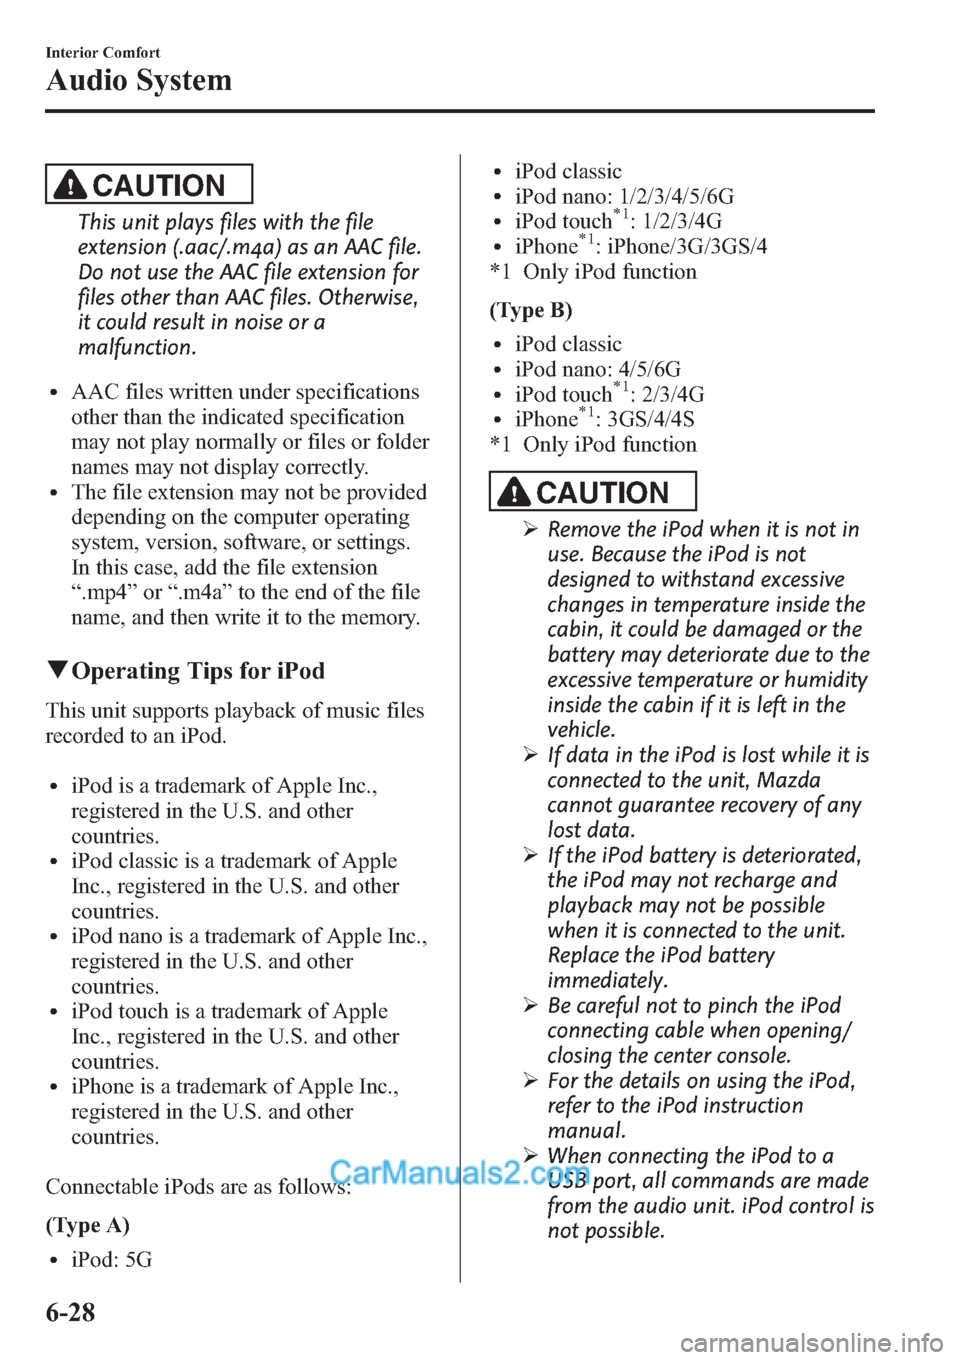
CAUTION
This unit plays files with the file
extension (.aac/.m4a) as an AAC file.
Do not use the AAC file extension for
files other than AAC files. Otherwise,
it could result in noise or a
malfunction.
lAAC files written under specifications
other than the indicated specification
may not play normally or files or folder
names may not display correctly.
lThe file extension may not be provided
depending on the computer operating
system, version, software, or settings.
In this case, add the file extension
“.mp4”or“.m4a”to the end of the file
name, and then write it to the memory.
qOperating Tips for iPod
This unit supports playback of music files
recorded to an iPod.
liPod is a trademark of Apple Inc.,
registered in the U.S. and other
countries.
liPod classic is a trademark of Apple
Inc., registered in the U.S. and other
countries.
liPod nano is a trademark of Apple Inc.,
registered in the U.S. and other
countries.
liPod touch is a trademark of Apple
Inc., registered in the U.S. and other
countries.
liPhone is a trademark of Apple Inc.,
registered in the U.S. and other
countries.
Connectable iPods are as follows:
(Type A)
liPod: 5G
liPod classicliPod nano: 1/2/3/4/5/6GliPod touch*1: 1/2/3/4GliPhone*1: iPhone/3G/3GS/4
*1 Only iPod function
(Type B)
liPod classicliPod nano: 4/5/6GliPod touch*1: 2/3/4GliPhone*1: 3GS/4/4S
*1 Only iPod function
CAUTION
ØRemove the iPod when it is not in
use. Because the iPod is not
designed to withstand excessive
changes in temperature inside the
cabin, it could be damaged or the
battery may deteriorate due to the
excessive temperature or humidity
inside the cabin if it is left in the
vehicle.
ØIf data in the iPod is lost while it is
connected to the unit, Mazda
cannot guarantee recovery of any
lost data.
ØIf the iPod battery is deteriorated,
the iPod may not recharge and
playback may not be possible
when it is connected to the unit.
Replace the iPod battery
immediately.
ØBe careful not to pinch the iPod
connecting cable when opening/
closing the center console.
ØFor the details on using the iPod,
refer to the iPod instruction
manual.
ØWhen connecting the iPod to a
USB port, all commands are made
from the audio unit. iPod control is
not possible.
6-28
Interior Comfort
Audio System
Page 270 of 611
NOTE
The audio unit cannot display the images or
videos stored in an iPod.
Interior Comfort
Audio System
6-29
Page 274 of 611
Audio Set (Type A)
Audio information is displayed on the information display.
CD Player In-Dash CD Changer
Power/Volume/Sound Controls .............................................................................. page 6-34
Operating the Radio ............................................................................................... page 6-38
Operating the Satellite Radio ................................................................................. page 6-40
Operating the Compact Disc (CD) Player .............................................................. page 6-52
Operating the In-Dash CD Changer ....................................................................... page 6-56
Operating the Auxiliary jack/USB port .................................................................. page 6-60
Error Indications ..................................................................................................... page 6-61
Interior Comfort
Audio System
6-33
Page 277 of 611
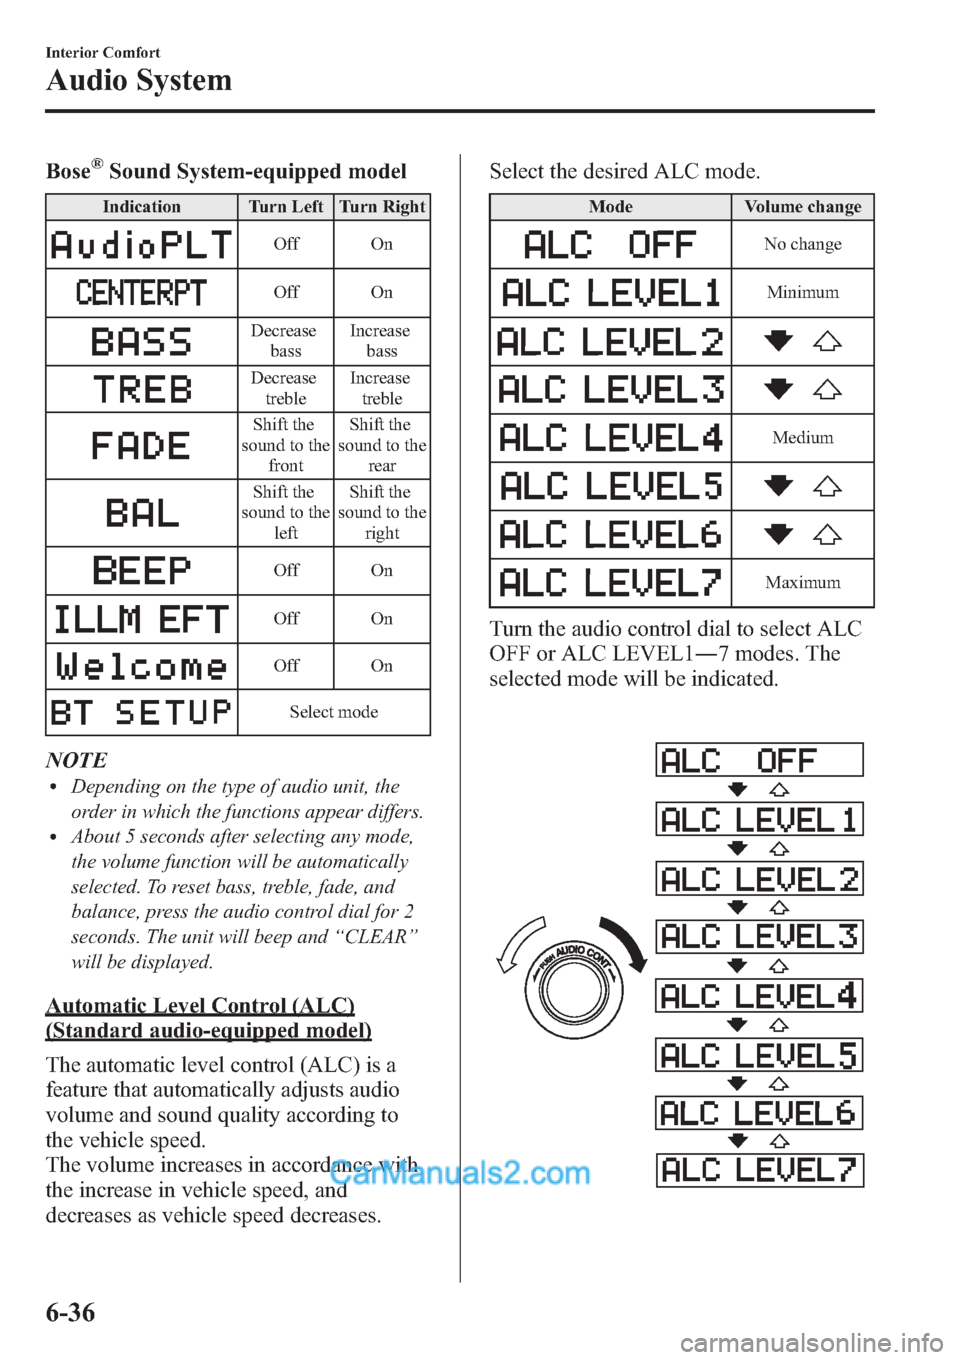
Bose®Sound System-equipped model
Indication Turn Left Turn Right
Off On
Off On
Decrease
bassIncrease
bass
Decrease
trebleIncrease
treble
Shift the
sound to the
frontShift the
sound to the
rear
Shift the
sound to the
leftShift the
sound to the
right
Off On
Off On
Off On
Select mode
NOTElDepending on the type of audio unit, the
order in which the functions appear differs.
lAbout 5 seconds after selecting any mode,
the volume function will be automatically
selected. To reset bass, treble, fade, and
balance, press the audio control dial for 2
seconds. The unit will beep and“CLEAR”
will be displayed.
Automatic Level Control (ALC)
(Standard audio-equipped model)
The automatic level control (ALC) is a
feature that automatically adjusts audio
volume and sound quality according to
the vehicle speed.
The volume increases in accordance with
the increase in vehicle speed, and
decreases as vehicle speed decreases.Select the desired ALC mode.
Mode Volume change
No change
Minimum
Medium
Maximum
Turn the audio control dial to select ALC
OFF or ALC LEVEL1―7 modes. The
selected mode will be indicated.
6-36
Interior Comfort
Audio System
Page 279 of 611
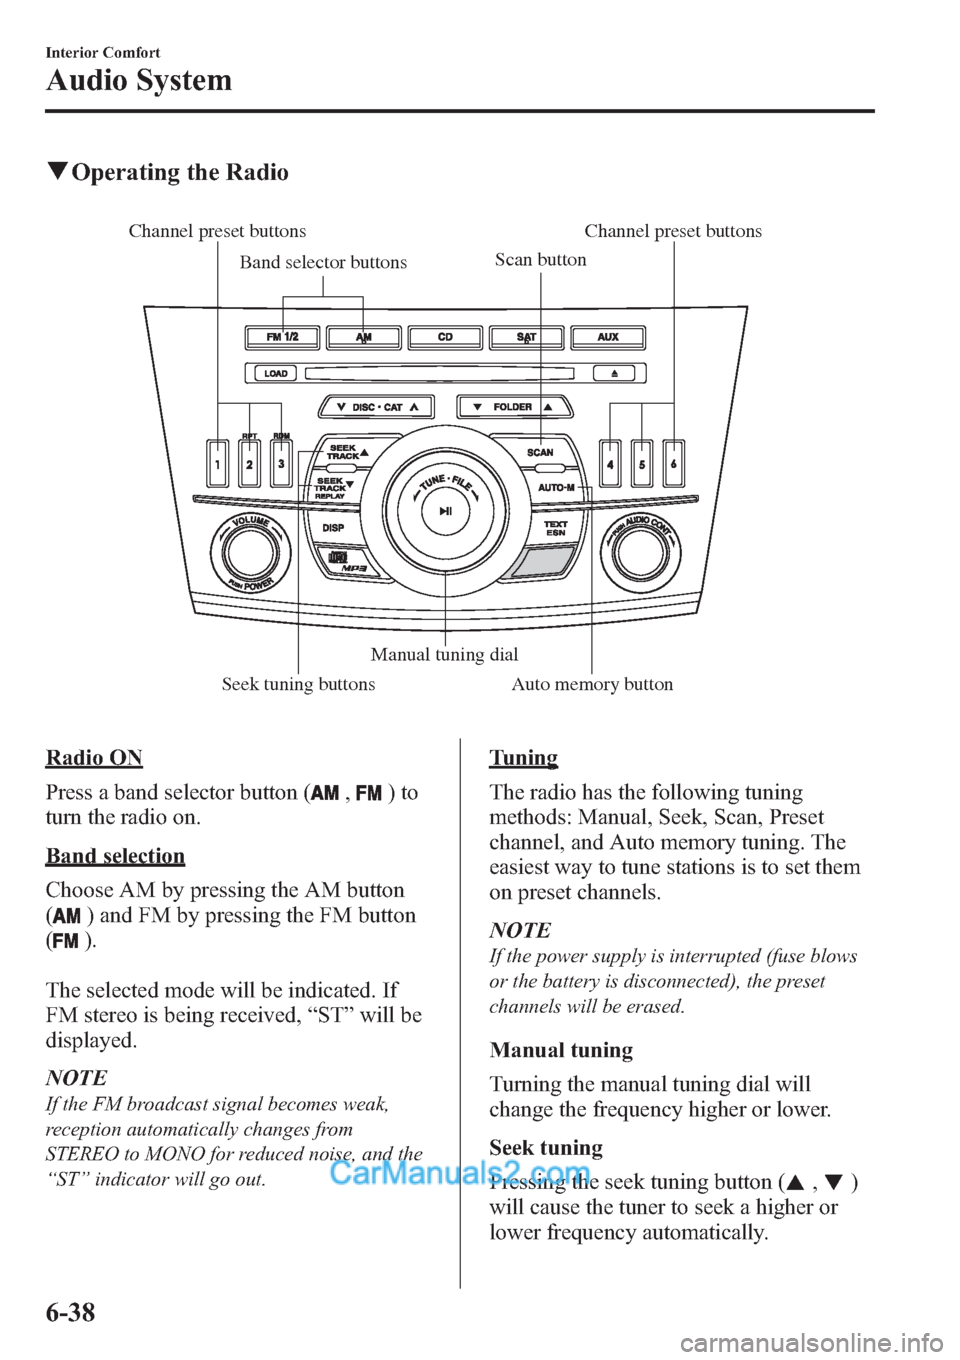
qOperating the Radio
Channel preset buttons
Seek tuning buttonsManual tuning dial Band selector buttonsScan buttonChannel preset buttons
Auto memory button
Radio ON
Press a band selector button (
,)to
turn the radio on.
Band selection
Choose AM by pressing the AM button
(
) and FM by pressing the FM button
(
).
The selected mode will be indicated. If
FM stereo is being received,“ST”will be
displayed.
NOTE
If the FM broadcast signal becomes weak,
reception automatically changes from
STEREO to MONO for reduced noise, and the
“ST”indicator will go out.
Tuning
The radio has the following tuning
methods: Manual, Seek, Scan, Preset
channel, and Auto memory tuning. The
easiest way to tune stations is to set them
on preset channels.
NOTE
If the power supply is interrupted (fuse blows
or the battery is disconnected), the preset
channels will be erased.
Manual tuning
Turning the manual tuning dial will
change the frequency higher or lower.
Seek tuning
Pressing the seek tuning button (
,)
will cause the tuner to seek a higher or
lower frequency automatically.
6-38
Interior Comfort
Audio System
Page 280 of 611
NOTE
If you continue to press and hold the button,
the frequency will continue changing without
stopping.
Scan tuning
Press the scan button (
)to
automatically sample strong stations.
Scanning stops at each station for about 5
seconds. To hold a station, press the scan
button (
) again during this interval.
Preset channel tuning
The 6 preset channels can be used to store
6 AM and 12 FM stations.
1. To set a channel first select AM, FM1,
or FM2. Tune to the desired station.
2. Depress a channel preset button for
about 2 seconds until a beep sound is
heard. The preset channel number and
station frequency will be displayed.
The station is now held in the memory.
3. Repeat this operation for the other
stations and bands you want to store.
To tune one in the memory, select AM,
FM1, or FM2 and then press its
channel preset button. The station
frequency and the channel number will
be displayed.
NOTE
If the power supply is interrupted (fuse blows
or the battery is disconnected), the preset
channels will be erased.
Auto memory tuning
This is especially useful when driving in
an area where the local stations are not
known. Additional AM/FM stations can
be stored without disturbing the
previously set channels.Press and hold the auto memory button
(
) for about 2 seconds until a beep
sound is heard; the system will
automatically scan and temporarily store
up to 6 stations with the strongest
frequencies in each selected band in that
area.
After scanning is completed, the station
with the strongest frequency will be tuned
and its frequency displayed.
Press and release the auto memory button
(
) to recall stations from the auto-
stored stations. One stored station will be
selected each time; its frequency and
channel number will be displayed.
NOTE
If no stations can be tuned after scanning
operations,“A”will be displayed.
Interior Comfort
Audio System
6-39
Page 281 of 611
qOperating the Satellite Radioí
Channel preset buttons Seek tuning
buttons
Manual tuning dialCategory
button Band selector buttons
Scan button
Channel preset buttons Text/Electronic Serial number buttonSatellite button
Instant replay button Display button
Information display
All operations of the satellite radio are displayed on the Information display.
Channel number, Channel name, Category name, Artist name, Song title,
ID code, Preset channel number, Bank number, Error signs
6-40
Interior Comfort
íSome models.
Audio System