Page 349 of 410
349
2. SETUP
7
TELEPHONE
CT200h_Navi_OM76113E_(EE)
13.12.06 15:16
1Display the “Telephone settings”
screen. (P.347)
2Select “Messaging settings”.
3Select the desired item to be set.
“Messaging settings” SCREENNo.Function
Select to set automatic message
transfer on/off.
Select to set automatic message
readout on/off.
Select to set the SMS/MMS notifi-
cation popup on/off.
Select to set the e-mail notification
popup on/off.
Select to set adding the vehicle
signature to outgoing messages
on/off.
Select to set updating message
read status on telephone on/off.
Select to change the incoming
SMS/MMS display.
“Full screen”: When an SMS/
MMS message is received, the in-
coming SMS/MMS display screen
is displayed and can be operated
on the screen.
“Drop down”: When an SMS/
MMS message is received, a mes-
sage is displayed on the upper side
of the screen.
Page 350 of 410
350
2. SETUP
CT200h_Navi_OM76113E_(EE)
13.12.06 15:16
DISPLAYING THE “Messaging
settings” SCREEN IN A DIFFER-
ENT WAY
1Display the telephone top screen.
(P.328)
2Select “Messages”.
3Select “Options”.
Select to change the incoming e-
mail display.
“Full screen”: When an e-mail is
received, the incoming e-mail dis-
play screen is the displayed and
can be operated on the screen.
“Drop down”: When an e-mail is
received, a message is displayed
on the upper side of the screen.
Select to set display of messaging
account names on the inbox tab
on/off.
When set to on, messaging ac-
count names used on the cellular
phone will be displayed.
Select to reset all setup items.
INFORMATION
Depending on the telephone, these
functions may not be available.
No.Function
Page 351 of 410

351
2. SETUP
7
TELEPHONE
CT200h_Navi_OM76113E_(EE)
13.12.06 15:16
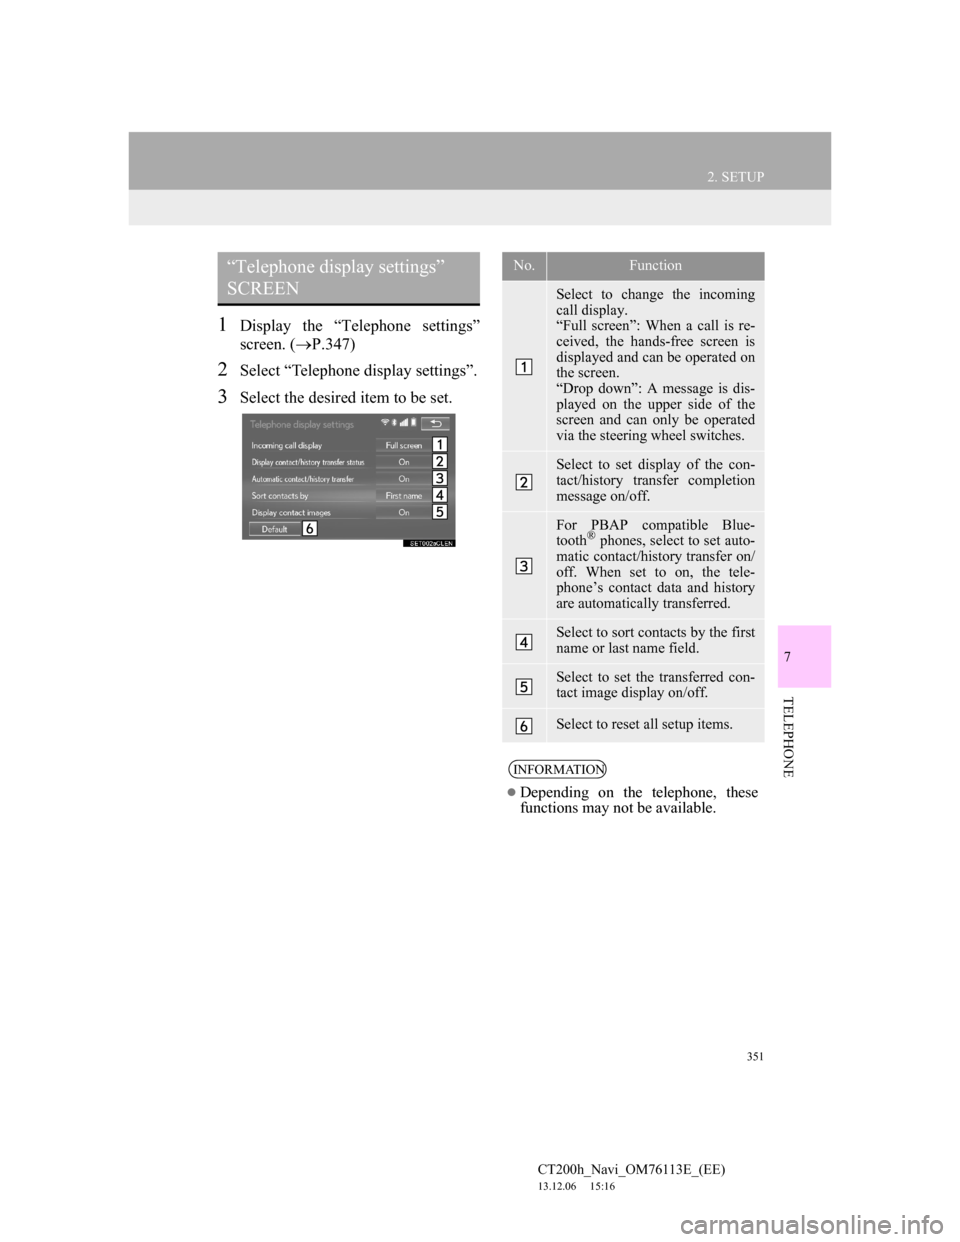
1Display the “Telephone settings”
screen. (P.347)
2Select “Telephone display settings”.
3Select the desired item to be set.
“Telephone display settings”
SCREENNo.Function
Select to change the incoming
call display.
“Full screen”: When a call is re-
ceived, the hands-free screen is
displayed and can be operated on
the screen.
“Drop down”: A message is dis-
played on the upper side of the
screen and can only be operated
via the steering wheel switches.
Select to set display of the con-
tact/history transfer completion
message on/off.
For PBAP compatible Blue-
tooth® phones, select to set auto-
matic contact/history transfer on/
off. When set to on, the tele-
phone’s contact data and history
are automatically transferred.
Select to sort contacts by the first
name or last name field.
Select to set the transferred con-
tact image display on/off.
Select to reset all setup items.
INFORMATION
Depending on the telephone, these
functions may not be available.
Page 352 of 410
352
2. SETUP
CT200h_Navi_OM76113E_(EE)
13.12.06 15:16
1Display the “Telephone settings”
screen. (P.347)
2Select “Lexus Euro assistance 24
settings”.
3Select the country.
4Check that a confirmation screen is
displayed when the operation is
complete.
DISPLAYING THE “Lexus Euro
assistance 24 settings” SCREEN IN
A DIFFERENT WAY
1Display the telephone top screen.
(P.328)
2Select “Favourites”.
3Select “Options”.
4Select “Lexus Euro assistance 24
setting”.
1Display the telephone top screen.
(P.328)
2Select “Favourites”.
3Select “Lexus Euro assistance 24”.
If a country has not been registered
4Select a country.
5Select “Yes” when the confirmation
screen appears.
“Lexus Euro assistance 24
settings” SCREEN
REGISTERING A COUNTRY
REGISTERING A COUNTRY
IN A DIFFERENT WAY
Page 355 of 410
355
2. SETUP
7
TELEPHONE
CT200h_Navi_OM76113E_(EE)
13.12.06 15:16
1Display the “Contacts” screen.
(P.354)
2Select “Manage contacts”.
3Select the desired item to be set.
*: For PBAP compatible Bluetooth
®
phones, this function is available
when “Automatic contact/history
transfer” is set to off. (P.351)
DISPLAYING THE “Contacts”
SCREEN IN A DIFFERENT WAY
1Display the telephone top screen.
(P.328)
2Select “Contacts”.
3Select “Options”.
4Select “Manage contacts”.
“Contacts” SCREEN
No.FunctionPage
Select to transfer con-
tacts from the connected
telephone.356
*
Select to add new con-
tacts to the contact list.358
*
Select to edit contacts in
the contact list.359
*
Select to delete contacts
from the contact list.361
Page 356 of 410

356
2. SETUP
CT200h_Navi_OM76113E_(EE)
13.12.06 15:16
FOR PBAP COMPATIBLE
Bluetooth
® PHONES
1Select “Transfer contacts”.
Contacts are transferred automatically.
2Check that a confirmation screen is
displayed when the operation is
complete.
This operation may be unnecessary
depending on the type of cellular
phone.
Depending on the type of cellular
phone, OBEX authentication may be
required when transferring contact data.
Enter “1234” into the Bluetooth
®
phone.
If another Bluetooth
® device is con-
nected when transferring contact data,
depending on the telephone, the con-
nected Bluetooth
® device may need to
be disconnected.
Depending on the type of Bluetooth
®
phone being connected, it may be nec-
essary to perform additional steps on
the phone.
TRANSFER CONTACTS
FROM TELEPHONE
Operation methods differ between
PBAP compatible and PBAP incom-
patible but OPP compatible
Bluetooth
® phones.
If your cellular phone is neither
PBAP nor OPP compatible, the con-
tacts cannot be transferred.
Page 357 of 410
357
2. SETUP
7
TELEPHONE
CT200h_Navi_OM76113E_(EE)
13.12.06 15:16
FOR PBAP INCOMPATIBLE
BUT OPP COMPATIBLE Blue-
tooth
® PHONES
1Select “Transfer contacts”.
2Select “Replace contacts” or “Add
contact”.
“Replace contacts”: Select to transfer
the contact from the connected cellular
phone and replace the current one.
“Add contact”: Select to transfer the de-
sired contact data from the connected
cellular phone to add to the current one.
3Transfer the contact data to the sys-
tem using a Bluetooth
® phone.
This operation may be unnecessary
depending on the type of cellular
phone.
Depending on the type of cellular
phone, OBEX authentication may be
required when transferring contact data.
Enter “1234” into the Bluetooth
®
phone.
To cancel this function, select “Can-
cel”.
4Select “Done” when it appears on
the screen.
5Check that a confirmation screen is
displayed when the operation is
complete.
This operation cannot be performed
while driving.
Page 358 of 410
358
2. SETUP
CT200h_Navi_OM76113E_(EE)
13.12.06 15:16
UPDATING THE CONTACTS IN
A DIFFERENT WAY (FROM
THE “Call history” SCREEN)
1Display the telephone top screen.
(P.328)
2Select “Call history” and select a
contact not yet registered in the con-
tact list.
3Select “Update contact”.
4Select the desired contact.
5Select a telephone type for the tele-
phone number.
1Select “New contact”.
2Enter the name and select “OK”.
3Enter the telephone number and se-
lect “OK”.
For PBAP compatible Bluetooth®
phones, this function is available
when “Automatic contact/history
transfer” is set to off. (P.351)
REGISTERING A NEW
CONTACT TO THE
CONTACT LIST
New contact data can be registered.
Up to 4 numbers per person can be
registered. For PBAP compatible
Bluetooth
® phones, this function is
available when “Automatic contact/
history transfer” is set to off.
P.351)