Page 249 of 410
249
3. MEDIA OPERATION
4
AUDIO/VISUAL SYSTEM
CT200h_Navi_OM76113E_(EE)
13.12.06 15:16
1Select “Options”.
2Select the desired settings to change.
VTR OPTIONS
No
.FunctionPage
Select to change the
screen size.200
Select to display the im-
age quality adjustment
screen.
200
Page 255 of 410

255
5. SETUP
4
AUDIO/VISUAL SYSTEM
CT200h_Navi_OM76113E_(EE)
13.12.06 15:16
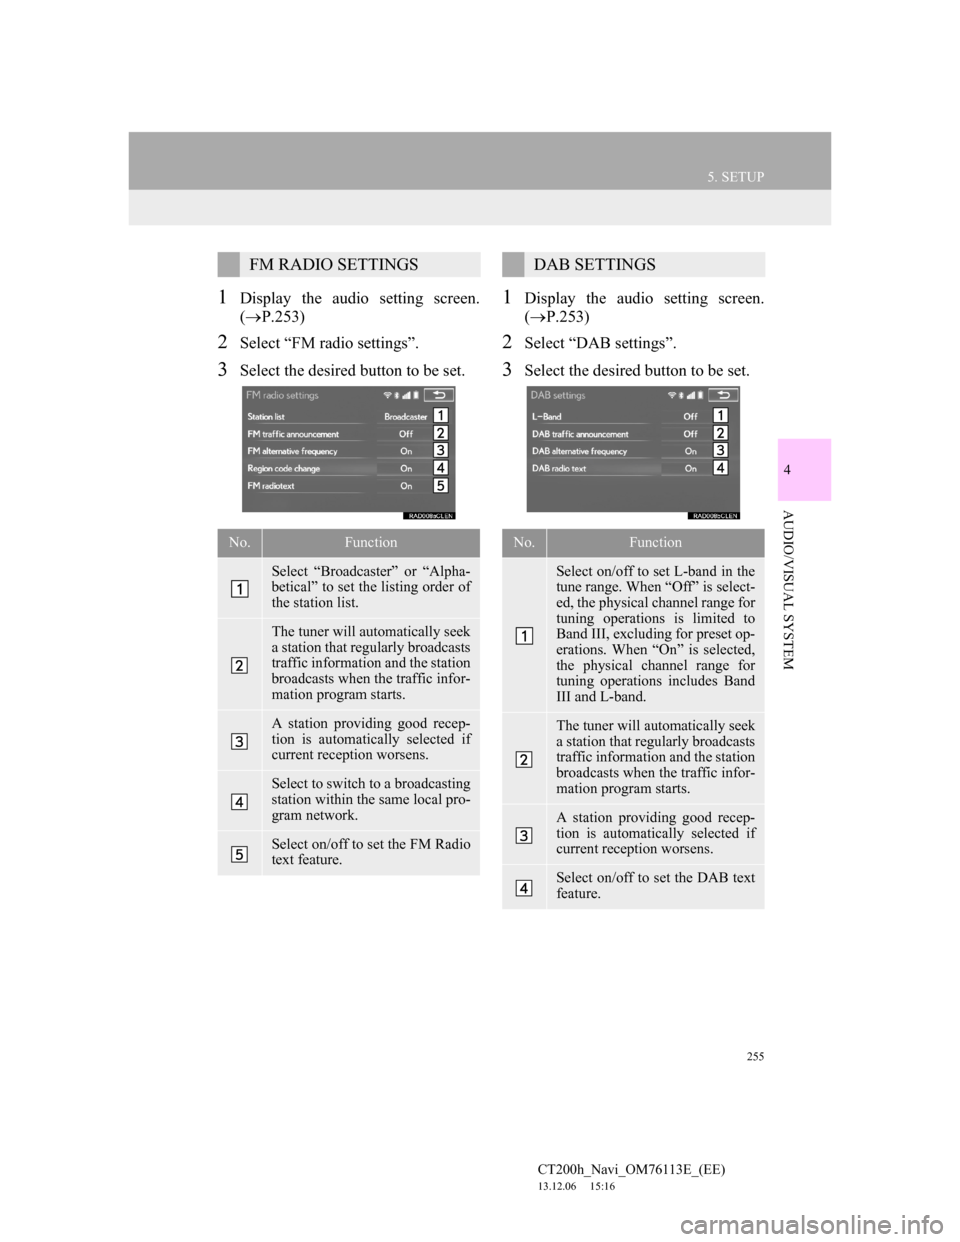
1Display the audio setting screen.
(P.253)
2Select “FM radio settings”.
3Select the desired button to be set.
1Display the audio setting screen.
(P.253)
2Select “DAB settings”.
3Select the desired button to be set.
FM RADIO SETTINGS
No.Function
Select “Broadcaster” or “Alpha-
betical” to set the listing order of
the station list.
The tuner will automatically seek
a station that regularly broadcasts
traffic information and the station
broadcasts when the traffic infor-
mation program starts.
A station providing good recep-
tion is automatically selected if
current reception worsens.
Select to switch to a broadcasting
station within the same local pro-
gram network.
Select on/off to set the FM Radio
text feature.
DAB SETTINGS
No.Function
Select on/off to set L-band in the
tune range. When “Off” is select-
ed, the physical channel range for
tuning operations is limited to
Band III, excluding for preset op-
erations. When “On” is selected,
the physical channel range for
tuning operations includes Band
III and L-band.
The tuner will automatically seek
a station that regularly broadcasts
traffic information and the station
broadcasts when the traffic infor-
mation program starts.
A station providing good recep-
tion is automatically selected if
current reception worsens.
Select on/off to set the DAB text
feature.
Page 256 of 410
256
5. SETUP
CT200h_Navi_OM76113E_(EE)
13.12.06 15:16
1Display the audio setting screen.
(P.253)
2Select “iPod settings”.
3Select “Video sound input”.
4Select a screen button for the desired
setting.
1Display the audio setting screen.
(P.253)
2Select “External video settings”.
3Select “Video signal switch”.
4Select a screen button for the desired
setting.
iPod SETTINGSEXTERNAL VIDEO
SETTINGS
Page 257 of 410
257
5. SETUP
4
AUDIO/VISUAL SYSTEM
CT200h_Navi_OM76113E_(EE)
13.12.06 15:16
1Display the audio setting screen.
(P.253)
2Select “Cover art settings”.
3Select the desired button to be set.
1Display the audio setting screen.
(P.253)
2Select “DVD settings”.
Selecting “DVD settings” on the DVD
top screen can also display “DVD set-
tings” screen. (P.215)
3Select the items to be set.
When “Default” is selected, all menus
are initialized.
COVER ART SETTINGS
No.Function
Select on/off to set the cover art
display in DISC mode.
Select on/off to set the cover art
display in USB mode.
Select on/off to set the priority of
the Gracenote database in USB
mode.
Select on/off to set the cover art
display in iPod mode.
Select on/off to set the priority of
the Gracenote database in iPod
mode.
INFORMATION
Images from the Gracenote database
displayed on the screen may be differ-
ent from the actual cover art.
DVD SETTINGS
Page 272 of 410

272
6. TIPS FOR OPERATING THE AUDIO/VISUAL SYSTEM
CT200h_Navi_OM76113E_(EE)
13.12.06 15:16
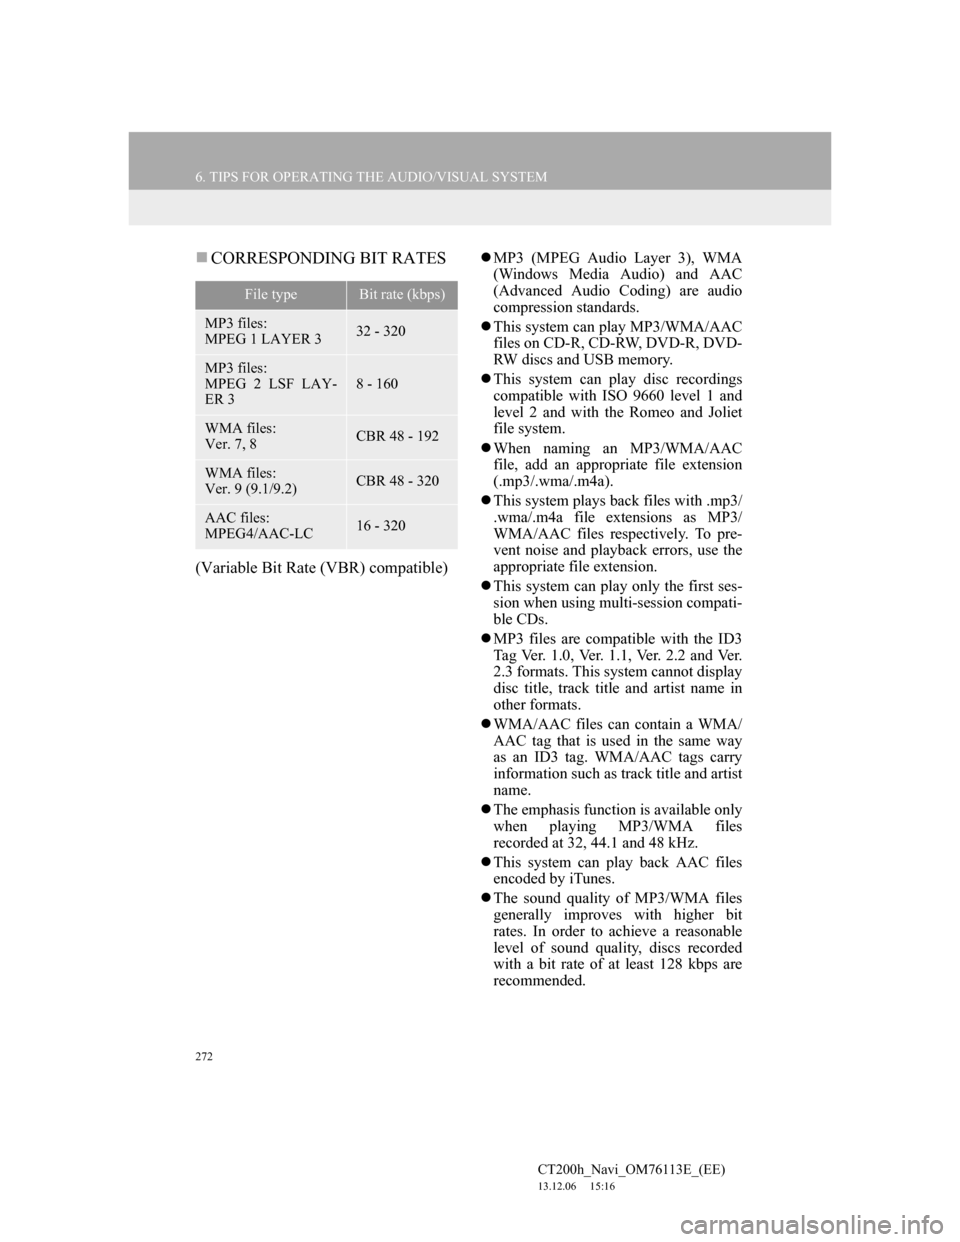
CORRESPONDING BIT RATES
(Variable Bit Rate (VBR) compatible)
MP3 (MPEG Audio Layer 3), WMA
(Windows Media Audio) and AAC
(Advanced Audio Coding) are audio
compression standards.
This system can play MP3/WMA/AAC
files on CD-R, CD-RW, DVD-R, DVD-
RW discs and USB memory.
This system can play disc recordings
compatible with ISO 9660 level 1 and
level 2 and with the Romeo and Joliet
file system.
When naming an MP3/WMA/AAC
file, add an appropriate file extension
(.mp3/.wma/.m4a).
This system plays back files with .mp3/
.wma/.m4a file extensions as MP3/
WMA/AAC files respectively. To pre-
vent noise and playback errors, use the
appropriate file extension.
This system can play only the first ses-
sion when using multi-session compati-
ble CDs.
MP3 files are compatible with the ID3
Tag Ver. 1.0, Ver. 1.1, Ver. 2.2 and Ver.
2.3 formats. This system cannot display
disc title, track title and artist name in
other formats.
WMA/AAC files can contain a WMA/
AAC tag that is used in the same way
as an ID3 tag. WMA/AAC tags carry
information such as track title and artist
name.
The emphasis function is available only
when playing MP3/WMA files
recorded at 32, 44.1 and 48 kHz.
This system can play back AAC files
encoded by iTunes.
The sound quality of MP3/WMA files
generally improves with higher bit
rates. In order to achieve a reasonable
level of sound quality, discs recorded
with a bit rate of at least 128 kbps are
recommended.
File typeBit rate (kbps)
MP3 files:
MPEG 1 LAYER 332 - 320
MP3 files:
MPEG 2 LSF LAY-
ER 3
8 - 160
WMA files:
Ver. 7, 8CBR 48 - 192
WMA files:
Ver. 9 (9.1/9.2)CBR 48 - 320
AAC files:
MPEG4/AAC-LC16 - 320
Page 273 of 410

273
6. TIPS FOR OPERATING THE AUDIO/VISUAL SYSTEM
4
AUDIO/VISUAL SYSTEM
CT200h_Navi_OM76113E_(EE)
13.12.06 15:16
M3u playlists are not compatible with
the audio player.
MP3i (MP3 interactive) and MP3PRO
formats are not compatible with the
audio player.
The player is compatible with VBR
(Variable Bit Rate).
When playing back files recorded as
VBR (Variable Bit Rate) files, the play
time will not be correctly displayed if
the fast forward or reverse operations
are used.
It is not possible to check folders that
do not include MP3/WMA/AAC files.
MP3/WMA/AAC files in folders up to
8 levels deep can be played. However,
the start of playback may be delayed
when using discs containing numerous
levels of folders. For this reason, we
recommend creating discs with no
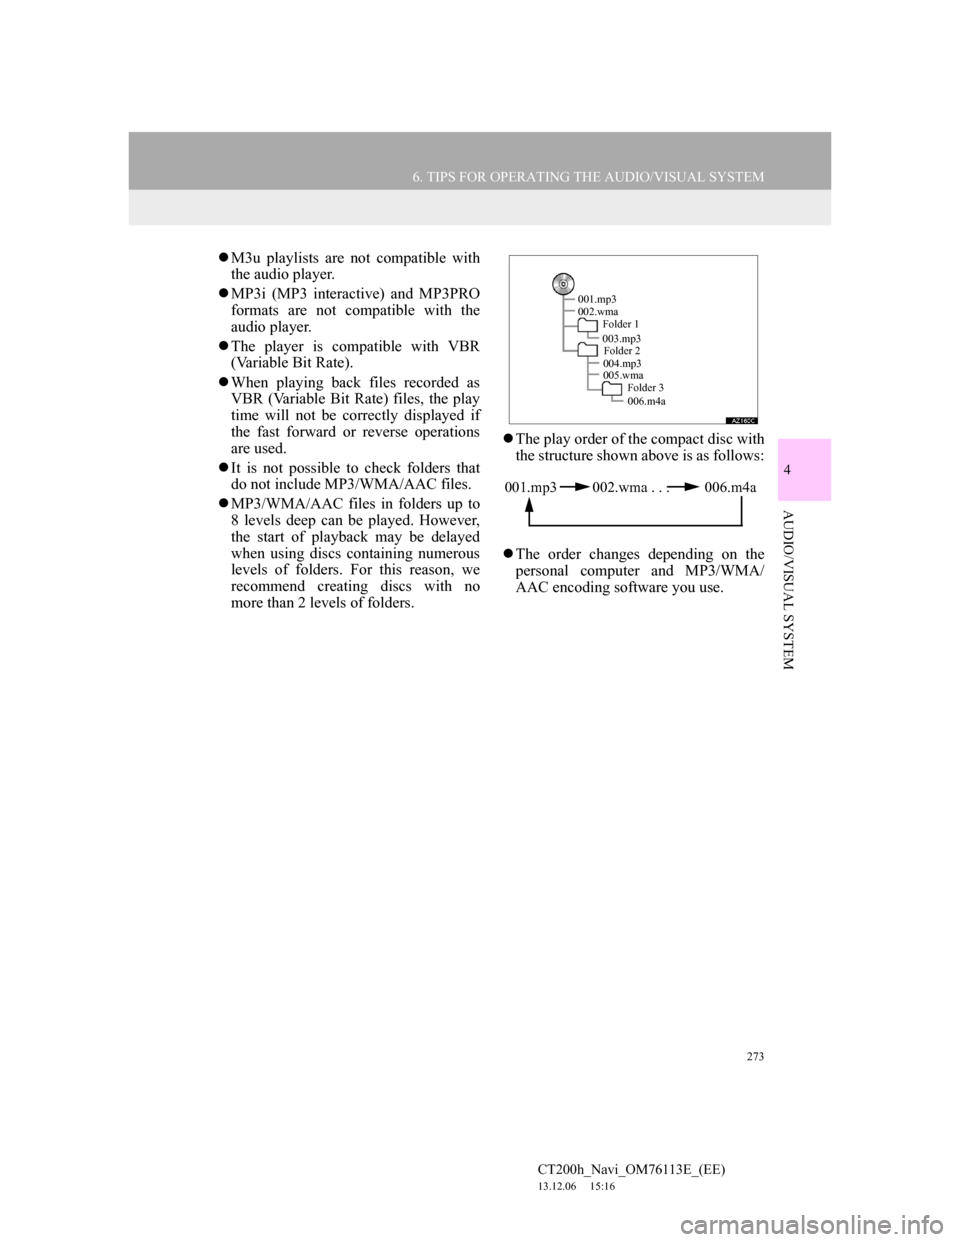
more than 2 levels of folders.The play order of the compact disc with
the structure shown above is as follows:
The order changes depending on the
personal computer and MP3/WMA/
AAC encoding software you use.
001.mp3
002.wma
Folder 1
003.mp3
Folder 2
004.mp3
005.wma
Folder 3
006.m4a
001.mp3 002.wma . . . 006.m4a
Page 280 of 410

280
CT200h_Navi_OM76113E_(EE)
13.12.06 15:16
1. SPEECH COMMAND SYSTEM OPERATION
1. SPEECH COMMAND SYSTEM
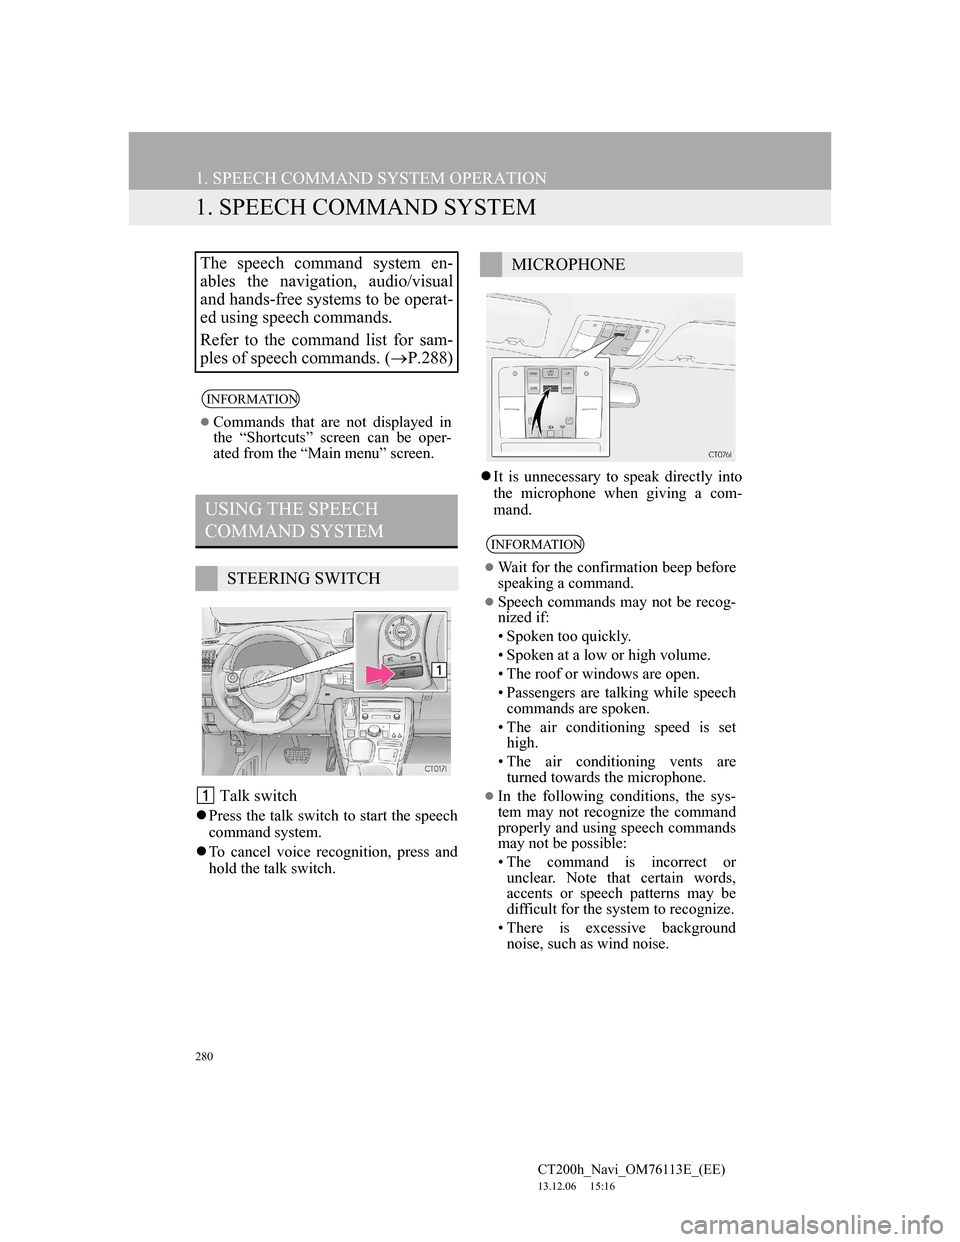
Talk switch
Press the talk switch to start the speech
command system.
To cancel voice recognition, press and
hold the talk switch.It is unnecessary to speak directly into
the microphone when giving a com-
mand.
The speech command system en-
ables the navigation, audio/visual
and hands-free systems to be operat-
ed using speech commands.
Refer to the command list for sam-
ples of speech commands. (P.288)
INFORMATION
Commands that are not displayed in
the “Shortcuts” screen can be oper-
ated from the “Main menu” screen.
USING THE SPEECH
COMMAND SYSTEM
STEERING SWITCH
MICROPHONE
INFORMATION
Wait for the confirmation beep before
speaking a command.
Speech commands may not be recog-
nized if:
• Spoken too quickly.
• Spoken at a low or high volume.
• The roof or windows are open.
• Passengers are talking while speech
commands are spoken.
• The air conditioning speed is set
high.
• The air conditioning vents are
turned towards the microphone.
In the following conditions, the sys-
tem may not recognize the command
properly and using speech commands
may not be possible:
• The command is incorrect or
unclear. Note that certain words,
accents or speech patterns may be
difficult for the system to recognize.
• There is excessive background
noise, such as wind noise.
Page 281 of 410
281
1. SPEECH COMMAND SYSTEM OPERATION
5
SPEECH COMMAND SYSTEM
CT200h_Navi_OM76113E_(EE)
13.12.06 15:16
1Press the talk switch.
After the “Shortcuts” screen has been
displayed, voice guidance will com-
mence.
2After a beep sounds, say or select the
desired command.
Speech commands are marked with
. Some commonly used com-
mands are displayed on the screen.
3Say or select the command displayed
on the screen.SPEECH COMMAND
SYSTEM OPERATION
OPERATION FROM THE
SHORTCUTS
Voice guidance for the speech com-
mand system can be skipped by
pressing the talk switch.
Saying “Help” or selecting “?”
prompts voice guidance to offer
examples of commands and operation
methods.