2013 Lancia Thema steering
[x] Cancel search: steeringPage 139 of 336

WARNING!
Forward Collision Warning (FCW)
is not intended to avoid a collision
on its own, nor can FCW detect
every type of potential collision.
The driver has the responsibility to
avoid a collision by controlling the
vehicle via braking and steering.
Failure to follow this warning could
lead to serious injury or death.
Changing FCW StatusThe FCW feature can be set to far, set
to near or turned off using the
Uconnect Touch™ System, refer to
“Uconnect Touch™ Settings” in “Un-
derstanding Your Instrument Panel”
for further information. The FCW Sta-
tus Off, Near or Far will be displayed
in the Uconnect Touch™ display.The default status of FCW is the
“Far” setting, this allows the system
to warn you of a possible collision
with the vehicle in front of you when
you are farther away. This gives you
the most reaction time. Changing the FCW status to the
“Near” setting, allows the system to
warn you of a possible collision with
the vehicle in front of you when you
are much closer. This setting provides
less reaction time than the “Far” set-
ting, which allows for a more dynamic
driving experience.
Changing the FCW status to “Off”
prevents the system from warning you
of a possible collision with the vehicle
in front of you.
NOTE:
In the “Off” setting FCW OFF will
be displayed on the Uconnect
Touch™ display.The system will retain the last
setting selected by the driver after
ignition shut down.FCW will not react to irrelevant
objects such as overhead objects,
ground reflections, objects not in
the path of the car, stationary ob-
jects that are far away, oncoming
traffic, or leading vehicles with
the same or higher rate of speed.
If the FCW becomes disabled
then a warning will display on
the EVIC screen.
FCW Unavailable Warning
If the system turns off, and the EVIC
displays “ACC/FCW Unavailable,
Service Required”, there may be a
temporary malfunction that limits
FCW functionality. Although the ve-
hicle is still drivable under normal
conditions, FCW will be temporarily
unavailable. If this occurs, try activat-
ing FCW again later, following a key
cycle. If the problem persists, see your
authorized dealer.
ACC/FCW Unavailable, Service Required Warning
133
Page 160 of 336

VEHICLE INFO (CUSTOMER INFORMATIONFEATURES) (for versions/markets, where
provided) . . . . . . . . . . . . . . . . . . . . . . . . . . . . .171
MESSAGES # . . . . . . . . . . . . . . . . . . . . . . . . . .172
TURN MENU OFF . . . . . . . . . . . . . . . . . . . . . . .172
Uconnect Touch™ SETTINGS . . . . . . . . . . . . . . .172
HARD-KEYS . . . . . . . . . . . . . . . . . . . . . . . . . .172
SOFT-KEYS . . . . . . . . . . . . . . . . . . . . . . . . . . .172
CUSTOMER PROGRAMMABLE FEATURES —Uconnect Touch™ SYSTEM 8.4 SETTINGS . . .172
SOUND SYSTEMS . . . . . . . . . . . . . . . . . . . . . . .181
NAVIGATION SYSTEM (for versions/markets, where provided) . . . . . . . .181
SETTING THE ANALOG CLOCK . . . . . . . . . . . . .181
iPod®/USB/MP3 CONTROL (for vehicles/markets, where provided) . . . . . . . .182
HARMAN KARDON® Logic7® HIGH PERFORMANCE MULTICHANNEL SURROUND
SOUND SYSTEM WITH DRIVER-SELECTABLE
SURROUND (DSS) (for versions/markets,
where required) . . . . . . . . . . . . . . . . . . . . . . . . . .182
STEERING WHEEL AUDIO CONTROLS . . . . . . .183 Radio Operation . . . . . . . . . . . . . . . . . . . . . . . .183
CD Player . . . . . . . . . . . . . . . . . . . . . . . . . . . . .183
CD/DVD DISC MAINTENANCE . . . . . . . . . . . . . .184
154
Page 169 of 336

CAUTION!
Driving with a hot engine cooling
system could damage your vehicle.
If the temperature gauge reads “H”
pull over and stop the vehicle. Idle
the vehicle with the air conditioner
turned off until the pointer drops
back into the normal range. If the
pointer remains on the “H” and you
hear continuous chimes, turn the
engine off immediately and call an
authorized studio for service.WARNING!
A hot engine cooling system is dan-
gerous. You or others could be
badly burned by steam or boiling
coolant. You may want to call an
authorized dealer for service if your
vehicle overheats. If you decide to
look under the hood yourself, see
“Maintaining Your Vehicle”. Fol-
low the warnings under the Cooling
System Pressure Cap paragraph.21. AWD (All Wheel Drive)
Indicator (for versions/ markets,
where provided)
The AWD indicator will illuminate
when All Wheel Drive (AWD) is
activated.
ELECTRONIC VEHICLE
INFORMATION CENTER
(EVIC)
The Electronic Vehicle Information
Center (EVIC) features a driver-
interactive display that is located in
the instrument cluster.
This system allows the driver to select
a variety of useful information by
pressing the switches mounted on the
steering wheel. The EVIC consists of
the following:
Radio Info
Fuel Economy Info
Cruise Control Info
Digital Vehicle Speed
Trip Info
Tire Pressure
Vehicle Info
Stored Warning Messages
Turn Menu OFF
Electronic Vehicle Information
Center (EVIC)
163
Page 170 of 336

The system allows the driver to select
information by pressing the following
buttons mounted on the steering wheel:UP ButtonPress and release the UP
button to scroll upward
through the main menu and
Vehicle Info and Trip Info
sub-menus (Fuel Economy, Vehicle
Info, Tire BAR, Cruise, Messages, Trip
Info, Vehicle Speed, and Turn Menu
OFF) and sub-menus.
DOWN Button
Press and release the DOWN
button to scroll downward
through the main menu and
Vehicle Info and Trip Info
sub-menus (Fuel Economy, Vehicle Info, Tire BAR, Cruise, Messages, Trip
Info, Vehicle Speed, and Turn Menu
OFF) and sub-menus.
SELECT Button
Press and release the SE-
LECT button to access the
information screens or sub-
menu screens of a main
menu item. Press and hold the SE-
LECT button for two seconds to reset
displayed/selected features that can be
reset.
BACK Button
Press the BACK button to
return to the main menu
from an info screen or sub-
menu item.
ELECTRONIC VEHICLE
INFORMATION CENTER
(EVIC) DISPLAYS
The EVIC display consists of three
sections:
1. The top line where compass direc-
tion, odometer line and outside tem-
perature are displayed. 2.
The main display area where the
menus and pop up messages are dis-
played.
3.
The reconfigurable telltales section.
The main display area will normally
display the main menu or the screens of
a selected feature of the main menu.
The main display area also displays
"pop up" messages that consist of ap-
proximately 60 possible warning or in-
formation messages. These pop up
messages fall into several categories:
Five Second Stored Messages
When the appropriate conditions oc-
cur, this type of message takes control
of the main display area for five sec-
onds and then returns to the previous
screen. Most of the messages of this
type are then stored (as long as the
condition that activated it remains ac-
tive) and can be reviewed from the
"Messages" main menu item. As long
as there is a stored message, an "i"
will be displayed in the EVIC's
compass/outside temp line. Examples
of this message type are "Right Front
Turn Signal Lamp Out" and "Low
Tire Pressure".
EVIC Steering Wheel Buttons
164
Page 174 of 336

continuously flash and a continuous
chime will occur until the engine is
allowed to cool.
If the telltale turns on while driving,
safely pull over and stop the vehicle. If
the A/C system is on, turn it off. Also,
shift the transmission into NEUTRAL
and idle the vehicle. If the tempera-
ture reading does not return to nor-
mal, turn the engine off immediately
and call for service. Refer to “If Your
Engine Overheats” in “What To Do In
Emergencies” for more information.
Transmission Temperature
Warning Telltale
This telltale indicates that
the transmission fluid tem-
perature is running hot. This
may occur with severe usage,
such as trailer towing. If this telltale
turns on, safely pull over and stop the
vehicle. Then, shift the transmission
into PARK and run the engine at idle or
faster until the light turns off.
CAUTION!
Continuous driving with the Trans-
mission Temperature Warning Tell-
tale illuminated will eventually
cause severe transmission damage
or transmission failure.WARNING!
If the Transmission Temperature
Warning Telltale is illuminated and
you continue operating the vehicle,
in some circumstances you could
cause the fluid to boil over, come in
contact with hot engine or exhaust
components and cause a fire.
Electric Power Steering
Malfunction This telltale is on when the
Electric Power Steering is
not operating and needs
service. OIL CHANGE DUE
Your vehicle is equipped with an en-
gine oil change indicator system. The
“Oil Change Due” message will flash
in the EVIC display for approxi-
mately 10 seconds after a single chime
has sounded to indicate the next
scheduled oil change interval. The en-
gine oil change indicator system is
duty cycle based, which means the
engine oil change interval may fluctu-
ate dependent upon your personal
driving style.
Unless reset, this message will con-
tinue to display each time you cycle the
ignition to the ON/RUN position. To
turn off the message temporarily, press
and release the BACK button. To reset
the oil change indicator system please
refer to a Lancia Dealership.
168
Page 178 of 336

Trans Temperature
Displays the actual transmissiontemperature.
Engine Hours
Displays the number of hours of engine operation.
MESSAGES #
Select from Main Menu using the UP
or DOWN buttons. This feature shows
the number of stored warning mes-
sages (in the # place holder). Pressing
the SELECT button will allow you to
see what the stored messages are.
Pressing the BACK button takes you
back to the Main Menu.
TURN MENU OFF
Select from Main Menu using the
DOWN button. Pressing the SELECT
button blanks the menu display.
Pressing any one of the four steering
wheel buttons brings the menu back. Uconnect Touch™
SETTINGS
The Uconnect Touch™ system uses a
combination of soft and hard keys
located on the center of the instru-
ment panel that allows you to access
and change the customer program-
mable features.
HARD-KEYS
Hard-Keys are located below the
Uconnect Touch™ system in the cen-
ter of the instrument panel. In addi-
tion, there is a Scroll/Enter control
knob located on the right side of the
Climate Controls in the center of the
instrument panel. Turn the control
knob to scroll through menus and
change settings (i.e., 30, 60, 90),
press the center of the control knob
one or more times to select or change a
setting (i.e., ON, OFF).
SOFT-KEYS
Soft-Keys are accessible on the
Uconnect Touch™ display.CUSTOMER
PROGRAMMABLE
FEATURES — Uconnect
Touch™ SYSTEM 8.4
SETTINGS
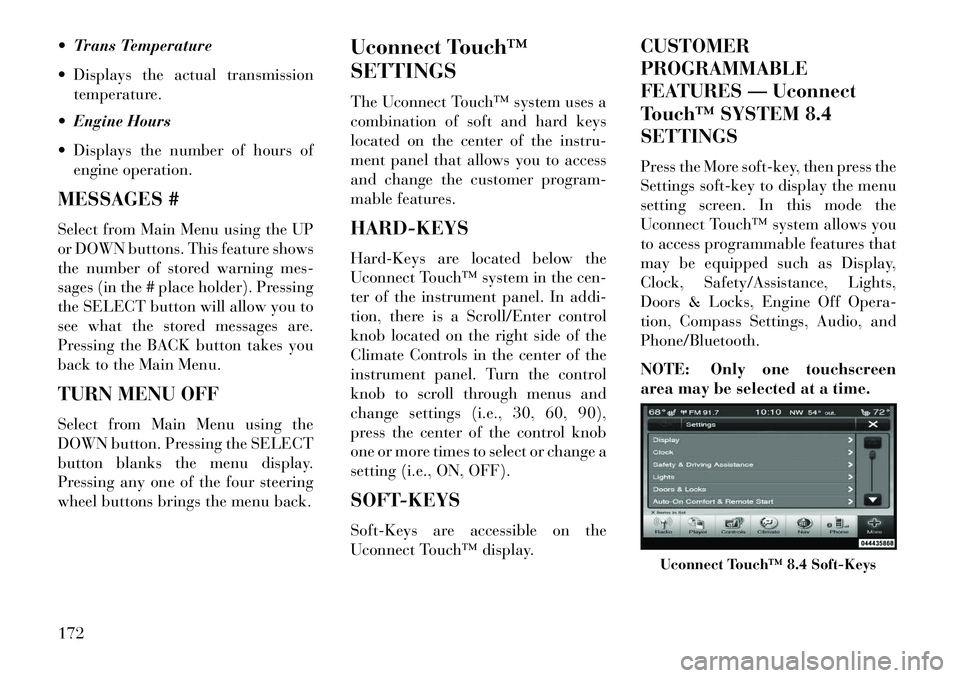
Press the More soft-key, then press the
Settings soft-key to display the menu
setting screen. In this mode the
Uconnect Touch™ system allows you
to access programmable features that
may be equipped such as Display,
Clock, Safety/Assistance, Lights,
Doors & Locks, Engine Off Opera-
tion, Compass Settings, Audio, and
Phone/Bluetooth.
NOTE: Only one touchscreen
area may be selected at a time.
Uconnect Touch™ 8.4 Soft-Keys
172
Page 183 of 336

Lights
After pressing the Lights soft-key the
following settings will be available.
Headlight Off DelayWhen this feature is selected, the driver
can choose to have the headlights re-
main on for 0, 30, 60, or 90 seconds
when exiting the vehicle. To change the
Headlight Off Delay status touch the 0,
30, 60 or 90 soft-key. Then touch the
arrow back soft-key. Headlight Illumination On
Approach
When this feature is selected, the
headlights will activate and remain on
for 0, 30, 60, or 90 seconds when the
doors are unlocked with the Remote
Keyless Entry (RKE) transmitter. To
change the Illuminated Approach sta-
tus, touch the + or - soft-key to select
your desired time interval. Touch the
back arrow soft-key to return to the
previous menu. Headlights With Wipers (for
versions/markets, where provided)
When this feature is selected, and the
headlight switch is in the AUTO posi-
tion, the headlights will turn on
approximately 10 seconds after the
wipers are turned on. The headlights
will also turn off when the wipers are
turned off if they were turned on by
this feature. To make your selection,
touch the Headlights With Wipers
soft-key, until a check-mark appears
next to setting, showing that setting
has been selected. Touch the back
arrow soft-key to return to the previ-
ous menu.
Auto Dim High Beams
“SmartBeam™” (for versions/
markets, where provided)
When this feature is selected, the high
beam headlights will deactivate auto-
matically under certain conditions. To
make your selection, touch the Auto
High Beams soft-key, until a check-
mark appears next to setting, showing
that setting has been selected. Touch
the back arrow soft-key to return to the previous menu. Refer to “Lights/
SmartBeam™ (for versions/markets,
where provided)” in “Understanding
The Features Of Your Vehicle” for fur-
ther information.
Daytime Running Lights (for
versions/markets, where provided)
When this feature is selected, the
headlights will turn on whenever the
engine is running. To make your se-
lection, touch the Daytime Running
Lights soft-key, until a check-mark
appears next to setting, showing that
setting has been selected. Touch the
back arrow soft-key to return to the
previous menu.
Steering Directed Lights (for
versions/markets, where provided)When this feature is selected, the head-
lights turn relative to a change in direc-
tion of the steering wheel. To make
your selection, touch the Steering Di-
rected Lights soft-key, until a check-
mark appears next to setting, showing
that setting has been selected. Touch
the back arrow soft-key to return to the
previous menu.
177
Page 189 of 336

Mode will only be available for video
media sources (DVDs, Video CDs, or
other video media supported by the
radio). Some audio will sound better
in DSS modes, others in Stereo mode.
When in “Audio Surround” mode,
balance is set automatically. Fader
control is available in surround mode
but should be set to the center position
for optimal surround performance.
STEERING WHEEL
AUDIO CONTROLS
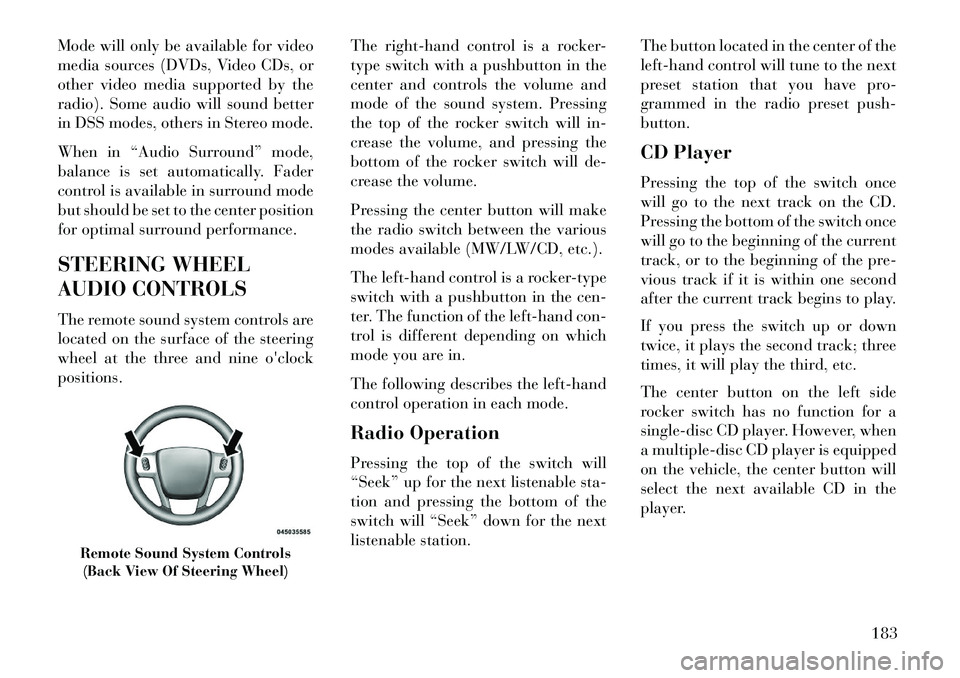
The remote sound system controls are
located on the surface of the steering
wheel at the three and nine o'clock
positions.The right-hand control is a rocker-
type switch with a pushbutton in the
center and controls the volume and
mode of the sound system. Pressing
the top of the rocker switch will in-
crease the volume, and pressing the
bottom of the rocker switch will de-
crease the volume.
Pressing the center button will make
the radio switch between the various
modes available (MW/LW/CD, etc.).
The left-hand control is a rocker-type
switch with a pushbutton in the cen-
ter. The function of the left-hand con-
trol is different depending on which
mode you are in.
The following describes the left-hand
control operation in each mode.
Radio Operation
Pressing the top of the switch will
“Seek” up for the next listenable sta-
tion and pressing the bottom of the
switch will “Seek” down for the next
listenable station.The button located in the center of the
left-hand control will tune to the next
preset station that you have pro-
grammed in the radio preset push-
button.
CD Player
Pressing the top of the switch once
will go to the next track on the CD.
Pressing the bottom of the switch once
will go to the beginning of the current
track, or to the beginning of the pre-
vious track if it is within one second
after the current track begins to play.
If you press the switch up or down
twice, it plays the second track; three
times, it will play the third, etc.
The center button on the left side
rocker switch has no function for a
single-disc CD player. However, when
a multiple-disc CD player is equipped
on the vehicle, the center button will
select the next available CD in the
player.
Remote Sound System Controls
(Back View Of Steering Wheel)
183