2013 Lancia Thema radio
[x] Cancel search: radioPage 84 of 336

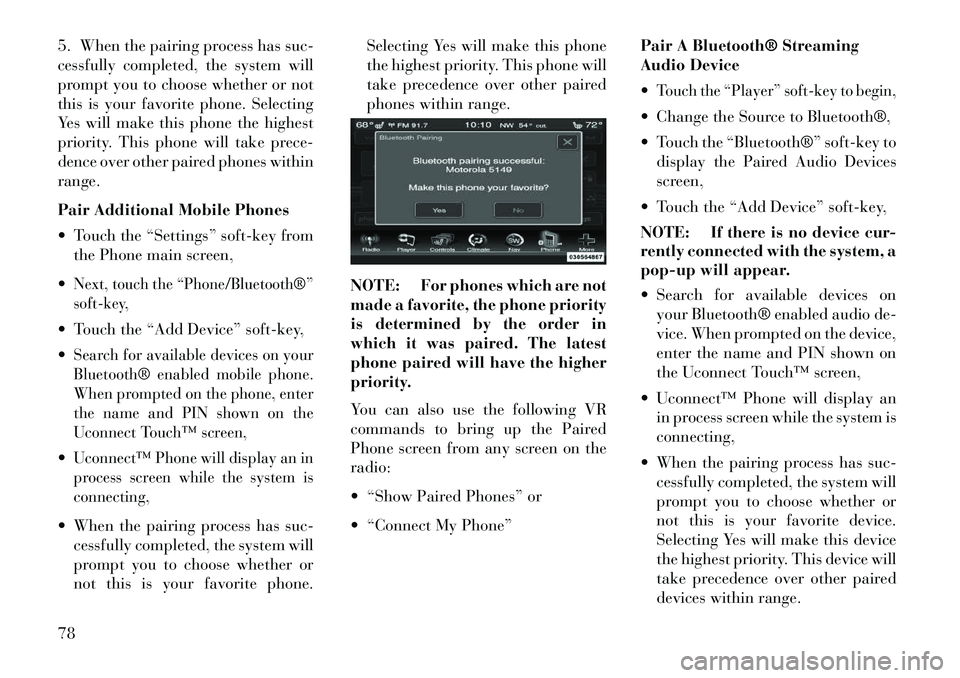
5. When the pairing process has suc-
cessfully completed, the system will
prompt you to choose whether or not
this is your favorite phone. Selecting
Yes will make this phone the highest
priority. This phone will take prece-
dence over other paired phones within
range.
Pair Additional Mobile Phones
Touch the “Settings” soft-key fromthe Phone main screen,
Next, touch the “Phone/Bluetooth®”
soft-key, Touch the “Add Device” soft-key,
Search for available devices on your
Bluetooth® enabled mobile phone.
When prompted on the phone, enter
the name and PIN shown on the
Uconnect Touch™ screen,Uconnect™ Phone will display an in
process screen while the system is
connecting, When the pairing process has suc- cessfully completed, the system will
prompt you to choose whether or
not this is your favorite phone. Selecting Yes will make this phone
the highest priority. This phone will
take precedence over other paired
phones within range.
NOTE: For phones which are not
made a favorite, the phone priority
is determined by the order in
which it was paired. The latest
phone paired will have the higher
priority.
You can also use the following VR
commands to bring up the Paired
Phone screen from any screen on the
radio:
“Show Paired Phones” or
“Connect My Phone” Pair A Bluetooth® Streaming
Audio Device
Touch the “Player” soft-key to begin, Change the Source to Bluetooth®,
Touch the “Bluetooth®” soft-key to
display the Paired Audio Devices
screen,
Touch the “Add Device” soft-key,
NOTE: If there is no device cur-
rently connected with the system, a
pop-up will appear.
Search for available devices on your Bluetooth® enabled audio de-
vice. When prompted on the device,
enter the name and PIN shown on
the Uconnect Touch™ screen,
Uconnect™ Phone will display an in process screen while the system is
connecting,
When the pairing process has suc- cessfully completed, the system will
prompt you to choose whether or
not this is your favorite device.
Selecting Yes will make this device
the highest priority. This device will
take precedence over other paired
devices within range.
78
Page 98 of 336

GENERAL INFORMATION
This device complies with Part 15
of the FCC rules and RSS 210 of
Industry Canada. Operation is subject
to the following conditions:
Changes or modifications not ex-
pressly approved by the party re-
sponsible for compliance could void
the user's authority to operate the
equipment. This device may not cause harmfulinterference.
This device must accept any inter-
ference received, including inter-
ference that may cause undesired
operation.VOICE COMMAND
Uconnect Touch™
8.4/8.4 Nav The Uconnect™ Voice
Command system allows
you to control your AM, FM
radio, satellite radio, disc
player, SD Card or USB/iPod. NOTE:
Take care to speak into
the Voice Command system as
calmly and normally as possible.
The ability of the Voice Command
system to recognize user voice com-
mands may be negatively affected
by rapid speaking or a raised voice
level.
WARNING!
Any voice commanded system
should be used only in safe driving
conditions following all applicable
laws, including laws regarding
phone use. All attention should be
kept on the roadway ahead. Failure
to do so may result in an accident
causing serious injury or death.
When you press the Uconnect™ Voice
Command
button, you will hear
a beep. The beep is your signal to give
a command.
If no command is spoken the system
will say one of two responses:
I didn't understand
I didn't get that, etc., If a command is not spoken a second
time, the system will respond with an
error and give some direction as what
can be said based on the context you
are in. After three consecutive failures
of a spoken command the VR session
with end.
Pressing the Uconnect™ Voice Com-
mand
button while the system is
speaking is known as “barging in.”
The system will be interrupted, and
after the beep, you can say a com-
mand. This will become helpful once
you start to learn the options.
NOTE: At any time, you can say
the words “Cancel” or “Help”.
These commands are universal and
can be used from any menu. All other
commands can be used depending
upon the active application.
When using this system, you should
speak clearly and at a normal speak-
ing volume.
The system will best recognize your
speech if the windows are closed, and
the heater/air conditioning fan is set
to low.
92
Page 99 of 336

At any point, if the system does not
recognize one of your commands, you
will be prompted to repeat it.
To hear available commands, press
the Uconnect™ Voice Command
button and say “Help”. You will
hear available commands for the
screen displayed.
Natural Speech
Natural speech allows the user to
speak commands in phrases or com-
plete sentences. The system filters out
certain non-word utterances and
sounds such as “ah” and “eh”. The
system handles fill-in words such as
“I would like to”.
The system handles multiple inputs in
the same phrase or sentence such as
“make a phone call” and “to Kelly
Smith”. For multiple inputs in the
same phrase or sentence, the system
identifies the topic or context and pro-
vides the associated follow-up prompt
such as “Who do you want to call?” in
the case where a phone call was re-
quested but the specific name was not
recognized.
The system utilizes continuous dialog;
when the system requires more infor-
mation from the user it will ask a ques-
tion to which the user can respond
without pressing the Uconnect™ Voice
Command
button.
Uconnect™ Voice
Commands
The Uconnect™ Voice Command sys-
tem understands two types of com-
mands. Universal commands are avail-
able at all times. Local commands are
available if the supported radio mode is
active.Start a dialogue by pressing the
Uconnect™ Voice Commandbutton.
Changing the Volume
1. Start a dialogue by pressing the
Voice Command
button.
2. Say a command (e.g., “Help”). 3.
Use the ON/OFF VOLUME rotary
knob to adjust the volume to a com-
fortable level while the Voice Com-
mand system is speaking. Please note
the volume setting for Voice Command
is different than the audio system.
Starting Voice Recognition (VR)
Session in Radio/Player Modes
In this mode, you can say the follow-
ing commands:
NOTE:
The commands can be
said on any screen when a call is not
active after pushing the Uconnect™
Voice Command
button.
Disc
To switch to the disc mode, say
“Change source to Disc”. This com-
mand can be given in any mode or
screen: “Track” (#) (to change the track)
93
Page 103 of 336

NOTE:
1. Only available with Navigationequipped vehicles.
2.
You can replace “Player” with
“Radio”, “Navigation”, “Phone”,
“Climate”, “More” or “Settings”.
3.
Navigation commands only work
if equipped with Navigation.
4.
Available Voice Commands are
shown in bold face and shaded
grey.
97
Page 112 of 336

desired position settings for the driver
seat, side mirrors, adjustable pedals
(for versions/markets, where pro-
vided), and power tilt and telescopic
steering column (for versions/
markets, where provided) and a set of
desired radio station presets. Your Re-
mote Keyless Entry (RKE) transmit-
ter can also be programmed to recall
the same positions when the UN-
LOCK button is pressed.
NOTE:
Only one RKE transmitter canbe linked to each of the memory
positions.
Passive Entry door handles can- not be linked to the memory
function. Use either the memory
recall switch or the RKE trans-
mitter (if linked to the memory
feature) to recall memory posi-
tions 1 or 2.
The memory seat switch is located
on the driver's door trim panel. The
switch consists of three buttons:
The (S) button, which is used to acti-
vate the memory save function and the (1) and (2) buttons which are
used to recall either of two pre-
programmed memory profiles.
PROGRAMMING THE
MEMORY FEATURE
To create a new memory profile, per-
form the following:
1. Cycle the ignition to the RUN po-
sition.
2.
Adjust all memory profile settings
to desired preferences (i.e., seat, side
mirror, adjustable pedals [for versions/
markets, where provided], power tilt
and telescopic steering column [for
versions/markets, where provided],
and radio station presets).
3. Press and release the SET (S) but-
ton on the memory switch.
4. Within five seconds, press and re-
lease the MEMORY button 1 or 2. The
Electronic Vehicle Information Center
will display which memory position
has been set.
NOTE:
Memory profiles can be set with- out the vehicle in PARK, but the
vehicle must be in PARK to re-
call a memory profile.
The Recall Memory with Remote
Key Unlock feature can be turned
on and off using the Uconnect
Touch™ System, refer to
“Uconnect Touch™ Settings” in
“Understanding Your Instrument
Panel” for further information.
Memory Seat Switch
106
Page 120 of 336

Ambient Light Control
Rotate the right dimmer control up-
ward or downward to increase or de-
crease the brightness of the door
handle lights and ambient light lo-
cated in the overhead console.
Dome Light Position
Rotate the left dimmer control com-
pletely upward to the second detent to
turn on the interior lights. The inte-
rior lights will remain on when the
dimmer control is in this position.
Interior Light Defeat (OFF)
Rotate the left dimmer control to the
extreme bottom OFF position. The
interior lights will remain off when
the doors are open.Parade Mode (Daytime Brightness
Feature)
Rotate the left dimmer control upward
to the first detent. This feature bright-
ens all text displays such as the odom-
eter, EVIC (for versions/markets,
where provided), and radio when the
parking lights or headlights are on.WINDSHIELD WIPERS
AND WASHERS
The multifunction lever operates the
windshield wipers and washer when
the ignition is placed in the ON/RUN
or ACC position. The multifunction
lever is located on the left side of the
steering column.
Rotate the end of the multifunction
lever to the first detent, past the inter-
mittent settings for low-speed wiper
operation, or to the second detent past
the intermittent settings for high-
speed wiper operation.
CAUTION!
Turn the windshield wipers off
when driving through an auto-
matic car wash. Damage to the
windshield wipers may result if
the wiper control is left in any
position other than off.
In cold weather, always turn off the wiper switch and allow the
wipers to return to the “Park”
position before turning off the
engine. If the wiper switch is left
on and the wipers freeze to the
windshield, damage to the wiper
motor may occur when the ve-
hicle is restarted.
(Continued)
Door Handle/Ambient Light Dimmer
Windshield Wiper/Washer Control
114
Page 144 of 336

CAUTION!
ParkSense® is only a parking aidand it is unable to recognize every
obstacle, including small ob-
stacles. Parking curbs might be
temporarily detected or not de-
tected at all. Obstacles located
above or below the sensors will
not be detected when they are in
close proximity.
The vehicle must be driven slowly
when using ParkSense® in order
to be able to stop in time when an
obstacle is detected. When back-
ing up, it is recommended that the
driver looks over his/her shoulder
when using ParkSense®.WARNING!
Drivers must be careful when backing up even when using the
ParkSense® Park Assist system.
Always check carefully behind
your vehicle, look behind you,
and be sure to check for pedestri-
ans, animals, other vehicles, ob-
structions, and blind spots before
(Continued)
WARNING!(Continued)
backing up. You are responsible
for safety and must continue to
pay attention to your surround-
ings. Failure to do so can result in
serious injury or death.
Before using the ParkSense® Park Assist system, it is strongly
recommended that the ball
mount and hitch ball assembly is
disconnected from the vehicle
when the vehicle is not used for
towing. Failure to do so can result
in injury or damage to vehicles or
obstacles because the hitch ball
will be much closer to the obstacle
than the rear fascia when the
warning display turns on the
single flashing arc and sounds the
continuous tone. Also, the sensors
could detect the ball mount and
hitch ball assembly, depending on
its size and shape, giving a false
indication that an obstacle is be-
hind the vehicle. PARKVIEW® REAR
BACK UP CAMERA
(for versions/markets,
where provided)
Your vehicle may be equipped with
the ParkView® Rear Back Up Cam-
era that allows you to see an on-screen
image of the rear surroundings of
your vehicle whenever the shift lever
is put into REVERSE. The image will
be displayed on the radio touchscreen
display along with a caution note to
“check entire surroundings” across
the top of the screen. After five sec-
onds this note will disappear. The
ParkView® camera is located on the
rear of the vehicle above the rear
License plate.
When the vehicle is shifted out of
REVERSE, the rear camera mode is
exited and the navigation or audio
screen appears again.
138
Page 160 of 336

VEHICLE INFO (CUSTOMER INFORMATIONFEATURES) (for versions/markets, where
provided) . . . . . . . . . . . . . . . . . . . . . . . . . . . . .171
MESSAGES # . . . . . . . . . . . . . . . . . . . . . . . . . .172
TURN MENU OFF . . . . . . . . . . . . . . . . . . . . . . .172
Uconnect Touch™ SETTINGS . . . . . . . . . . . . . . .172
HARD-KEYS . . . . . . . . . . . . . . . . . . . . . . . . . .172
SOFT-KEYS . . . . . . . . . . . . . . . . . . . . . . . . . . .172
CUSTOMER PROGRAMMABLE FEATURES —Uconnect Touch™ SYSTEM 8.4 SETTINGS . . .172
SOUND SYSTEMS . . . . . . . . . . . . . . . . . . . . . . .181
NAVIGATION SYSTEM (for versions/markets, where provided) . . . . . . . .181
SETTING THE ANALOG CLOCK . . . . . . . . . . . . .181
iPod®/USB/MP3 CONTROL (for vehicles/markets, where provided) . . . . . . . .182
HARMAN KARDON® Logic7® HIGH PERFORMANCE MULTICHANNEL SURROUND
SOUND SYSTEM WITH DRIVER-SELECTABLE
SURROUND (DSS) (for versions/markets,
where required) . . . . . . . . . . . . . . . . . . . . . . . . . .182
STEERING WHEEL AUDIO CONTROLS . . . . . . .183 Radio Operation . . . . . . . . . . . . . . . . . . . . . . . .183
CD Player . . . . . . . . . . . . . . . . . . . . . . . . . . . . .183
CD/DVD DISC MAINTENANCE . . . . . . . . . . . . . .184
154