2013 Lancia Flavia warning lights
[x] Cancel search: warning lightsPage 38 of 244

NOTE:
Air Bag covers may not be obvious
in the interior trim, but they will
open during air bag deployment. After any collision, the vehicleshould be taken to an autho-
rized dealer immediately.
Air Bag System ComponentsYour vehicle may be equipped with the
following air bag system components: Occupant Restraint Controller (ORC)
Air Bag Warning Light
Steering Wheel and Column
Instrument Panel
Knee Impact Bolster
Driver Advanced Front Air Bag
Passenger Advanced Front Air Bag
Supplemental Seat-Mounted Side Air Bags (SAB)
Front and Side Impact Sensors
Front Seat Belt Pretensioners, Seat Belt Buckle Switch Advanced Front Air Bag Features
The Advanced Front Air Bag system
has multistage driver and front pas-
senger air bags. This system provides
output appropriate to several factors,
including the severity and type of col-
lision as determined by the Occupant
Restraint Controller (ORC), which
may receive information from the
front impact sensors.
The first stage inflator is triggered
immediately during an impact that
requires air bag deployment. This low
output is used in less severe collisions.
A higher energy output is used for
more severe collisions.
WARNING!
No objects should be placed over or
near the air bag on the instrument
panel, because any such objects
could cause harm if the vehicle is in
a collision severe enough to cause
the air bag to inflate.
(Continued)
WARNING!
(Continued)
Do not put anything on or around
the air bag covers or attempt to
open them manually. You may
damage the air bags and you could
be injured because the air bags
may no longer be functional. The
protective covers for the air bag
cushions are designed to open only
when the air bags are inflating. Do not drill, cut or tamper with the knee bolster in any way.
Do not mount any accessories to
the knee bolster such as alarm
lights, stereos, citizen band radios,
etc.
Supplemental Seat-Mounted Side
Air Bags (SAB)
Supplemental Seat-Mounted Side Air
Bags (SAB) may provide enhanced
protection to help protect an occupant
during a side impact. The SAB is
marked with an air bag label sewn
into the outboard side of the front
seats.
32
Page 95 of 244

WARNING!
Adjusting a seat while drivingmay be dangerous. Moving a seat
while driving could result in loss
of control which could cause a
collision and serious injury or
death.
Seats should be adjusted before
fastening the seat belts and while
the vehicle is parked. Serious in-
jury or death could result from a
poorly adjusted seat belt.
Do not ride with the seatback re- clined so that the shoulder belt is
no longer resting against your
chest. In a collision you could
slide under the seat belt, which
could result in serious injury or
death.
CAUTION!
Do not place any article under any
seat as it may cause damage to the
seat controls.
Adjusting The Seat Forward Or
Rearward
The seat can be adjusted both forward
and rearward. Push the seat switch
forward or rearward, the seat will
move in the direction of the switch.
Release the switch when the desired
position has been reached.
Adjusting The Seat Up Or Down
The height of the seats can be ad-
justed up or down. Pull upward or
push downward on the seat switch,
the seat will move in the direction of
the switch. Release the switch when
the desired position has been reached.
Tilting The Seat Up Or Down
The angle of the seat cushion can be
adjusted in four directions. Pull up-
ward or push downward on the front
or rear of the seat switch, the front or
rear of the seat cushion will move in
the direction of the switch. Release the
switch when the desired position has
been reached. HEATED SEATS
On some models, the front driver and
passenger seats may be equipped with
heaters in both the seat cushions and
seatbacks. The controls for the front
heated seats are located on the center
instrument panel area.
You can choose from HIGH, LOW or
OFF heat settings. Amber indicator
lights in each switch indicate the level
of heat in use. Two indicator lights
will illuminate for HIGH, one for
LOW and none for OFF.
Press the switch once to se-
lect HIGH-level heating.
Press the switch a second
time to select LOW-level
heating. Press the switch a third time
to shut the heating elements OFF.
If HIGH-level heating is selected, the
system automatically switches to
LOW-level heating and turns one indi-
cator light OFF after a maximum of
60 minutes of continuous operation. It
will turn the heater and the remaining
indicator light OFF after a maximum
of 45 minutes of continuous operation.
Power Seat Switch
89
Page 105 of 244

If you activate the washer while the
wiper control is in the off position, the
wipers will operate for two wipe cycles
and then turn off.WARNING!
Sudden loss of visibility through
the windshield could lead to a col-
lision. You might not see other ve-
hicles or other obstacles. To avoid
sudden icing of the windshield dur-
ing freezing weather, warm the
windshield with defroster before
and during windshield washer use.
MIST FEATURE
Push down on the wiper control lever
to activate a single wipe to clear the
windshield of road mist or spray from
a passing vehicle. As long as the lever
is held down, the wipers will continue
to operate.
NOTE:
The mist feature does not
activate the washer pump; therefore,
no washer fluid will be sprayed on
the windshield. The wash function
must be used in order to spray the
windshield with washer fluid.
HEADLIGHTS WITH
WIPERS FEATURE
(AVAILABLE WITH
AUTOMATIC HEADLIGHTS
ONLY)When this feature is active, the head-
lights will turn on approximately
10 seconds after the wipers are turned
on if the multifunction lever (on the
left side of the steering column) is
placed in the AUTO position. In addi-
tion, the headlights will turn off when
the wipers are turned off if they were
turned on by this feature.
The headlights with wipers feature
can be turned on or off through the
Electronic Vehicle Information Center
(EVIC). Refer to “Electronic Vehicle Information Center (EVIC)/Personal
Settings (Customer-Programmable
Features)” in “Understanding Your
Instrument Panel” for further infor-
mation.
TILT/TELESCOPING
STEERING COLUMN
This feature allows you to tilt the
steering column upward or down-
ward. It also allows you to lengthen or
shorten the steering column. The tilt/
telescoping lever is located below the
steering wheel at the end of the steer-
ing column.
To unlock the steering column, push
the lever downward. To tilt the steer-
ing column, move the steering wheel
upward or downward as desired.
Mist Control
Tilt/Telescoping Lever
99
Page 109 of 244

WARNING!
To avoid serious injury or death:
Only devices designed for use inthis type of outlet should be in-
serted into any 12 Volt outlet.
Do not touch with wet hands.
Close the lid when not in use and while driving the vehicle.
If this outlet is mishandled, it may
cause an electric shock and failure.CAUTION!
Many accessories that can be
plugged in draw power from the
vehicle's battery, even when not
in use (i.e., cellular phones, etc.).
Eventually, if plugged in long
enough, the vehicle's battery will
discharge sufficiently to degrade
battery life and/or prevent the
engine from starting.
Accessories that draw higher power (i.e., coolers, vacuum
cleaners, lights, etc.) will degrade
the battery even more quickly.
Only use these intermittently and
with greater caution.
(Continued)
CAUTION!(Continued)
After the use of high power draw accessories, or long periods of the
vehicle not being started (with
accessories still plugged in), the
vehicle must be driven a suffi-
cient length of time to allow the
generator to recharge the vehi-
cle's battery.CIGAR LIGHTER AND
ASH RECEIVER
(for versions/markets,
where provided)An optional ash receiver is available
from your authorized dealer and will
fit in the center console front cup-
holder.
The optional ash receiver also comes
with a cigar lighter that can be used
with the power outlets. Refer to “Elec-
trical Power Outlets” in “Understand-
ing The Features Of Your Vehicle” for
further information. CUPHOLDERS
FRONT SEAT CUPHOLDER
The cupholder in the center console
will accommodate either two large
size cups or two 0.5 L bottles or cans.
The one-piece insert can be removed
easily for cleaning. An optional re-
movable ashtray may be located in
one of the cupholders.
Front Cupholders
103
Page 125 of 244
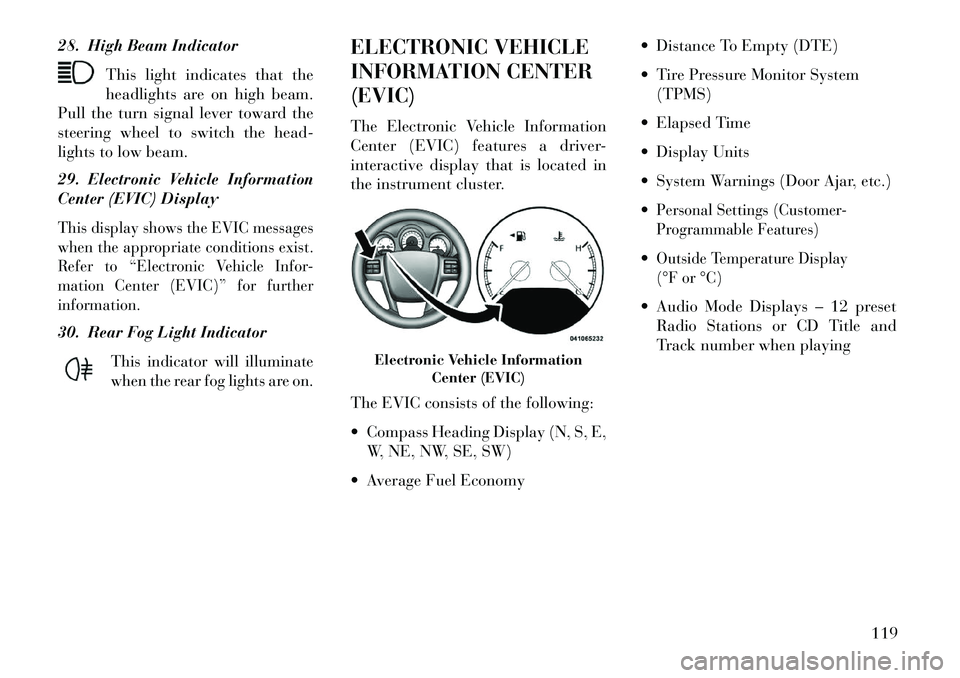
28. High Beam IndicatorThis light indicates that the
headlights are on high beam.
Pull the turn signal lever toward the
steering wheel to switch the head-
lights to low beam.
29. Electronic Vehicle Information
Center (EVIC) DisplayThis display shows the EVIC messages
when the appropriate conditions exist.
Refer to “Electronic Vehicle Infor-
mation Center (EVIC)” for further
information.30. Rear Fog Light Indicator
This indicator will illuminate
when the rear fog lights are on.
ELECTRONIC VEHICLE
INFORMATION CENTER
(EVIC)
The Electronic Vehicle Information
Center (EVIC) features a driver-
interactive display that is located in
the instrument cluster.
The EVIC consists of the following:
Compass Heading Display (N, S, E, W, NE, NW, SE, SW)
Average Fuel Economy Distance To Empty (DTE)
Tire Pressure Monitor System
(TPMS)
Elapsed Time
Display Units
System Warnings (Door Ajar, etc.)
Personal Settings (Customer-
Programmable Features)Outside Temperature Display
(°F or °C) Audio Mode Displays – 12 preset Radio Stations or CD Title and
Track number when playing
Electronic Vehicle Information Center (EVIC)
119
Page 132 of 244

SYSTEM STATUS
Displays SYSTEM OK if there are no
active Warning Messages stored.
Pressing and releasing the DOWN
button when SYSTEM OK is dis-
played will do nothing. Displays SYS-
TEM WARNINGS PRESENT if there
are active Warning Messages stored.
Pressing and releasing the DOWN
button when SYSTEM WARNINGS
PRESENT is displayed will display
each stored warning for each button
press. Press and Release the MENU
button to return to the Main Menu.
PERSONAL SETTINGS
(CUSTOMER-
PROGRAMMABLE
FEATURES)
Personal Settings allows the driver to
set and recall features when the auto-
matic transaxle is in PARK.
Press and release the MENU button
until “Personal Settings” displays in
the EVIC.Press and release the DOWN button
to display the following program-
mable features:
Language
When in this display you may select
different languages for all display no-
menclature, including the trip func-
tions. Pressing the SELECT button
while in this display selects English,
Spanish, French, German, Italian, or
Dutch depending on availability. As you
continue, the displayed information will
be shown in the selected language.Auto Unlock On Exit
When ON is selected and the transaxle
is in the PARK or NEUTRAL position,
all doors will unlock when the driver's
door is opened. To make your selec-
tion, press the SELECT button until
ON or OFF appears.
RKE Unlock
When “Driver Door 1st Press” is se-
lected, only the driver's door will un-
lock on the first press of the Remote
Keyless Entry (RKE) transmitter UN-
LOCK button. When Driver Door 1st
Press is selected, you must press theRKE transmitter UNLOCK button
twice to unlock the passenger's doors.
When “All Doors 1st Press” is se-
lected, all of the doors will unlock on
the first press of the RKE transmitter
UNLOCK button. To make your se-
lection, press and release the SELECT
button until “Driver Door 1st Press”
or “All Doors 1st Press” appears.
Flash Lamp with LOCK
When ON is selected, the front and
rear turn signals will flash when the
doors are locked or unlocked with the
RKE transmitter. This feature may be
selected with or without the Sound
Horn with LOCK feature selected. To
make your selection, press and release
the SELECT button until ON or OFF
appears.
Headlamp Off Delay
When this feature is selected, the
driver can choose to have the head-
lights remain on for 0, 30, 60, or 90
seconds when exiting the vehicle. To
make your selection, press the SE-
LECT button until 0, 30, 60, or 90
appears.
126
Page 211 of 244

If you carry special cargo such aschemicals, fertilizers, de-icer salt,
etc., be sure that such materials are
well packaged and sealed.
If a lot of driving is done on gravel roads, consider mud or stone
shields behind each wheel.
Use MOPAR® Touch Up Paint or equivalent on scratches as soon as
possible. Your authorized dealer
has touch up paint to match the
color of your vehicle.
Wheel And Wheel Trim Care
All wheels and wheel trim, especially
aluminum and chrome-plated wheels
should be cleaned regularly with a
mild soap and water to prevent corro-
sion. To remove heavy soil and/or ex-
cessive brake dust, use a nonabrasive,
non-acidic cleaner. Do not use scour-
ing pads, steel wool, a bristle brush, or
metal polishes. Do not use oven
cleaner. Avoid automatic car washes
that use acidic solutions or harsh
brushes that may damage the wheels’
protective finish. Interior Care
Interior trim should be cleaned start-
ing with a damp cloth. Do not use
harsh cleaners.
Your leather upholstery can be best
preserved by regular cleaning with a
damp soft cloth. Small particles of
dirt can act as an abrasive and dam-
age the leather upholstery and should
be removed promptly with a damp
cloth. Stubborn soils can be removed
easily with a soft cloth and appropri-
ate products. Care should be taken to
avoid soaking your leather upholstery
with any liquid. Please do not use
polishes, oils, cleaning fluids, sol-
vents, detergents, or ammonia-based
cleaners to clean your leather uphol-
stery. Application of a leather condi-
tioner is not required to maintain the
original condition.
WARNING!
Do not use volatile solvents for
cleaning purposes. Many are poten-
tially flammable, and if used in
closed areas they may cause respi-
ratory harm.Cleaning Headlights
Your vehicle has plastic headlights
that are lighter and less susceptible to
stone breakage than glass headlights.
Plastic is not as scratch resistant as
glass and therefore different lens
cleaning procedures must be followed.To minimize the possibility of scratch-
ing the lenses and reducing light out-
put, avoid wiping with a dry cloth. To
remove road dirt, wash with a mild
soap solution followed by rinsing.Do not use abrasive cleaning compo-
nents, solvents, steel wool or other ag-
gressive material to clean the lenses.Glass Surfaces
All glass surfaces should be cleaned
on a regular basis with any commer-
cial household-type glass cleaner.
Never use an abrasive type cleaner.
Use caution when cleaning the inside
rear window equipped with electric
defrosters or the right rear quarter
window equipped with the radio an-
tenna. Do not use scrapers or other
sharp instruments which may scratch
the elements.
205
Page 228 of 244

MAINTENANCE
SCHEDULEThe Scheduled Maintenance services
listed in this manual must be done at the
times or mileages specified to protect
your vehicle warranty and ensure the
best vehicle performance and reliability.
More frequent maintenance may be
needed for vehicles in severe operating
conditions, such as dusty areas and very
short trip driving. Inspection and ser-
vice should also be done anytime a mal-
function is suspected.The oil change indicator system will
remind you that it is time to take your
vehicle in for scheduled maintenance.On Electronic Vehicle Information
Center (EVIC) equipped vehicles “Oil
Change Required” will be displayed
in the EVIC and a single chime will
sound, indicating that an oil change is
necessary.
NOTE:
The oil change indicator message
will not monitor the time since the
last oil change. Change your ve-
hicles oil if it has been 12 months
since your last oil change even if
the oil change indicator message
is NOT illuminated.
Under no circumstances should
oil change intervals exceed
12,000 km or 12 months, which-
ever comes first.
Your authorized dealer will reset the
oil change indicator message after
completing the scheduled oil change.CAUTION!
Failure to perform the required
maintenance items may result in
damage to the vehicle.
Thousands Of Kilometers 24 48 72 96 120 144 168 192 Months 12 24 36 48 60 72 84 96
Inspect and replace PCV valve if necessary.
Check battery charge status and possibly recharge.
Check tire condition/wear and adjust pressure, if necessary.
Check operation of lighting system (headlamps, direction
indicators, hazard warning lights, luggage compartment,
passenger compartment, glove compartment, instrument
panel warning lights, etc.).
Check operation of windshield washer system and adjust jets if
necessary.
222