2013 KIA VENGA tow
[x] Cancel search: towPage 392 of 751
I9
Index
Checking tire inflation pressure . . . . . . . . . . . . . . . . . 7-43
Compact spare tire replacement . . . . . . . . . . . . . . . . . 7-47
Recommended cold tire inflation pressures . . . . . . . . 7-42
Tire care . . . . . . . . . . . . . . . . . . . . . . . . . . . . . . . . . . . 7-42
Tire maintenance . . . . . . . . . . . . . . . . . . . . . . . . . . . . 7-47
Tire replacement . . . . . . . . . . . . . . . . . . . . . . . . . . . . . 7-46
Tire rotation . . . . . . . . . . . . . . . . . . . . . . . . . . . . . . . . 7-44
Tire sidewall labeling . . . . . . . . . . . . . . . . . . . . . . . . . 7-48
Tire traction . . . . . . . . . . . . . . . . . . . . . . . . . . . . . . . . 7-47
Wheel alignment and tire balance . . . . . . . . . . . . . . . 7-45
Wheel replacement . . . . . . . . . . . . . . . . . . . . . . . . . . . 7-47
TMK, see tiremobilitykit . . . . . . . . . . . . . . . . . . . . . . . 6-15
Towing . . . . . . . . . . . . . . . . . . . . . . . . . . . . . . . . . . . . . 6-25
TPMS . . . . . . . . . . . . . . . . . . . . . . . . . . . . . . . . . . . . . . 6-20
Trailer towing . . . . . . . . . . . . . . . . . . . . . . . . . . . . . . . . 5-52
Transaxle Automatic transaxle . . . . . . . . . . . . . . . . . . . . . . . . . . 5-19
Manual transaxle . . . . . . . . . . . . . . . . . . . . . . . . . . . . 5-16
Trip computer . . . . . . . . . . . . . . . . . . . . . . . . . . . . . . . . 4-44
Using the tiremobilitykit. . . . . . . . . . . . . . . . . . . . . . . . 6-15 Vehicle break-in process . . . . . . . . . . . . . . . . . . . . . . . . . 1-5
Vehicle certification label . . . . . . . . . . . . . . . . . . . . . . . . 8-7
Vehicle identification number (VIN) . . . . . . . . . . . . . . . 8-7
Vehicle stability management . . . . . . . . . . . . . . . . . . . . 5-33
Vehicle weight . . . . . . . . . . . . . . . . . . . . . . . . . . . . . . . 5-60
Warning and indicators . . . . . . . . . . . . . . . . . . . . . . . . . 4-47
Washer fluid . . . . . . . . . . . . . . . . . . . . . . . . . . . . . . . . . 7-31
Wheel alignment and tire balance . . . . . . . . . . . . . . . . 7-45
Wheel replacement . . . . . . . . . . . . . . . . . . . . . . . . . . . . 7-47
Windows . . . . . . . . . . . . . . . . . . . . . . . . . . . . . . . . . . . . 4-19
Auto up/down window . . . . . . . . . . . . . . . . . . . . . . . . 4-21
Manual window . . . . . . . . . . . . . . . . . . . . . . . . . . . . . 4-23
Power window lock button. . . . . . . . . . . . . . . . . . . . . 4-22
Winter driving . . . . . . . . . . . . . . . . . . . . . . . . . . . . . . . . 5-48
Snow tires . . . . . . . . . . . . . . . . . . . . . . . . . . . . . . . . . . 5-48
Tire chains . . . . . . . . . . . . . . . . . . . . . . . . . . . . . . . . . 5-49
Wiper blades . . . . . . . . . . . . . . . . . . . . . . . . . . . . . . . . . 7-36
Wipers and washers . . . . . . . . . . . . . . . . . . . . . . . . . . . 4-67
U
V
W
YN eng INDEX.QXP 2011.09.22. 16:35 Page 9
Page 400 of 751
15
Introduction
Biodiesel
Commercially supplied Diesel blends of no more than 7% biodiesel, commonly
known as "B7 Diesel" may be used in
your vehicle if Biodiesel meets EN 14214
or equivalent specifications. (EN stands
for "European Norm"). The use of biofu-
els exceeding 7% made from rapeseed
methyl ester (RME), fatty acid methyl
ester (FAME), vegetable oil methyl ester
(VME) etc. or mixing diesel exceeding7% with biodiesel will cause increased
wear or damage to the engine and fuel
system. Repair or replacement of worn ordamaged components due to the use of
non approved fuels will not be covered by
the manufactures warranty.
Biodiesel (for New Zealand)
Commercially supplied Diesel blends of no more than 7% biodiesel, commonly
known as "B7 Diesel" may be used in
your vehicle if Biodiesel meets EN 14214
or equivalent specifications. (EN stands
for "European Norm"). The use of biofu-
els exceeding 7%, made from rapeseed
methyl ester (RME), vegetable oil methyl
ester (VME) etc. or mixing diesel exceed-ing 7% with biodiesel will cause
increased wear or damage to the engine
and fuel system. Repair or replacement
of worn or damaged components due to
the use of non approved fuels will not be
covered by the manufactures warranty.No special break-in period is needed. By
following a few simple precautions for the
first 1,000 km (600 miles) you may add to
the performance, economy and life of
your vehicle.
Do not race the engine.
Whilst driving, keep your engine speed
(rpm, or revolutions per minute) within
3000 rpm.
Do not maintain a single speed for long periods of time, either fast or slow.
Varying engine speed is needed to
properly break-in the engine.
Avoid hard stops, except in emergen-
cies, to allow the brakes to seat prop-
erly.
Don't let the engine idle longer than 3 minutes at one time.
Don't tow a trailer during the first 2,000 km (1,200 miles) of operation.
VEHICLE BREAK-IN PROCESS
CAUTION
Never use any fuel, whether
diesel, B7 biodiesel or otherwise,that fails to meet the latest petro-leum industry specification.
Never use any fuel additives or treatments that are not recom-mended or approved by the vehi- cle manufacturer.
CAUTION
Never use any fuel, whether diesel, B7 biodiesel or otherwise,that fails to meet the latest petro-
leum industry specification.
Never use any fuel additives or treatments that are not recom-mended or approved by the vehi- cle manufacturer.
YN RHD 1.QXP 3/31/2012 4:00 PM Page 5
Page 423 of 751
Safety features of your vehicle
18
3
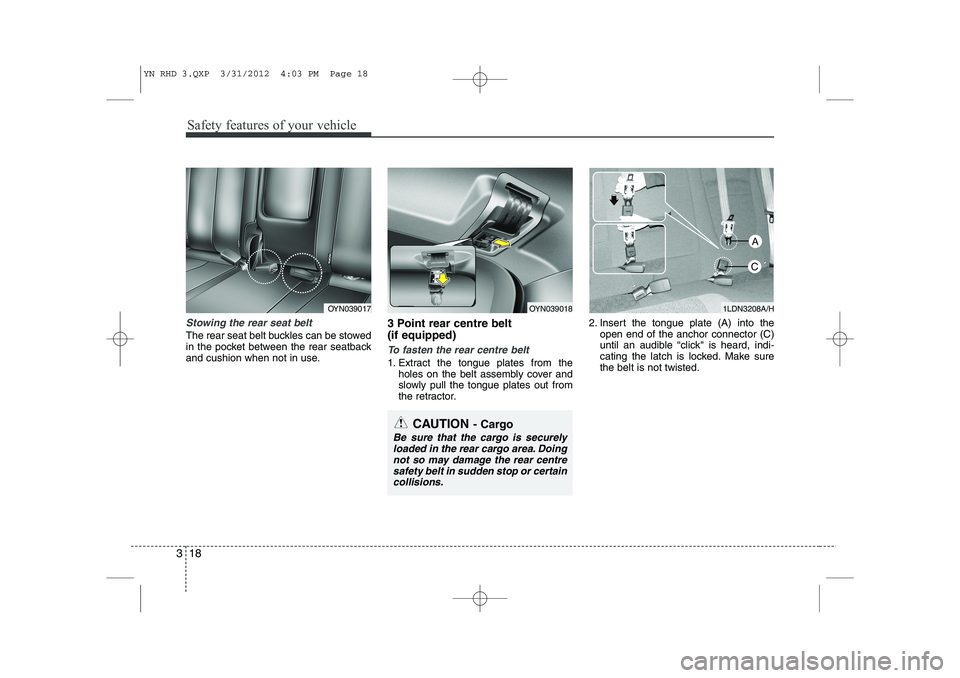
Stowing the rear seat belt
The rear seat belt buckles can be stowed
in the pocket between the rear seatback
and cushion when not in use. 3 Point rear centre belt (if equipped)
To fasten the rear centre belt
1. Extract the tongue plates from the
holes on the belt assembly cover and
slowly pull the tongue plates out from
the retractor. 2. Insert the tongue plate (A) into the
open end of the anchor connector (C)
until an audible “click" is heard, indi-
cating the latch is locked. Make surethe belt is not twisted.
OYN039018OYN0390171LDN3208A/H
CAUTION - Cargo
Be sure that the cargo is securely
loaded in the rear cargo area. Doing not so may damage the rear centresafety belt in sudden stop or certain collisions.
A
C
YN RHD 3.QXP 3/31/2012 4:03 PM Page 18
Page 434 of 751
329
Safety features of your vehicle
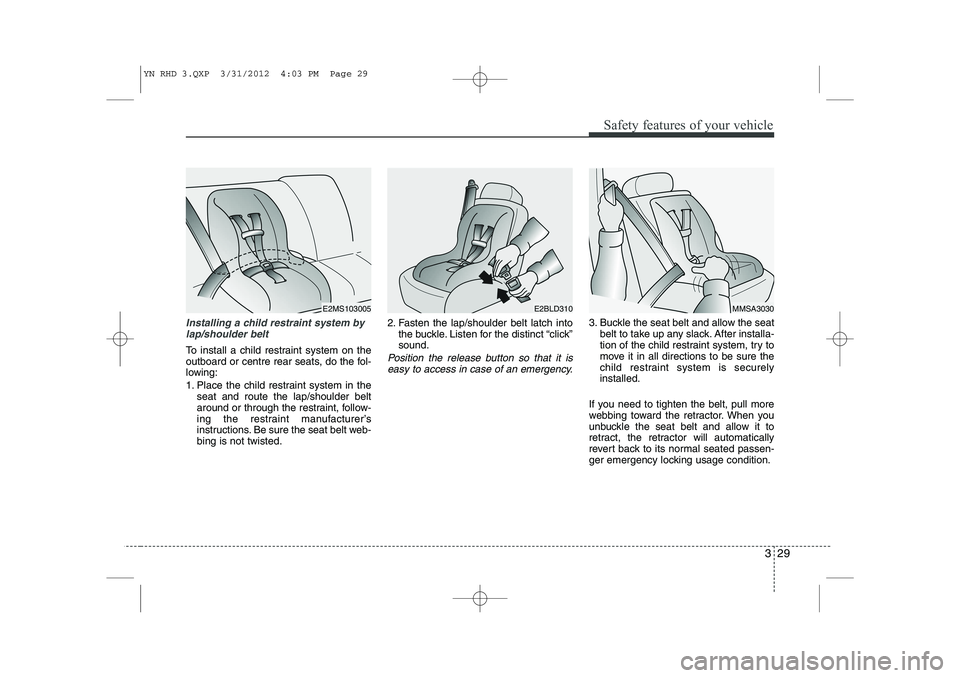
Installing a child restraint system bylap/shoulder belt
To install a child restraint system on the
outboard or centre rear seats, do the fol-
lowing:
1. Place the child restraint system in the seat and route the lap/shoulder belt
around or through the restraint, follow-
ing the restraint manufacturer’s
instructions. Be sure the seat belt web-bing is not twisted. 2. Fasten the lap/shoulder belt latch into
the buckle. Listen for the distinct “click”sound.Position the release button so that it is
easy to access in case of an emergency.
3. Buckle the seat belt and allow the seat belt to take up any slack. After installa-
tion of the child restraint system, try to
move it in all directions to be sure the
child restraint system is securelyinstalled.
If you need to tighten the belt, pull more
webbing toward the retractor. When you
unbuckle the seat belt and allow it to
retract, the retractor will automatically
revert back to its normal seated passen-
ger emergency locking usage condition.
E2MS103005MMSA3030E2BLD310
YN RHD 3.QXP 3/31/2012 4:03 PM Page 29
Page 477 of 751
413
Features of your vehicle
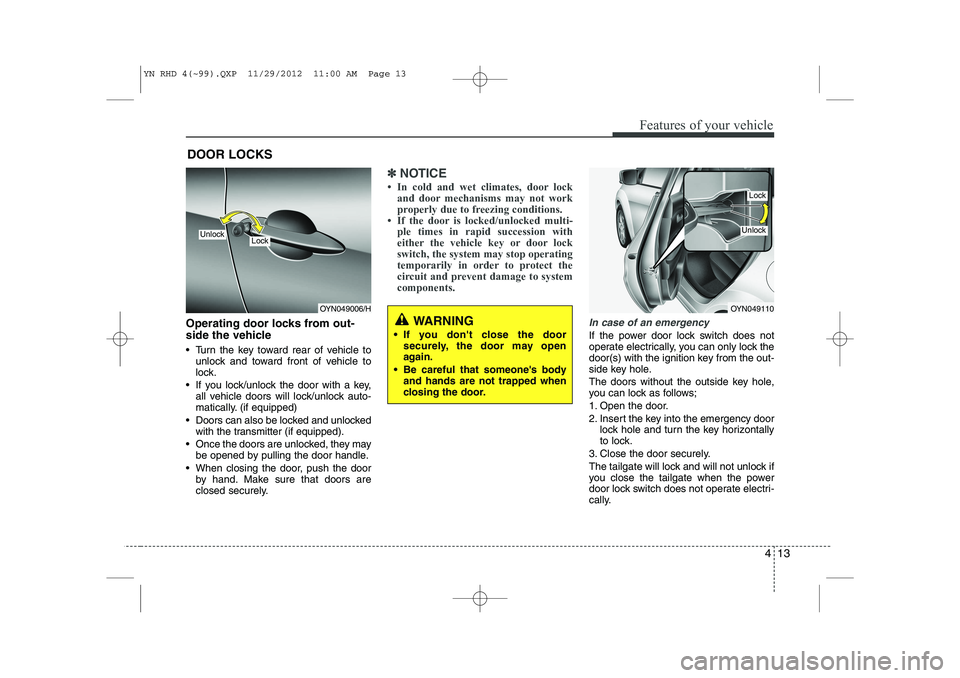
Operating door locks from out-
side the vehicle
Turn the key toward rear of vehicle tounlock and toward front of vehicle to
lock.
If you lock/unlock the door with a key, all vehicle doors will lock/unlock auto-
matically. (if equipped)
Doors can also be locked and unlocked with the transmitter (if equipped).
Once the doors are unlocked, they may be opened by pulling the door handle.
When closing the door, push the door by hand. Make sure that doors are
closed securely.
✽✽ NOTICE
Page 499 of 751

435
Features of your vehicle
Inside rearview mirror
Adjust the rearview mirror so that the
centre view through the rear window is
seen. Make this adjustment before you
start driving.
Day/night rearview mirror (if equipped)
Make this adjustment before you start
driving and whilst the day/night lever is in
the day position.
Pull the day/night lever toward you to reduce glare from the headlights of the
vehicles behind you during night driving.
Remember that you lose some rearviewclarity in the night position.
Electrochromic mirror (ECM)
(if equipped)
The electric rearview mirror automatical- ly controls the glare from the headlights
of the car behind you in nighttime or low
light driving conditions. The sensormounted in the mirror senses the light
level around the vehicle, and automati-cally controls the headlight glare from
vehicles behind you.
When the engine is running, the glare is
automatically controlled by the sensor
mounted in the rearview mirror.
Whenever the shift lever is shifted into
reverse (R), the mirror will automatically
go to the brightest setting in order to
improve the drivers view behind the vehi-
cle.
MIRRORS
OAM049023
CAUTION
When cleaning the mirror, use a
paper towel or similar materialdampened with glass cleaner. Do not spray glass cleaner directly on
the mirror as that may cause the liq-uid cleaner to enter the mirror hous- ing.
Day
Night
WARNING - Rear visibility
Do not place objects in the rear
seat or cargo area which would
interfere with your vision out the
rear window.
WARNING
Do not adjust the rearview mirror
whilst the vehicle is moving. This
could result in loss of control, and
an accident which could cause
death, serious injury or property
damage.
WARNING
Do not modify the inside mirror and
do not install a wide mirror. It could
result in injury, during an accident
or deployment of the air bag.
YN RHD 4(~99).QXP 11/29/2012 11:01 AM Page 35
Page 502 of 751
Features of your vehicle
38
4
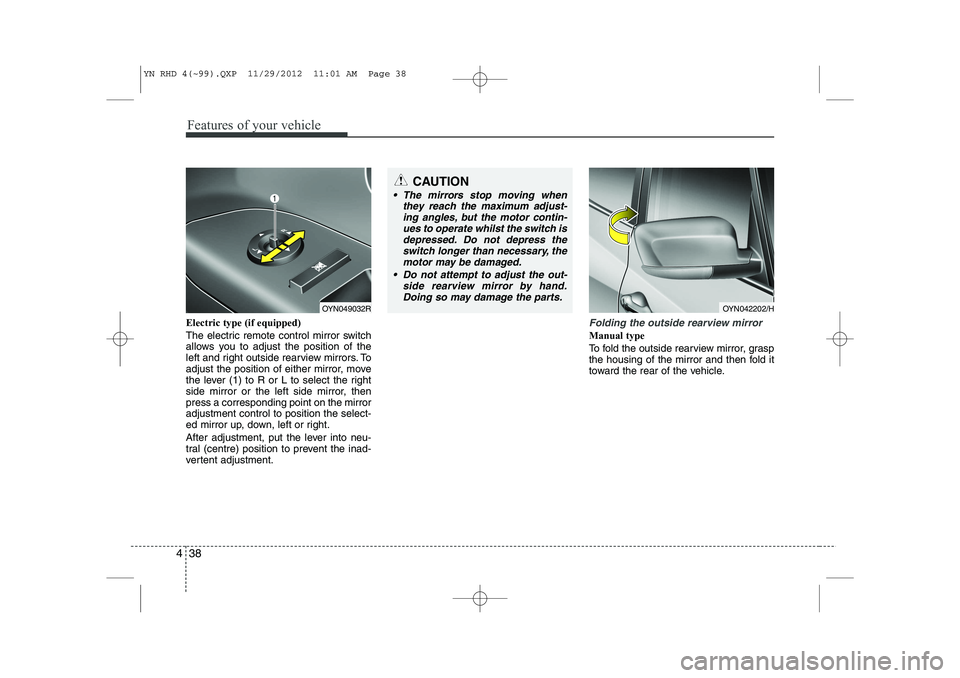
Electric type (if equipped)
The electric remote control mirror switch
allows you to adjust the position of the
left and right outside rearview mirrors. To
adjust the position of either mirror, move
the lever (1) to R or L to select the right
side mirror or the left side mirror, thenpress a corresponding point on the mirroradjustment control to position the select-
ed mirror up, down, left or right.
After adjustment, put the lever into neu-
tral (centre) position to prevent the inad-
vertent adjustment.Folding the outside rearview mirror
Manual type
To fold the outside rearview mirror, grasp
the housing of the mirror and then fold it
toward the rear of the vehicle.
CAUTION
The mirrors stop moving when
they reach the maximum adjust-
ing angles, but the motor contin- ues to operate whilst the switch isdepressed. Do not depress theswitch longer than necessary, the
motor may be damaged.
Do not attempt to adjust the out- side rearview mirror by hand.Doing so may damage the parts.
OYN049032ROYN042202/H
YN RHD 4(~99).QXP 11/29/2012 11:01 AM Page 38
Page 522 of 751

Features of your vehicle
58
4
The sensing distance whilst the rear
parking assist system is in operation is
approximately 120 cm (47 in.).
When more than two objects are sensed at the same time, the closest
one will be recognized first.
Types of warning sound
When an object is 120 cm to 81 cm (47in. to 32 in.) from the rear bumper:
Buzzer beeps intermittently
When an object is 80 cm to 41 cm (31 in. to 16 in.) from the rear bumper:
Buzzer beeps more frequently
When an object is within 40 cm (15 in.) of the rear bumper:
Buzzer sounds continuously. Non-operational conditions of rear parking assist system
The rear parking assist system may
not operate properly when:
1. Moisture is frozen to the sensor. (It will
operate normally when the moisture has been cleared.)
2. The sensor is covered with foreign matter, such as snow or water, or the
sensor cover is blocked. (It will operate
normally when the material is removed
or the sensor is no longer blocked.)
3. Driving on uneven road surfaces (unpaved roads, gravel, bumps, gradi-ent).
4. Objects generating excessive noise (vehicle horns, loud motorcycle
engines, or truck air brakes) are within
range of the sensor.
5. Heavy rain or water spray exists.
6. Wireless transmitters or mobile phones are within range of the sensor.
7. The sensor is covered with snow.
8. Trailer towing. The detecting range may decrease when:
1. The sensor is stained with foreign mat-
ter such as snow or water. (The sens-
ing range will return to normal when
removed.)
2. Outside air temperature is extremely hot or cold.
The following objects may not be rec-
ognized by the sensor:
1. Sharp or slim objects such as ropes, chains or small poles.
2. Objects which tend to absorb the sen- sor frequency such as clothes, spongy
material or snow.
3. Undetectable objects smaller than 1 m (40 in.) and narrower than 14 cm (6 in.)
in diameter.
YN RHD 4(~99).QXP 11/29/2012 11:02 AM Page 58