2013 KIA VENGA tow
[x] Cancel search: towPage 622 of 751
559
Driving your vehicle
Weight of the trailer
How heavy can a trailer be considered
safe? It should never weigh more than
the maximum trailer weight with trailer
brakes. But even that can be too heavy.
It depends on how you plan to use your
trailer. For example, speed, altitude, road
grades, outside temperature and how
often your vehicle is used to pull a trailer
are all important. The ideal trailer weight
can also depend on any special equip-
ment that you have on your vehicle.
Weight of the trailer nose
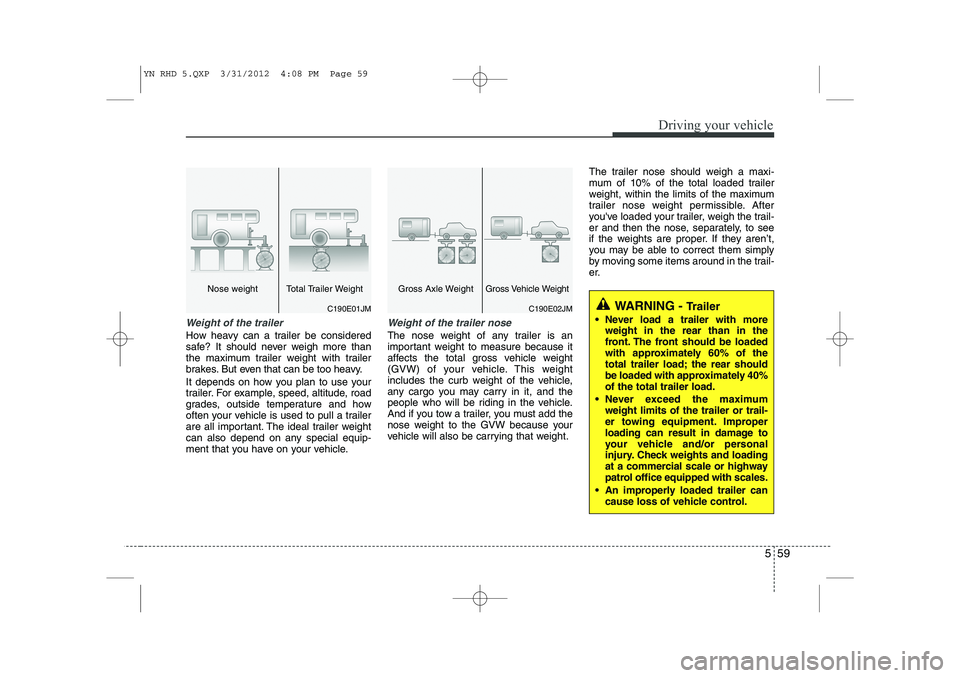
The nose weight of any trailer is an
important weight to measure because it
affects the total gross vehicle weight
(GVW) of your vehicle. This weight
includes the curb weight of the vehicle,
any cargo you may carry in it, and the
people who will be riding in the vehicle.
And if you tow a trailer, you must add the
nose weight to the GVW because your
vehicle will also be carrying that weight.The trailer nose should weigh a maxi-
mum of 10% of the total loaded trailer
weight, within the limits of the maximum
trailer nose weight permissible. After
you've loaded your trailer, weigh the trail-
er and then the nose, separately, to see
if the weights are proper. If they aren’t,
you may be able to correct them simply
by moving some items around in the trail-
er.
C190E01JM
Nose weight Total Trailer Weight
WARNING -
Trailer
Never load a trailer with more weight in the rear than in the
front. The front should be loaded
with approximately 60% of the
total trailer load; the rear should
be loaded with approximately 40%of the total trailer load.
Never exceed the maximum weight limits of the trailer or trail-
er towing equipment. Improper
loading can result in damage to
your vehicle and/or personal
injury. Check weights and loading
at a commercial scale or highway
patrol office equipped with scales.
An improperly loaded trailer can cause loss of vehicle control.C190E02JM
Gross Axle WeightGross Vehicle Weight
YN RHD 5.QXP 3/31/2012 4:08 PM Page 59
Page 624 of 751
6
Road warning / 6-2 In case of an emergency whilst driving / 6-2If the engine will not start / 6-3Emergency starting / 6-4If the engine overheats / 6-6
If you have a flat tyre (with spare tyre) / 6-7
If you have a flat tyre (with Tyre Mobility Kit) / 6-15
Tyre pressure monitoring system (TPMS) / 6-20
Towing / 6-25
What to do in an emergency
YN RHD 6.QXP 3/31/2012 4:10 PM Page 1
Page 625 of 751
What to do in an emergency
2
6
ROAD WARNING
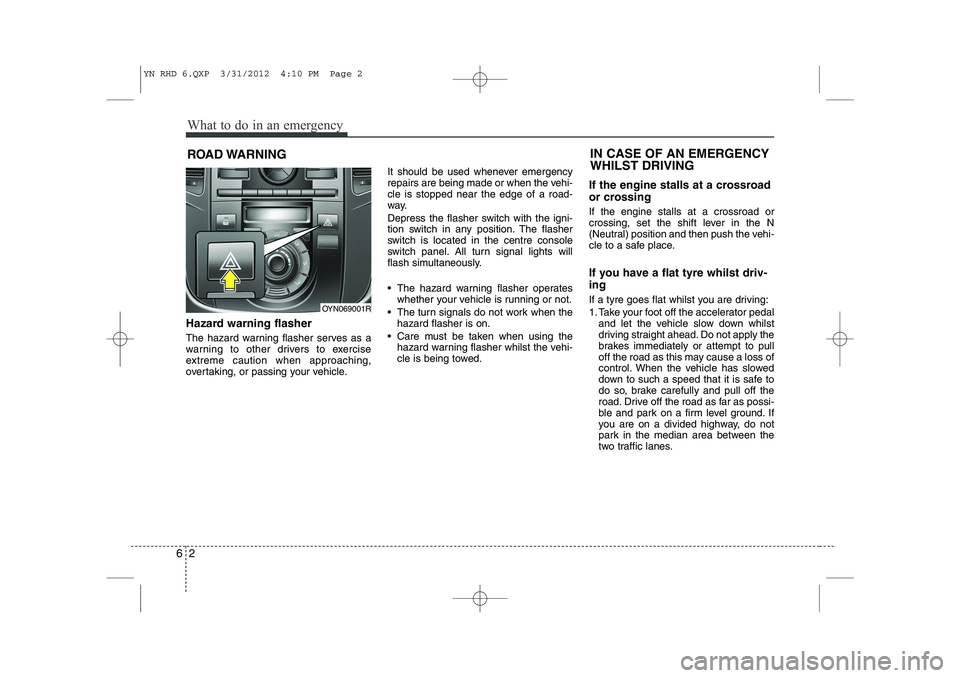
Hazard warning flasher
The hazard warning flasher serves as a
warning to other drivers to exercise
extreme caution when approaching,
overtaking, or passing your vehicle. It should be used whenever emergency
repairs are being made or when the vehi-cle is stopped near the edge of a road-
way.
Depress the flasher switch with the igni-
tion switch in any position. The flasher
switch is located in the centre console
switch panel. All turn signal lights will
flash simultaneously.
• The hazard warning flasher operates
whether your vehicle is running or not.
The turn signals do not work when the hazard flasher is on.
Care must be taken when using the hazard warning flasher whilst the vehi-
cle is being towed. If the engine stalls at a crossroad
or crossing If the engine stalls at a crossroad or
crossing, set the shift lever in the N
(Neutral) position and then push the vehi-
cle to a safe place.
If you have a flat tyre whilst driv- ing
If a tyre goes flat whilst you are driving:
1. Take your foot off the accelerator pedal
and let the vehicle slow down whilst
driving straight ahead. Do not apply the
brakes immediately or attempt to pull
off the road as this may cause a loss of
control. When the vehicle has slowed
down to such a speed that it is safe to
do so, brake carefully and pull off the
road. Drive off the road as far as possi-
ble and park on a firm level ground. If
you are on a divided highway, do not
park in the median area between the
two traffic lanes.
IN CASE OF AN EMERGENCY WHILST DRIVING
OYN069001R
YN RHD 6.QXP 3/31/2012 4:10 PM Page 2
Page 627 of 751
What to do in an emergency
4
6
EMERGENCY STARTING
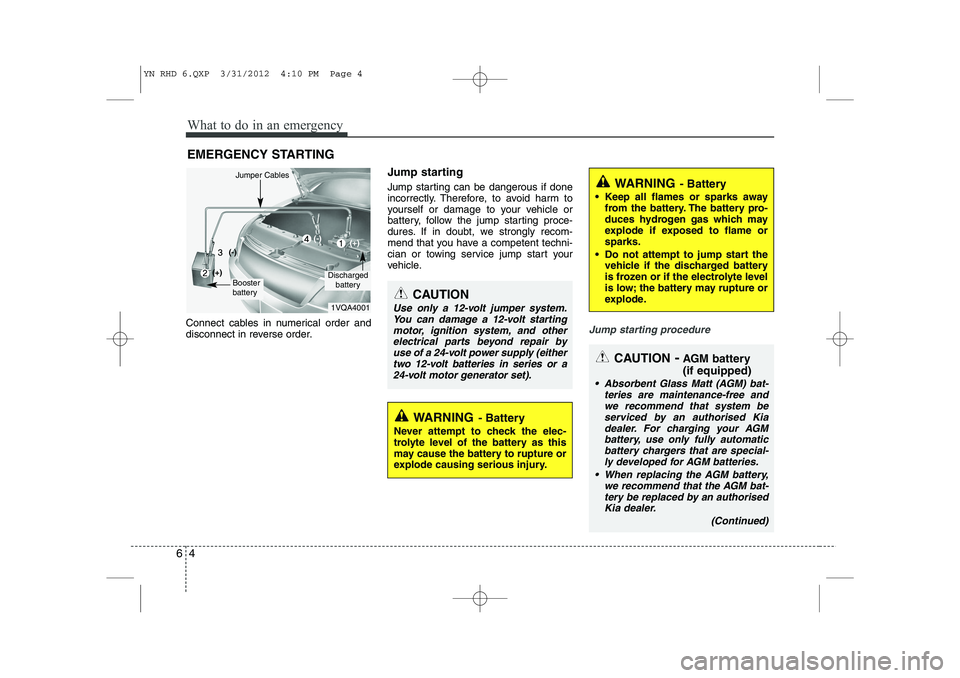
Connect cables in numerical order and
disconnect in reverse order. Jump starting
Jump starting can be dangerous if done
incorrectly. Therefore, to avoid harm to
yourself or damage to your vehicle or
battery, follow the jump starting proce-
dures. If in doubt, we strongly recom-
mend that you have a competent techni-
cian or towing service jump start your
vehicle.
Jump starting procedure
CAUTION
Use only a 12-volt jumper system.
You can damage a 12-volt starting
motor, ignition system, and otherelectrical parts beyond repair by use of a 24-volt power supply (eithertwo 12-volt batteries in series or a
24-volt motor generator set).
WARNING - Battery
• Keep all flames or sparks away from the battery. The battery pro-
duces hydrogen gas which may
explode if exposed to flame orsparks.
Do not attempt to jump start the vehicle if the discharged battery
is frozen or if the electrolyte level
is low; the battery may rupture or
explode.
WARNING - Battery
Never attempt to check the elec-
trolyte level of the battery as this
may cause the battery to rupture or
explode causing serious injury.
1VQA4001
Discharged battery
Jumper Cables
Booster
battery
(-)
(+)
(+)(-)
CAUTION -AGM battery (if equipped)
Absorbent Glass Matt (AGM) bat-
teries are maintenance-free and
we recommend that system beserviced by an authorised Kiadealer. For charging your AGM battery, use only fully automatic
battery chargers that are special-ly developed for AGM batteries.
When replacing the AGM battery, we recommend that the AGM bat-tery be replaced by an authorised
Kia dealer.
(Continued)
YN RHD 6.QXP 3/31/2012 4:10 PM Page 4
Page 628 of 751

65
What to do in an emergency
1. Make sure the booster battery is 12-volt and that its negative terminal is
grounded.
2. If the booster battery is in another vehicle, do not allow the vehicles comein contact.
3. Turn off all unnecessary electrical loads.
4. Connect the jumper cables in the exact sequence shown in the illustration.First connect one end of a jumper
cable to the positive terminal of the
discharged battery (1), then connect
the other end to the positive terminal
on the booster battery (2). 5. Proceed to connect one end of the
other jumper cable to the negative ter-
minal of the booster battery (3), then
the other end to a solid, stationary,
metallic point (for example, the engine
lifting bracket) away from the battery
(4). Do not connect it to or near any
part that moves when the engine is
cranked.
Do not allow the jumper cables to con-
tact anything except the correct battery
terminals or the correct ground. Do not
lean over the battery when making
connections.
6. Start the engine of the vehicle with the booster battery and let it run at 2,000
rpm, then start the engine of the vehi-
cle with the discharged battery.
If the cause of your battery discharging is
not apparent, we recommend that thesystem be checked by an authorised Kia
dealer.
Push-starting
Your manual transaxle-equipped vehicle
should not be push-started because itmight damage the emission control sys-tem.
Vehicles equipped with automatic
transaxle cannot be push-started.
Follow the directions in this section for
jump-starting.
WARNING
Never tow a vehicle to start it
because the sudden surge forward
when the engine starts could cause
a collision with the tow vehicle.
CAUTION - Battery cables
Do not connect the jumper cable
from the negative terminal of the booster battery to the negative ter-minal of the discharged battery. This can cause the discharged bat-
tery to overheat and crack, releas- ing battery acid.
(Continued)
If the AGM battery is reconnected or replaced, ISG function will notoperate immediately.
If you want to use the ISG func-tion, the battery sensor needs to be calibrated for approximately 4hours with the ignition off.
YN RHD 6.QXP 3/31/2012 4:10 PM Page 5
Page 630 of 751
67
What to do in an emergency
IF YOU HAVE A FLAT TYRE (WITH SPARE TYRE, IF EQUIPPED)
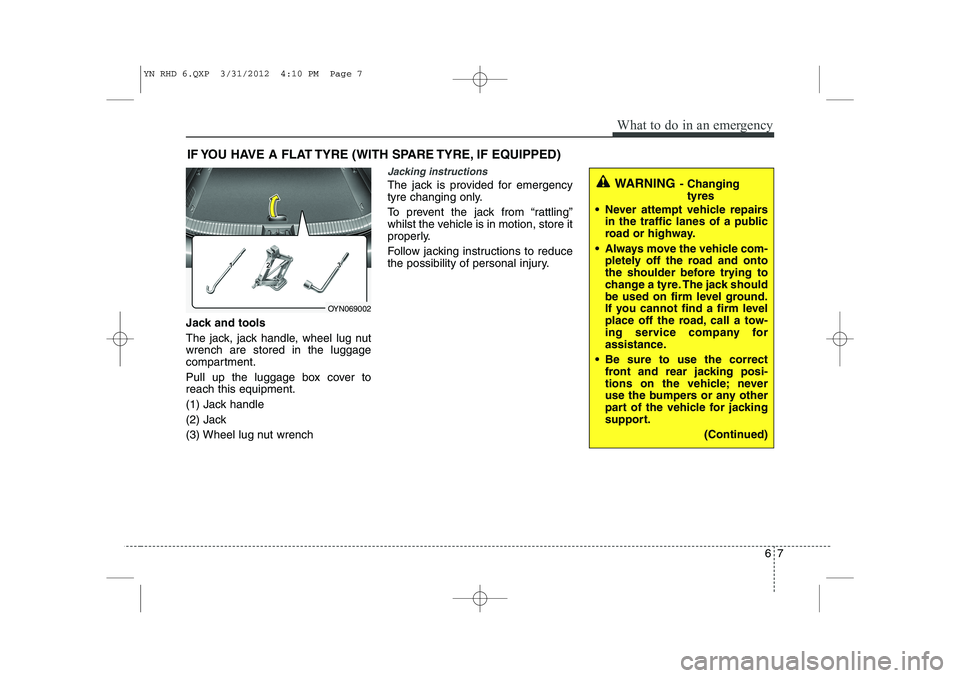
Jack and tools
The jack, jack handle, wheel lug nut wrench are stored in the luggage
compartment.
Pull up the luggage box cover to reach this equipment.
(1) Jack handle
(2) Jack
(3) Wheel lug nut wrench
Jacking instructions
The jack is provided for emergency
tyre changing only.
To prevent the jack from “rattling”
whilst the vehicle is in motion, store it
properly.
Follow jacking instructions to reduce
the possibility of personal injury.WARNING - Changing
tyres
Never attempt vehicle repairs in the traffic lanes of a public
road or highway.
Always move the vehicle com- pletely off the road and onto
the shoulder before trying to
change a tyre. The jack should
be used on firm level ground.
If you cannot find a firm level
place off the road, call a tow-
ing service company for
assistance.
Be sure to use the correct front and rear jacking posi-
tions on the vehicle; never
use the bumpers or any other
part of the vehicle for jacking
support.
(Continued)
OYN069002
YN RHD 6.QXP 3/31/2012 4:10 PM Page 7
Page 637 of 751
What to do in an emergency
14
6
Do not take this vehicle through an
automatic car wash whilst the com- pact spare tyre is installed.
Do not use tyre chains on the com- pact spare tyre. Because of the
smaller size, a tyre chain will not fit
properly. This could damage the
vehicle and result in loss of thechain.
The compact spare tyre should not be installed on the front axle if the
vehicle must be driven in snow or
on ice.
Do not use the compact spare tyre on any other vehicle because thistyre has been designed especially
for your vehicle.
The compact spare tyre’s tread life is shorter than a regular tyre.
Inspect your compact spare tyre
regularly and replace worn com-
pact spare tyres with the same sizeand design, mounted on the samewheel. The compact spare tyre should not
be used on any other wheels, nor
should standard tyres, snow tyres,
wheel covers or trim rings be used
with the compact spare wheel. Ifsuch use is attempted, damage tothese items or other car compo-
nents may occur.
Do not use more than one compact spare tyre at a time.
Do not tow a trailer whilst the com- pact spare tyre is installed.
YN RHD 6.QXP 3/31/2012 4:10 PM Page 14
Page 641 of 751
What to do in an emergency
18
6
Distributing the sealant
Immediately drive approximately 3 km
(2 miles) to evenly distribute the
sealant in the tyre. Producing the tyre inflation pres- sure
1) After driving approximately 3 km (2
miles), stop at a suitable location.
2) Connect connection hose 9 of the compressor directly to the tyre
valve.
3) Connect between compressor and the vehicle power outlet using
the cable and connectors.
4) Adjust the tyre inflation pressure to 220 kPa (32 psi). With the igni-
tion switched on, proceed as fol-
lows.
- To increase the inflation pres- sure: Switch on the compressor,
position I. To check the current
inflation pressure setting, briefly
switch off the compressor. - To reduce the inflation pres-
sure: Press the button 8 on the
compressor.
WARNING
Do not let the compressor run for
more than 10 minutes, otherwise
the device will overheat and may
be damaged.
WARNING
The tyre inflation pressure must
be at least 220 kPa (32 psi). If it is
not, do not continue driving. Call
for road side service or towing.
CAUTION
Do not exceed a speed of 80 km/h (50 mph). If possible, donot fall below a speed of 20 km/h (12 mph).
Whilst driving, if you experienceany unusual vibration, ride dis-turbance or noise, reduce yourspeed and drive with caution until you can safely pull off ofthe side of the road.
Call for road side service or tow-ing.
CAUTION
If the inflation pressure is notmaintained, drive the vehicle asecond time, refer to Distributing the sealant. Then repeat steps 1to 4.
Use of the Tyre Mobility Kit maybe ineffectual for tyre damagelarger than approximately 6 mm (0.24 in).
We recommend that you contactthe nearest Kia A/S centre, or aworkshop that works according toKia repair procedures with corre- spondingly trained personnel ifthe tyre cannot be made roadwor-thy with the Tyre Mobility Kit.
YN RHD 6.QXP 3/31/2012 4:10 PM Page 18