Page 632 of 751
69
What to do in an emergency
4. Remove the wheel lug nut wrench,jack, jack handle, and spare tyre
from the vehicle.
5. Block both the front and rear of wheel that is diagonally opposite
the jack position. 6. Loosen the wheel lug nuts coun-
terclockwise one turn each, but do
not remove any nut until the tyre
has been raised off the ground.
WARNING - Changing a tyre
To prevent vehicle movement
whilst changing a tyre, always
set the parking brake fully,
and always block the wheel
diagonally opposite the wheel
being changed.
We recommend that the wheels of the vehicle be
chocked, and that no person
remain in a vehicle that is
being jacked.
OYN069019OED066026
YN RHD 6.QXP 3/31/2012 4:10 PM Page 9
Page 633 of 751

What to do in an emergency
10
6
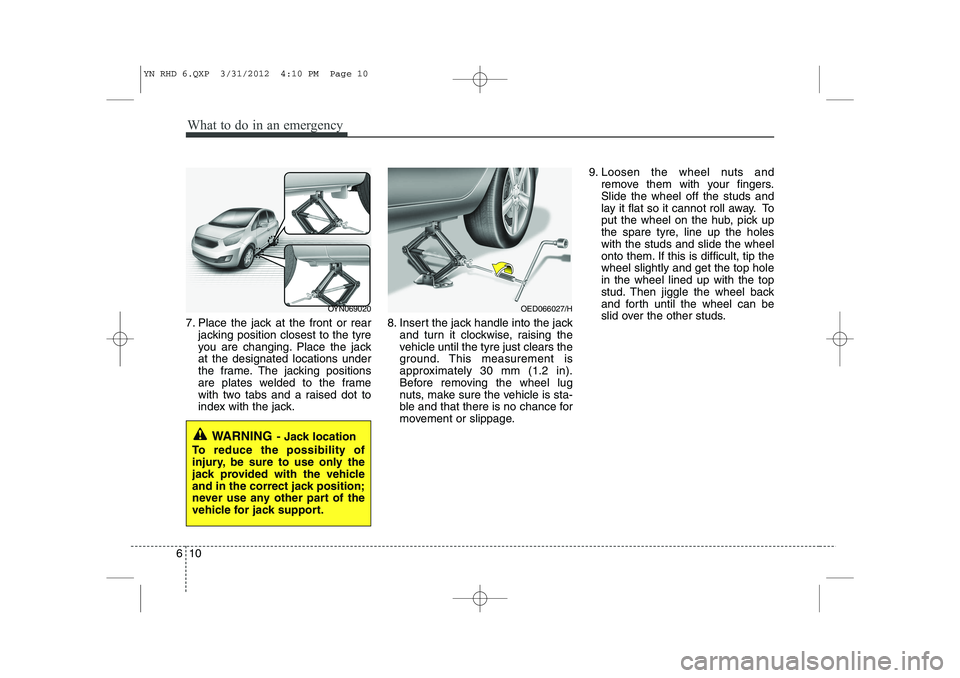
7. Place the jack at the front or rear
jacking position closest to the tyre
you are changing. Place the jackat the designated locations under
the frame. The jacking positions
are plates welded to the frame
with two tabs and a raised dot to
index with the jack. 8. Insert the jack handle into the jack
and turn it clockwise, raising the
vehicle until the tyre just clears the
ground. This measurement is
approximately 30 mm (1.2 in).
Before removing the wheel lug
nuts, make sure the vehicle is sta-
ble and that there is no chance for
movement or slippage. 9. Loosen the wheel nuts and
remove them with your fingers.Slide the wheel off the studs and
lay it flat so it cannot roll away. To
put the wheel on the hub, pick up
the spare tyre, line up the holeswith the studs and slide the wheel
onto them. If this is difficult, tip thewheel slightly and get the top holein the wheel lined up with the top
stud. Then jiggle the wheel back
and forth until the wheel can be
slid over the other studs.
WARNING - Jack location
To reduce the possibility of
injury, be sure to use only the
jack provided with the vehicle
and in the correct jack position;
never use any other part of the
vehicle for jack support.
OYN069020OED066027/H
YN RHD 6.QXP 3/31/2012 4:10 PM Page 10
Page 634 of 751

611
What to do in an emergency
10. To reinstall the wheel, hold it onthe studs, put the wheel nuts on the studs and tighten them finger
tight. Jiggle the tyre to be sure itis completely seated, then tight-
en the nuts as much as possible
with your fingers again.
11. Lower the vehicle to the ground by turning the wheel nut wrench
counterclockwise.
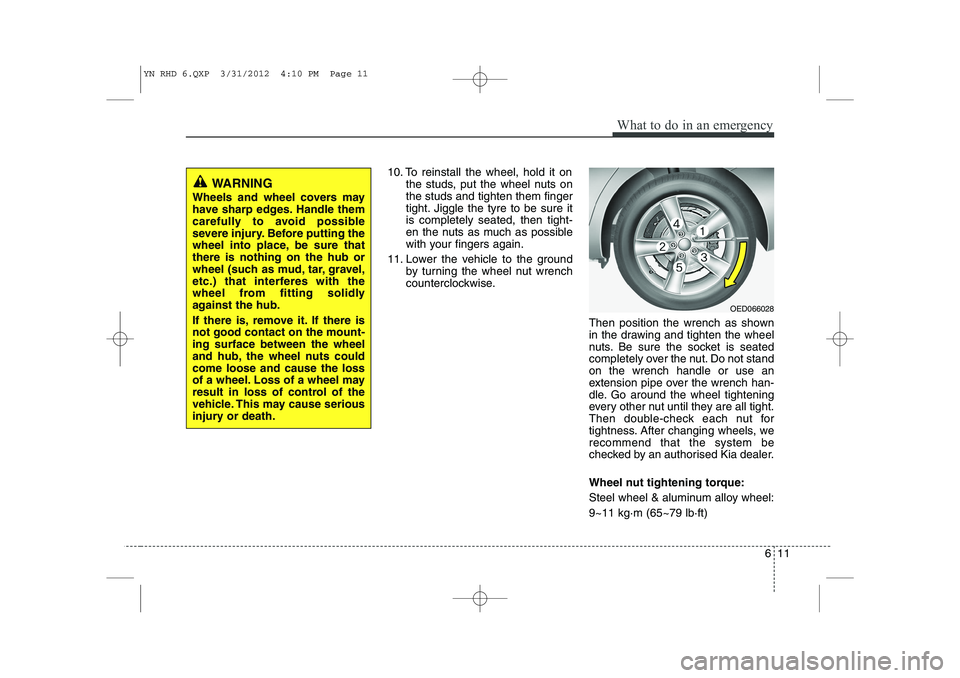
Then position the wrench as shown
in the drawing and tighten the wheel
nuts. Be sure the socket is seated
completely over the nut. Do not standon the wrench handle or use an
extension pipe over the wrench han-
dle. Go around the wheel tightening
every other nut until they are all tight.
Then double-check each nut for
tightness. After changing wheels, werecommend that the system be
checked by an authorised Kia dealer.
Wheel nut tightening torque:
Steel wheel & aluminum alloy wheel:9~11 kg·m (65~79 lb·ft)
WARNING
Wheels and wheel covers may
have sharp edges. Handle them
carefully to avoid possible
severe injury. Before putting the
wheel into place, be sure thatthere is nothing on the hub or
wheel (such as mud, tar, gravel,
etc.) that interferes with the
wheel from fitting solidly
against the hub.
If there is, remove it. If there is not good contact on the mount-ing surface between the wheel
and hub, the wheel nuts couldcome loose and cause the loss
of a wheel. Loss of a wheel may
result in loss of control of the
vehicle. This may cause serious
injury or death.
OED066028
YN RHD 6.QXP 3/31/2012 4:10 PM Page 11
Page 649 of 751
When towing your vehicle in an emer- gency without wheel dollies :
1. Set the ignition switch in the ACC posi-tion.
2. Place the transaxle shift lever in N (Neutral).
3. Release the parking brake.
Removable towing hook (front) (if equipped)
1. Open the tailgate, and remove the tow-ing hook from the tool case.
2. Remove the hole cover pressing the lower part of the cover on the front
bumper. 3. Install the towing hook by turning it
clockwise into the hole until it is fullysecured.
4. Remove the towing hook and install the cover after use.
CAUTION
Failure to place the transaxle shift
lever in N (Neutral) may cause inter-nal damage to the transaxle.
OYN069014OYN069015
626
What to do in an emergency
YN RHD 6.QXP 3/31/2012 4:11 PM Page 26
Page 677 of 751

725
Maintenance
Changing the engine oil and filter
We recommend that the engine oil and
filter be replaced by an authorised Kia
dealer.The high-pressure cooling system has a
reservoir filled with year-round antifreeze
coolant. The reservoir is filled at the fac-
tory.
Check the antifreeze protection and
coolant level at least once a year, at thebeginning of the winter season, and
before travelling to a colder climate.
Checking the coolant level
WARNING
Used engine oil may cause skin irri- tation or cancer if left in contact
with the skin for prolonged periods
of time. Used engine oil contains
chemicals that have caused cancer
in laboratory animals. Always pro-
tect your skin by washing your
hands thoroughly with soap and
warm water as soon as possibleafter handling used oil.
ENGINE COOLANT
WARNING
Removing radiator cap
Never attempt to remove the radi- ator cap whilst the engine is
operating or hot. Doing so mightlead to cooling system and
engine damage. Also hot coolantor steam could cause serious
personal injury.
(Continued)
(Continued)
Turn the engine off and wait untilit cools down. Use extreme care
when removing the radiator cap.
Wrap a thick towel around it, and
turn it counterclockwise slowly to
the first stop. Step back whilst
the pressure is released from thecooling system.
When you are sure all the pres-
sure has been released, press
down on the cap, using a thick
towel, and continue turning coun-
terclockwise to remove it.
Even if the engine is not operat- ing, do not remove the radiatorcap or the drain plug whilst the
engine and radiator are hot. Hot
coolant and steam may still blow
out under pressure, causing seri-
ous injury.
YN RHD 7.QXP 3/31/2012 4:13 PM Page 25
Page 693 of 751

741
Maintenance
Reset items
Items should be reset after the battery
has been discharged or the battery hasbeen disconnected.
Auto up/down window (See section 4)
Sunroof (See section 4)
Trip computer (See section 4)
Climate control system (See section 4)
Clock (See section 4)
Audio (See section 4)(Continued)
If the AGM battery is reconnected or replaced, ISG function will notoperate immediately.
If you want to use the ISG func-tion, the battery sensor needs to be calibrated for approximately 4hours with the ignition off.
WARNING
Before performing maintenance or recharging the battery, turn off all accessories and stop the
engine.
The negative battery cable must be removed first and installed
last when the battery is discon-nected.
WARNING - Recharging
battery
When recharging the battery,
observe the following precautions:
The battery must be removed from the vehicle and placed in an area with good ventilation.
Do not allow cigarettes, sparks, or flame near the battery.
Watch the battery during charg- ing, and stop or reduce the charg-
ing rate if the battery cells begin
gassing (boiling) violently or if
the temperature of the electrolyte
of any cell exceeds 49°C (120°F).
Wear eye protection when check- ing the battery during charging.
(Continued)
(Continued)
Disconnect the battery charger inthe following order.
1. Turn off the battery charger main switch.
2. Unhook the negative clamp from the negative battery terminal.
3. Unhook the positive clamp from the positive battery terminal.
YN RHD 7.QXP 3/31/2012 4:14 PM Page 41
Page 710 of 751
Maintenance
58
7
DescriptionFuse ratingSystemProtected Component
15ATRANSMISSION
CONTROL UNITSpeed In Sensor, Speed Out Sensor, Speed Sensor, Inhibitor Switch
15AIGNITION COILIgnition Coil, Condensor
10AIGNITIONHLLD Switch, HLLD Actuator, BCM, Air Conditioning System, Sunroof
25AWINDSCREEN WIPING
SYSTEM (CONTINUOUS)Front Wiper Motor Relay, Multi Function Switch Wiper
10AFRONT FOG LAMPFront Fog Lamp, BCM
10AREAR FOG LAMPRear Fog Lamp, BCM
10AROOM LAMPRoom Lamp Switch, MUT
15ASTOP LAMPStop Switch, BCM
10ACLUSTERCluster, BCM, Digtal Clock
10AIGNITIONAudio,TPMS, Centre Facia Switch
10AANTI-LOCK BRAKE SYSTEMYaw Rate Sensor, ABS(ESP),ESP Switch
10AB/UP LPBack Up Switch
10AELECTRONIC (ENGINE) CONTROL UNITECU, AFS
10ARAIN SENSOR
(PTC HEATER )Rain Sensor Relay (PTC, Fuel Filter Heater)
10APOWER DISTRIBUTION MODULESmart key Unit, SSB
YN RHD 7.QXP 3/31/2012 4:15 PM Page 58
Page 711 of 751
759
Maintenance
DescriptionFuse ratingSystemProtected Component
15AFRONT HEAT RAYS JOINGLASSFront Deicer, BCM
15APOWER OUTLETFront Power Outlet
25APOWER OUTLETRear Power Outlet, Centre Power Outlet
10AIGNITIONAudio, Digtal Clock
10AAIR BAG INDICATORCluster (Air Bag Indicator)
10AAIR BAG ACU
10ADIRECTION INDICATORTURN SIGNAL LAMPMulti Function Switch Light
10AHEADLAMP HI INDICATORCluster
15AWIPER SYSTEM RRRear Wiper Motor, Rain Sensor, Multi Function Switch Wiper
15ASEAT HEATERCentre Facia Switch
20AAUDIOAudio
10ALUGGAGE LPLuggage Lamp
YN RHD 7.QXP 3/31/2012 4:15 PM Page 59