2013 KIA VENGA clock
[x] Cancel search: clockPage 361 of 751
Maintenance
68
7
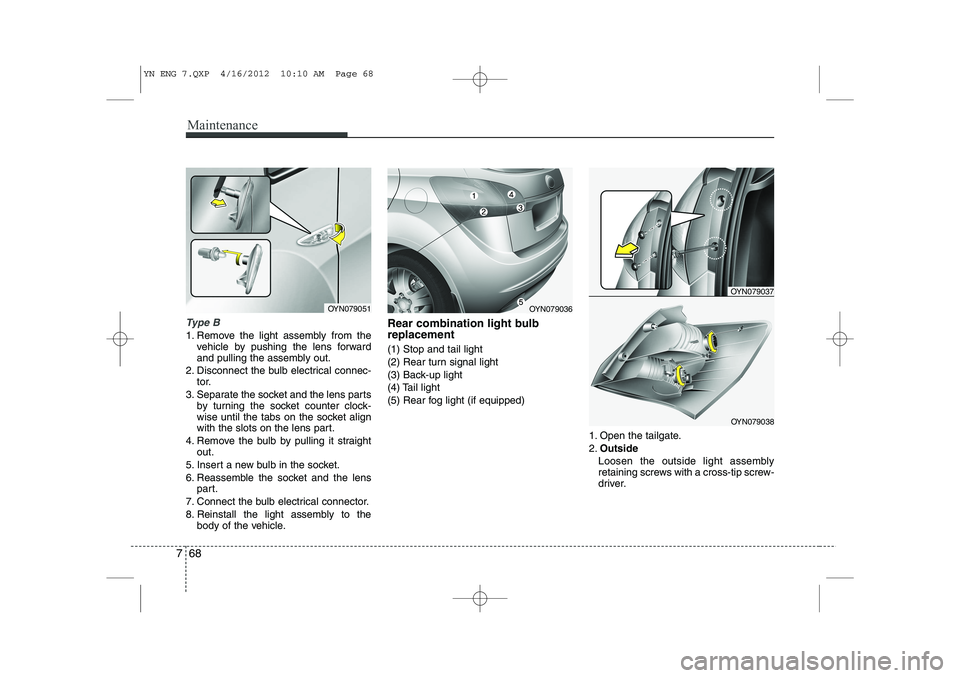
Type B
1. Remove the light assembly from the
vehicle by pushing the lens forward
and pulling the assembly out.
2. Disconnect the bulb electrical connec- tor.
3. Separate the socket and the lens parts by turning the socket counter clock-
wise until the tabs on the socket align
with the slots on the lens part.
4. Remove the bulb by pulling it straight out.
5. Insert a new bulb in the socket.
6. Reassemble the socket and the lens part.
7. Connect the bulb electrical connector.
8. Reinstall the light assembly to the body of the vehicle. Rear combination light bulb replacement (1) Stop and tail light
(2) Rear turn signal light
(3) Back-up light
(4) Tail light
(5) Rear fog light (if equipped)
1. Open the tailgate.2.Outside
Loosen the outside light assembly
retaining screws with a cross-tip screw-
driver.
OYN079051OYN079036
OYN079037
OYN079038
YN ENG 7.QXP 4/16/2012 10:10 AM Page 68
Page 362 of 751
769
Maintenance
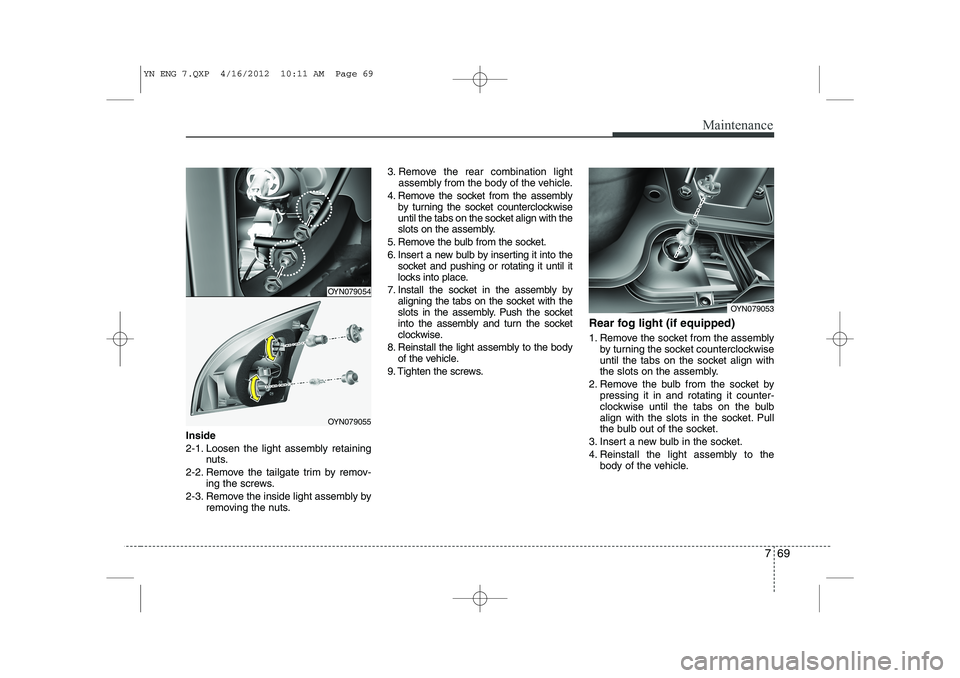
Inside
2-1. Loosen the light assembly retainingnuts.
2-2. Remove the tailgate trim by remov- ing the screws.
2-3. Remove the inside light assembly by removing the nuts. 3. Remove the rear combination light
assembly from the body of the vehicle.
4. Remove the socket from the assembly by turning the socket counterclockwise
until the tabs on the socket align with the
slots on the assembly.
5. Remove the bulb from the socket.
6. Insert a new bulb by inserting it into the socket and pushing or rotating it until it
locks into place.
7. Install the socket in the assembly by aligning the tabs on the socket with the
slots in the assembly. Push the socket
into the assembly and turn the socket
clockwise.
8. Reinstall the light assembly to the body of the vehicle.
9. Tighten the screws. Rear fog light (if equipped)
1. Remove the socket from the assembly
by turning the socket counterclockwise
until the tabs on the socket align with
the slots on the assembly.
2. Remove the bulb from the socket by pressing it in and rotating it counter-
clockwise until the tabs on the bulb
align with the slots in the socket. Pull
the bulb out of the socket.
3. Insert a new bulb in the socket.
4. Reinstall the light assembly to the body of the vehicle.
OYN079054
OYN079055
OYN079053
YN ENG 7.QXP 4/16/2012 10:11 AM Page 69
Page 386 of 751
I3
Index
Care
Exterior care . . . . . . . . . . . . . . . . . . . . . . . . . . . . . . . . 7-72
Interior care . . . . . . . . . . . . . . . . . . . . . . . . . . . . . . . . 7-77
Tire care . . . . . . . . . . . . . . . . . . . . . . . . . . . . . . . . . . . 7-42
Catalytic converters . . . . . . . . . . . . . . . . . . . . . . . . . . . 7-80
Center console storage . . . . . . . . . . . . . . . . . . . . . . . . . 4-91
Central door lock switch. . . . . . . . . . . . . . . . . . . . . . . . 4-14
Certification label . . . . . . . . . . . . . . . . . . . . . . . . . . . . . . 8-7Chains Tire chains . . . . . . . . . . . . . . . . . . . . . . . . . . . . . . . . . 5-49
Changing tires . . . . . . . . . . . . . . . . . . . . . . . . . . . . . . . . . 6-8
Checking tire inflation pressure . . . . . . . . . . . . . . . . . . 7-43
Child restraint system . . . . . . . . . . . . . . . . . . . . . . . . . . 3-26 ISOFIX system . . . . . . . . . . . . . . . . . . . . . . . . . . . . . . 3-32
lap/shoulder belt . . . . . . . . . . . . . . . . . . . . . . . . . . . . . 3-16
Recommended child restraint system. . . . . . . . . . . . . 3-36
Tether anchor system . . . . . . . . . . . . . . . . . . . . . . . . . 3-31
Child-protector rear door lock . . . . . . . . . . . . . . . . . . . 4-16
Cigarette lighter . . . . . . . . . . . . . . . . . . . . . . . . . . . . . . 4-93
Climate control (automatic) . . . . . . . . . . . . . . . . . . . . . 4-81
Climate control (manual) . . . . . . . . . . . . . . . . . . . . . . . 4-72
Climate control air filter . . . . . . . . . . . . . . . . . . . . . 4-79,87
Climate control air filter (replacement) . . . . . . . . . . . . 7-34
Clock (Digital) . . . . . . . . . . . . . . . . . . . . . . . . . . . . . . . 4-93
Clothes hanger . . . . . . . . . . . . . . . . . . . . . . . . . . . . . . . 4-97
Combined instrument, see instrument cluster . . . . . . . 4-40 Compact spare tire . . . . . . . . . . . . . . . . . . . . . . . . . . . . 6-13
Compact spare tire replacement . . . . . . . . . . . . . . . . . . 7-47
Components of the tire mobility kit . . . . . . . . . . . . . . . 6-16
Coolant . . . . . . . . . . . . . . . . . . . . . . . . . . . . . . . . . . . . . 7-25
Cool box . . . . . . . . . . . . . . . . . . . . . . . . . . . . . . . . . . . . 4-92
Cooling fluid, see engine coolant . . . . . . . . . . . . . . . . . 7-25
Crankcase emission control system . . . . . . . . . . . . . . . 7-78
Cruise control system . . . . . . . . . . . . . . . . . . . . . . . . . . 5-35
Cup holder . . . . . . . . . . . . . . . . . . . . . . . . . . . . . . . . . . 4-94
Curtain air bag . . . . . . . . . . . . . . . . . . . . . . . . . . . . . . . 3-51
Dashboard illumination, see instrument panel illumination. . 4-42
Dashboard, see instrument cluster . . . . . . . . . . . . . . . . 4-40
Defogging (Windshield) . . . . . . . . . . . . . . . . . . . . . . . . 4-89
Defroster (Rear window) . . . . . . . . . . . . . . . . . . . . . . . 4-71
Defrosting (Windshield) . . . . . . . . . . . . . . . . . . . . . . . . 4-89
Diesel particulate filter . . . . . . . . . . . . . . . . . . . . . . . . . 7-81
Digital clock . . . . . . . . . . . . . . . . . . . . . . . . . . . . . . . . . 4-93
Dimensions . . . . . . . . . . . . . . . . . . . . . . . . . . . . . . . . . . . 8-2
Display illumination, see instrument panel illumination . . 4-42
Displays, see instrument cluster . . . . . . . . . . . . . . . . . . 4-40
Door locks. . . . . . . . . . . . . . . . . . . . . . . . . . . . . . . . . . . 4-13
Central door lock switch . . . . . . . . . . . . . . . . . . . . . . 4-14
Child-protector rear door lock . . . . . . . . . . . . . . . . . . 4-16
DPF . . . . . . . . . . . . . . . . . . . . . . . . . . . . . . . . . . . . . . . . 7-81
D
YN eng INDEX.QXP 2011.09.22. 16:35 Page 3
Page 388 of 751

I5
Index
Fuel gauge. . . . . . . . . . . . . . . . . . . . . . . . . . . . . . . . . . . 4-43
Fuel requirements . . . . . . . . . . . . . . . . . . . . . . . . . . . . . . 1-3
Fuses . . . . . . . . . . . . . . . . . . . . . . . . . . . . . . . . . . . . . . . 7-52
Fuse/relay panel description . . . . . . . . . . . . . . . . . . . . 7-56
Instrument panel fuse . . . . . . . . . . . . . . . . . . . . . . . . . 7-53
Main fuse . . . . . . . . . . . . . . . . . . . . . . . . . . . . . . . . . . 7-55
Gauge Fuel gauge . . . . . . . . . . . . . . . . . . . . . . . . . . . . . . . . . 4-43
Glove box . . . . . . . . . . . . . . . . . . . . . . . . . . . . . . . . . . . 4-91
Hazard warning flasher. . . . . . . . . . . . . . . . . . . . . . . . . 4-61
Hazardous driving conditions . . . . . . . . . . . . . . . . . . . . 5-43
Headlight bulb replacement . . . . . . . . . . . . . . . . . . . . . 7-63
Headrest(front) . . . . . . . . . . . . . . . . . . . . . . . . . . . . . . . . 3-6
Headrest(rear) . . . . . . . . . . . . . . . . . . . . . . . . . . . . . . . . 3-12
Height adjustment . . . . . . . . . . . . . . . . . . . . . . . . . . . . . 3-16
Highway driving . . . . . . . . . . . . . . . . . . . . . . . . . . . . . . 5-47
Hood . . . . . . . . . . . . . . . . . . . . . . . . . . . . . . . . . . . . . . . 4-24
Horn . . . . . . . . . . . . . . . . . . . . . . . . . . . . . . . . . . . . . . . 4-34
How to use this manual . . . . . . . . . . . . . . . . . . . . . . . . . 1-2 Immobilizer system . . . . . . . . . . . . . . . . . . . . . . . . . . . . 4-3
Indicator symbols on the instrument cluster . . . . . . . . . 1-7
Indicators and warnings . . . . . . . . . . . . . . . . . . . . . . . . 4-47
Inside rearview mirror . . . . . . . . . . . . . . . . . . . . . . . . . 4-35
Instrument cluster . . . . . . . . . . . . . . . . . . . . . . . . . . . . . 4-40
Fuel gauge . . . . . . . . . . . . . . . . . . . . . . . . . . . . . . . . . 4-43
Instrument panel illumination . . . . . . . . . . . . . . . . . . 4-42
Odometer . . . . . . . . . . . . . . . . . . . . . . . . . . . . . . . . . . 4-43
Speedometer . . . . . . . . . . . . . . . . . . . . . . . . . . . . . . . . 4-42
Tachometer . . . . . . . . . . . . . . . . . . . . . . . . . . . . . . . . . 4-42
Trip computer . . . . . . . . . . . . . . . . . . . . . . . . . . . . . . . 4-44
Warning and indicators . . . . . . . . . . . . . . . . . . . . . . . . 4-47
Instrument panel fuse . . . . . . . . . . . . . . . . . . . . . . . . . . 7-53
Instrument panel illumination. . . . . . . . . . . . . . . . . . . . 4-42
Instrument panel overview . . . . . . . . . . . . . . . . . . . . . . . 2-3
Interior care. . . . . . . . . . . . . . . . . . . . . . . . . . . . . . . . . . 7-77
Interior features. . . . . . . . . . . . . . . . . . . . . . . . . . . . . . . 4-93 Ashtray . . . . . . . . . . . . . . . . . . . . . . . . . . . . . . . . . . . . 4-94
Aux, USB and iPod port. . . . . . . . . . . . . . . . . . . . . . . 4-96
Cigarette lighter . . . . . . . . . . . . . . . . . . . . . . . . . . . . . 4-93
Clothes hanger . . . . . . . . . . . . . . . . . . . . . . . . . . . . . . 4-97
Cup holder . . . . . . . . . . . . . . . . . . . . . . . . . . . . . . . . . 4-94
Digital clock . . . . . . . . . . . . . . . . . . . . . . . . . . . . . . . . 4-93
Floor mat anchor(s) . . . . . . . . . . . . . . . . . . . . . . . . . . 4-97
G
H
I
YN eng INDEX.QXP 2011.09.22. 16:35 Page 5
Page 487 of 751
423
Features of your vehicle
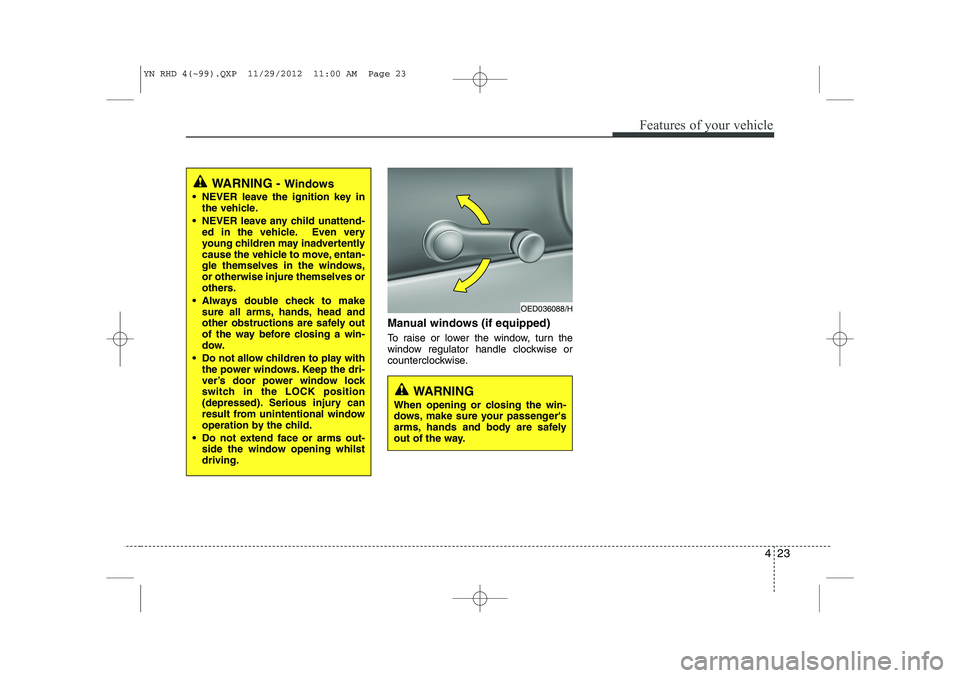
Manual windows (if equipped)
To raise or lower the window, turn the
window regulator handle clockwise or
counterclockwise.
WARNING - Windows
NEVER leave the ignition key in the vehicle.
NEVER leave any child unattend- ed in the vehicle. Even very
young children may inadvertently
cause the vehicle to move, entan-
gle themselves in the windows,or otherwise injure themselves or
others.
Always double check to make sure all arms, hands, head and
other obstructions are safely out
of the way before closing a win-
dow.
Do not allow children to play with the power windows. Keep the dri-
ver’s door power window lock
switch in the LOCK position
(depressed). Serious injury can
result from unintentional window
operation by the child.
Do not extend face or arms out- side the window opening whilstdriving.
OED036088/H
WARNING
When opening or closing the win-
dows, make sure your passenger's
arms, hands and body are safely
out of the way.
YN RHD 4(~99).QXP 11/29/2012 11:00 AM Page 23
Page 490 of 751
Features of your vehicle
26
4
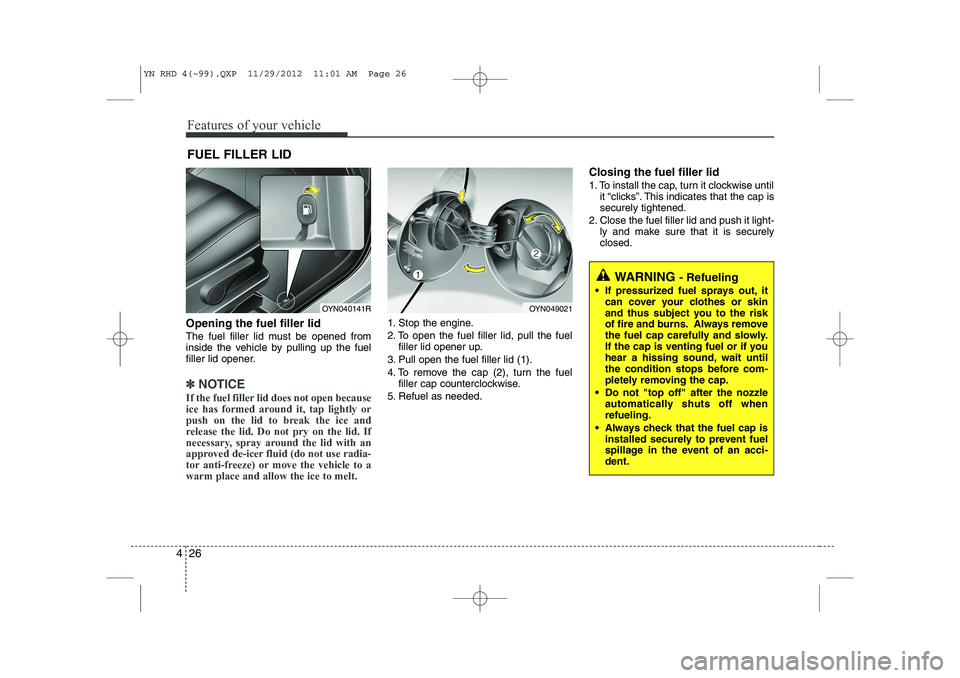
Opening the fuel filler lid
The fuel filler lid must be opened from
inside the vehicle by pulling up the fuel
filler lid opener.
✽✽
NOTICE
If the fuel filler lid does not open because
ice has formed around it, tap lightly or
push on the lid to break the ice and
release the lid. Do not pry on the lid. If
necessary, spray around the lid with an
approved de-icer fluid (do not use radia-
tor anti-freeze) or move the vehicle to awarm place and allow the ice to melt.
1. Stop the engine.
2. To open the fuel filler lid, pull the fuel filler lid opener up.
3. Pull open the fuel filler lid (1).
4. To remove the cap (2), turn the fuel filler cap counterclockwise.
5. Refuel as needed. Closing the fuel filler lid
1. To install the cap, turn it clockwise until
it “clicks”. This indicates that the cap is securely tightened.
2. Close the fuel filler lid and push it light- ly and make sure that it is securelyclosed.
FUEL FILLER LID
WARNING
- Refueling
If pressurized fuel sprays out, it can cover your clothes or skin
and thus subject you to the risk
of fire and burns. Always remove
the fuel cap carefully and slowly.
If the cap is venting fuel or if you
hear a hissing sound, wait until
the condition stops before com-
pletely removing the cap.
Do not "top off" after the nozzle automatically shuts off whenrefueling.
Always check that the fuel cap is installed securely to prevent fuel
spillage in the event of an acci-dent.
OYN049021OYN040141R
YN RHD 4(~99).QXP 11/29/2012 11:01 AM Page 26
Page 557 of 751

493
Features of your vehicle
INTERIOR FEATURES
LCD monitor (clock, outside tem-
perature, etc.) (if equipped)
The monitor will display the outside tem-
perature, date* and time.
If your vehicle enters into the icy road at
outside temperature range of -5°C to 3°C
(23°F to 37°F), the temperature digits will
blink five times and the symbol ( ) will
illuminate. The date display when the radio power is
turned off.
To change the date*, time, distance unit (km
↔ mi)* or temperature unit(°C ↔
°F), press the SET button for more than1 second.
Then you will enter the set-up mode and
mode changes in the following order as
you press the SET button less than 1second. YEAR* →MONTH* →DAY* →HOUR →
MINUTE →DISTANCE UNIT CHANGE*
→ TEMPERATURE UNIT CHANGE →
Escape set-up mode
Press the SET button less than 1 second to select the mode and set the data usingthe UP( ▲) and DOWN( ▼) button whilst
the selected setting mode blinks.
To cancel the SET UP mode, do one of
the following :
- Press the SET button less than 1 sec- ond in set-up temperature unit change mode
- Press the SET button more than 1 sec- ond in any set-up mode
- After 15 seconds without any key press
- Ignition is ON or OFF in set-up mode
- Battery is disconnected * if equipped Cigarette lighter (if equipped)
For the cigarette lighter to work, the igni-
tion switch must be in the ACC or ONposition.
To use the cigarette lighter, push it all the
way into its socket. When the element isheated, the lighter will pop out to the
“ready” position.
OYN049080R
OYN049106
OYN049132
■
Type A
■Type B
YN RHD 4(~99).QXP 11/29/2012 11:07 AM Page 93
Page 631 of 751
What to do in an emergency
8
6
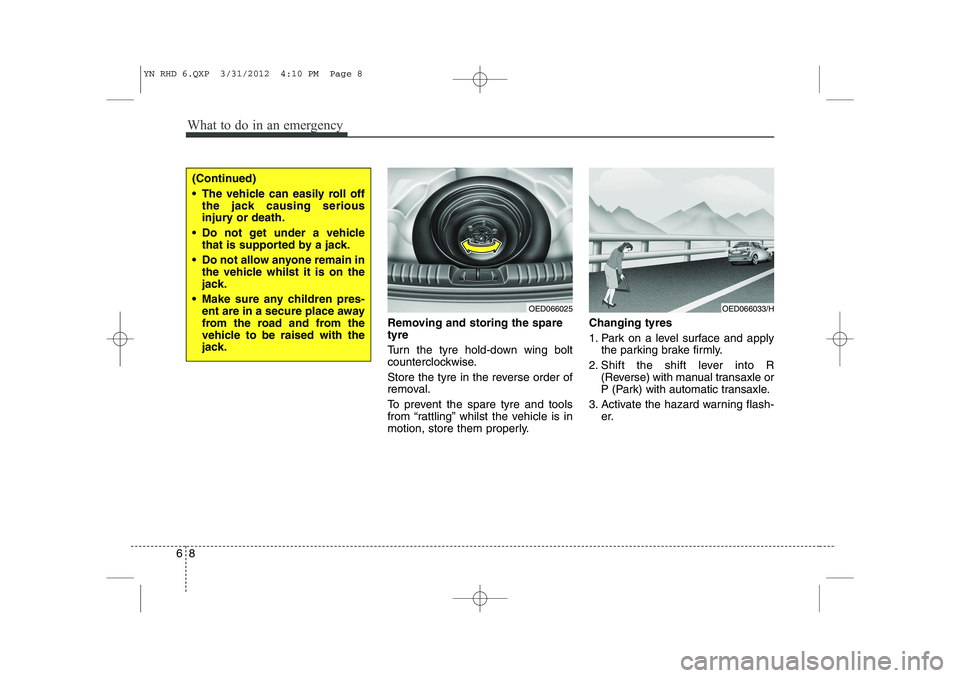
Removing and storing the spare tyre
Turn the tyre hold-down wing bolt
counterclockwise.
Store the tyre in the reverse order of
removal.
To prevent the spare tyre and tools
from “rattling” whilst the vehicle is in
motion, store them properly. Changing tyres
1. Park on a level surface and apply
the parking brake firmly.
2. Shift the shift lever into R (Reverse) with manual transaxle or
P (Park) with automatic transaxle.
3. Activate the hazard warning flash- er.
(Continued)
The vehicle can easily roll offthe jack causing serious
injury or death.
Do not get under a vehicle that is supported by a jack.
Do not allow anyone remain in the vehicle whilst it is on the
jack.
Make sure any children pres- ent are in a secure place away
from the road and from the
vehicle to be raised with the
jack.
OED066025OED066033/H
YN RHD 6.QXP 3/31/2012 4:10 PM Page 8