2013 KIA VENGA clock
[x] Cancel search: clockPage 717 of 751

765
Maintenance
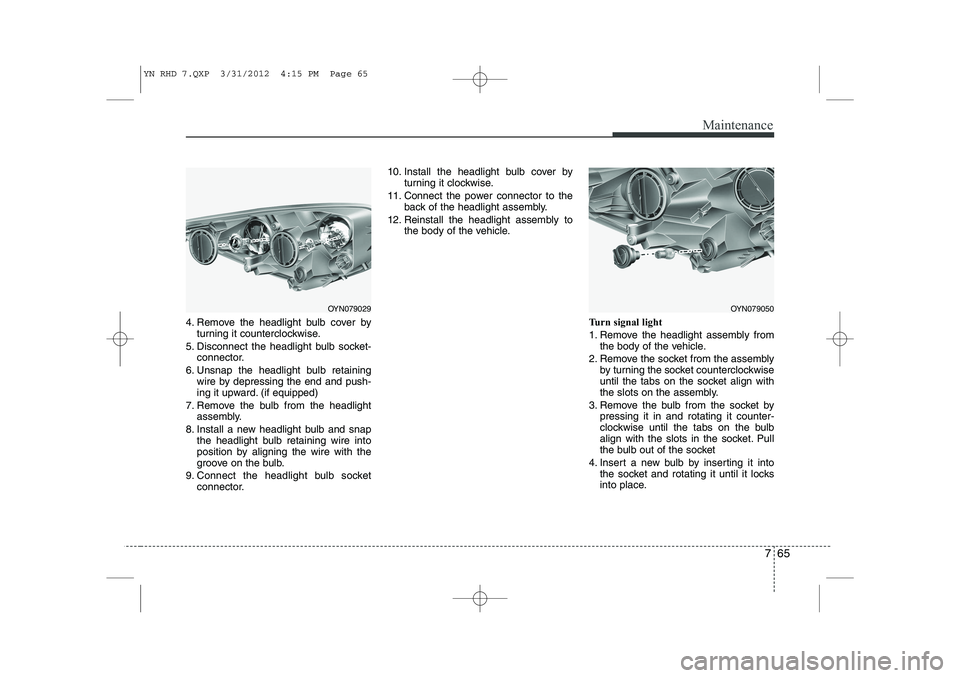
4. Remove the headlight bulb cover byturning it counterclockwise.
5. Disconnect the headlight bulb socket- connector.
6. Unsnap the headlight bulb retaining wire by depressing the end and push-
ing it upward. (if equipped)
7. Remove the bulb from the headlight assembly.
8. Install a new headlight bulb and snap the headlight bulb retaining wire into
position by aligning the wire with the
groove on the bulb.
9. Connect the headlight bulb socket connector. 10. Install the headlight bulb cover by
turning it clockwise.
11. Connect the power connector to the back of the headlight assembly.
12. Reinstall the headlight assembly to the body of the vehicle.
Turn signal light
1. Remove the headlight assembly fromthe body of the vehicle.
2. Remove the socket from the assembly by turning the socket counterclockwise
until the tabs on the socket align with
the slots on the assembly.
3. Remove the bulb from the socket by pressing it in and rotating it counter-
clockwise until the tabs on the bulb
align with the slots in the socket. Pull
the bulb out of the socket
4. Insert a new bulb by inserting it into the socket and rotating it until it locks
into place.
OYN079029OYN079050
YN RHD 7.QXP 3/31/2012 4:15 PM Page 65
Page 718 of 751

Maintenance
66
7
5. Install the socket in the assembly by
aligning the tabs on the socket with the
slots in the assembly. Push the socket
into the assembly and turn the socket
clockwise.
6. Reinstall the headlight assembly to the body of the vehicle.
Position light
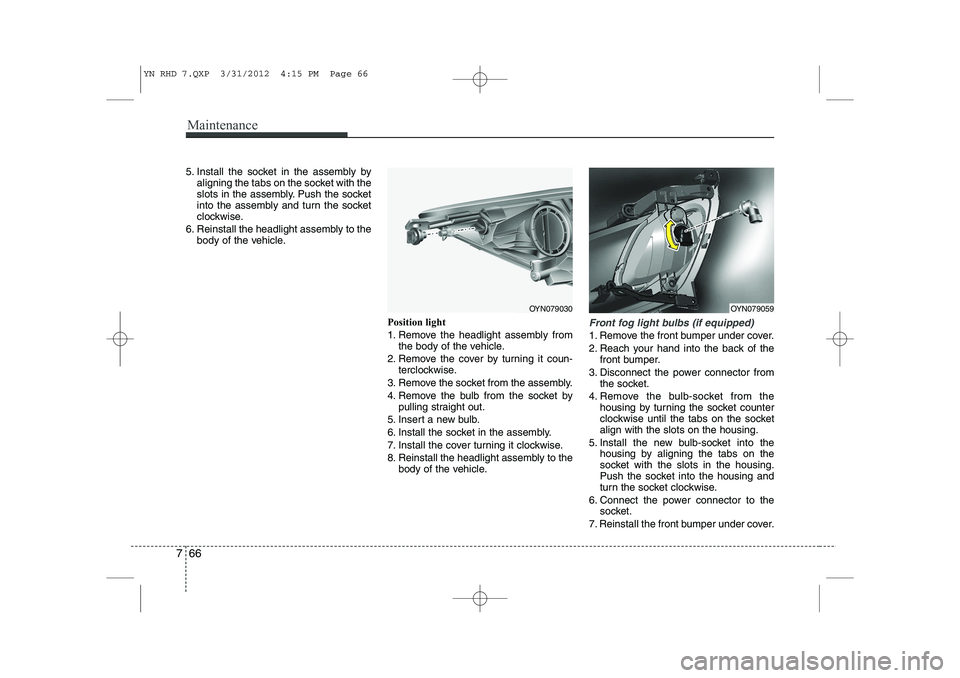
1. Remove the headlight assembly fromthe body of the vehicle.
2. Remove the cover by turning it coun- terclockwise.
3. Remove the socket from the assembly.
4. Remove the bulb from the socket by pulling straight out.
5. Insert a new bulb.
6. Install the socket in the assembly.
7. Install the cover turning it clockwise.
8. Reinstall the headlight assembly to the body of the vehicle.
Front fog light bulbs (if equipped)
1. Remove the front bumper under cover.
2. Reach your hand into the back of the
front bumper.
3. Disconnect the power connector from the socket.
4. Remove the bulb-socket from the housing by turning the socket counter
clockwise until the tabs on the socketalign with the slots on the housing.
5. Install the new bulb-socket into the housing by aligning the tabs on the
socket with the slots in the housing.
Push the socket into the housing and
turn the socket clockwise.
6. Connect the power connector to the socket.
7. Reinstall the front bumper under cover.
OYN079030OYN079059
YN RHD 7.QXP 3/31/2012 4:15 PM Page 66
Page 720 of 751

Maintenance
68
7
Type B
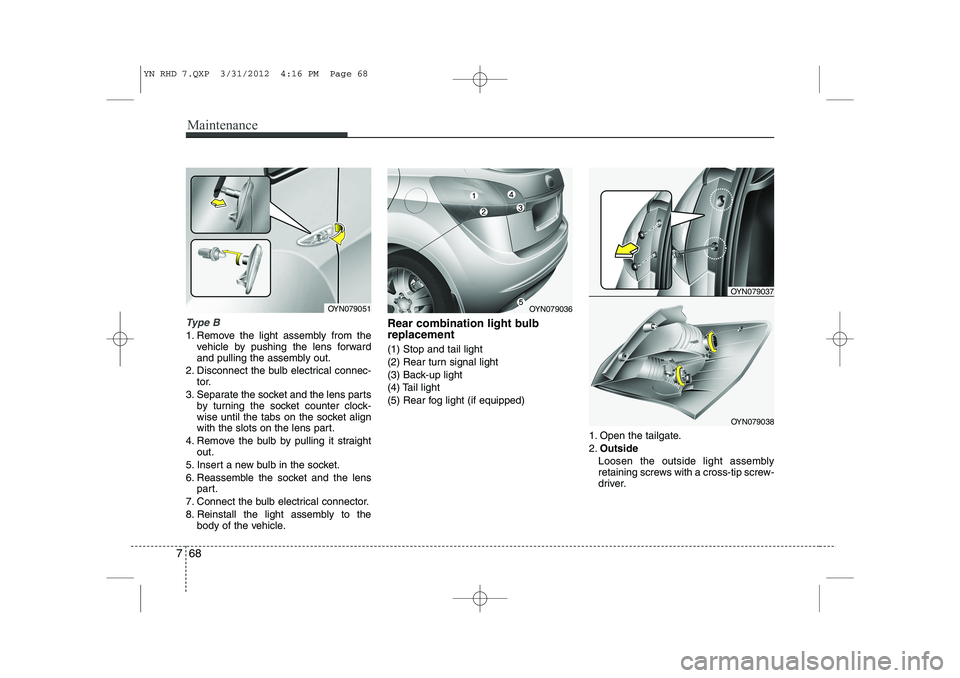
1. Remove the light assembly from the
vehicle by pushing the lens forward
and pulling the assembly out.
2. Disconnect the bulb electrical connec- tor.
3. Separate the socket and the lens parts by turning the socket counter clock-
wise until the tabs on the socket align
with the slots on the lens part.
4. Remove the bulb by pulling it straight out.
5. Insert a new bulb in the socket.
6. Reassemble the socket and the lens part.
7. Connect the bulb electrical connector.
8. Reinstall the light assembly to the body of the vehicle. Rear combination light bulb replacement (1) Stop and tail light
(2) Rear turn signal light
(3) Back-up light
(4) Tail light
(5) Rear fog light (if equipped)
1. Open the tailgate.2.Outside
Loosen the outside light assembly
retaining screws with a cross-tip screw-
driver.
OYN079051OYN079036
OYN079037
OYN079038
YN RHD 7.QXP 3/31/2012 4:16 PM Page 68
Page 721 of 751

769
Maintenance
Inside
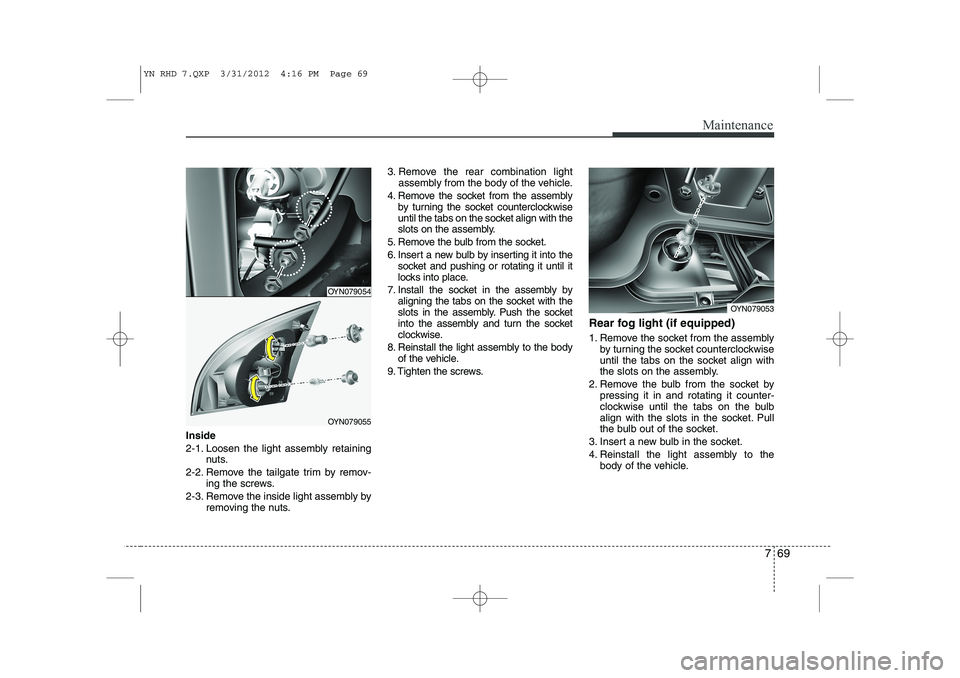
2-1. Loosen the light assembly retainingnuts.
2-2. Remove the tailgate trim by remov- ing the screws.
2-3. Remove the inside light assembly by removing the nuts. 3. Remove the rear combination light
assembly from the body of the vehicle.
4. Remove the socket from the assembly by turning the socket counterclockwise
until the tabs on the socket align with the
slots on the assembly.
5. Remove the bulb from the socket.
6. Insert a new bulb by inserting it into the socket and pushing or rotating it until it
locks into place.
7. Install the socket in the assembly by aligning the tabs on the socket with the
slots in the assembly. Push the socket
into the assembly and turn the socket
clockwise.
8. Reinstall the light assembly to the body of the vehicle.
9. Tighten the screws. Rear fog light (if equipped)
1. Remove the socket from the assembly
by turning the socket counterclockwise
until the tabs on the socket align with
the slots on the assembly.
2. Remove the bulb from the socket by pressing it in and rotating it counter-
clockwise until the tabs on the bulb
align with the slots in the socket. Pull
the bulb out of the socket.
3. Insert a new bulb in the socket.
4. Reinstall the light assembly to the body of the vehicle.
OYN079054
OYN079055
OYN079053
YN RHD 7.QXP 3/31/2012 4:16 PM Page 69
Page 745 of 751

I3
Index
Care . . . . . . . . . . . . . . . . . . . . . . . . . . . . . . . . . . . . . . . . 7-72
Exterior care . . . . . . . . . . . . . . . . . . . . . . . . . . . . . . . . 7-72
Interior care . . . . . . . . . . . . . . . . . . . . . . . . . . . . . . . . 7-77
Tyre care . . . . . . . . . . . . . . . . . . . . . . . . . . . . . . . . . . . 7-42
Catalytic converters . . . . . . . . . . . . . . . . . . . . . . . . . . . 7-80
Centre console storage . . . . . . . . . . . . . . . . . . . . . . . . . 4-91
Central door lock switch. . . . . . . . . . . . . . . . . . . . . . . . 4-14
Certification label . . . . . . . . . . . . . . . . . . . . . . . . . . . . . . 8-6Chains Tyre chains . . . . . . . . . . . . . . . . . . . . . . . . . . . . . . . . . 5-48
Changing tyres . . . . . . . . . . . . . . . . . . . . . . . . . . . . . . . . 6-8
Checking tyre inflation pressure. . . . . . . . . . . . . . . . . . 7-43
Child restraint system . . . . . . . . . . . . . . . . . . . . . . . . . . 3-26 ISOFIX system . . . . . . . . . . . . . . . . . . . . . . . . . . . . . . 3-32
lap/shoulder belt . . . . . . . . . . . . . . . . . . . . . . . . . . . . . 3-16
Recommended child restraint system. . . . . . . . . . . . . 3-36
Tether anchor system . . . . . . . . . . . . . . . . . . . . . . . . . 3-31
Child-protector rear door lock . . . . . . . . . . . . . . . . . . . 4-16
Cigarette lighter . . . . . . . . . . . . . . . . . . . . . . . . . . . . . . 4-93
Climate control (automatic) . . . . . . . . . . . . . . . . . . . . . 4-81
Climate control (manual) . . . . . . . . . . . . . . . . . . . . . . . 4-72
Climate control air filter . . . . . . . . . . . . . . . . . . . . . 4-79,87
Climate control air filter (replacement) . . . . . . . . . . . . 7-34
Clock (Digital) . . . . . . . . . . . . . . . . . . . . . . . . . . . . . . . 4-93
Clothes hanger . . . . . . . . . . . . . . . . . . . . . . . . . . . . . . . 4-97
Combined instrument, see instrument cluster . . . . . . . 4-40 Compact spare tyre . . . . . . . . . . . . . . . . . . . . . . . . . . . . . 6-7
Compact spare tyre replacement . . . . . . . . . . . . . . . . . 7-47
Components of the tyre mobility kit . . . . . . . . . . . . . . 6-16
Coolant . . . . . . . . . . . . . . . . . . . . . . . . . . . . . . . . . . . . . 7-25
Cool box . . . . . . . . . . . . . . . . . . . . . . . . . . . . . . . . . . . . 4-92
Cooling fluid, see engine coolant . . . . . . . . . . . . . . . . . 7-25
Crankcase emission control system . . . . . . . . . . . . . . . 7-78
Cruise control system . . . . . . . . . . . . . . . . . . . . . . . . . . 5-35
Cup holder . . . . . . . . . . . . . . . . . . . . . . . . . . . . . . . . . . 4-94
Curtain air bag . . . . . . . . . . . . . . . . . . . . . . . . . . . . . . . 3-51
Dashboard illumination, see instrument panel illumination . 4-42
Dashboard, see instrument cluster . . . . . . . . . . . . . . . . 4-40
Declaration of conformity . . . . . . . . . . . . . . . . . . . . . . . 8-9
Defogging (Windscreen). . . . . . . . . . . . . . . . . . . . . . . . 4-89
Defroster (Rear window) . . . . . . . . . . . . . . . . . . . . . . . 4-71
Defrosting (Windscreen). . . . . . . . . . . . . . . . . . . . . . . . 4-89
Diesel particulate filter . . . . . . . . . . . . . . . . . . . . . . . . . 7-81
Digital clock . . . . . . . . . . . . . . . . . . . . . . . . . . . . . . . . . 4-93
Dimensions . . . . . . . . . . . . . . . . . . . . . . . . . . . . . . . . . . . 8-2
Display illumination, see instrument panel illumination . . 4-42
Displays, see instrument cluster . . . . . . . . . . . . . . . . . . 4-40
Door locks. . . . . . . . . . . . . . . . . . . . . . . . . . . . . . . . . . . 4-13
Central door lock switch . . . . . . . . . . . . . . . . . . . . . . 4-14
Child-protector rear door lock . . . . . . . . . . . . . . . . . . 4-16
D
YN RHD INDEX.QXP 1/15/2013 12:59 PM Page 3
Page 747 of 751

I5
Index
Fuel filter . . . . . . . . . . . . . . . . . . . . . . . . . . . . . . . . . . . 7-32
Fuel gauge. . . . . . . . . . . . . . . . . . . . . . . . . . . . . . . . . . . 4-43
Fuel requirements . . . . . . . . . . . . . . . . . . . . . . . . . . . . . . 1-3
Fuses . . . . . . . . . . . . . . . . . . . . . . . . . . . . . . . . . . . . . . . 7-52
Fuse/relay panel description . . . . . . . . . . . . . . . . . . . . 7-56
Instrument panel fuse . . . . . . . . . . . . . . . . . . . . . . . . . 7-53
Main fuse . . . . . . . . . . . . . . . . . . . . . . . . . . . . . . . . . . 7-55
Gauge Main fuse, see memory fuse. . . . . . . . . . . . . . . . . . . . 7-55
Memory fuse. . . . . . . . . . . . . . . . . . . . . . . . . . . . . . . . 7-54
Glove box . . . . . . . . . . . . . . . . . . . . . . . . . . . . . . . . . . . 4-91
Hazard warning flasher. . . . . . . . . . . . . . . . . . . . . . . . . 4-60
Hazardous driving conditions . . . . . . . . . . . . . . . . . . . . 5-43
Headlight bulb replacement . . . . . . . . . . . . . . . . . . . . . 7-63
Headrest(front) . . . . . . . . . . . . . . . . . . . . . . . . . . . . . . . . 3-6
Headrest(rear) . . . . . . . . . . . . . . . . . . . . . . . . . . . . . . . . 3-12
Height adjustment . . . . . . . . . . . . . . . . . . . . . . . . . . . . . 3-16
Highway driving . . . . . . . . . . . . . . . . . . . . . . . . . . . . . . 5-46
Horn . . . . . . . . . . . . . . . . . . . . . . . . . . . . . . . . . . . . . . . 4-34
How to use this manual . . . . . . . . . . . . . . . . . . . . . . . . . 1-2 Immobiliser system. . . . . . . . . . . . . . . . . . . . . . . . . . . . . 4-3
Indicator symbols on the instrument cluster . . . . . . . . . 1-6
Indicators and warnings . . . . . . . . . . . . . . . . . . . . . . . . 4-47
Inside rearview mirror . . . . . . . . . . . . . . . . . . . . . . . . . 4-35
Instrument cluster . . . . . . . . . . . . . . . . . . . . . . . . . . . . . 4-40
Fuel gauge . . . . . . . . . . . . . . . . . . . . . . . . . . . . . . . . . 4-43
Instrument panel illumination . . . . . . . . . . . . . . . . . . 4-42
Odometer . . . . . . . . . . . . . . . . . . . . . . . . . . . . . . . . . . 4-43
Speedometer . . . . . . . . . . . . . . . . . . . . . . . . . . . . . . . . 4-42
Tachometer . . . . . . . . . . . . . . . . . . . . . . . . . . . . . . . . . 4-42
Trip computer . . . . . . . . . . . . . . . . . . . . . . . . . . . . . . . 4-44
Warning and indicators . . . . . . . . . . . . . . . . . . . . . . . . 4-47
Instrument panel fuse . . . . . . . . . . . . . . . . . . . . . . . . . . 7-53
Instrument panel illumination. . . . . . . . . . . . . . . . . . . . 7-44
Instrument panel overview . . . . . . . . . . . . . . . . . . . . . . . 2-3
Interior care. . . . . . . . . . . . . . . . . . . . . . . . . . . . . . . . . . 7-77
Interior features. . . . . . . . . . . . . . . . . . . . . . . . . . . . . . . 4-93 Ashtray . . . . . . . . . . . . . . . . . . . . . . . . . . . . . . . . . . . . 4-94
Aux, USB and iPod port. . . . . . . . . . . . . . . . . . . . . . . 4-97
Cigarette lighter . . . . . . . . . . . . . . . . . . . . . . . . . . . . . 4-93
Clothes hanger . . . . . . . . . . . . . . . . . . . . . . . . . . . . . . 4-97
Cup holder . . . . . . . . . . . . . . . . . . . . . . . . . . . . . . . . . 4-94
Digital clock . . . . . . . . . . . . . . . . . . . . . . . . . . . . . . . . 4-93
Floor mat anchor(s) . . . . . . . . . . . . . . . . . . . . . . . . . . 4-98
G
H
I
YN RHD INDEX.QXP 1/15/2013 12:59 PM Page 5