Page 101 of 408

Vehicles Equipped with Remote Start
On models that are equipped with remote start,
the driver’s heated seat and heated steering
wheel can be programmed to come on during a
remote start. Refer to “Remote Starting System —
If Equipped” in “Things To Know Before Starting
Your Vehicle” for further information.
Front Heated Seats
There are two heated seat switches that allow
the driver and passenger to operate the seats
independently. The controls for each heater are
located near the bottom center of the instrument
panel (below the climate controls).
You can choose from HIGH, LOW or OFF heat
settings. Amber indicator lights in each switch
indicate the level of heat in use. Two indicator
lights will illuminate for HIGH, one for LOW and
none for OFF.
Press the switch once to select
HIGH-level heating. Press the switch
a second time to select LOW-level
heating. Press the switch a third time
to shut the heating elements OFF.
NOTE:
Once a heat setting is selected, heat will be
felt within two to five minutes.
When the HIGH-level setting is selected, the
heater will provide a boosted heat level during
the first four minutes of operation. Then, the
heat output will drop to the normal HIGH-level. If
the HIGH-level setting is selected, the system
will automatically switch to LOW-level after ap-
proximately 60 minutes of continuous opera-
tion. At that time, the number of illuminated
LEDs changes from two to one, indicating the
change. The LOW-level setting will turn OFF
automatically after approximately 45 minutes.
Rear Heated Seats
On some models, the two outboard seats are
equipped with heated seats. There are two
heated seat switches that allow the rear pas-
sengers to operate the seats independently.
The heated seat switches for each heater are
located on the rear of the center console.You can choose from HIGH, LOW or OFF heat
settings. Amber indicator lights in each switch
indicate the level of heat in use. Two indicator
lights will illuminate for HIGH, one for LOW and
none for OFF.
Press the switch once to select
HIGH-level heating. Press the switch
a second time to select LOW-level
heating. Press the switch a third time
to shut the heating elements OFF.
Rear Heated Seat Switches
97
Page 163 of 408
•Information Mode Display ...................... .203
• Mode Selection Menu ........................ .204
• Numeric Keypad Menu ........................ .205
• Disc Menu ............................... .205
• Display Settings ............................ .206
• Listening To Audio With The Screen Closed ............206
• Why Does The Screen Mode Change Automatically? .......206
• Auxiliary Inputs ............................ .207
•STEERING WHEEL AUDIO CONTROLS ...............207•Radio Operation ............................ .208
• CD Player ............................... .208
•CD/DVD DISC MAINTENANCE .....................208
• RADIO OPERATION AND MOBILE PHONES ............209
• CLIMATE CONTROLS ..........................209
•Dual-Zone Automatic Temperature Control (ATC) —
If Equipped .............................. .209
• Operating Tips ............................. .213
159
Page 213 of 408

RADIO OPERATION AND
MOBILE PHONES
Under certain conditions, the mobile phone
being on in your vehicle can cause erratic or
noisy performance from your radio. This condi-
tion may be lessened or eliminated by relocat-
ing the mobile phone antenna. This condition is
not harmful to the radio. If your radio perfor-
mance does not satisfactorily “clear” by the
repositioning of the antenna, it is recommended
that the radio volume be turned down or off
during mobile phone operation when not using
Uconnect® (if equipped).
CLIMATE CONTROLS
The air conditioning and heating system is
designed to make you comfortable in all types
of weather.
Dual-Zone Automatic Temperature
Control (ATC) — If Equipped
•The Automatic Temperature Control (ATC) al-
lows both driver and front passenger seat
occupants to select individual comfort settings.
•When occupants in the vehicle select the
AUTO mode operation, a comfort tempera-
ture can be set by using the temperature up
and down buttons, and the auto blower op-
eration will be set automatically.
• The system provides set-and-forget opera-
tion for optimum comfort and convenience.
• The system can be controlled manually, if
desired.
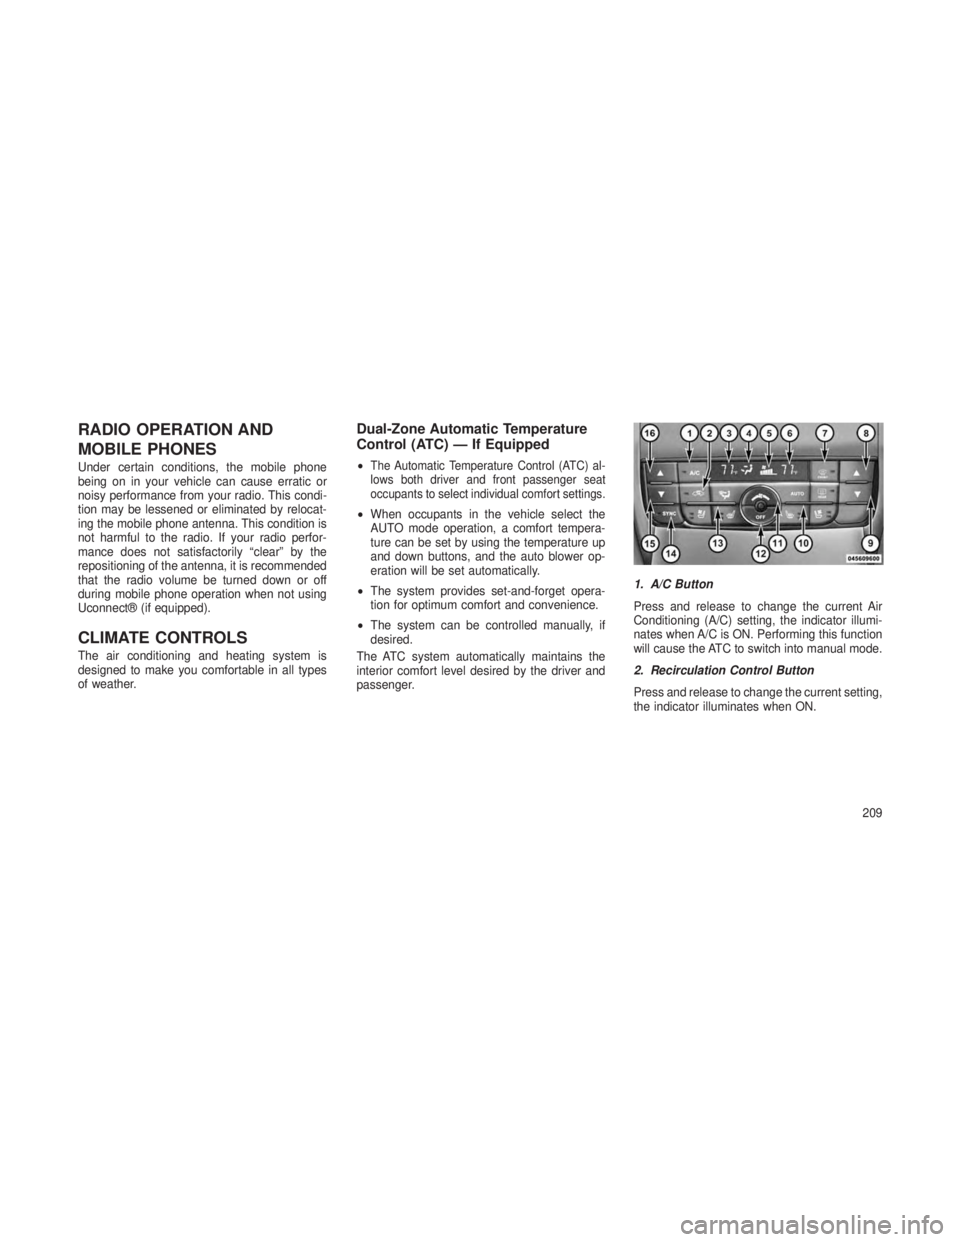
The ATC system automatically maintains the
interior comfort level desired by the driver and
passenger. 1. A/C Button
Press and release to change the current Air
Conditioning (A/C) setting, the indicator illumi-
nates when A/C is ON. Performing this function
will cause the ATC to switch into manual mode.
2. Recirculation Control Button
Press and release to change the current setting,
the indicator illuminates when ON.
209
Page 214 of 408

3. Left Front Seat Occupant Temperature
Display
This display shows the temperature setting for
the left front seat occupant.
4. Mode Display
This display shows the current Mode selection
(Panel, Bi-Level, Floor, Mix).
5. Blower Control Display
This display shows the current Blower speed
selection.
6. Right Front Seat Occupant Temperature
Display
This display shows the temperature setting for
the right front seat occupant.
7. Front Defrost Button
Press and release to change the current setting,
the indicator illuminates when ON. Performing
this function will cause the ATC to switch into
manual mode. The blower will engage immedi-
ately if the Defrost mode is selected.8.Passenger Temperature Control Up Button
Provides the passenger with independent tem-
perature control. Push the button for warmer
temperature settings.
9. Passenger Temperature Control Down
Button
Provides the passenger with independent tem-
perature control. Push the button for cooler
temperature settings.
10. Auto Temperature Control Button
Controls airflow temperature, distribution, volume,
and the amount of air recirculation automatically.
Press and release to select. Refer to “Automatic
Operation” for more information. Performing this
function will cause the ATC to switch between
manual mode and automatic modes.
11. Blower Control
There are seven blower speeds, the blower
speed increases as you move the control to the
right from the lowest blower setting. Performing
this function will cause the ATC to switch into
manual mode.12. Climate Control ON/OFF Button
Press and release this button to turn the Cli-
mate Control OFF
13. Mode Control Button
Press and release to select between Modes
(Panel, Bi-Level, Floor, Mix). Performing this
function will cause the ATC to switch into
manual mode.
14. SYNC Button
Press and release to control the temperature
setting for both zones from the driver tempera-
ture control.
15.
Driver Temperature Control Down Button
Provides the driver with independent tempera-
ture control. Push the button for cooler tempera-
ture settings.
16. Driver Temperature Control Up Button
Provides the driver with independent tempera-
ture control. Push the button for warmer tem-
perature settings.
210