Page 168 of 397
Features of your vehicle
88
4
Sunglass holder
To open the sunglass holder, press the
cover and the holder will slowly open.
Place your sunglasses in the compart-
ment door with the lenses facing out.
Push to close.
WARNING
Do not keep objects except sun- glass inside the sunglass holder.
Such objects can be thrown from
the holder in the event of a sud-
den stop or an accident, possibly
injuring the passengers in the
vehicle.
Do not open the sunglass holder while the vehicle is moving. The
rear view mirror of the vehicle
can be blocked by an open sun-
glass holder.
OLM049142
Page 172 of 397
Features of your vehicle
92
4
Digital clock (if equipped)
Whenever the battery terminals or relat-
ed fuses are disconnected, you must
reset the time.
When the ignition switch is in the ACC or
ON position, the clock buttons operate as
follows:
Setup the clock
With audio off
1. Press the [SETUP] button until the
clock of the display blinks.
2. Set the clock by turning the knob(1) and press it.
With audio on
1. Press the [SETUP] button.
2. Select the [CLOCK] mode by turning the knob(1) and press it.
3. Set the clock by turning the knob(1) and press it.
Floor mat anchor(s) (if equipped)
When using a floor mat on the front floor
carpet, make sure it attaches to the floor
mat anchor(s) in your vehicle. This keeps
the floor mat from sliding forward.
OLM049208
WARNING
Do not adjust the clock while driv-
ing. You may lose your steering
control and cause severe personal
injury or accidents.
OXM049228
■
Type A ■Type B
Page 177 of 397
497
Features of your vehicle
✽✽NOTICE
If you install an aftermarket HID head-
lamp, your vehicle's audio and electron-
ic device may malfunction.
Antenna
Roof antenna
Your vehicle uses a roof antenna to
receive both AM and FM broadcast sig-
nals. This antenna is removable. To
remove the antenna, turn it counterclock-
wise. To install the antenna, turn it clock-
wise.
AUDIO SYSTEM
OHM048154
■
Type A ■Type B
CAUTION
• Before entering a place with a low
height clearance or a car wash,remove the antenna by rotating it
counterclockwise. If not, theantenna may be damaged.
When reinstalling your antenna, it is important that it is fully tight-
ened and adjusted to the uprightposition to ensure proper recep-tion. But it could be removed
when parking the vehicle or whenloading cargo on the roof rack.
When cargo is loaded on the roof rack, do not place the cargo near
the antenna pole to ensure properreception.
Page 180 of 397

Features of your vehicle
100
4
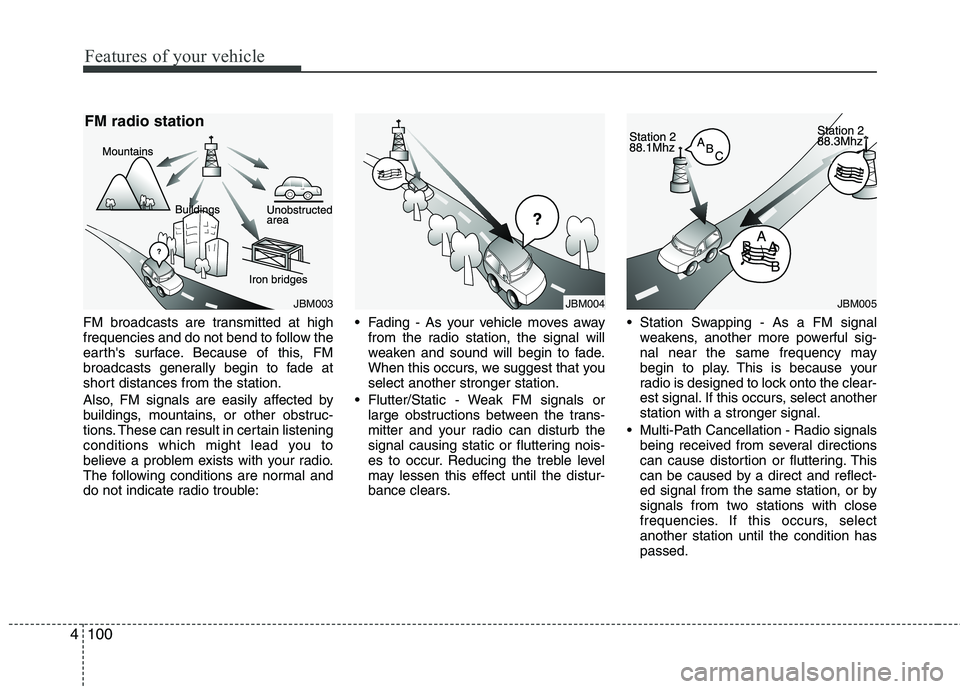
FM broadcasts are transmitted at high
frequencies and do not bend to follow the
earth's surface. Because of this, FM
broadcasts generally begin to fade at
short distances from the station.
Also, FM signals are easily affected by
buildings, mountains, or other obstruc-
tions. These can result in certain listening
conditions which might lead you to
believe a problem exists with your radio.
The following conditions are normal and
do not indicate radio trouble: Fading - As your vehicle moves away
from the radio station, the signal will
weaken and sound will begin to fade.
When this occurs, we suggest that youselect another stronger station.
Flutter/Static - Weak FM signals or large obstructions between the trans-
mitter and your radio can disturb the
signal causing static or fluttering nois-
es to occur. Reducing the treble level
may lessen this effect until the distur-
bance clears. Station Swapping - As a FM signal
weakens, another more powerful sig-
nal near the same frequency may
begin to play. This is because your
radio is designed to lock onto the clear-
est signal. If this occurs, select another station with a stronger signal.
Multi-Path Cancellation - Radio signals being received from several directions
can cause distortion or fluttering. This
can be caused by a direct and reflect-
ed signal from the same station, or by
signals from two stations with close
frequencies. If this occurs, selectanother station until the condition haspassed.
JBM003
FM radio station
JBM005JBM004
Page 181 of 397

4101
Features of your vehicle
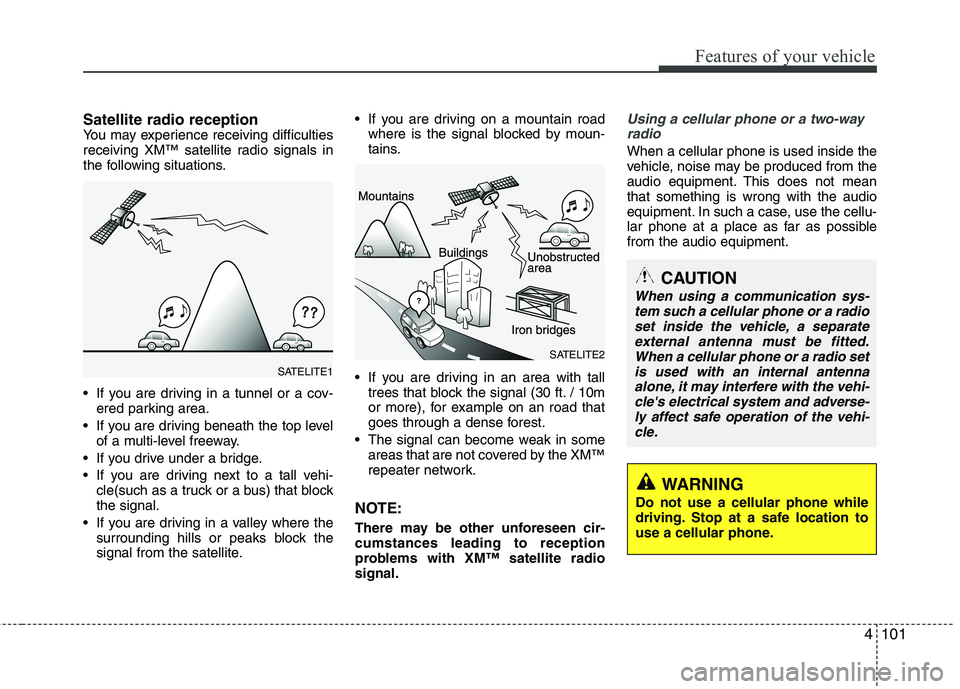
Satellite radio receptionYou may experience receiving difficulties
receiving XM™ satellite radio signals in
the following situations.
If you are driving in a tunnel or a cov-ered parking area.
If you are driving beneath the top level of a multi-level freeway.
If you drive under a bridge.
If you are driving next to a tall vehi- cle(such as a truck or a bus) that block the signal.
If you are driving in a valley where the surrounding hills or peaks block the
signal from the satellite. If you are driving on a mountain road
where is the signal blocked by moun-
tains.
If you are driving in an area with tall trees that block the signal (30 ft. / 10m
or more), for example on an road that
goes through a dense forest.
The signal can become weak in some areas that are not covered by the XM™
repeater network.
NOTE:
There may be other unforeseen cir- cumstances leading to reception
problems with XM™ satellite radio signal.
Using a cellular phone or a two-way
radio
When a cellular phone is used inside the
vehicle, noise may be produced from the
audio equipment. This does not mean that something is wrong with the audio
equipment. In such a case, use the cellu-
lar phone at a place as far as possible from the audio equipment.
WARNING
Do not use a cellular phone while
driving. Stop at a safe location to
use a cellular phone.
SATELITE2
SATELITE1
CAUTION
When using a communication sys- tem such a cellular phone or a radioset inside the vehicle, a separate
external antenna must be fitted.When a cellular phone or a radio setis used with an internal antennaalone, it may interfere with the vehi-
cle's electrical system and adverse-ly affect safe operation of the vehi-cle.
Page 184 of 397
![HYUNDAI TUCSON 2013 Owners Manual Features of your vehicle
104
4
Using RADIO, SETUP, VOLUME
and AUDIO CONTROL
1. AM Selection Button
Pressing the [AM] button selects the AM
band. AM Mode is displayed on the LCD.
2. FM Selection Bu HYUNDAI TUCSON 2013 Owners Manual Features of your vehicle
104
4
Using RADIO, SETUP, VOLUME
and AUDIO CONTROL
1. AM Selection Button
Pressing the [AM] button selects the AM
band. AM Mode is displayed on the LCD.
2. FM Selection Bu](/manual-img/35/56204/w960_56204-183.png)
Features of your vehicle
104
4
Using RADIO, SETUP, VOLUME
and AUDIO CONTROL
1. AM Selection Button
Pressing the [AM] button selects the AM
band. AM Mode is displayed on the LCD.
2. FM Selection Button Turns to FM mode and toggles FM1 and
FM2 when the button is pressed each
time.
3. Automatic Station Seek Button
When the [SEEK ] is pressed, it will
automatically tune to the next lower station.
When the [SEEK ] is pressed, it will automatically tune to the next higher station.
4. Power ON/OFF Button & Volume Control Knob
Turns the audio system on/off whenthe ignition switch is on ACC or ON.
If the knob is turned clockwise/counter- clockwise, the volume will increase
/decrease.
5. Preset Selection Button
Press [1]~[6] buttons less than 0.8 sec-onds to play the station saved in each
button.
Press [1]~[6] b utton more than 0.8 sec-
onds or longer to save the current sta-
tion to the respective button with a
beep.
6. SCAN Button
When the button is pressed, it auto- matically scans the radio stations
upwards.
The SCAN feature steps through each station, starting from the initial station,
for ten seconds.
Press the [SCAN] button again to stop the scan feature and to listen to the currently selected channel.
7. DISP Button
Turn the LCD Display & Backlight on/off
when [DISP] button press.
8. SETUP Button
Press this Button to enter SETUP mode,
If no action is taken for 8 seconds, it will
return to previous mode.
In “SETUP” mode, rotate the TUNE knob
to move the cursor between items, and
push the TUNE knob to select.
Select whether long file names are
scrolled continuously (“ON”) or just once(“OFF”).
Select this item to turn the SDVC(Speed
Dependent Volume Control) feature ON
or OFF. If it is turned ON, volume level is adjusted automatically according to the
vehicle speed.
This function creates virtual sound
effects and allows adjustments to the
BASS level. HIGH
➟MID ➟LOW ➟OFF
Select default display of XM mode.
“Category/Channel name” or “Artist/Song
Title” can be selected.
Page 185 of 397

4105
Features of your vehicle
Select this item to enter
Bluetooth®Wireless Technology setup mode. Refer to “BLUETOOTH ®WIRELESS TECH-
NOLOGY PHONE OPERATION” section
for detailed information.
Press the [SETUP] button. Use the vol-
ume controller to adjust the clock in the
following order: CLOCK
ENTERhour or
minute. Adjust the hour and press the [ENTER]
button to set. Use the same method to
adjust the minute and press the [ENTER]
button to complete and exit from clock
adjustment mode.
Pressing the [SETUP] button while in
POWER OFF screen will allow the user
to make immediately adjustments to the
clock.
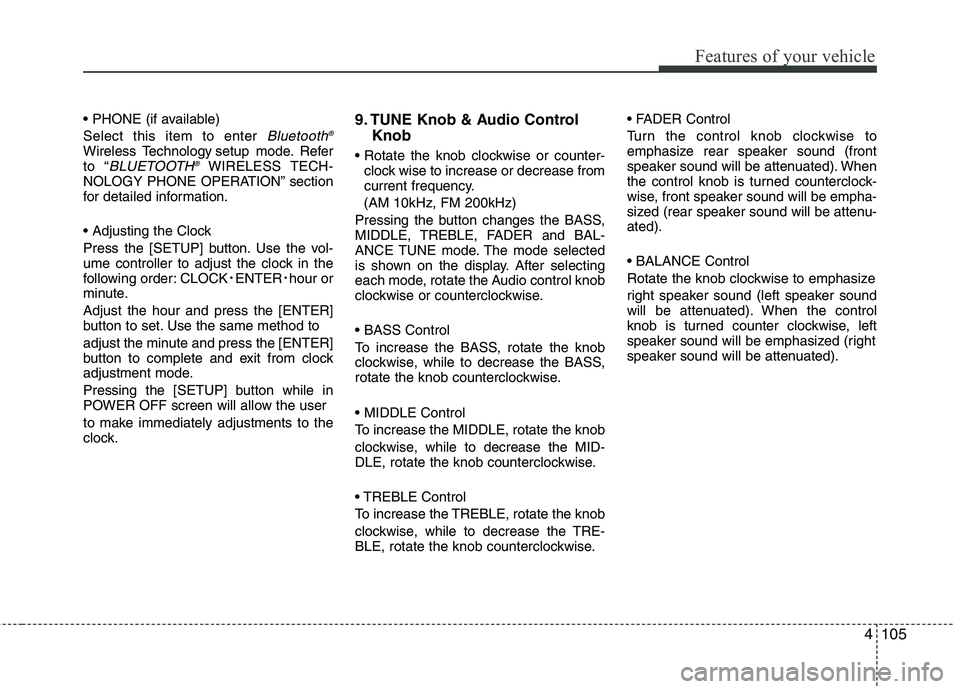
9. TUNE Knob & Audio Control
Knob
clock wise to increase or decrease from
current frequency.
(AM 10kHz, FM 200kHz)
Pressing the button changes the BASS,
MIDDLE, TREBLE, FADER and BAL-
ANCE TUNE mode. The mode selected
is shown on the display. After selecting
each mode, rotate the Audio control knob
clockwise or counterclockwise.
To increase the BASS, rotate the knob
clockwise, while to decrease the BASS,
rotate the knob counterclockwise.
To increase the MIDDLE, rotate the knob
clockwise, while to decrease the MID-
DLE, rotate the knob counterclockwise.
Control
To increase the TREBLE, rotate the knob
clockwise, while to decrease the TRE-
BLE, rotate the knob counterclockwise.
Turn the control knob clockwise to
emphasize rear speaker sound (front
speaker sound will be attenuated). When
the control knob is turned counterclock-
wise, front speaker sound will be empha-
sized (rear speaker sound will be attenu- ated).
Rotate the knob clockwise to emphasize
right speaker sound (left speaker sound
will be attenuated). When the control
knob is turned counter clockwise, left
speaker sound will be emphasized (right
speaker sound will be attenuated).
Page 188 of 397

Features of your vehicle
108
4
- MP3 CD : File Name, Title, Artist,
Album, Folder, Total Files (Not displayed
if the information is unavailable on the
CD or file.)
10. FOLDER Moving Button
Press [FOLDER ] button to move to child folder of the current folder and
display the first song in the folder.
Press TUNE/ ENTER knob to move to
the folder displayed. It will play the first
song in the folder.
Press [FOLDER ] button to move to parent folder of the current folder and
display the first song in the folder.
Press TUNE/ENTER knob to move to
the folder displayed.
11. SEARCH Knob & ENTER Button
Turn this knob clockwise to browsesongs after current song, or counter-
clockwise to browse songs before cur-
rent song. To play the displayed song,
press the knob.
Pressing this knob without turning enters to AUDIO CONTROL mode.
NOTE:
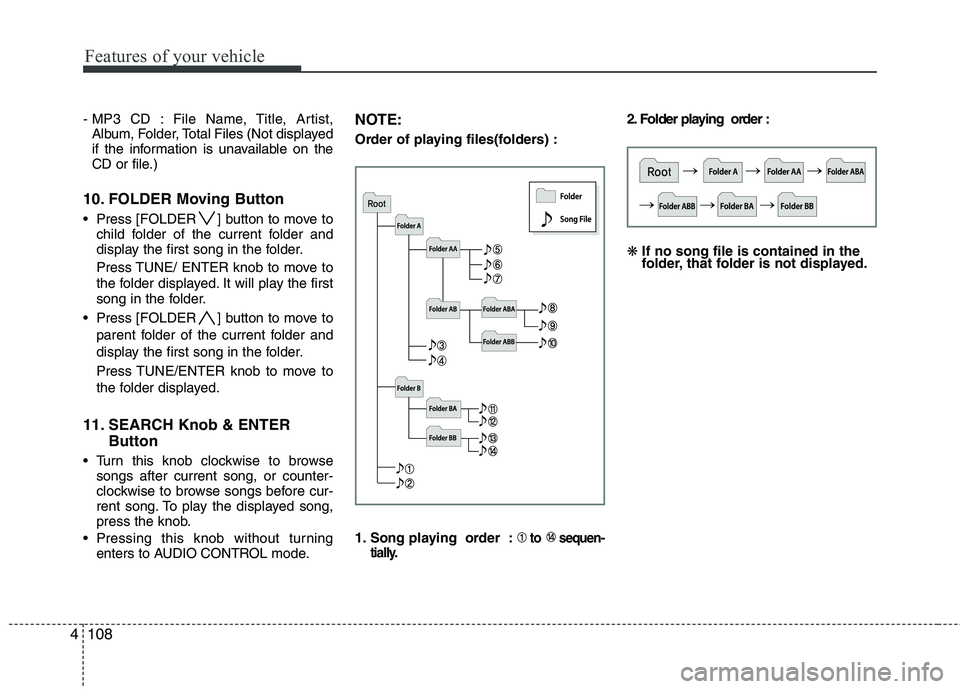
Order of playing files(folders) :
1. Song playing order :
to sequen-
tially.
2. Folder playing order : ❋ If no song file is contained in the
folder, that folder is not displayed.