2013 HYUNDAI TUCSON lock
[x] Cancel search: lockPage 101 of 397
421
Features of your vehicle
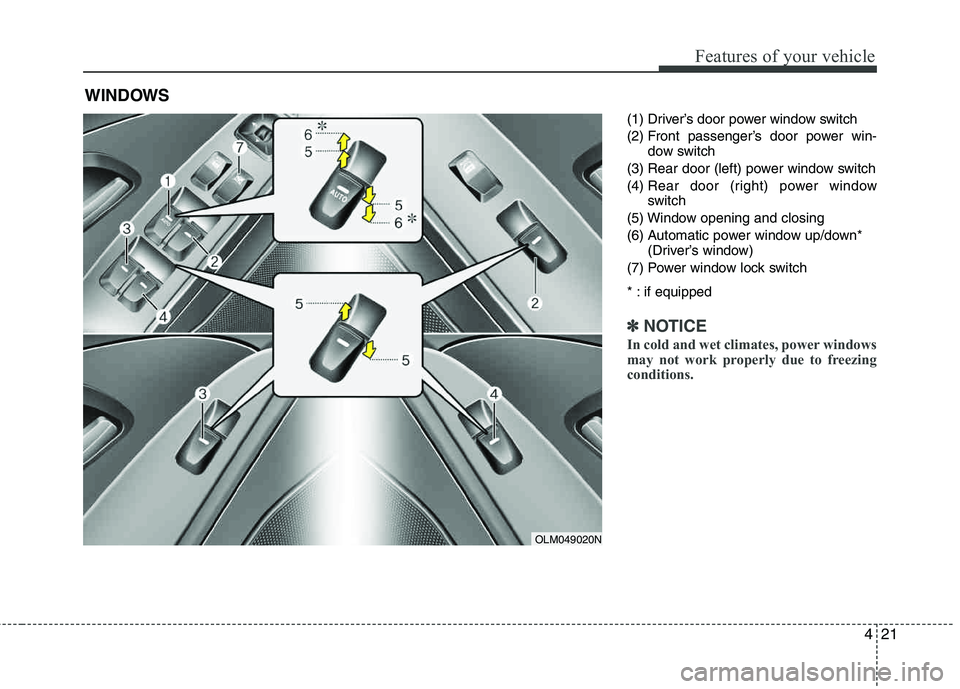
(1) Driver’s door power window switch
(2) Front passenger’s door power win-dow switch
(3) Rear door (left) power window switch (4) Rear door (right) power window
switch
(5) Window opening and closing
(6) Automatic power window up/down* (Driver’s window)
(7) Power window lock switch
* : if equipped
✽✽ NOTICE
In cold and wet climates, power windows
may not work properly due to freezing
conditions.
WINDOWS
OLM049020N
Page 102 of 397
Features of your vehicle
22
4
Power windows
The ignition switch must be in the ON
position for power windows to operate.
Each door has a power window switch
that controls the door's window. The driv-
er has a power window lock switch which
can block the operation of passenger
windows. The power windows can be
operated for approximately 30 seconds
after the ignition key is removed or turned
to the ACC or LOCK position. However, if
the front doors are opened, the power
windows cannot be operated within the
30 second period after the ignition key
removal.
✽✽
NOTICE
While driving with the rear windows
down or with the sunroof (if equipped)
in an open (or partially open) position,
your vehicle may demonstrate a wind
buffeting or pulsation noise. This noise
is a normal occurrence and can be
reduced or eliminated by taking the fol-
lowing actions. If the noise occurs with
one or both of the rear windows down,
partially lower both front windows
approximately one inch. If you experi-
ence the noise with the sunroof open,
slightly reduce the size of the sunroof
opening.
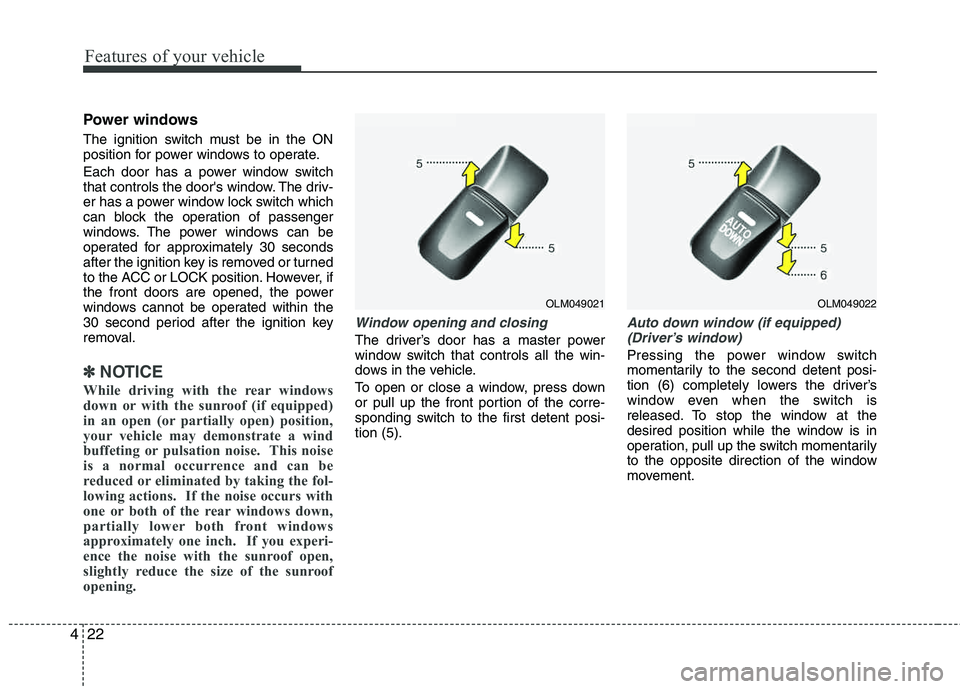
Window opening and closing
The driver’s door has a master power
window switch that controls all the win-
dows in the vehicle.
To open or close a window, press down
or pull up the front portion of the corre-
sponding switch to the first detent posi-tion (5).
Auto down window (if equipped) (Driver’s window)
Pressing the power window switch
momentarily to the second detent posi-
tion (6) completely lowers the driver’s
window even when the switch is
released. To stop the window at the
desired position while the window is in
operation, pull up the switch momentarily
to the opposite direction of the window
movement.
OLM049021OLM049022
Page 103 of 397
423
Features of your vehicle
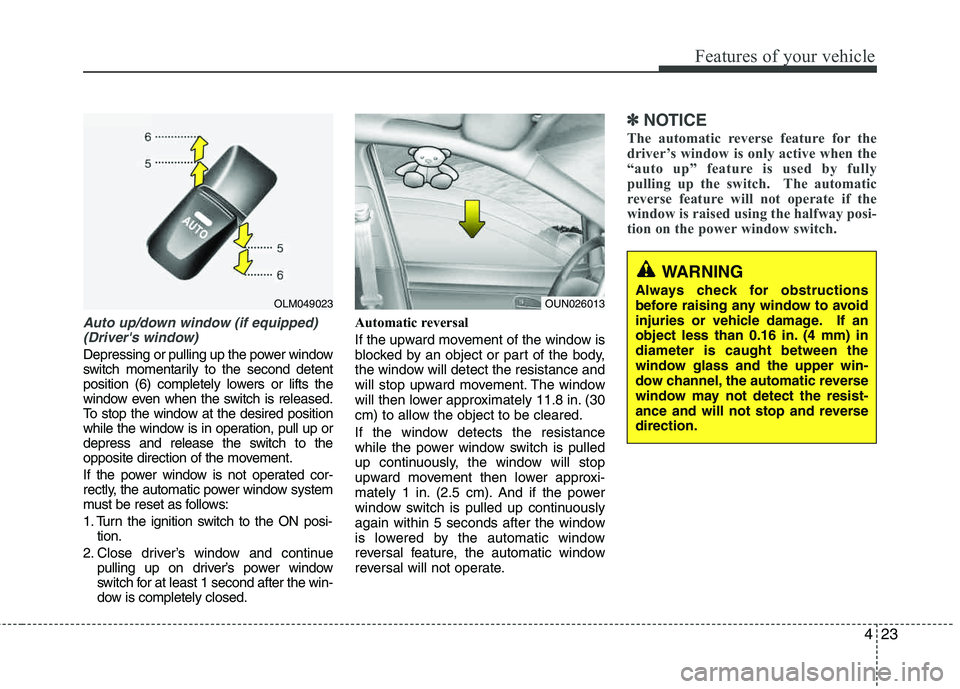
Auto up/down window (if equipped) (Driver's window)
Depressing or pulling up the power window
switch momentarily to the second detent
position (6) completely lowers or lifts the
window even when the switch is released.
To stop the window at the desired position
while the window is in operation, pull up or
depress and release the switch to the
opposite direction of the movement.
If the power window is not operated cor-
rectly, the automatic power window system
must be reset as follows:
1. Turn the ignition switch to the ON posi- tion.
2. Close driver’s window and continue pulling up on driver’s power window
switch for at least 1 second after the win-
dow is completely closed. Automatic reversal
If the upward movement of the window is
blocked by an object or part of the body,
the window will detect the resistance and
will stop upward movement. The window
will then lower approximately 11.8 in. (30
cm) to allow the object to be cleared.
If the window detects the resistance
while the power window switch is pulled
up continuously, the window will stop
upward movement then lower approxi-
mately 1 in. (2.5 cm). And if the power
window switch is pulled up continuously
again within 5 seconds after the window
is lowered by the automatic window
reversal feature, the automatic window
reversal will not operate.
✽✽
NOTICE
The automatic reverse feature for the
driver’s window is only active when the
“auto up” feature is used by fully
pulling up the switch. The automatic
reverse feature will not operate if the
window is raised using the halfway posi-
tion on the power window switch.
WARNING
Always check for obstructions
before raising any window to avoid
injuries or vehicle damage. If an
object less than 0.16 in. (4 mm) indiameter is caught between the
window glass and the upper win-
dow channel, the automatic reverse
window may not detect the resist-
ance and will not stop and reverse direction.
OUN026013OLM049023
Page 104 of 397
Features of your vehicle
24
4
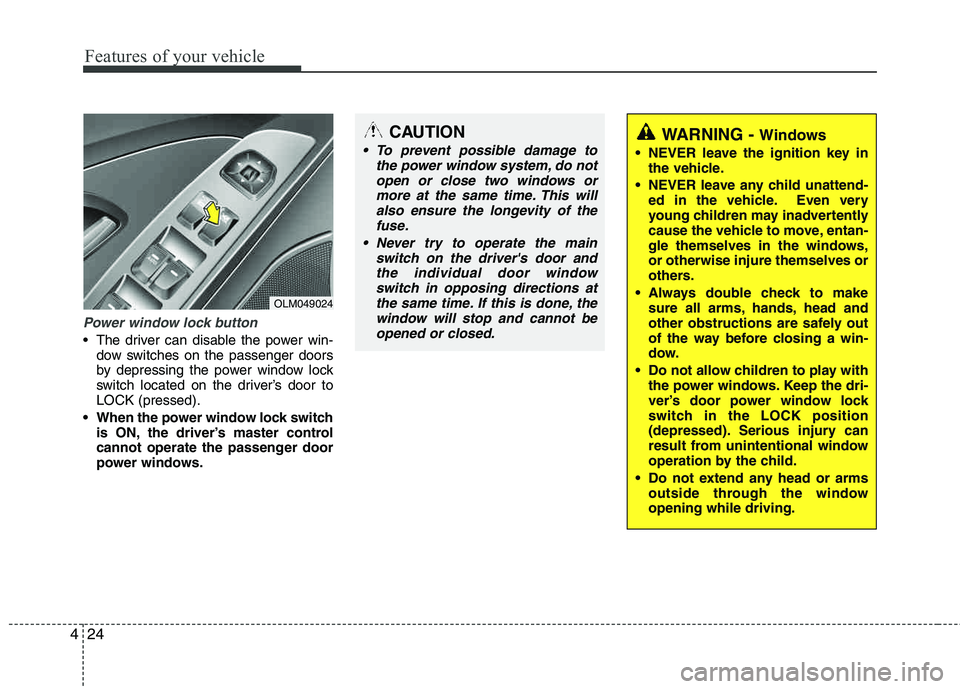
Power window lock button
The driver can disable the power win-
dow switches on the passenger doors
by depressing the power window lock
switch located on the driver’s door to LOCK (pressed).
When the power window lock switch is ON, the driver’s master control
cannot operate the passenger door
power windows.
OLM049024
CAUTION
To prevent possible damage to
the power window system, do notopen or close two windows or
more at the same time. This willalso ensure the longevity of thefuse.
Never try to operate the main switch on the driver's door andthe individual door windowswitch in opposing directions at
the same time. If this is done, thewindow will stop and cannot be opened or closed.WARNING - Windows
NEVER leave the ignition key in the vehicle.
NEVER leave any child unattend- ed in the vehicle. Even very
young children may inadvertently
cause the vehicle to move, entan-
gle themselves in the windows, or otherwise injure themselves or
others.
Always double check to make sure all arms, hands, head and
other obstructions are safely out
of the way before closing a win-
dow.
Do not allow children to play with the power windows. Keep the dri-
ver’s door power window lock
switch in the LOCK position
(depressed). Serious injury can
result from unintentional window
operation by the child.
Do not extend any head or arms outside through the windowopening while driving.
Page 106 of 397
Features of your vehicle
26
4
Closing the hood
1. Before closing the hood, check the fol-
lowing:
must be correctly installed.
bustible material must be removed
from the engine compartment.
2. Return the support rod to its clip to prevent it from rattling.
3. Lower the hood until it is about 1 ft. (30 cm) above the closed position and let
it drop. Make sure that it locks into
place.WARNING
Before closing the hood, ensure that all obstructions are removed
from the hood opening. Closingthe hood with an obstruction
present in the hood opening may
result in property damage or
severe personal injury.
Do not leave gloves, rags or any other combustible material in the
engine compartment. Doing so
may cause a heat-induced fire.
Always double check to be sure that the hood is firmly latched
before driving away. If it is not
latched, the hood could open
while the vehicle is being driven,
causing a total loss of visibility,
which might result in an accident.
Do not move the vehicle with the hood in the raised position, asvision is obstructed and the hood
could fall or be damaged.
Page 107 of 397

427
Features of your vehicle
Opening the fuel filler door
The fuel filler door must be opened from
inside the vehicle by pulling up the fuel
filler door opener lever.
✽✽NOTICE
If the fuel filler door does not open
because ice has formed around it, tap
lightly or push on the door to break the
ice and release the door. Do not pry on
the door. If necessary, spray around the
door with an approved de-icer fluid (do
not use radiator anti-freeze) or move the
vehicle to a warm place and allow the ice
to melt.
1. Stop the engine.
2. To open the fuel filler door, pull the fuel filler door opener up.
3. Pull the fuel filler door (1) out to fully open.
4. To remove the cap, turn the fuel filler cap (2) counterclockwise.
5. Refuel as needed.
Closing the fuel filler door
1. To install the cap, turn it clockwise until it “clicks” one time. This indicates that the cap is securely tightened.
2. Close the fuel filler door and push it lightly making sure that it is securely closed.
FUEL FILLER DOOR
OSA047022OLM042028N
WARNING - Refueling
If pressurized fuel sprays out, it
can cover your clothes or skin
and thus subject you to the risk
of fire and burns. Always remove
the fuel cap carefully and slowly.
If the cap is venting fuel or if you
hear a hissing sound, wait until
the condition stops before com-
pletely removing the cap.
Do not "top off" after the nozzle automatically shuts off whenrefueling.
Tighten the cap until it clicks one time, otherwise the Check Engine light will illuminate.
Always check that the fuel cap is installed securely to prevent fuel
spillage in the event of an acci- dent.
Page 114 of 397

Features of your vehicle
34
4
Electric power steering
The power steering uses a motor to
assist you in steering the vehicle. If the
engine is off or if the power steering sys-
tem becomes inoperative, the vehicle
may still be steered, but it will require
increased steering effort.
The motor driven power steering is con-
trolled by a power steering control unit
which senses the steering wheel torque,
steering wheel position and vehicle
speed to command the motor.
The steering wheel becomes heavier as
the vehicle’s speed increases and
becomes lighter as the vehicle’s speed
decreases for optimum steering control.
Should you notice any change in the
effort required to steer during normal
vehicle operation, have the power steer-
ing checked by an authorized HYUNDAI
dealer.
✽✽
NOTICE
The following symptoms may occur dur-
ing normal vehicle operation:
The EPS warning light does not illu- minate.
The steering wheel becomes heavier after turning the ignition switch on.
This happens as the system performs
the EPS system diagnostics. When the
diagnostics is completed, the steering
wheel will return to its normal condi-
tion.
Click noise may be heard from the EPS relay after the ignition switch is
turned to the ON or LOCK position.
Motor noise may be heard when the vehicle is at a stop or at a low driving
speed.
If the Electric Power Steering System does not operate normally, the warn-
ing light will illuminate on the instru-
ment cluster. The steering wheel may
become difficult to control or operate
abnormally. Take your vehicle to an
authorized HYUNDAI dealer and
have the vehicle checked as soon as
possible.
When you operate the steering wheel in low temperature, abnormal noise
could occur. If temperature rises, the
noise will disappear. This is a normal
condition. Tilt steering/Telescope steering (if equipped)
Tilt steering allows you to adjust the
steering wheel before you drive. You can
also raise the steering wheel to give your
legs more room when you exit and enter
the vehicle (if equipped).
The steering wheel should be positioned
so that it is comfortable for you to drive,
while permitting you to see the instru-
ment panel warning lights and gauges.
STEERING WHEEL
WARNING
Never adjust the angle and height of steering wheel while driving.
You may lose your steering con-
trol and cause severe personal
injury or accidents.
After adjusting, push the steering wheel both up and down to be
certain it is locked in position.
Page 115 of 397
435
Features of your vehicle
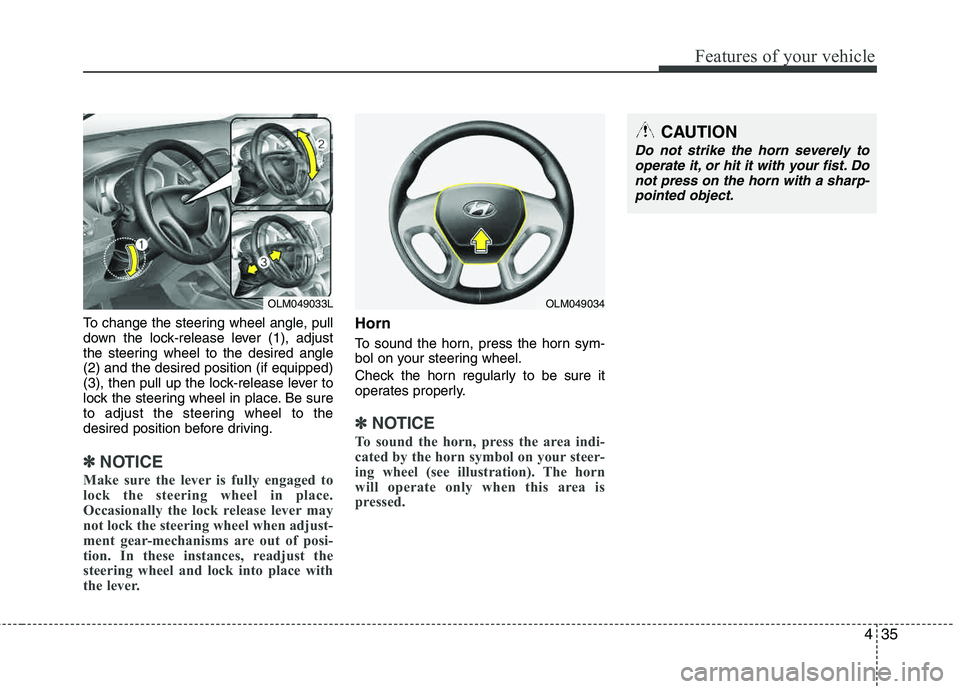
To change the steering wheel angle, pull
down the lock-release lever (1), adjust
the steering wheel to the desired angle (2) and the desired position (if equipped)
(3), then pull up the lock-release lever to
lock the steering wheel in place. Be sure
to adjust the steering wheel to the
desired position before driving.
✽✽NOTICE
Make sure the lever is fully engaged to
lock the steering wheel in place.
Occasionally the lock release lever may
not lock the steering wheel when adjust-
ment gear-mechanisms are out of posi-
tion. In these instances, readjust the
steering wheel and lock into place with
the lever.
Horn
To sound the horn, press the horn sym-
bol on your steering wheel.
Check the horn regularly to be sure it
operates properly.
✽✽ NOTICE
To sound the horn, press the area indi-
cated by the horn symbol on your steer-
ing wheel (see illustration). The horn
will operate only when this area is
pressed.
OLM049033L
CAUTION
Do not strike the horn severely to operate it, or hit it with your fist. Donot press on the horn with a sharp-
pointed object.
OLM049034