2013 Hyundai Sonata Hybrid steering
[x] Cancel search: steeringPage 269 of 425
527
Driving your vehicle
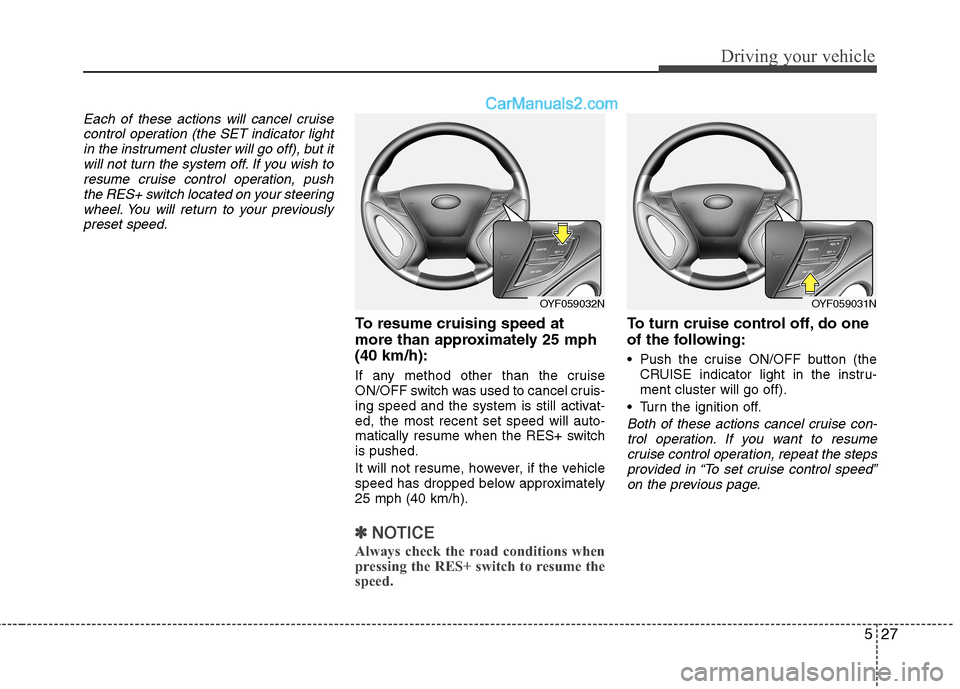
Each of these actions will cancel cruise
control operation (the SET indicator light
in the instrument cluster will go off), but it
will not turn the system off. If you wish to
resume cruise control operation, push
the RES+ switch located on your steering
wheel. You will return to your previously
preset speed.
To resume cruising speed at
more than approximately 25 mph
(40 km/h):
If any method other than the cruise
ON/OFF switch was used to cancel cruis-
ing speed and the system is still activat-
ed, the most recent set speed will auto-
matically resume when the RES+ switch
is pushed.
It will not resume, however, if the vehicle
speed has dropped below approximately
25 mph (40 km/h).
✽ ✽
NOTICE
Always check the road conditions when
pressing the RES+ switch to resume the
speed.
To turn cruise control off, do one
of the following:
Push the cruise ON/OFF button (the
CRUISE indicator light in the instru-
ment cluster will go off).
Turn the ignition off.
Both of these actions cancel cruise con-
trol operation. If you want to resume
cruise control operation, repeat the steps
provided in “To set cruise control speed”
on the previous page.
OYF059032NOYF059031N
Page 271 of 425
529
Driving your vehicle
Use your air conditioning sparingly.
The air conditioning system is operat-
ed by engine power so your fuel econ-
omy is reduced when you use it.
Open windows at high speeds can
reduce fuel economy.
Fuel economy is less in crosswinds
and headwinds. To help offset some of
this loss, slow down when driving in
these conditions.
Keeping a vehicle in good operating con-
dition is important both for economy and
safety. Therefore, have an authorized
HYUNDAI dealer perform scheduled
inspections and maintenance.
WARNING - HEV system
off during motion
Never turn the HEV system off to
coast down hills or anytime the
vehicle is in motion. The power
steering and power brakes will not
function properly without the HEV
system running. Instead, keep the
HEV system on and downshift to an
appropriate gear for engine braking
effect. In addition, turning off the
ignition while driving could engage
the steering wheel lock resulting in
loss of vehicle steering which
could cause serious injury or
death.
Page 272 of 425
Driving your vehicle
30 5
Hazardous driving conditions
When hazardous driving conditions are
encountered such as water, snow, ice,
mud, sand, or similar hazards, follow
these suggestions:
Drive cautiously and allow extra dis-
tance for braking.
Avoid sudden changes in braking or
steering. If stalled in snow, mud, or sand, use
second gear. Accelerate slowly to
avoid spinning the drive wheels.
Use sand, rock salt, tire chains, or
other non-slip material under the drive
wheels to provide traction when stalled
in ice, snow, or mud.
Rocking the vehicle
If it is necessary to rock the vehicle to
free it from snow, sand, or mud, first turn
the steering wheel right and left to clear
the area around your front wheels. Then,
shift back and forth between R (Reverse)
and any forward gear. Do not race the
engine, and the wheels as little as possi-
ble. If you are still stuck after a few tries,
have the vehicle pulled out by a tow vehi-
cle to avoid engine overheating and pos-
sible damage to the transaxle.
SPECIAL DRIVING CONDITIONS
1JBB3302
WARNING - ABS
Do not pump the brake pedal on a
vehicle equipped with ABS.
WARNING - Downshifting
Downshifting with an automatic
transaxle, while driving on slippery
surfaces can cause an accident.
The sudden change in tire speed
could cause the tires to skid. Be
careful when downshifting on slip-
pery surfaces.
CAUTION
Prolonged rocking may cause
engine over-heating, transaxle dam-
age or failure, and tire damage.
Page 279 of 425
537
Driving your vehicle
To keep locks from freezing
To keep the locks from freezing, squirt an
approved de-icer fluid or glycerine into
the key opening. If a lock is covered with
ice, squirt it with an approved de-icing
fluid to remove the ice. If the lock is
frozen internally, you may be able to thaw
it out by using a heated key. Handle the
heated key with care to avoid injury.
Use approved window washer
anti-freeze in system
To keep the water in the window washer
system from freezing, add an approved
window washer anti-freeze solution in
accordance with instructions on the con-
tainer. Window washer anti-freeze is
available from an authorized HYUNDAI
dealer and most auto parts outlets. Do
not use engine coolant or other types of
anti-freeze as these may damage the
paint finish.
Don't let your parking brake
freeze
Under some conditions your parking
brake can freeze in the engaged position.
This is most likely to happen when there
is an accumulation of snow or ice around
or near the rear brakes or if the brakes
are wet. If there is a risk the parking
brake may freeze, apply it only temporar-
ily while you put the shift lever in P (auto-
matic transaxle) or in first and block the
rear wheels so the vehicle cannot roll.
Then release the parking brake.
Don't let ice and snow accumu-
late underneath
Under some conditions, snow and ice
can build up under the fenders and inter-
fere with the steering. When driving in
severe winter conditions where this may
happen, you should periodically check
underneath the car to be sure the move-
ment of the front wheels and the steering
components is not obstructed.
Carry emergency equipment
Depending on the severity of the weath-
er where you drive your car, you should
carry appropriate emergency equipment.
Some of the items you may want to carry
include tire chains, tow straps or chains,
flashlight, emergency flares, sand, a
shovel, jumper cables, a window scraper,
gloves, ground cloth, coveralls, a blanket,
etc.
Page 309 of 425
623
What to do in an emergency
It is possible that some tires, espe-
cially with larger punctures or dam-
age to the sidewall, cannot be sealed
completely.
Air pressure loss in the tire may
adversely affect tire performance.
For this reason, you should avoid
abrupt steering or other driving
maneuvers, especially if the vehicle is
heavily loaded or if a trailer is in use.
The Tire Mobility Kit is not designed
or intended as a permanent tire
repair method and is to be used for
one tire only.
This instruction shows you step by
step how to temporarily seal the
puncture simply and reliably.
Read the section "Notes on the safe
use of the Tire Mobility Kit".Notes on the safe use of the Tire
Mobility Kit
Park your car at the side of the
road so that you can work with the
Tire Mobility Kit away from moving
traffic.
To be sure your vehicle will not
move, even when you're on fairly
level ground, always set your park-
ing brake.
Only use the Tire Mobility Kit for
sealing/inflation passenger car tires.
Only punctured areas located with-
in the tread region of the tire can be
sealed using the tire mobility kit.
Do not use on motorcycles, bicy-
cles or any other type of tires.
When the tire and wheel are both
damaged, do not use the Tire
Mobility Kit for your safety.
Use of the Tire Mobility Kit may not
be effective for tire damage larger
than approximately 0.24 in (6 mm).
Please contact the nearest
HYUNDAI dealership if the tire
cannot be made roadworthy with
the Tire Mobility Kit. Do not use the Tire Mobility Kit if a
tire is severely damaged by driving
run flat or with insufficient air pres-
sure.
Do not remove any foreign objects
such as nails or screws that have
penetrated the tire.
Provided the car is outdoors, leave
the engine running. Otherwise
operating the compressor may
eventually drain the car battery.
Never leave the Tire Mobility Kit
unattended while it is being used.
Do not leave the compressor run-
ning for more than 10 min. at a time
or it may overheat.
Do not use the Tire Mobility Kit if
the ambient temperature is below -
22°F (-30°C).
Before using the Tire Mobility Kit,
read the precautionary advice
printed on the sealant bottle.
Page 311 of 425
625
What to do in an emergency
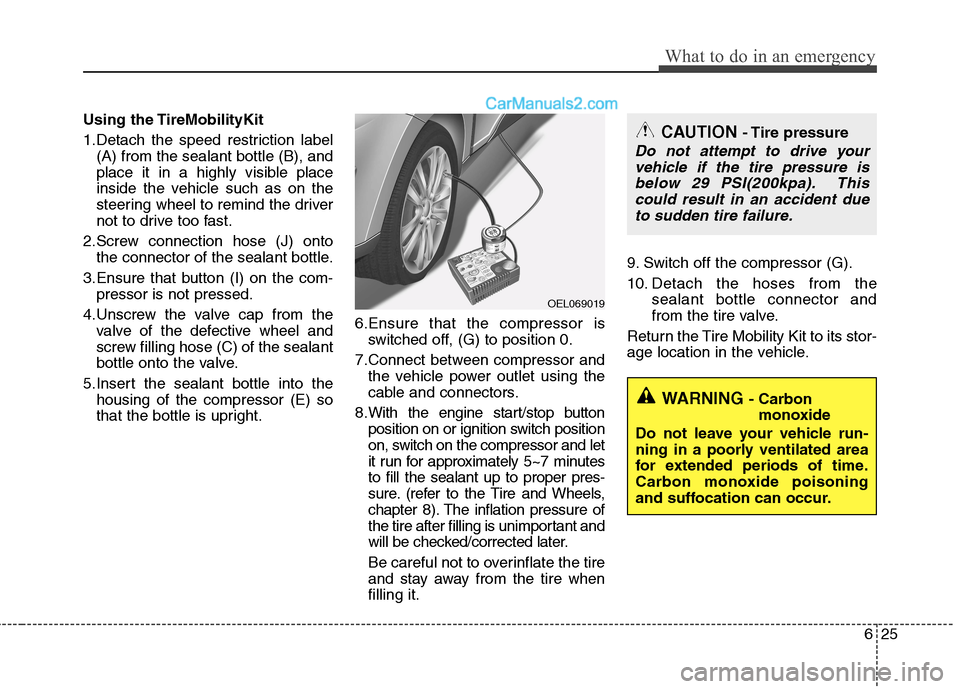
Using the TireMobilityKit
1.Detach the speed restriction label
(A) from the sealant bottle (B), and
place it in a highly visible place
inside the vehicle such as on the
steering wheel to remind the driver
not to drive too fast.
2.Screw connection hose (J) onto
the connector of the sealant bottle.
3.Ensure that button (I) on the com-
pressor is not pressed.
4.Unscrew the valve cap from the
valve of the defective wheel and
screw filling hose (C) of the sealant
bottle onto the valve.
5.Insert the sealant bottle into the
housing of the compressor (E) so
that the bottle is upright.6.Ensure that the compressor is
switched off, (G) to position 0.
7.Connect between compressor and
the vehicle power outlet using the
cable and connectors.
8.With the engine start/stop button
position on or ignition switch position
on, switch on the compressor and let
it run for approximately 5~7 minutes
to fill the sealant up to proper pres-
sure. (refer to the Tire and Wheels,
chapter 8). The inflation pressure of
the tire after filling is unimportant and
will be checked/corrected later.
Be careful not to overinflate the tire
and stay away from the tire when
filling it.9. Switch off the compressor (G).
10. Detach the hoses from the
sealant bottle connector and
from the tire valve.
Return the Tire Mobility Kit to its stor-
age location in the vehicle.
OEL069019
CAUTION - Tire pressure
Do not attempt to drive your
vehicle if the tire pressure is
below 29 PSI(200kpa). This
could result in an accident due
to sudden tire failure.
WARNING - Carbon
monoxide
Do not leave your vehicle run-
ning in a poorly ventilated area
for extended periods of time.
Carbon monoxide poisoning
and suffocation can occur.
Page 319 of 425
75
Maintenance
OWNER MAINTENANCE
The following lists are vehicle checks and
inspections that should be performed by
the owner or an authorized HYUNDAI
dealer at the frequencies indicated to
help ensure safe, dependable operation
of your vehicle.
Any adverse conditions should be
brought to the attention of your dealer as
soon as possible.
These Owner Maintenance Checks are
generally not covered by warranties and
you may be charged for labor, parts and
lubricants used.Owner maintenance schedule
When you stop for fuel:
Check the engine oil level.
Check coolant level in coolant reser-
voirs (engine and inverter).
Check the windshield washer fluid
level.
Look for low or under-inflated tires.
While operating your vehicle:
Note any changes in the sound of the
exhaust or any smell of exhaust fumes
in the vehicle.
Check for vibrations in the steering
wheel. Notice any increased steering
effort or looseness in the steering
wheel, or change in its straight-ahead
position.
Notice if your vehicle constantly turns
slightly or “pulls” to one side when trav-
eling on smooth, level road.
When stopping, listen and check for
unusual sounds, pulling to one side,
increased brake pedal travel or “hard-
to-push” brake pedal.
If any slipping or changes in the oper-
ation of your transaxle occurs, check
the transaxle fluid level.
Check automatic transaxle P (Park)
function.
Check parking brake.
Check for fluid leaks under your vehicle
(water dripping from the air condition-
ing system during or after use is nor-
mal).
Check inverter coolant.
WARNING - Radiator cap &
Inverter coolant cap
Do not remove the radiator cap and
/or inverter coolant cap when the
engine and radiator are hot.
Scalding hot coolant and steam
may blow out under pressure caus-
ing serious injury.
Page 322 of 425
Maintenance
8 7
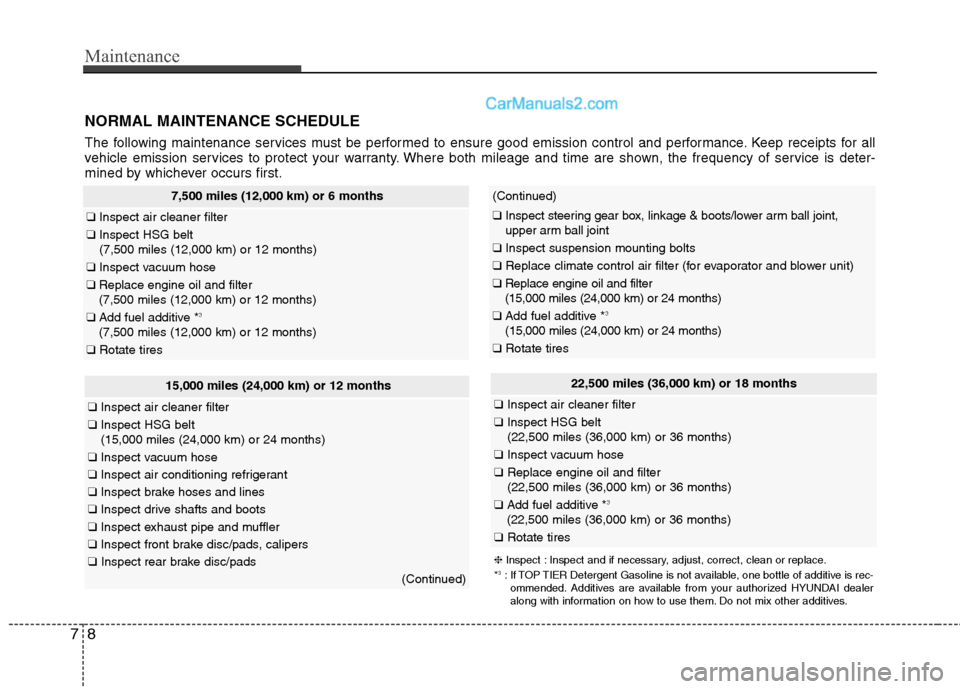
NORMAL MAINTENANCE SCHEDULE
The following maintenance services must be performed to ensure good emission control and performance. Keep receipts for all
vehicle emission services to protect your warranty. Where both mileage and time are shown, the frequency of service is deter-
mined by whichever occurs first.
15,000 miles (24,000 km) or 12 months
❑Inspect air cleaner filter
❑Inspect HSG belt
(15,000 miles (24,000 km) or 24 months)
❑Inspect vacuum hose
❑Inspect air conditioning refrigerant
❑Inspect brake hoses and lines
❑Inspect drive shafts and boots
❑Inspect exhaust pipe and muffler
❑Inspect front brake disc/pads, calipers
❑Inspect rear brake disc/pads
(Continued)
(Continued)
❑Inspect steering gear box, linkage & boots/lower arm ball joint,
upper arm ball joint
❑Inspect suspension mounting bolts
❑Replace climate control air filter (for evaporator and blower unit)
❑Replace engine oil and filter
(15,000 miles (24,000 km) or 24 months)
❑Add fuel additive *3
(15,000 miles (24,000 km) or 24 months)
❑Rotate tires
22,500 miles (36,000 km) or 18 months
❑Inspect air cleaner filter
❑Inspect HSG belt
(22,500 miles (36,000 km) or 36 months)
❑Inspect vacuum hose
❑Replace engine oil and filter
(22,500 miles (36,000 km) or 36 months)
❑Add fuel additive *3
(22,500 miles (36,000 km) or 36 months)
❑Rotate tires
7,500 miles (12,000 km) or 6 months
❑Inspect air cleaner filter
❑Inspect HSG belt
(7,500 miles (12,000 km) or 12 months)
❑Inspect vacuum hose
❑Replace engine oil and filter
(7,500 miles (12,000 km) or 12 months)
❑Add fuel additive *3
(7,500 miles (12,000 km) or 12 months)
❑Rotate tires
❈Inspect : Inspect and if necessary, adjust, correct, clean or replace.
*3: If TOP TIER Detergent Gasoline is not available, one bottle of additive is rec-
ommended. Additives are available from your authorized HYUNDAI dealer
along with information on how to use them. Do not mix other additives.