2013 Hyundai Sonata Hybrid wheel
[x] Cancel search: wheelPage 127 of 425

447
Features of your vehicle
Power Reserve
When the engine oper-
ates the vehicle, the
battery is simultane-
ously charged.
(Engine ➞ Wheel &
Battery)
Engine Generation/Motor Drive
To decelerate the vehi-
cle, engine braking is
used while the regener-
ative braking is applied
and also charges the
hybrid battery.
(Engine ➞Battery ➞
Wheel)Engine Generation/Regeneration
The engine and regen-
erative brake system
charges the hybrid bat-
tery.
(Engine & Wheel ➞
Battery)
Engine Brake/Regeneration
The engine friction is
used to slack the vehi-
cle and the regenera-
tive brake charges the
hybrid battery.
(Wheel ➞Engine &
Battery)
ECO Level
Flower mode.1
When the hybrid vehicle is started, the
ECO level step 4 is displayed. If you drive
economically, ECO level will be upgraded.
- However, if you do not drive economi-
cally, the ECO level will be down-grad-
ed.
OYFH041349N
OYFH041323N
OYFH041329N
OYFH041332N
OYFH041337N
Page 136 of 425
Features of your vehicle
56 4
WARNING
Driving the vehicle with a warning
light on is dangerous. If the brake
warning light remains on, have the
brakes checked and repaired imme-
diately by an authorized HYUNDAI
dealer.
Brake system &
Parking brake &
Brake fluid warning light
When the service brake system or the
regenerative brake system malfunctions,
the brake warning light is turned on and
'check brake' is displayed on the LCD.
Have the system checked by an author-
ized HYUNDAI dealer as soon as possi-
ble.
Parking brake warning
This light illuminated when the parking
brake is applied with engine start/stop
button in the START or ON position. The
warning light should go off when the
parking brake is released.Low brake fluid level warning
If the warning light remains on, it may
indicate that the brake fluid level in the
reservoir is low.
If the warning light remains on:
1. Drive carefully to the nearest safe
location and stop your vehicle.
2. With the engine stopped, check the
brake fluid level immediately and add
fluid as required. Then check all brake
components for fluid leaks.
3. Do not drive the vehicle if leaks are
found, the warning light remains on or
the brakes do not operate properly.
Have the vehicle towed to any author-
ized HYUNDAI dealer for a brake sys-
tem inspection and necessary repairs.
Your vehicle is equipped with a dual-
diagonal braking system. This means you
still have braking on two wheels even if
one of the brake circuits is damaged or
malfunctions. With only one of the circuits
working, more than normal pedal travel
and greater pedal pressure are required
to stop the car. Also, the car will not stop
in as short a distance with only a portion
of the brake system working. If the
brakes fail while you are driving, shift to a
lower gear for additional engine braking
and stop the car as soon as it is safe to
do so.To check bulb operation, check whether
the parking brake and brake fluid warning
light illuminates when the engine
start/stop button is in the ON position.
CAUTION
When the service brake system and
the regenerative brake system mal-
functions, the brake warning light is
turned on and 'check brake' is dis-
played on the LCD, and also the warn-
ing chime will sound. If this occurs
you can stop your vehicle by apply-
ing greater force to the brake pedal
than normal and the stopping dis-
tance will be longer. Have the system
checked by an authorized HYUNDAI
dealer as soon as possible.
Page 140 of 425
Features of your vehicle
60 4
ESC indicator (Electronic
Stability Control)
The ESC indicator will illuminate when
the engine start/stop button is pressed to
ON, but should go off after approximate-
ly 3 seconds. When the ESC is on, it
monitors the driving conditions under
normal driving conditions, the ESC light
will remain off. When a slippery or low
traction condition is encountered, the
ESC will operate, and the ESC indicator
will blink to indicate the ESC is operating.
The ESC indicator stays on when the
ESC may have a malfunction. Take your
car to an authorized HYUNDAI dealer
and have the system checked.
ESC OFF indicator
The ESC OFF indicator will illuminate
when the engine start/stop button is
pressed to ON, but should go off after
approximately 3 seconds. To switch to
ESC OFF mode, press the ESC OFF
button. The ESC OFF indicator will illumi-
nate indicating the ESC is deactivated.
If this indicator stays on when ESC OFF
is not selected, the ESC may have mal-
functioned. Take your vehicle to an
authorized HYUNDAI dealer and have
the system checked.
Cruise indicator (if equipped)
CRUISE indicator
The indicator light illuminates when the
cruise control system is enabled.
The cruise indicator light in the instru-
ment cluster is illuminated when the
cruise control ON-OFF button on the
steering wheel is pushed.
The indicator light turns off when the
cruise control ON-OFF button is pushed
again. For more information about the
use of cruise control, refer to “Cruise
control system or Smart cruise control
system” in section 5.CRUISE
Page 166 of 425
Features of your vehicle
86 4
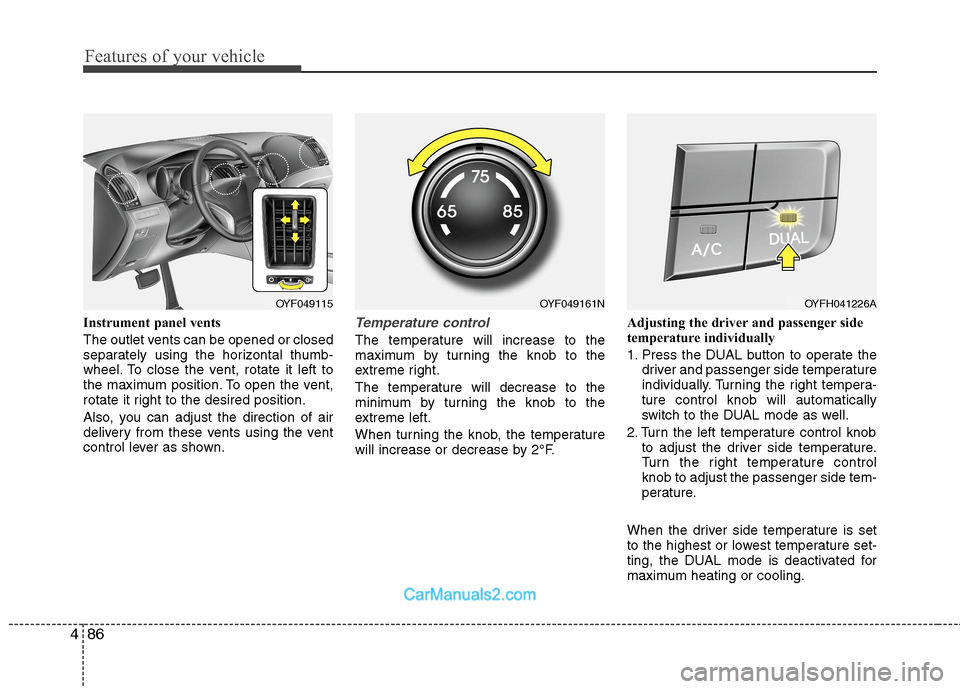
Instrument panel vents
The outlet vents can be opened or closed
separately using the horizontal thumb-
wheel. To close the vent, rotate it left to
the maximum position. To open the vent,
rotate it right to the desired position.
Also, you can adjust the direction of air
delivery from these vents using the vent
control lever as shown.Temperature control
The temperature will increase to the
maximum by turning the knob to the
extreme right.
The temperature will decrease to the
minimum by turning the knob to the
extreme left.
When turning the knob, the temperature
will increase or decrease by 2°F.Adjusting the driver and passenger side
temperature individually
1. Press the DUAL button to operate the
driver and passenger side temperature
individually. Turning the right tempera-
ture control knob will automatically
switch to the DUAL mode as well.
2. Turn the left temperature control knob
to adjust the driver side temperature.
Turn the right temperature control
knob to adjust the passenger side tem-
perature.
When the driver side temperature is set
to the highest or lowest temperature set-
ting, the DUAL mode is deactivated for
maximum heating or cooling.
OYF049115OYF049161NOYFH041226A
Page 177 of 425
497
Features of your vehicle
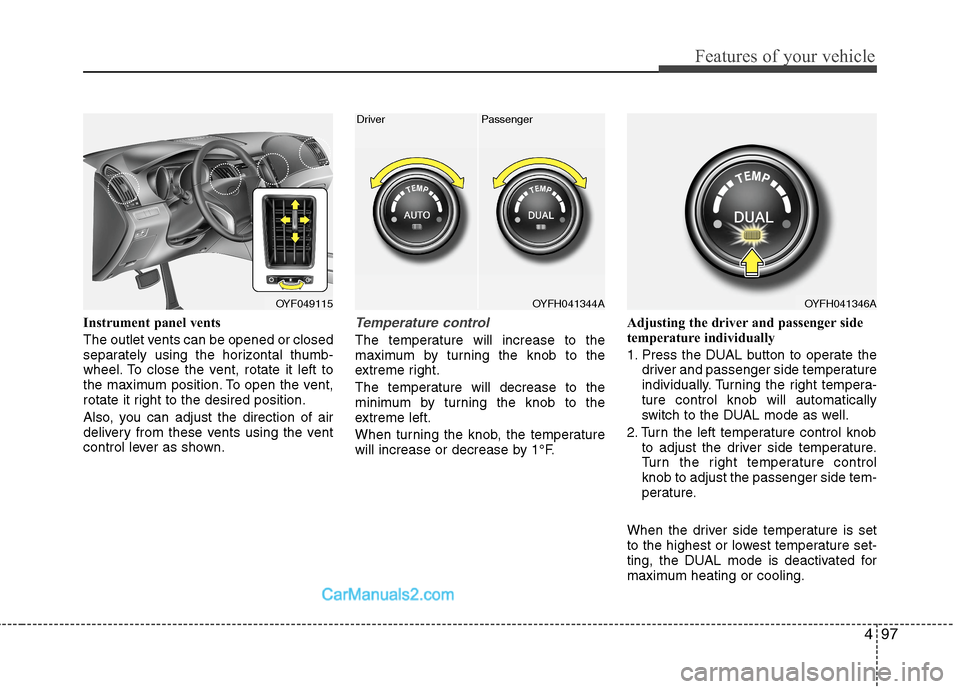
Instrument panel vents
The outlet vents can be opened or closed
separately using the horizontal thumb-
wheel. To close the vent, rotate it left to
the maximum position. To open the vent,
rotate it right to the desired position.
Also, you can adjust the direction of air
delivery from these vents using the vent
control lever as shown.Temperature control
The temperature will increase to the
maximum by turning the knob to the
extreme right.
The temperature will decrease to the
minimum by turning the knob to the
extreme left.
When turning the knob, the temperature
will increase or decrease by 1°F.Adjusting the driver and passenger side
temperature individually
1. Press the DUAL button to operate the
driver and passenger side temperature
individually. Turning the right tempera-
ture control knob will automatically
switch to the DUAL mode as well.
2. Turn the left temperature control knob
to adjust the driver side temperature.
Turn the right temperature control
knob to adjust the passenger side tem-
perature.
When the driver side temperature is set
to the highest or lowest temperature set-
ting, the DUAL mode is deactivated for
maximum heating or cooling.
OYF049115OYFH041344A
Driver Passenger
OYFH041346A
Page 194 of 425
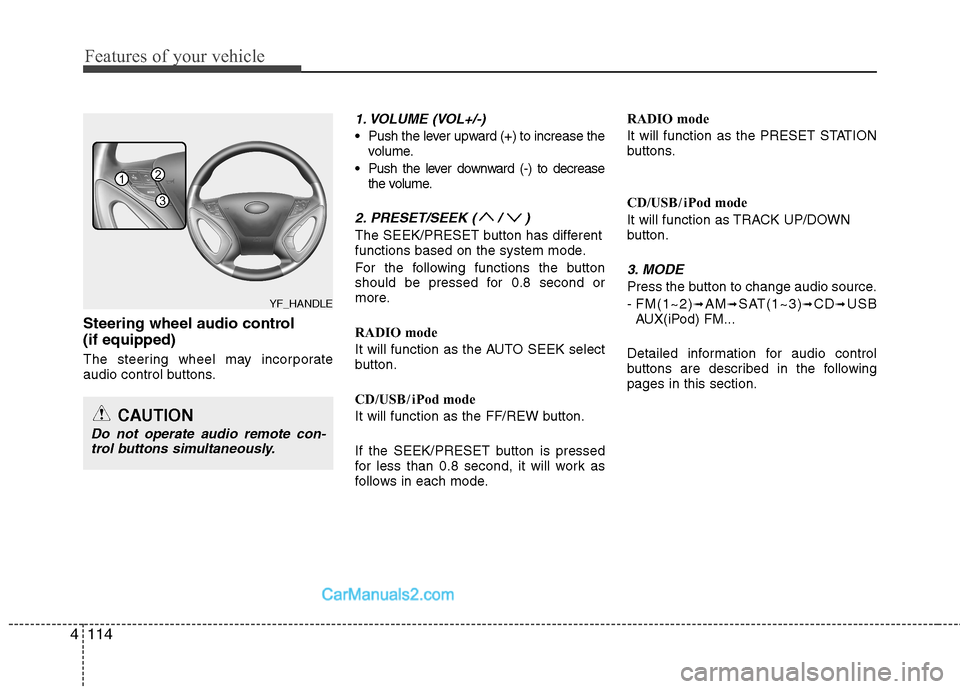
Features of your vehicle
114 4
Steering wheel audio control
(if equipped)
The steering wheel may incorporate
audio control buttons.
1. VOLUME (VOL+/-)
Push the lever upward (+) to increase the
volume.
Push the lever downward (-) to decrease
the volume.
2. PRESET/SEEK ( / )
The SEEK/PRESET button has different
functions based on the system mode.
For the following functions the button
should be pressed for 0.8 second or
more.
RADIO mode
It will function as the AUTO SEEK select
button.
CD/USB/ iPod mode
It will function as the FF/REW button.
If the SEEK/PRESET button is pressed
for less than 0.8 second, it will work as
follows in each mode.RADIO mode
It will function as the PRESET STATION
buttons.
CD/USB/ iPod mode
It will function as TRACK UP/DOWN
button.
3. MODE
Press the button to change audio source.
- FM(1~2)
➟AM➟SAT(1~3)➟CD➟USB
AUX(iPod) FM...
Detailed information for audio control
buttons are described in the following
pages in this section.
CAUTION
Do not operate audio remote con-
trol buttons simultaneously.
1
3
2
YF_HANDLE
Page 227 of 425

4147
Features of your vehicle
Phone
Before using the Bluetooth®Wireless
Technology enabled phone features
In order to use
Bluetooth®Wireless
Technology phone, you must first pair
and connect the
Bluetooth®Wireless
Technology mobile phone.
If the mobile phone is not paired or
connected, it is not possible to enter
Phone mode. Once a phone is paired
or connected, the guidance screen will
be displayed.
If Priority is set upon vehicle ignition
(IGN/ACC ON), the
Bluetooth®
Wireless Technology enabled phone
will be automatically connected. Even if
you are outside, the
Bluetooth®
Wireless Technology enabled phone
will be automatically connected once
you are in the vicinity of the vehicle. If
you do not want automatic
Bluetooth®
Wireless Technology enabled phone
connection, set the Bluetooth®
Wireless Technology power to OFF.
Making a call using the steering
wheel remote controller
1. button : Activates voice recognition.
2. button : Places and transfers calls.
3. button : Ends calls or cancels
functions. Check call history and making call
➀Shortly press (under 0.8 seconds) the
key on the steering remote con-
troller .
➁ The call history list will be displayed
on the screen.
➂Press the key again to connect a
call to the selected number.
Redialing the most recently called
number
➀Press and hold (over 0.8 seconds) the
key on the steering remote con-
troller.
➁ The most recently called number is
redialed.
❈ If call history does not exist, a screen
asking whether to download call histo-
ry is displayed. (The download feature
may not be supported in some mobile
phones)
Page 231 of 425
![Hyundai Sonata Hybrid 2013 Owners Manual 4151
Features of your vehicle
VOICE COMMAND
Starting Voice Command
To start voice command, shortly press
the key on the steering wheel
remote controller.
If voice command is in [Normal Mode],
then Hyundai Sonata Hybrid 2013 Owners Manual 4151
Features of your vehicle
VOICE COMMAND
Starting Voice Command
To start voice command, shortly press
the key on the steering wheel
remote controller.
If voice command is in [Normal Mode],
then](/manual-img/35/19650/w960_19650-230.png)
4151
Features of your vehicle
VOICE COMMAND
Starting Voice Command
To start voice command, shortly press
the key on the steering wheel
remote controller.
If voice command is in [Normal Mode],
then the system will say “Please say a
command. Beep”
❈If voice command is in [Expert Mode],
then the system will only say a “Beep-”
❈Setting Voice command [Normal
Mode]/[Expert Mode]:
Press the key Select [System]
through the TUNE knob or
key Select [Voice Command Mode]
through the TUNE knob Set [Normal
Mode]/[Expert Mode]
Say the voice command.
Skipping the Guidance Message
While the guidance message is being
stated, shortly press the key (under
0.8 seconds) to discontinue the guidance
message and sound the “beep”.
After the “beep”, say the voice command.
Ending Voice Command
While using voice command, press and
hold the key (over 0.8 seconds) to
end voice command.
While using voice command, pressing
the steering wheel remote controller or
a different key will end voice command.
In a state where the system is waiting
for your voice command, say “cancel”
or “end” to end voice command.
In a state where the system is waiting
for your voice command, shortly press
the key (under 0.8 seconds) to
end voice command.
5
SETUP
CAUTION
For proper voice recognition, say the
voice command after the guidance
message and the “Beep” sound.