2013 Hyundai Equus hood release
[x] Cancel search: hood releasePage 90 of 479

Features of your vehicle
Smart key . . . . . . . . . . . . . . . . . . . . . . . . . . . . . . . . . 4-4
• Smart key function . . . . . . . . . . . . . . . . . . . . . . . . . . . . 4-4
• Buttons on the smart key . . . . . . . . . . . . . . . . . . . . . . . 4-7
• Restrictions in handling keys . . . . . . . . . . . . . . . . . . . . 4-8
• Smart key precautions . . . . . . . . . . . . . . . . . . . . . . . . . 4-9
• Immobilizer system . . . . . . . . . . . . . . . . . . . . . . . . . . . 4-10
• Battery replacement . . . . . . . . . . . . . . . . . . . . . . . . . . 4-11
Theft-alarm system . . . . . . . . . . . . . . . . . . . . . . . . 4-13
Door locks . . . . . . . . . . . . . . . . . . . . . . . . . . . . . . . . 4-16
• From outside . . . . . . . . . . . . . . . . . . . . . . . . . . . . . . . . 4-16
• Power door latch . . . . . . . . . . . . . . . . . . . . . . . . . . . . . 4-17
• From inside . . . . . . . . . . . . . . . . . . . . . . . . . . . . . . . . . 4-17
• Child-protector rear door lock . . . . . . . . . . . . . . . . . 4-19
Trunk . . . . . . . . . . . . . . . . . . . . . . . . . . . . . . . . . . . . 4-20
• Non-powered trunk . . . . . . . . . . . . . . . . . . . . . . . . . . . 4-20
• Power trunk . . . . . . . . . . . . . . . . . . . . . . . . . . . . . . . . . 4-21
• Emergency trunk safety release . . . . . . . . . . . . . . . . . 4-26
Windows . . . . . . . . . . . . . . . . . . . . . . . . . . . . . . . . . 4-28
Hood. . . . . . . . . . . . . . . . . . . . . . . . . . . . . . . . . . . . . 4-33
Fuel filler lid . . . . . . . . . . . . . . . . . . . . . . . . . . . . . . 4-35
• Emergency fuel filler lid release. . . . . . . . . . . . . . . . . 4-37
Sunroof . . . . . . . . . . . . . . . . . . . . . . . . . . . . . . . . . . 4-38
• Sliding the sunroof . . . . . . . . . . . . . . . . . . . . . . . . . . . 4-39
• Tilting the sunroof . . . . . . . . . . . . . . . . . . . . . . . . . . . . 4-39
• Sunshade . . . . . . . . . . . . . . . . . . . . . . . . . . . . . . . . . . . 4-40• Resetting the sunroof . . . . . . . . . . . . . . . . . . . . . . . . . 4-41
Driver position memory system . . . . . . . . . . . . . . 4-42
Steering wheel . . . . . . . . . . . . . . . . . . . . . . . . . . . . . 4-44
• Power steering . . . . . . . . . . . . . . . . . . . . . . . . . . . . . . . 4-44
• Tilt/Telescopic steering . . . . . . . . . . . . . . . . . . . . . . . . 4-45
• Heated steering wheel . . . . . . . . . . . . . . . . . . . . . . . . . 4-45
• Horn . . . . . . . . . . . . . . . . . . . . . . . . . . . . . . . . . . . . . . . 4-46
Mirrors . . . . . . . . . . . . . . . . . . . . . . . . . . . . . . . . . . 4-47
• Inside rearview mirror . . . . . . . . . . . . . . . . . . . . . . . . 4-47
• Outside rearview mirror . . . . . . . . . . . . . . . . . . . . . . . 4-51
Instrument cluster . . . . . . . . . . . . . . . . . . . . . . . . . 4-55
• Instrument cluster control . . . . . . . . . . . . . . . . . . . . . 4-56
• LCD display control . . . . . . . . . . . . . . . . . . . . . . . . . . 4-57
• Gauges . . . . . . . . . . . . . . . . . . . . . . . . . . . . . . . . . . . . . 4-58
LCD display . . . . . . . . . . . . . . . . . . . . . . . . . . . . . . 4-63
• LCD modes. . . . . . . . . . . . . . . . . . . . . . . . . . . . . . . . . . 4-63
• Trip computer mode . . . . . . . . . . . . . . . . . . . . . . . . . . 4-64
• ASCC/LDWS mode . . . . . . . . . . . . . . . . . . . . . . . . . . . 4-64
• A/V mode . . . . . . . . . . . . . . . . . . . . . . . . . . . . . . . . . . . 4-64
• Turn by turn mode . . . . . . . . . . . . . . . . . . . . . . . . . . . 4-65
• Information mode . . . . . . . . . . . . . . . . . . . . . . . . . . . . 4-65
• User settings mode. . . . . . . . . . . . . . . . . . . . . . . . . . . . 4-68
• Warning messages . . . . . . . . . . . . . . . . . . . . . . . . . . . . 4-75
4
Page 94 of 479

45
Features of your vehicle
To remove the mechanical keyConventional smart key
• To remove the mechanical key, press
and hold the release button (1) and
remove the mechanical key (2).
• To reinstall the mechanical key, put
the key into the hole and push it
until a click sound is heard.
Card type smart key
• To remove the mechanical key,
press and hold the release lever (1)
and remove the mechanical key (2).
• To reinstall the mechanical key,
press and hold the release lever (1)
and put the key into the hole and
push it until a click sound is heard.Locking
1. Carry the smart key.
2. Close all doors.
3. Press the button of the outside
door handle.
4. The hazard warning lights will
blink once (the engine hood and
trunk must be closed). Also, the
outside rearview mirror will auto-
matically fold.
OHG040004L
■Conventional smart key
OVI043005
■Card type smart keyOVI043003
Page 122 of 479
433
Features of your vehicle
HOOD
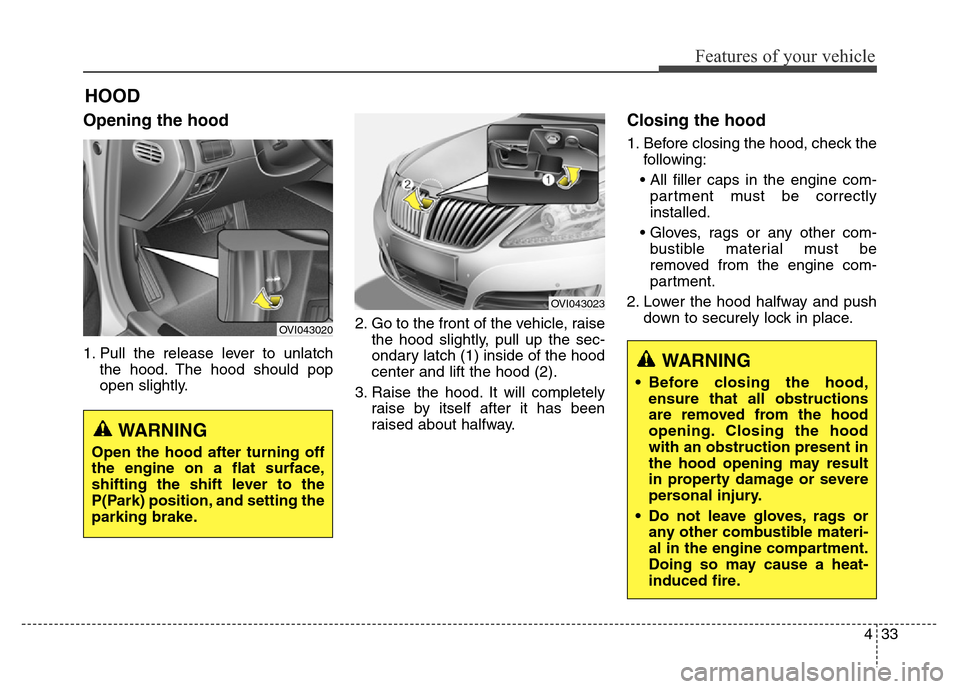
Opening the hood
1. Pull the release lever to unlatch
the hood. The hood should pop
open slightly.2. Go to the front of the vehicle, raise
the hood slightly, pull up the sec-
ondary latch (1) inside of the hood
center and lift the hood (2).
3. Raise the hood. It will completely
raise by itself after it has been
raised about halfway.
Closing the hood
1. Before closing the hood, check the
following:
• All filler caps in the engine com-
partment must be correctly
installed.
• Gloves, rags or any other com-
bustible material must be
removed from the engine com-
partment.
2. Lower the hood halfway and push
down to securely lock in place.
OVI043020
WARNING
Open the hood after turning off
the engine on a flat surface,
shifting the shift lever to the
P(Park) position, and setting the
parking brake.
OVI043023
WARNING
• Before closing the hood,
ensure that all obstructions
are removed from the hood
opening. Closing the hood
with an obstruction present in
the hood opening may result
in property damage or severe
personal injury.
• Do not leave gloves, rags or
any other combustible materi-
al in the engine compartment.
Doing so may cause a heat-
induced fire.
Page 283 of 479
Driving your vehicle
26 5
Electric parking brake (EPB)
Applying the parking brake
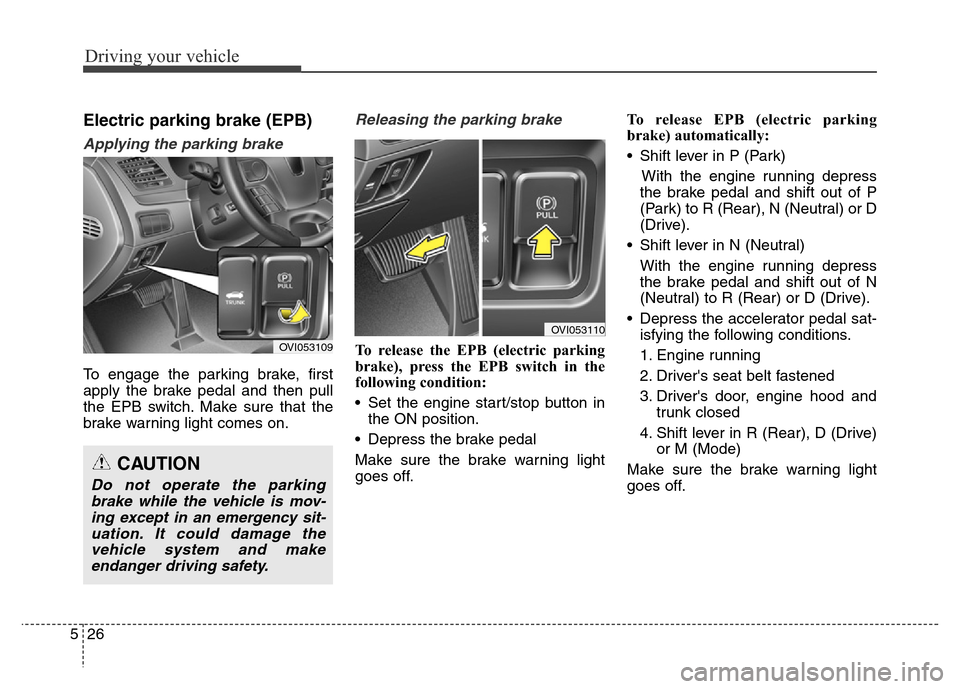
To engage the parking brake, first
apply the brake pedal and then pull
the EPB switch. Make sure that the
brake warning light comes on.
Releasing the parking brake
To release the EPB (electric parking
brake), press the EPB switch in the
following condition:
• Set the engine start/stop button in
the ON position.
• Depress the brake pedal
Make sure the brake warning light
goes off.To release EPB (electric parking
brake) automatically:
• Shift lever in P (Park)
With the engine running depress
the brake pedal and shift out of P
(Park) to R (Rear), N (Neutral) or D
(Drive).
• Shift lever in N (Neutral)
With the engine running depress
the brake pedal and shift out of N
(Neutral) to R (Rear) or D (Drive).
• Depress the accelerator pedal sat-
isfying the following conditions.
1. Engine running
2. Driver's seat belt fastened
3. Driver's door, engine hood and
trunk closed
4. Shift lever in R (Rear), D (Drive)
or M (Mode)
Make sure the brake warning light
goes off.
CAUTION
Do not operate the parking
brake while the vehicle is mov-
ing except in an emergency sit-
uation. It could damage the
vehicle system and make
endanger driving safety.
OVI053109
OVI053110
Page 284 of 479
527
Driving your vehicle
✽NOTICE
• For your safety, you can engage
the EPB even though the engine
start/stop button is in the OFF
position, but you cannot release it.
• For your safety, press the brake
pedal and release the parking
brake manually with EPB switch
when you drive downhill or back
up the vehicle.
EPB (electric parking brake) may be
automatically applied when:
• The EPB is overheated
• Requested by other systems
• The engine is turned off with the
EPB applied
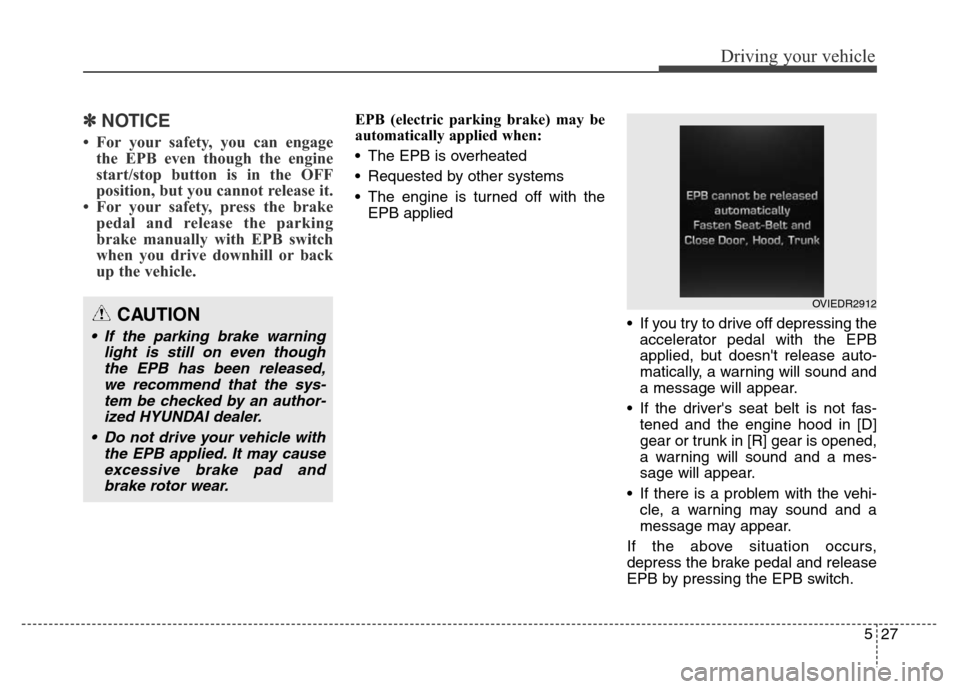
• If you try to drive off depressing the
accelerator pedal with the EPB
applied, but doesn't release auto-
matically, a warning will sound and
a message will appear.
• If the driver's seat belt is not fas-
tened and the engine hood in [D]
gear or trunk in [R] gear is opened,
a warning will sound and a mes-
sage will appear.
• If there is a problem with the vehi-
cle, a warning may sound and a
message may appear.
If the above situation occurs,
depress the brake pedal and release
EPB by pressing the EPB switch.
CAUTION
• If the parking brake warning
light is still on even though
the EPB has been released,
we recommend that the sys-
tem be checked by an author-
ized HYUNDAI dealer.
• Do not drive your vehicle with
the EPB applied. It may cause
excessive brake pad and
brake rotor wear.
OVIEDR2912
Page 287 of 479
Driving your vehicle
30 5
When the EPB (electric parking
brake) is not released
If the EPB does not release normal-
ly, we recommend that you contact
an authorized HYUNDAI dealer by
loading the vehicle on a flatbed tow
truck and have the system checked.
AUTO HOLD (if equipped)
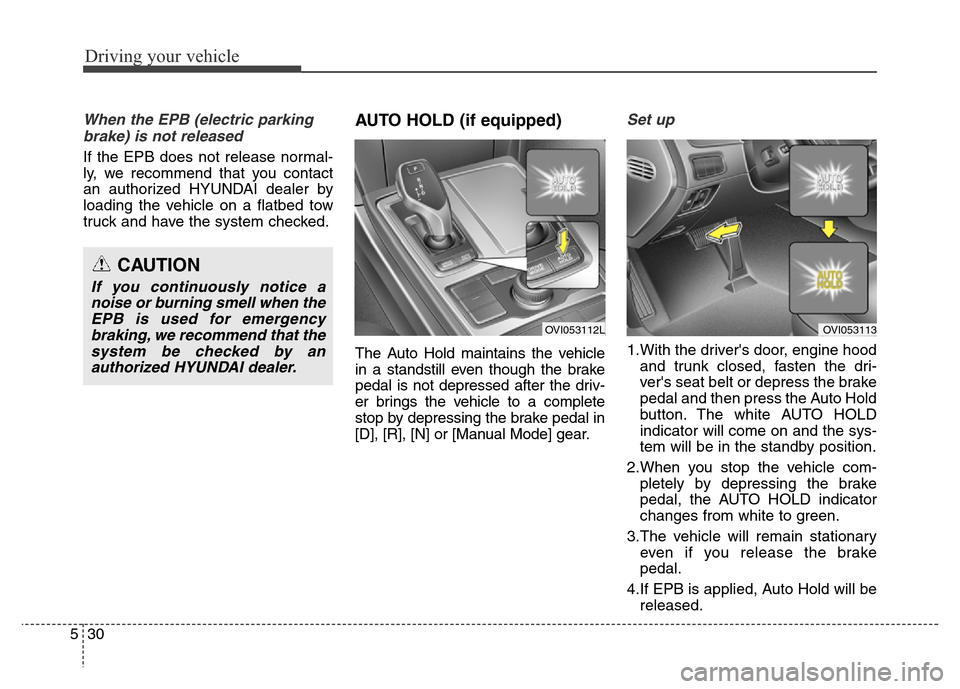
The Auto Hold maintains the vehicle
in a standstill even though the brake
pedal is not depressed after the driv-
er brings the vehicle to a complete
stop by depressing the brake pedal in
[D], [R], [N] or [Manual Mode] gear.
Set up
1.With the driver's door, engine hood
and trunk closed, fasten the dri-
ver's seat belt or depress the brake
pedal and then press the Auto Hold
button. The white AUTO HOLD
indicator will come on and the sys-
tem will be in the standby position.
2.When you stop the vehicle com-
pletely by depressing the brake
pedal, the AUTO HOLD indicator
changes from white to green.
3.The vehicle will remain stationary
even if you release the brake
pedal.
4.If EPB is applied, Auto Hold will be
released.
CAUTION
If you continuously notice a
noise or burning smell when the
EPB is used for emergency
braking, we recommend that the
system be checked by an
authorized HYUNDAI dealer.
OVI053112LOVI053113
Page 288 of 479
531
Driving your vehicle
Leaving
If you press the accelerator pedal
with the shift lever in R (Reverse), D
(Drive) or manual mode, the Auto
Hold will be released automatically
and the vehicle will start to move.
The indicator changes from green to
white.
If you want to release it manually, pull
the EPB switch while depressing the
brake pedal. The AUTO HOLD indi-
cator changes from green to white
and the system changes to the
standby position.
For your safety, release the AUTO
HOLD operation manually if the vehi-
cle ahead is too close.Cancel
To cancel the Auto Hold operation,
press the Auto Hold switch while
depressing the brake pedal. The
AUTO HOLD indicator will go out.
✽NOTICE
• The Auto Hold does not operate
when:
- The driver's seat belt is unfas-
tened and driver's door is opened
- The engine hood is opened
- The trunk is opened
- The shift lever is in P (Park)
- The EPB is applied
• For your safety, the Auto Hold
automatically switches to EPB in
such cases:
- The driver's seat belt is unfas-
tened and driver's door is opened
- The engine hood is opened in [D]
gear
- The trunk is opened in [R] gear
- The vehicle is in a standstill for
more than 10 minutes
- The vehicle is standing on a steep
slope
- The vehicle moved several times
In these cases, the brake warning
light comes on, the AUTO HOLD
indicator changes from green to
white, and a warning sounds and a
message will appear to inform you
that EPB has been automatically
engaged.
(Continued)
WARNING
When driving off from Auto
Hold by depressing the acceler-
ator pedal, always check the
surrounding area near your
vehicle.
Slowly depress the accelerator
pedal for a smooth launch.
CAUTION
For your safety, cancel the Auto
Hold operation when:
• Driving downhill.
• Driving slowly, parking, or
backing up.
• Washing the vehicle in an
automatic car wash.
Page 289 of 479
Driving your vehicle
32 5
(Continued)
Before driving off again, press foot
brake pedal, check the surround-
ing area near your vehicle and
release parking brake manually
with the EPB switch.
• If the AUTO HOLD indicator
lights up yellow, the Auto Hold is
not working properly. We recom-
mend that you contact an author-
ized HYUNDAI dealer.
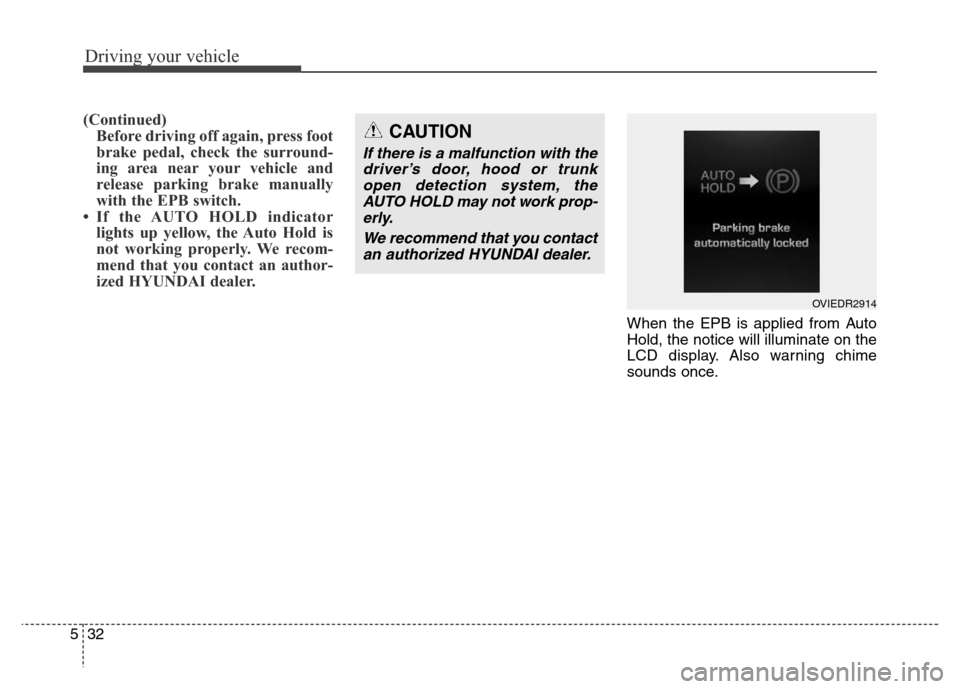
When the EPB is applied from Auto
Hold, the notice will illuminate on the
LCD display. Also warning chime
sounds once.
CAUTION
If there is a malfunction with the
driver’s door, hood or trunk
open detection system, the
AUTO HOLD may not work prop-
erly.
We recommend that you contact
an authorized HYUNDAI dealer.
OVIEDR2914