2013 Hyundai Equus buttons
[x] Cancel search: buttonsPage 90 of 479

Features of your vehicle
Smart key . . . . . . . . . . . . . . . . . . . . . . . . . . . . . . . . . 4-4
• Smart key function . . . . . . . . . . . . . . . . . . . . . . . . . . . . 4-4
• Buttons on the smart key . . . . . . . . . . . . . . . . . . . . . . . 4-7
• Restrictions in handling keys . . . . . . . . . . . . . . . . . . . . 4-8
• Smart key precautions . . . . . . . . . . . . . . . . . . . . . . . . . 4-9
• Immobilizer system . . . . . . . . . . . . . . . . . . . . . . . . . . . 4-10
• Battery replacement . . . . . . . . . . . . . . . . . . . . . . . . . . 4-11
Theft-alarm system . . . . . . . . . . . . . . . . . . . . . . . . 4-13
Door locks . . . . . . . . . . . . . . . . . . . . . . . . . . . . . . . . 4-16
• From outside . . . . . . . . . . . . . . . . . . . . . . . . . . . . . . . . 4-16
• Power door latch . . . . . . . . . . . . . . . . . . . . . . . . . . . . . 4-17
• From inside . . . . . . . . . . . . . . . . . . . . . . . . . . . . . . . . . 4-17
• Child-protector rear door lock . . . . . . . . . . . . . . . . . 4-19
Trunk . . . . . . . . . . . . . . . . . . . . . . . . . . . . . . . . . . . . 4-20
• Non-powered trunk . . . . . . . . . . . . . . . . . . . . . . . . . . . 4-20
• Power trunk . . . . . . . . . . . . . . . . . . . . . . . . . . . . . . . . . 4-21
• Emergency trunk safety release . . . . . . . . . . . . . . . . . 4-26
Windows . . . . . . . . . . . . . . . . . . . . . . . . . . . . . . . . . 4-28
Hood. . . . . . . . . . . . . . . . . . . . . . . . . . . . . . . . . . . . . 4-33
Fuel filler lid . . . . . . . . . . . . . . . . . . . . . . . . . . . . . . 4-35
• Emergency fuel filler lid release. . . . . . . . . . . . . . . . . 4-37
Sunroof . . . . . . . . . . . . . . . . . . . . . . . . . . . . . . . . . . 4-38
• Sliding the sunroof . . . . . . . . . . . . . . . . . . . . . . . . . . . 4-39
• Tilting the sunroof . . . . . . . . . . . . . . . . . . . . . . . . . . . . 4-39
• Sunshade . . . . . . . . . . . . . . . . . . . . . . . . . . . . . . . . . . . 4-40• Resetting the sunroof . . . . . . . . . . . . . . . . . . . . . . . . . 4-41
Driver position memory system . . . . . . . . . . . . . . 4-42
Steering wheel . . . . . . . . . . . . . . . . . . . . . . . . . . . . . 4-44
• Power steering . . . . . . . . . . . . . . . . . . . . . . . . . . . . . . . 4-44
• Tilt/Telescopic steering . . . . . . . . . . . . . . . . . . . . . . . . 4-45
• Heated steering wheel . . . . . . . . . . . . . . . . . . . . . . . . . 4-45
• Horn . . . . . . . . . . . . . . . . . . . . . . . . . . . . . . . . . . . . . . . 4-46
Mirrors . . . . . . . . . . . . . . . . . . . . . . . . . . . . . . . . . . 4-47
• Inside rearview mirror . . . . . . . . . . . . . . . . . . . . . . . . 4-47
• Outside rearview mirror . . . . . . . . . . . . . . . . . . . . . . . 4-51
Instrument cluster . . . . . . . . . . . . . . . . . . . . . . . . . 4-55
• Instrument cluster control . . . . . . . . . . . . . . . . . . . . . 4-56
• LCD display control . . . . . . . . . . . . . . . . . . . . . . . . . . 4-57
• Gauges . . . . . . . . . . . . . . . . . . . . . . . . . . . . . . . . . . . . . 4-58
LCD display . . . . . . . . . . . . . . . . . . . . . . . . . . . . . . 4-63
• LCD modes. . . . . . . . . . . . . . . . . . . . . . . . . . . . . . . . . . 4-63
• Trip computer mode . . . . . . . . . . . . . . . . . . . . . . . . . . 4-64
• ASCC/LDWS mode . . . . . . . . . . . . . . . . . . . . . . . . . . . 4-64
• A/V mode . . . . . . . . . . . . . . . . . . . . . . . . . . . . . . . . . . . 4-64
• Turn by turn mode . . . . . . . . . . . . . . . . . . . . . . . . . . . 4-65
• Information mode . . . . . . . . . . . . . . . . . . . . . . . . . . . . 4-65
• User settings mode. . . . . . . . . . . . . . . . . . . . . . . . . . . . 4-68
• Warning messages . . . . . . . . . . . . . . . . . . . . . . . . . . . . 4-75
4
Page 96 of 479

47
Features of your vehicle
Trunk unlocking
Power trunk
1. Carry the smart key.
2. Press the trunk handle switch.
3. The trunk will unlock and open.
Non-powered trunk
1. Carry the smart key.
2. Press the trunk handle switch.
3. The trunk will unlock.
✽NOTICE
• Once the trunk is opened and then
closed, the trunk will lock auto-
matically.
• The button will only operate when
the smart key is within 0.7 m (28
in.) from the trunk handle.
Buttons on the smart key
Lock (1)
1. Close all doors.
2. Press the lock button.
3. The hazard warning light will blink
once to indicate that all doors are
locked (the engine hood and trunk
must be closed).
Also, the outside rearview mirror
will automatically fold.
✽NOTICE
The doors will not lock if any door is
opened.
Unlock (2)
1. Press the unlock button.
2. The hazard warning lights will
blink twice to indicate that all
doors are unlocked.
Also, the outside rearview mirror
will automatically unfold.
✽NOTICE
After unlocking all doors, the doors
will lock automatically unless a door
is opened within 30 seconds.
Trunk unlock (3)
Non-powered trunk
1. Press the trunk unlock button for
more than 1 second.
2. The hazard warning light will blink
twice to indicate that the trunk is
unlocked.
OHG040007L
Page 131 of 479

Features of your vehicle
42 4
A driver position memory system is
provided to store and recall the driv-
er seat, outside rearview mirrors,
steering wheel position and HUD
(Head-Up Display) height with a sim-
ple button operation. By saving the
desired positions into the system
memory, different drivers can reposi-
tion the driver seat, outside rearview
mirrors, steering wheel and HUD
(Head-Up Display) height based
upon their driving preference. If the
battery is disconnected, the position
memory will be lost and the driving
positions should be restored in the
system.
✽NOTICE
If the memory system does not oper-
ate normally, have the driver posi-
tion memory system checked by an
authorized HYUNDAI dealer.
Storing positions into memory
using the buttons on the door
Storing driver’s seat positions
1. Shift the shift lever into P while the
engine start/stop button is ON.
2. Adjust the driver seat, outside
rearview mirrors, steering wheel
and HUD (Head-Up Display)
height to positions comfortable for
the driver.
3. Press SET button on the control
panel. The system will beep once.
4. Press one of the memory buttons
(1 or 2) within 5 seconds after
pressing the SET button. The sys-
tem will beep twice when the
memory has been successfully
stored.
DRIVER POSITION MEMORY SYSTEM (IF EQUIPPED)
WARNING
Never attempt to operate the
driver position memory system
while the vehicle is moving.
This could result in loss of con-
trol, and an accident causing
death, serious injury, or property
damage.
OVI049032
Page 146 of 479
457
Features of your vehicle
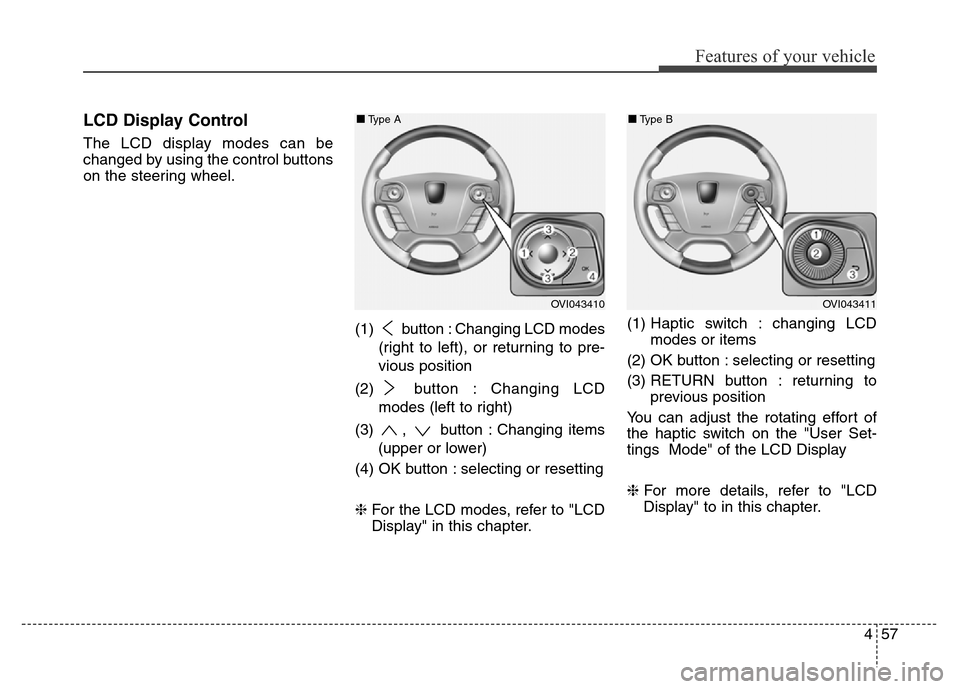
LCD Display Control
The LCD display modes can be
changed by using the control buttons
on the steering wheel.
(1) button : Changing LCD modes
(right to left), or returning to pre-
vious position
(2) button : Changing LCD
modes (left to right)
(3) , button : Changing items
(upper or lower)
(4) OK button : selecting or resetting
❈For the LCD modes, refer to "LCD
Display" in this chapter.(1) Haptic switch : changing LCD
modes or items
(2) OK button : selecting or resetting
(3) RETURN button : returning to
previous position
You can adjust the rotating effort of
the haptic switch on the "User Set-
tings Mode" of the LCD Display
❈For more details, refer to "LCD
Display" to in this chapter.
OVI043410
■Type A
OVI043411
■Type B
Page 224 of 479
4135
Features of your vehicle
✽NOTICE
Never place anything near the sensor
to ensure better control of the heating
and cooling system.
Manual heating and air condi-
tioning
The heating and cooling system can be
controlled manually by pushing buttons
other than the AUTO button. In this
case, the system works sequentially
according to the order of buttons select-
ed. When pressing any button except
the AUTO button while using automatic
operation, the functions not selected
will be controlled automatically.
1. Start the engine.
2. Set the mode to the desired position.
For improving the effectiveness of
heating and cooling;
- Heating:
- Cooling:
3. Set the temperature control to the
desired position.
4. Set the air intake control to the
outside (fresh) air position.
5. Set the fan speed control to the
desired speed.
6. If air conditioning is desired, turn
the air conditioning system on.
Press the AUTO button in order to
convert to full automatic control of
the system.
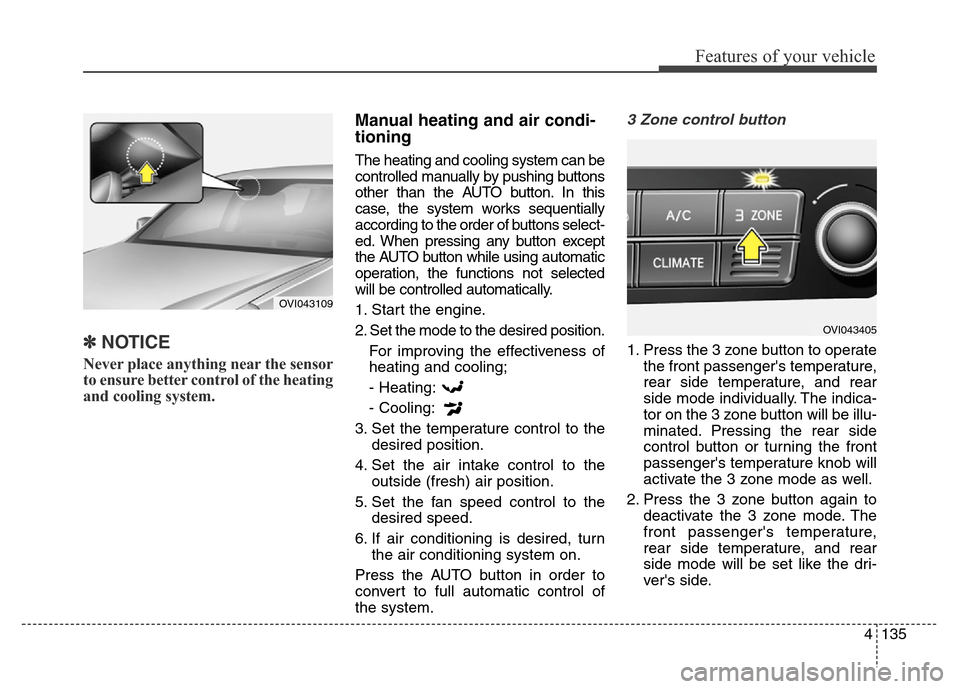
3 Zone control button
1. Press the 3 zone button to operate
the front passenger's temperature,
rear side temperature, and rear
side mode individually. The indica-
tor on the 3 zone button will be illu-
minated. Pressing the rear side
control button or turning the front
passenger's temperature knob will
activate the 3 zone mode as well.
2. Press the 3 zone button again to
deactivate the 3 zone mode. The
front passenger's temperature,
rear side temperature, and rear
side mode will be set like the dri-
ver's side.
OVI043109
OVI043405
Page 232 of 479
4143
Features of your vehicle
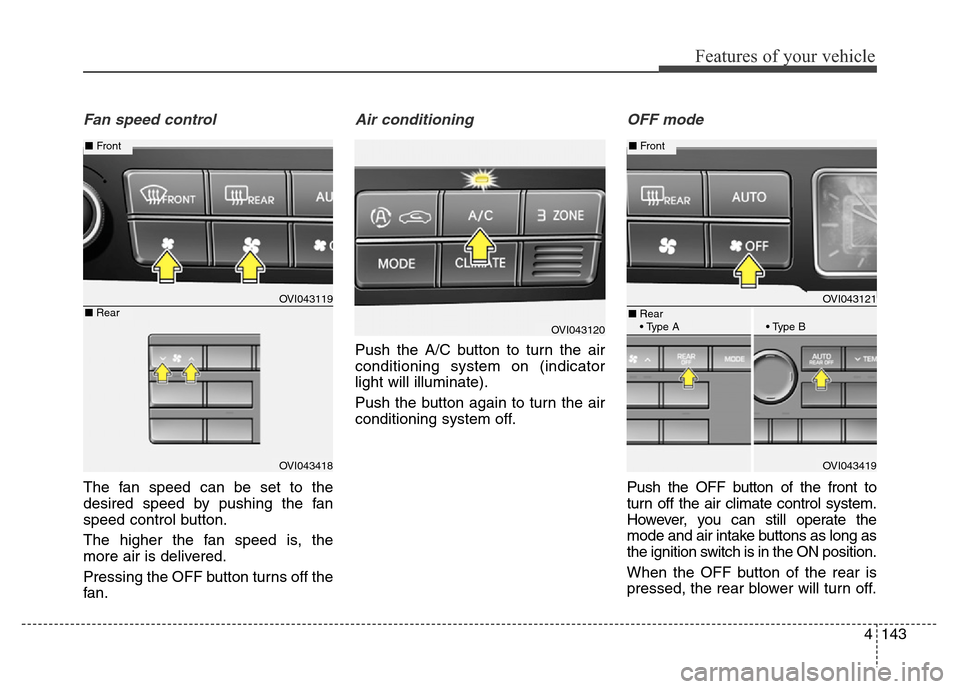
Fan speed control
The fan speed can be set to the
desired speed by pushing the fan
speed control button.
The higher the fan speed is, the
more air is delivered.
Pressing the OFF button turns off the
fan.
Air conditioning
Push the A/C button to turn the air
conditioning system on (indicator
light will illuminate).
Push the button again to turn the air
conditioning system off.
OFF mode
Push the OFF button of the front to
turn off the air climate control system.
However, you can still operate the
mode and air intake buttons as long as
the ignition switch is in the ON position.
When the OFF button of the rear is
pressed, the rear blower will turn off.
OVI043120
OVI043121
OVI043419
■Front
■Rear
• Type A • Type B
OVI043119
OVI043418
■Front
■Rear
Page 256 of 479
4167
Features of your vehicle
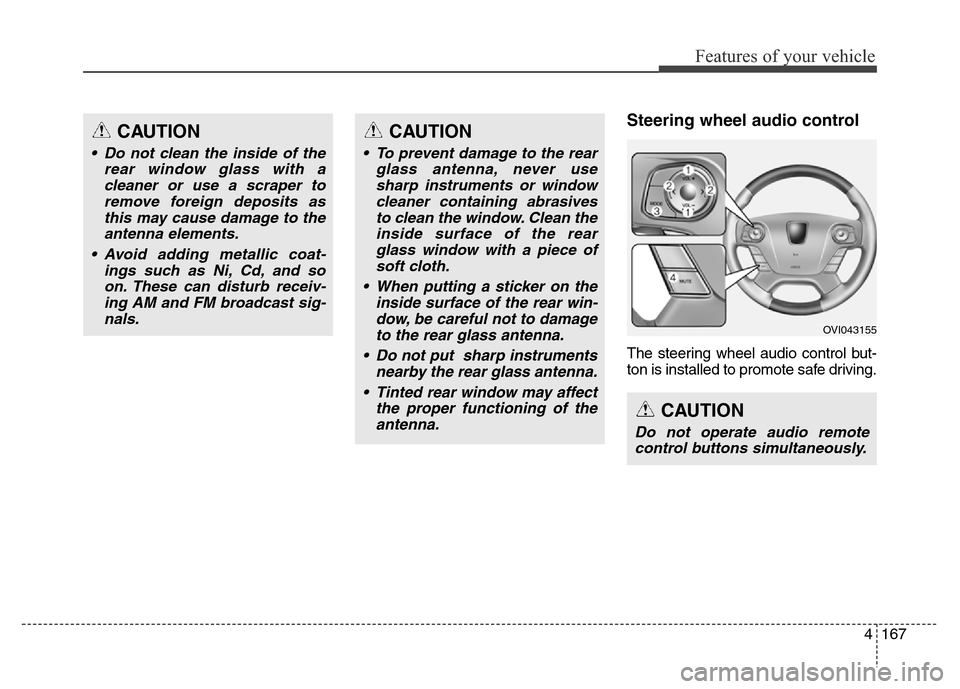
Steering wheel audio control
The steering wheel audio control but-
ton is installed to promote safe driving.
CAUTION
• Do not clean the inside of the
rear window glass with a
cleaner or use a scraper to
remove foreign deposits as
this may cause damage to the
antenna elements.
• Avoid adding metallic coat-
ings such as Ni, Cd, and so
on. These can disturb receiv-
ing AM and FM broadcast sig-
nals.
OVI043155
CAUTION
Do not operate audio remote
control buttons simultaneously.
CAUTION
• To prevent damage to the rear
glass antenna, never use
sharp instruments or window
cleaner containing abrasives
to clean the window. Clean the
inside surface of the rear
glass window with a piece of
soft cloth.
• When putting a sticker on the
inside surface of the rear win-
dow, be careful not to damage
to the rear glass antenna.
• Do not put sharp instruments
nearby the rear glass antenna.
• Tinted rear window may affect
the proper functioning of the
antenna.
Page 257 of 479
VOLUME (VOL + / - ) (1)
• Press the up button (+) to increase
volume.
• Press the down button (-) to
decrease volume.
SEEK/PRESET ( / ) (2)
If the SEEK/PRESET button is
pressed for 0.8 second or more, it
will work as follows in each mode.
RADIO mode
It will function as the AUTO SEEK
select button. It will SEEK until you
release the button.
MEDIA mode
It will function as the FF/REW button.If the SEEK/PRESET button is
pressed for less than 0.8 second, it
will work as follows in each mode.
RADIO mode
It will function as the PRESET STA-
TION select buttons.
MEDIA mode
It will function as the TRACK UP/
DOWN button.
MODE (3)
Press the MODE button to select
Radio, disc, or AUX.
MUTE (4)
• Press the MUTE button to cancel
the sound.
• Press the MUTE button again to
activate the sound.
✽NOTICE
Detailed information is described in
a separately supplied manual.
4168
Features of your vehicle