Page 235 of 433
uuGeneral Information on the Audio SystemuRecommended CDs
234Features
■Protecting CDs
Follow these precautions when handling or storing CDs:
•Store a CD in its case when it is not being played.
•When wiping a CD, use a soft clean cloth from the center to the outside edge.
•Handle a CD by its edge. Never touch either surface.
•Never insert foreign objects into the CD player.
•Keep CDs out of direct sunlight and extreme heat.
•Do not place stabilizer rings or labels on the CD.
•Avoid fingerprints, liquids, and felt-tip pens on the CD.
1Protecting CDsNOTICEDo not insert a damaged CD. It may be stuck inside
and damage the audio unit.Examples:●Damaged CDsBubbled/
WrinkledWith Label/
StickerUsing
Printer Label
Kit
Sealed With Plastic Ring
●Poor quality
CDs
Chipped/
CrackedWarped Burrs
●Small CDs
3-inch
(8-cm)
CD●Bubbled, wrinkled, labeled, and
excessively thick CDs
Page 239 of 433

238
uuRear Entertainment System
*uOperating the System
Features
■
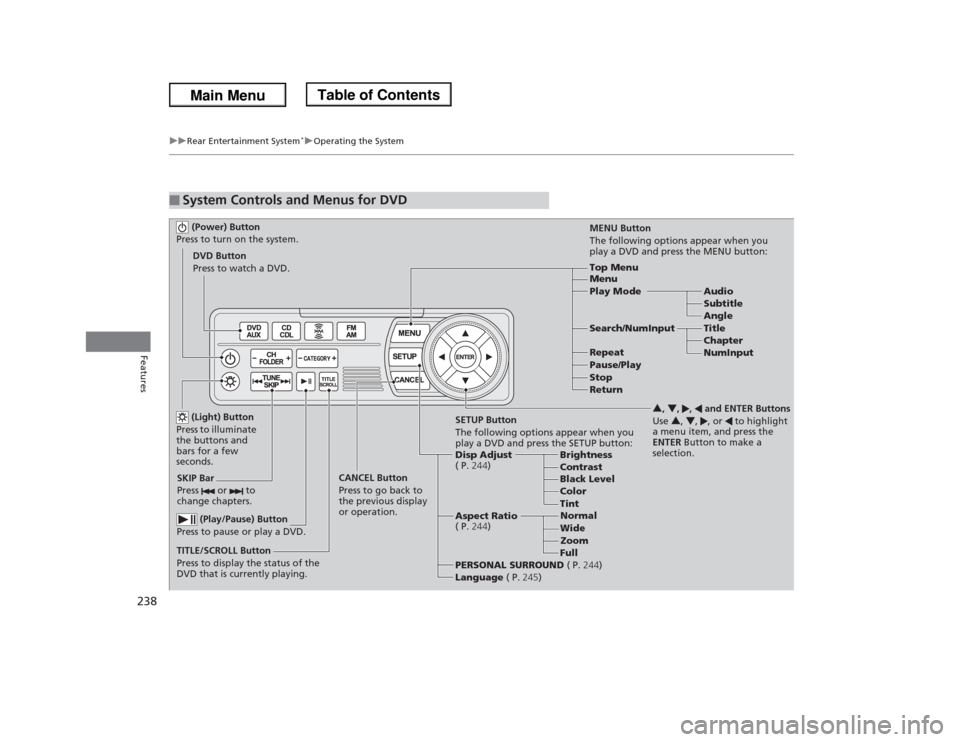
System Controls and Menus for DVD (Power) Button
Press to turn on the system.DVD Button
Press to watch a DVD.
(Light) Button
Press to illuminate
the buttons and
bars for a few
seconds.
SKIP Bar
Press or to
change chapters.
(Play/Pause) Button
Press to pause or play a DVD.
TITLE/SCROLL Button
Press to display the status of the
DVD that is currently playing.MENU Button
The following options appear when you
play a DVD and press the MENU button:
Top Menu
Menu
Play Mode Audio
Subtitle
Angle
Search/NumInput Title
Chapter
NumInput Repeat
Pause/Play
Stop
Return
SETUP Button
The following options appear when you
play a DVD and press the SETUP button:
Disp Adjust
( P.244)Brightness
Contrast
Black Level
Color CANCEL Button
Press to go back to
the previous display
or operation.3, 4, , and ENTER Buttons
Use 3, 4, , or to highlight
a menu item, and press the
ENTER Button to make a
selection.
Tint
Normal
Wide
Zoom
Full Aspect Ratio
( P.244)
PERSONAL SURROUND ( P.244)
Language ( P.245)
Page 241 of 433
uuRear Entertainment System
*uOperating the System
240Features
Auto Play On:
1.Rotate to select Auto Play On, then press .
2.The check mark disappears, and the auto play feature turns off.
uWith this feature off, the DVD does not automatically start playing when the
disc is inserted. Press button to play.
Title/Chapter Search:
1.Rotate to select Title Search or Chapter Search, then press .
2.Rotate to select a title or chapter number, then press .■TITLE/SCROLL button on the remote
Press the TITLE/SCROLL button while the DVD is playing to see the current status of
title, chapter, elapsed time, angle, subtitle, audio, and sound characteristics.■MENU button on the remote
Press the MENU button while the DVD is
playing to see the available options.
Use the 3, 4, , and buttons to highlight
the option and then press the ENTER button.
1TITLE/SCROLL button on the remote
Press the TITLE/SCROLL button again to return.
Page 244 of 433
243
uuRear Entertainment System
*uOperating the System
Continued
Features
Search:
You can search for a DVD segment from the following methods.
1.Select NumInput to go to the number input screen.
2.Use the 3, 4, , and buttons to input numbers.
uIf you want to delete a number, select DEL.
3.The cursor automatically goes to ENT after you input three digits. Press the
ENTER button to command.
Repeat:
Highlight this option and press the ENTER button to change the repeat mode from
chapter repeat and title repeat, to repeat off.Title Search - Select the title you want to play.
Chapter Search - Select the chapter you want to play.
NumInput - Enter a three digit number, if issued to the DVD, to find the
segment you want to start to play.
Page 245 of 433
244
uuRear Entertainment System
*uOperating the System
Features
■SETUP button on the remote
Press the SETUP button while the DVD is
playing to see the available options.
Use the 3, 4, , and buttons to highlight
the option and then press the ENTER button.
Disp Adjust:
You can adjust the overhead screen’s brightness, contrast, black level, color, and
tint. To return to the default display setting, select Reset.
After you make all the adjustments, the screen goes back to the top SETUP screen,
or press the CANCEL button to return.
Aspect Ratio:
You can select the screen mode with a different aspect ratio from Normal, Wide,
Zoom and Full. After you select the mode, it takes about one second to return to the
play mode with the selected ratio.
Personal Surround:
You can select the sound effect mode that fits the DVD’s audio source from Music,
Cinema, and Voice. Select Off to turn this feature off.
Page 247 of 433

246
uuRear Entertainment System
*uOperating the System
Features
■
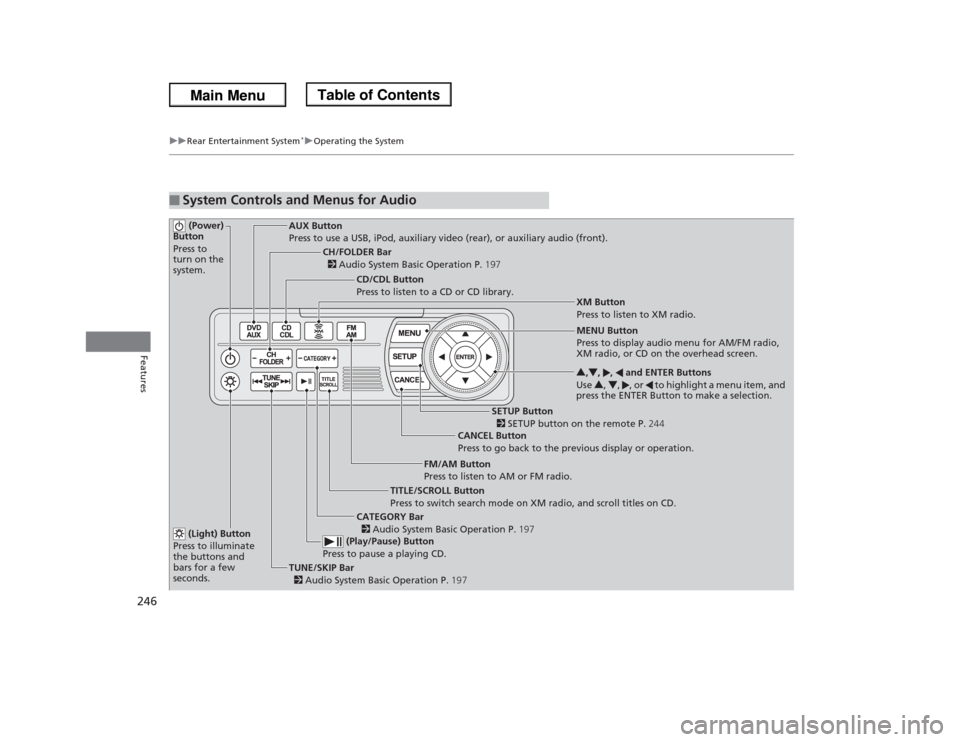
System Controls and Menus for Audio (Power)
Button
Press to
turn on the
system.
AUX Button
Press to use a USB, iPod, auxiliary video (rear), or auxiliary audio (front).
(Light) Button
Press to illuminate
the buttons and
bars for a few
seconds.TUNE/SKIP Bar
2 Audio System Basic Operation P.197 (Play/Pause) Button
Press to pause a playing CD.
TITLE/SCROLL Button
Press to switch search mode on XM radio, and scroll titles on CD.CANCEL Button
Press to go back to the previous display or operation.3,4, , and ENTER Buttons
Use 3, 4, , or to highlight a menu item, and
press the ENTER Button to make a selection.
CATEGORY Bar
2 Audio System Basic Operation P.197
CH/FOLDER Bar
2 Audio System Basic Operation P.197
CD/CDL Button
Press to listen to a CD or CD library.
FM/AM Button
Press to listen to AM or FM radio.
SETUP Button
2 SETUP button on the remote P.244 XM Button
Press to listen to XM radio.
MENU Button
Press to display audio menu for AM/FM radio,
XM radio, or CD on the overhead screen.
Page 253 of 433

252Features
HomeLink® Universal Transceiver
*
The HomeLink® Universal Transceiver can be programmed to operate up to three
remote controlled devices around your home, such as garage doors, lighting, or
home security systems.
Refer to the safety information that comes with your garage door opener to test that
the safety features are functioning properly. If you do not have the safety
information, contact the manufacturer.
Before programming HomeLink, make sure that people and objects are out of the
way of the garage or gate to prevent potential injury or damage.
When programming a garage door opener, park just outside the garage door’s
path.Training HomeLink
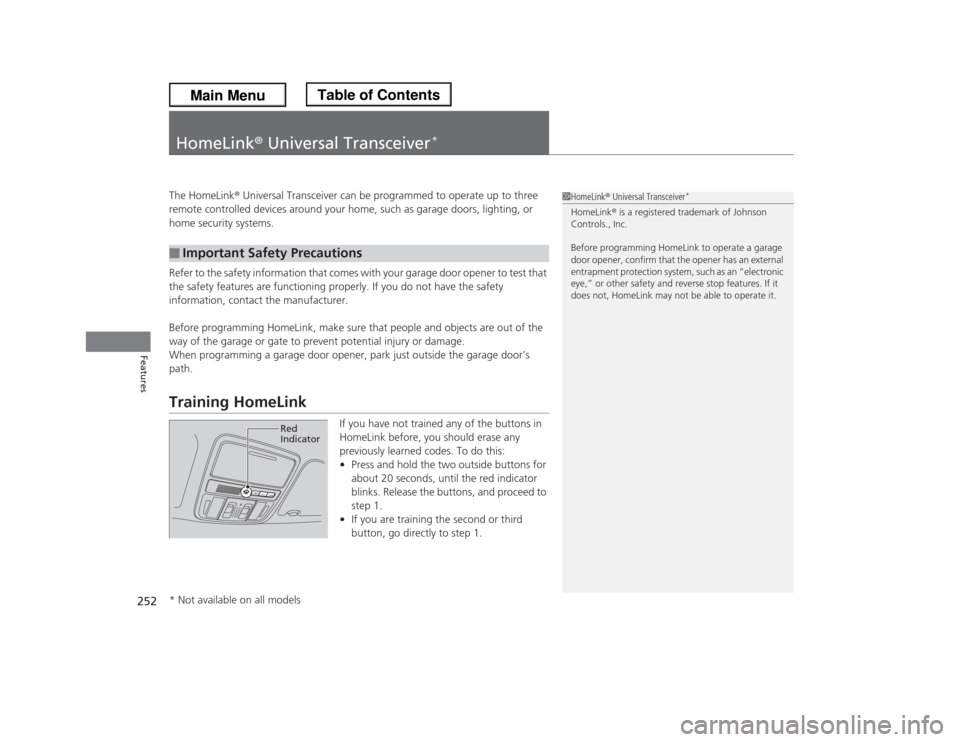
If you have not trained any of the buttons in
HomeLink before, you should erase any
previously learned codes. To do this:
•Press and hold the two outside buttons for
about 20 seconds, until the red indicator
blinks. Release the buttons, and proceed to
step 1.
•If you are training the second or third
button, go directly to step 1.
■
Important Safety Precautions
1HomeLink® Universal Transceiver
*
HomeLink® is a registered trademark of Johnson
Controls., Inc.
Before programming HomeLink to operate a garage
door opener, confirm that the opener has an external
entrapment protection system, such as an “electronic
eye,” or other safety and reverse stop features. If it
does not, HomeLink may not be able to operate it.
Red
Indicator
* Not available on all models
Page 281 of 433

280Driving
Before DrivingDriving PreparationCheck the following items before you start driving.
•Make sure there are no obstructions on the windows, door mirrors, exterior
lights, or other parts of the vehicle.
uRemove any frost, snow, or ice.
uRemove any snow on the roof, as this can slip down and obstruct your field of
vision while driving. If frozen solid, remove ice once it has softened.
uWhen removing ice from around the wheels, be sure not to damage the wheel
or wheel components.
•Make sure the hood is securely closed.
uIf the hood opens while driving, your front view will be blocked.
•Make sure the tires are in good condition.
uCheck air pressure, and check for damage and excessive wear.
2Checking and Maintaining Tires P. 362
•Make sure there are no people or objects behind or around the vehicle.
uThere are blind spots from the inside.■
Exterior Checks
1Exterior ChecksNOTICEWhen doors are frozen shut, use warm water around
the door edges to melt any ice. Do not try to force
them open, as this can damage the rubber trim
around the doors. When done, wipe dry to avoid
further freezing.
Do not pour warm water into the key cylinder.
You will be unable to insert key if the water freezes in
the hole.
Heat from the engine and exhaust can ignite
flammable materials left under the hood, causing a
fire. If you've parked your vehicle for an extended
period, inspect and remove any debris that may have
collected, such as dried grass and leaves that have
fallen or have been carried in for use as a nest by a
small animal.
Also check under the hood for leftover flammable
materials after you or someone else has performed
maintenance on your vehicle.