Page 290 of 433
289
uuTowing a TraileruDriving Safely with a Trailer
Continued
Driving
Driving Safely with a Trailer•Have the trailer properly serviced and keep it in good condition.
•Make sure that all the weights and load in the vehicle and trailer are within limits.
2Towing Load Limits P. 285
•Securely attach the hitch, safety chains, and other necessary parts to the trailer.
•Securely store all the items in and on the trailer so that they do not shift while
driving.
•Check if the lights and brakes on the trailer are working properly.
•Check the pressure of the trailer tires, including the spare.
•Drive slower than normal.
•Obey posted speed limits for vehicles with trailer.
•Use the
(D
when towing a trailer on level roads.
•Turn more slowly and with a wider turning arc than normal.
•Allow more time and distance for braking.
•Do not brake or turn suddenly.
■
Things You Need To Know Before Towing a Trailer
■
Towing Speeds and Gears
■
Turning and Braking
1Driving Safely with a Trailer
Parking
In addition to the normal precautions, place wheel
chocks at each of the trailer’s tires.
When towing a trailer, we recommend that you carry
a full-size spare wheel and tire for your vehicle and
trailer. If you use the compact spare tire that came
with your vehicle, it could adversely affect vehicle
handling.
2Specifications P. 413
2Changing a Flat Tire P. 383
Remember to unhitch the trailer before changing a
flat tire. Ask the trailer sales or rental agency where
and how to store the trailer’s spare tire.
Page 337 of 433
336
uuMaintenance Under the HooduOpening the Hood
Maintenance
Opening the Hood
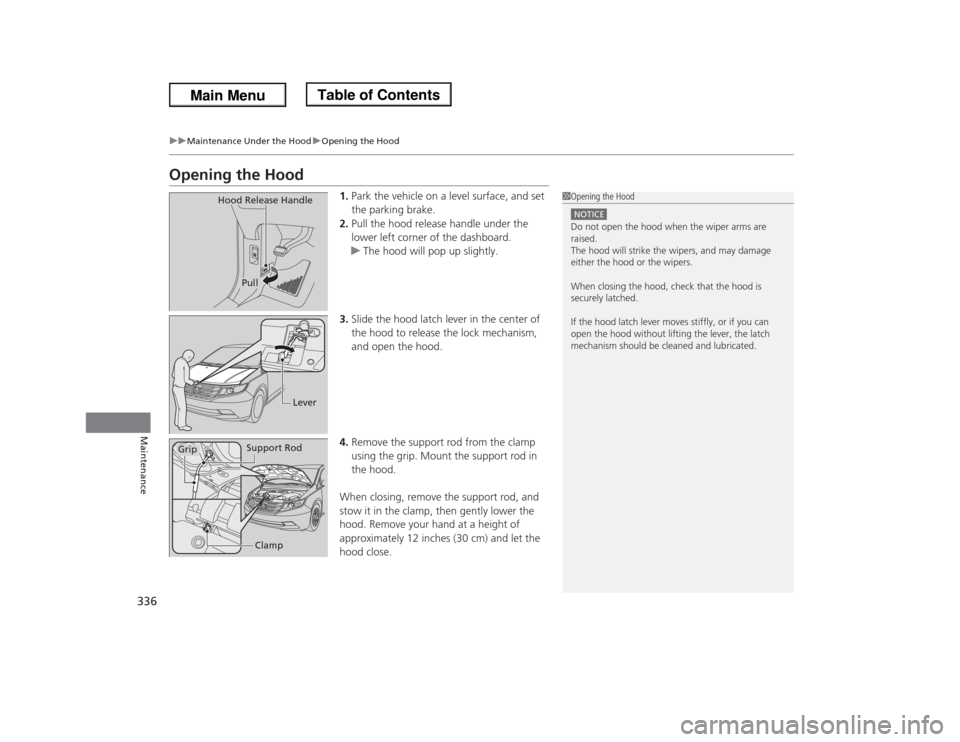
1.Park the vehicle on a level surface, and set
the parking brake.
2.Pull the hood release handle under the
lower left corner of the dashboard.
uThe hood will pop up slightly.
3.Slide the hood latch lever in the center of
the hood to release the lock mechanism,
and open the hood.
4.Remove the support rod from the clamp
using the grip. Mount the support rod in
the hood.
When closing, remove the support rod, and
stow it in the clamp, then gently lower the
hood. Remove your hand at a height of
approximately 12 inches (30 cm) and let the
hood close.
1Opening the HoodNOTICEDo not open the hood when the wiper arms are
raised.
The hood will strike the wipers, and may damage
either the hood or the wipers.
When closing the hood, check that the hood is
securely latched.
If the hood latch lever moves stiffly, or if you can
open the hood without lifting the lever, the latch
mechanism should be cleaned and lubricated.
Hood Release Handle
Pull
Lever
Support Rod
Grip
Clamp
Page 340 of 433
339
uuMaintenance Under the HooduAdding Engine Oil
Maintenance
Adding Engine Oil
1.Unscrew and remove the engine oil fill cap.
2.Add oil slowly.
3.Reinstall the engine oil fill cap, and tighten
it securely.
4.Wait for three minutes and recheck the
engine oil dipstick.
1Adding Engine Oil
If any oil spills, wipe it up immediately. Spilled oil may
damage the engine compartment components.NOTICEDo not fill the engine oil above the upper mark.
Overfilling the engine oil can result in leaks and
engine damage.
Engine Oil
Fill Cap
Page 342 of 433
341
uuMaintenance Under the HooduChanging the Engine Oil and Oil Filter
Maintenance
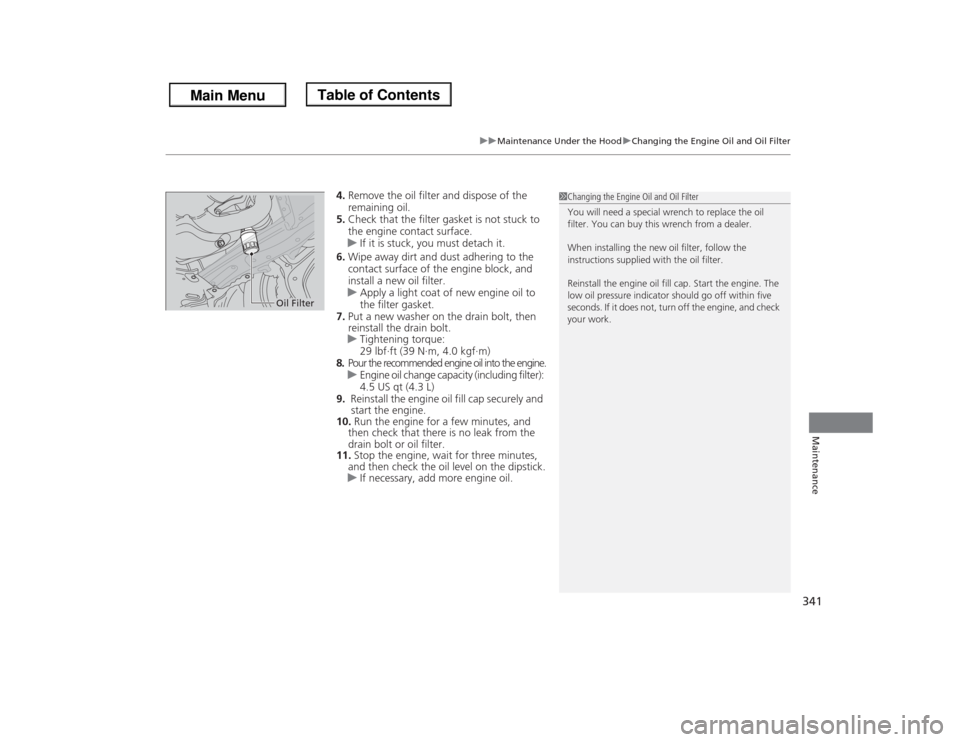
4.Remove the oil filter and dispose of the
remaining oil.
5.Check that the filter gasket is not stuck to
the engine contact surface.
uIf it is stuck, you must detach it.
6.Wipe away dirt and dust adhering to the
contact surface of the engine block, and
install a new oil filter.
uApply a light coat of new engine oil to
the filter gasket.
7.Put a new washer on the drain bolt, then
reinstall the drain bolt.
uTightening torque:
29 lbf∙ft (39 N∙m, 4.0 kgf∙m)
8.Pour the recommended engine oil into the engine.
uEngine oil change capacity (including filter):
4.5 US qt (4.3 L)
9. Reinstall the engine oil fill cap securely and
start the engine.
10. Run the engine for a few minutes, and
then check that there is no leak from the
drain bolt or oil filter.
11. Stop the engine, wait for three minutes,
and then check the oil level on the dipstick.
uIf necessary, add more engine oil.
1Changing the Engine Oil and Oil Filter
You will need a special wrench to replace the oil
filter. You can buy this wrench from a dealer.
When installing the new oil filter, follow the
instructions supplied with the oil filter.
Reinstall the engine oil fill cap. Start the engine. The
low oil pressure indicator should go off within five
seconds. If it does not, turn off the engine, and check
your work.
Oil Filter
Page 345 of 433
344
uuMaintenance Under the HooduTransmission Fluid
Maintenance
Transmission FluidCheck the fluid level when the engine is at normal operating temperature.
1.Park on level ground, and start the engine.
2.Wait until the radiator fan starts and then
turn off the engine.
uPerform step 3 after waiting for about 60
seconds (less than 90 seconds).
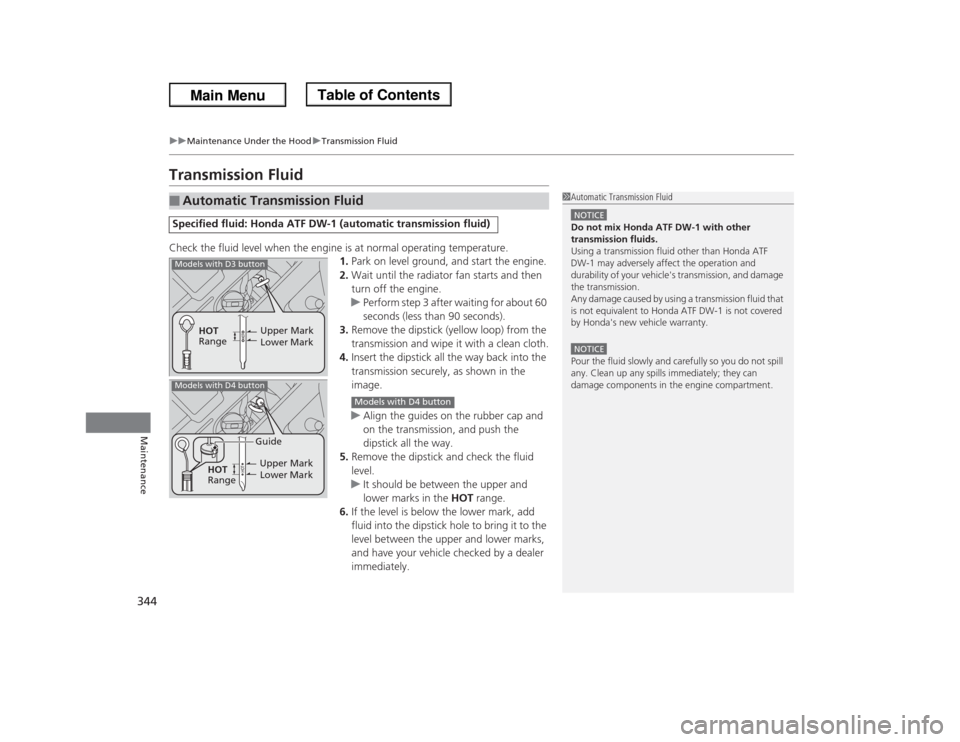
3.Remove the dipstick (yellow loop) from the
transmission and wipe it with a clean cloth.
4.Insert the dipstick all the way back into the
transmission securely, as shown in the
image.
uAlign the guides on the rubber cap and
on the transmission, and push the
dipstick all the way.
5.Remove the dipstick and check the fluid
level.
uIt should be between the upper and
lower marks in the HOT range.
6.If the level is below the lower mark, add
fluid into the dipstick hole to bring it to the
level between the upper and lower marks,
and have your vehicle checked by a dealer
immediately.■
Automatic Transmission FluidSpecified fluid: Honda ATF DW-1 (automatic transmission fluid)
1Automatic Transmission FluidNOTICEDo not mix Honda ATF DW-1 with other
transmission fluids.
Using a transmission fluid other than Honda ATF
DW-1 may adversely affect the operation and
durability of your vehicle's transmission, and damage
the transmission.
Any damage caused by using a transmission fluid that
is not equivalent to Honda ATF DW-1 is not covered
by Honda's new vehicle warranty.NOTICEPour the fluid slowly and carefully so you do not spill
any. Clean up any spills immediately; they can
damage components in the engine compartment.
Upper Mark
Lower Mark HOT
RangeUpper Mark
Lower Mark HOT
RangeGuide
Models with D3 buttonModels with D4 button
Models with D4 button
Page 379 of 433
uuCleaninguInterior Care
378Maintenance
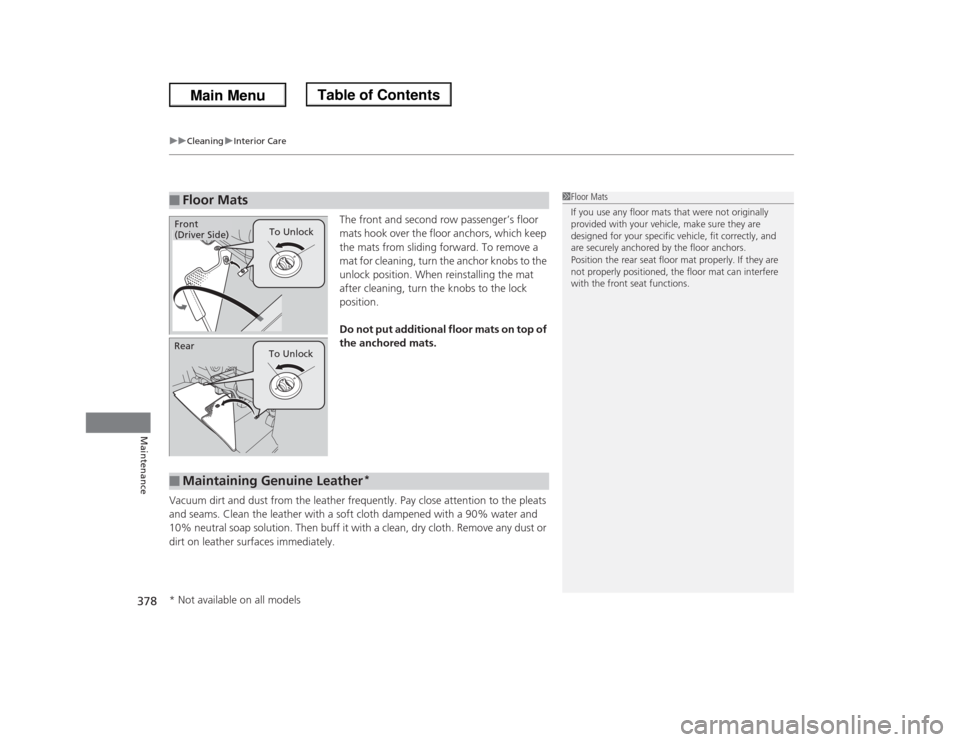
The front and second row passenger’s floor
mats hook over the floor anchors, which keep
the mats from sliding forward. To remove a
mat for cleaning, turn the anchor knobs to the
unlock position. When reinstalling the mat
after cleaning, turn the knobs to the lock
position.
Do not put additional floor mats on top of
the anchored mats.
Vacuum dirt and dust from the leather frequently. Pay close attention to the pleats
and seams. Clean the leather with a soft cloth dampened with a 90% water and
10% neutral soap solution. Then buff it with a clean, dry cloth. Remove any dust or
dirt on leather surfaces immediately.
■
Floor Mats
1Floor Mats
If you use any floor mats that were not originally
provided with your vehicle, make sure they are
designed for your specific vehicle, fit correctly, and
are securely anchored by the floor anchors.
Position the rear seat floor mat properly. If they are
not properly positioned, the floor mat can interfere
with the front seat functions.
To Unlock
Front
(Driver Side)
Rear
To Unlock■
Maintaining Genuine Leather
*
* Not available on all models
Page 389 of 433
uuIf a Tire Goes FlatuChanging a Flat Tire
388Handling the Unexpected
5.Lower the vehicle and remove the jack.
Tighten the wheel nuts in the order
indicated in the image. Go around,
tightening the nuts, two to three times in
this order.
Wheel nut torque:
94 lbf∙ft (127 N∙m, 13 kgf∙m)
The storage bag, bracket, mounting wing bolt
(A) and mounting wing bolt (B) are in the tool
case.
1.Put the flat tire in the storage bag provided
with your vehicle.
■
Storing the Flat Tire
1Storing the Flat Tire
3
WARNING
Loose items can fly around the interior in a
crash and can seriously injure the
occupants.
Store the wheel, jack, and tools securely
before driving.
Bracket
Mounting Wing Bolt (A)Mounting Wing Bolt (B)
Storage Bag
Page 394 of 433
393
Continued
Handling the Unexpected
Jump StartingTurn off the power to electric devices, such as audio and lights. Turn off the engine,
then open the hood.
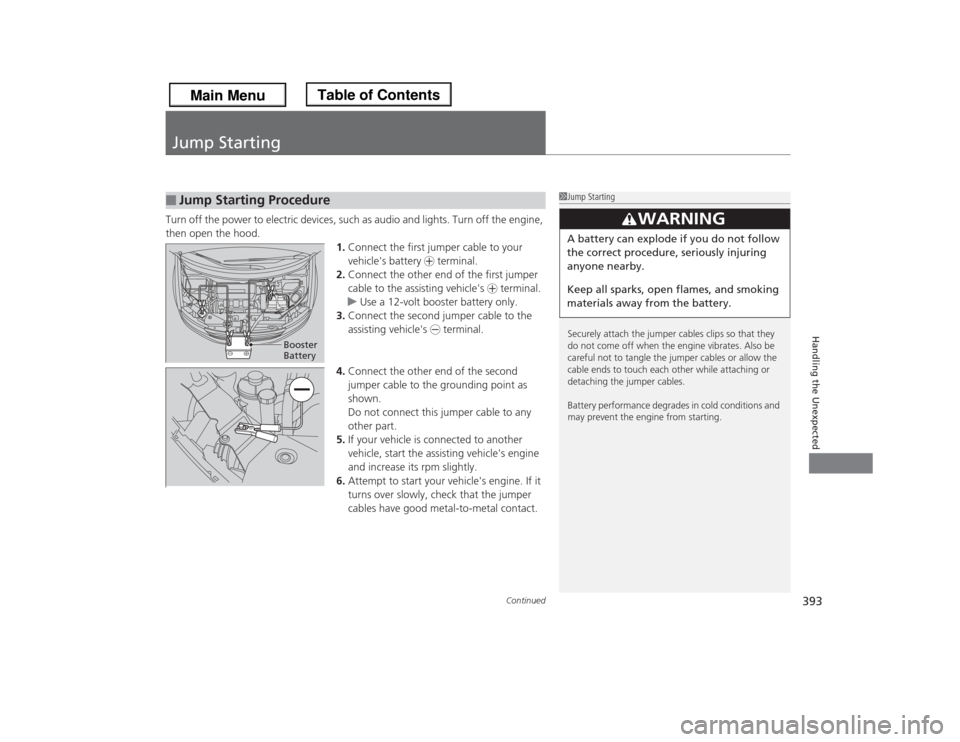
1.Connect the first jumper cable to your
vehicle's battery + terminal.
2.Connect the other end of the first jumper
cable to the assisting vehicle's + terminal.
uUse a 12-volt booster battery only.
3.Connect the second jumper cable to the
assisting vehicle's - terminal.
4.Connect the other end of the second
jumper cable to the grounding point as
shown.
Do not connect this jumper cable to any
other part.
5.If your vehicle is connected to another
vehicle, start the assisting vehicle's engine
and increase its rpm slightly.
6.Attempt to start your vehicle's engine. If it
turns over slowly, check that the jumper
cables have good metal-to-metal contact.■
Jump Starting Procedure
1Jump Starting
Securely attach the jumper cables clips so that they
do not come off when the engine vibrates. Also be
careful not to tangle the jumper cables or allow the
cable ends to touch each other while attaching or
detaching the jumper cables.
Battery performance degrades in cold conditions and
may prevent the engine from starting.
3
WARNING
A battery can explode if you do not follow
the correct procedure, seriously injuring
anyone nearby.
Keep all sparks, open flames, and smoking
materials away from the battery.
Booster
Battery