Page 205 of 433

204
uuAudio System Basic OperationuPlaying the XM® Radio
*
Features
Playing the XM® Radio
*
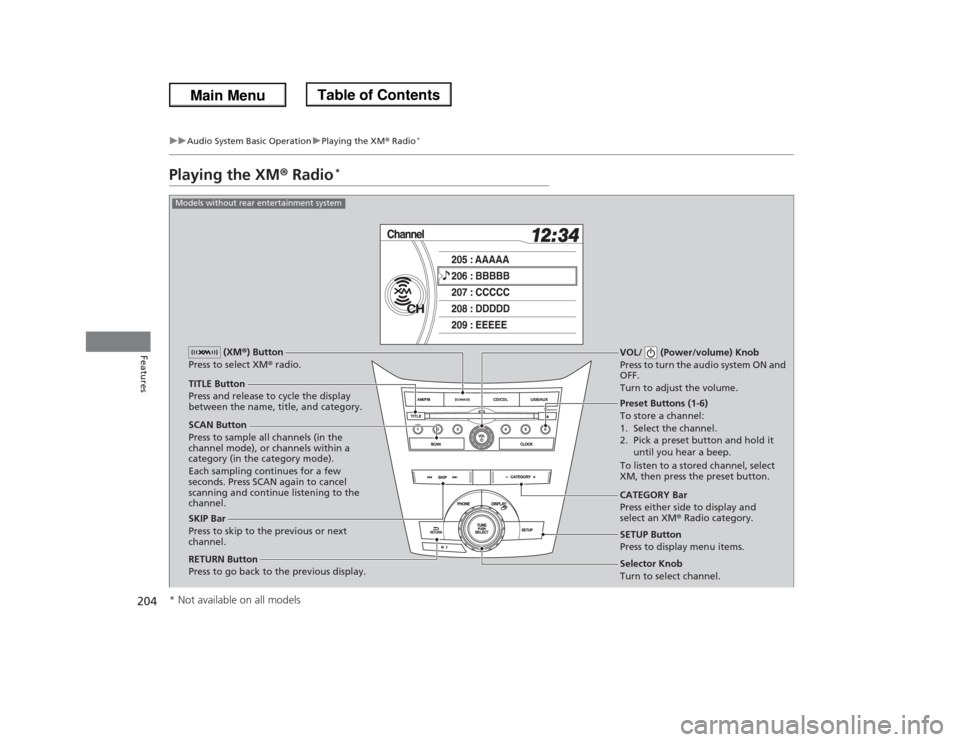
SCAN Button
Press to sample all channels (in the
channel mode), or channels within a
category (in the category mode).
Each sampling continues for a few
seconds. Press SCAN again to cancel
scanning and continue listening to the
channel.VOL/ (Power/volume) Knob
Press to turn the audio system ON and
OFF.
Turn to adjust the volume.
Preset Buttons (1-6)
To store a channel:
1. Select the channel.
2. Pick a preset button and hold it
until you hear a beep.
To listen to a stored channel, select
XM, then press the preset button.
SKIP Bar
Press to skip to the previous or next
channel.CATEGORY Bar
Press either side to display and
select an XM® Radio category. TITLE Button
Press and release to cycle the display
between the name, title, and category. (XM®) Button
Press to select XM® radio.
RETURN Button
Press to go back to the previous display.
Selector Knob
Turn to select channel. SETUP Button
Press to display menu items.
Models without rear entertainment system* Not available on all models
Page 206 of 433

205
uuAudio System Basic OperationuPlaying the XM® Radio
*
Continued
Features
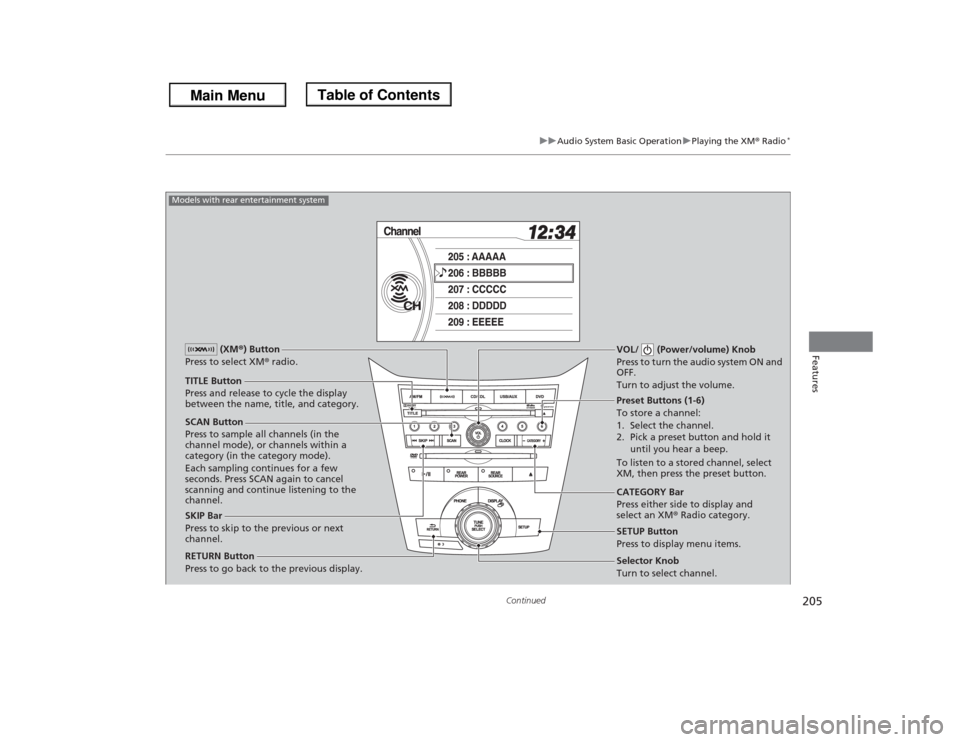
SCAN Button
Press to sample all channels (in the
channel mode), or channels within a
category (in the category mode).
Each sampling continues for a few
seconds. Press SCAN again to cancel
scanning and continue listening to the
channel.VOL/ (Power/volume) Knob
Press to turn the audio system ON and
OFF.
Turn to adjust the volume.
Preset Buttons (1-6)
To store a channel:
1. Select the channel.
2. Pick a preset button and hold it
until you hear a beep.
To listen to a stored channel, select
XM, then press the preset button.
SKIP Bar
Press to skip to the previous or next
channel.CATEGORY Bar
Press either side to display and
select an XM® Radio category. TITLE Button
Press and release to cycle the display
between the name, title, and category. (XM®) Button
Press to select XM® radio.
RETURN Button
Press to go back to the previous display.
Selector Knob
Turn to select channel. SETUP Button
Press to display menu items.
Models with rear entertainment system
Page 207 of 433

uuAudio System Basic OperationuPlaying the XM® Radio
*
206Features
1.Press the button to select the XM® radio band (XM1 or XM2).
2.Press and hold the TITLE button to switch between the channel mode and
category mode.
If you press the SETUP button, rotate to select XM Mode, and press . You
can select channel mode or category mode by turning and pressing the selector
knob.
3.Select a channel using the TUNE ( ), SKIP, CATEGORY, SCAN, or preset buttons.
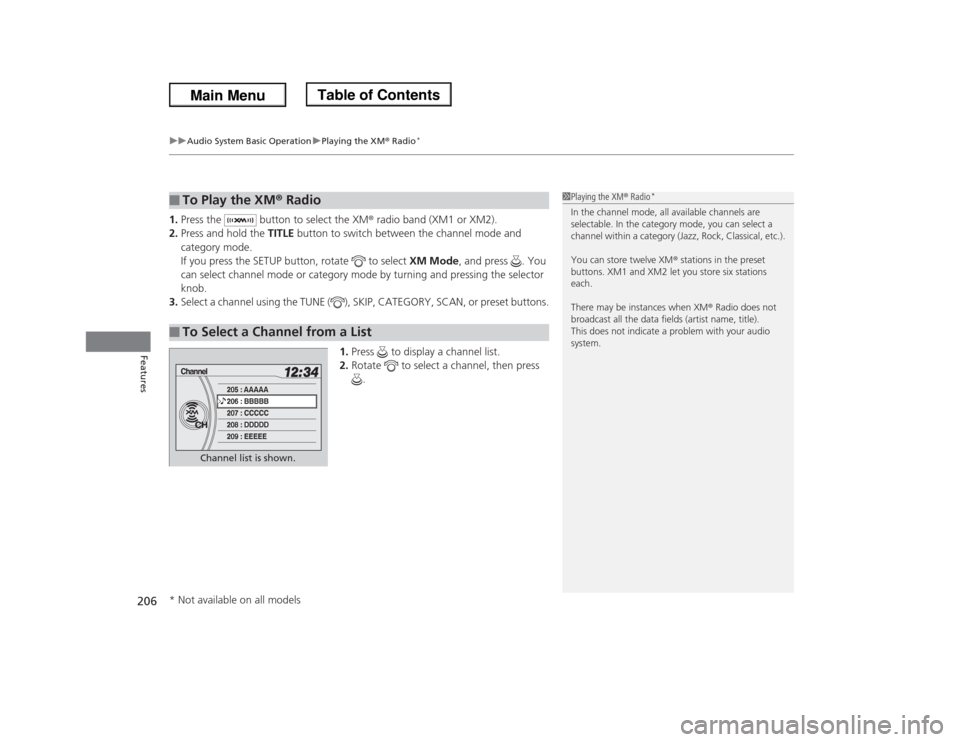
1.Press to display a channel list.
2.Rotate to select a channel, then press
.■
To Play the XM® Radio
■
To Select a Channel from a List
1Playing the XM® Radio
*
In the channel mode, all available channels are
selectable. In the category mode, you can select a
channel within a category (Jazz, Rock, Classical, etc.).
You can store twelve XM® stations in the preset
buttons. XM1 and XM2 let you store six stations
each.
There may be instances when XM® Radio does not
broadcast all the data fields (artist name, title).
This does not indicate a problem with your audio
system.
Channel list is shown.
* Not available on all models
Page 245 of 433
244
uuRear Entertainment System
*uOperating the System
Features
■SETUP button on the remote
Press the SETUP button while the DVD is
playing to see the available options.
Use the 3, 4, , and buttons to highlight
the option and then press the ENTER button.
Disp Adjust:
You can adjust the overhead screen’s brightness, contrast, black level, color, and
tint. To return to the default display setting, select Reset.
After you make all the adjustments, the screen goes back to the top SETUP screen,
or press the CANCEL button to return.
Aspect Ratio:
You can select the screen mode with a different aspect ratio from Normal, Wide,
Zoom and Full. After you select the mode, it takes about one second to return to the
play mode with the selected ratio.
Personal Surround:
You can select the sound effect mode that fits the DVD’s audio source from Music,
Cinema, and Voice. Select Off to turn this feature off.
Page 275 of 433

uuBluetooth® HandsFreeLink®uHFL Menus
274Features
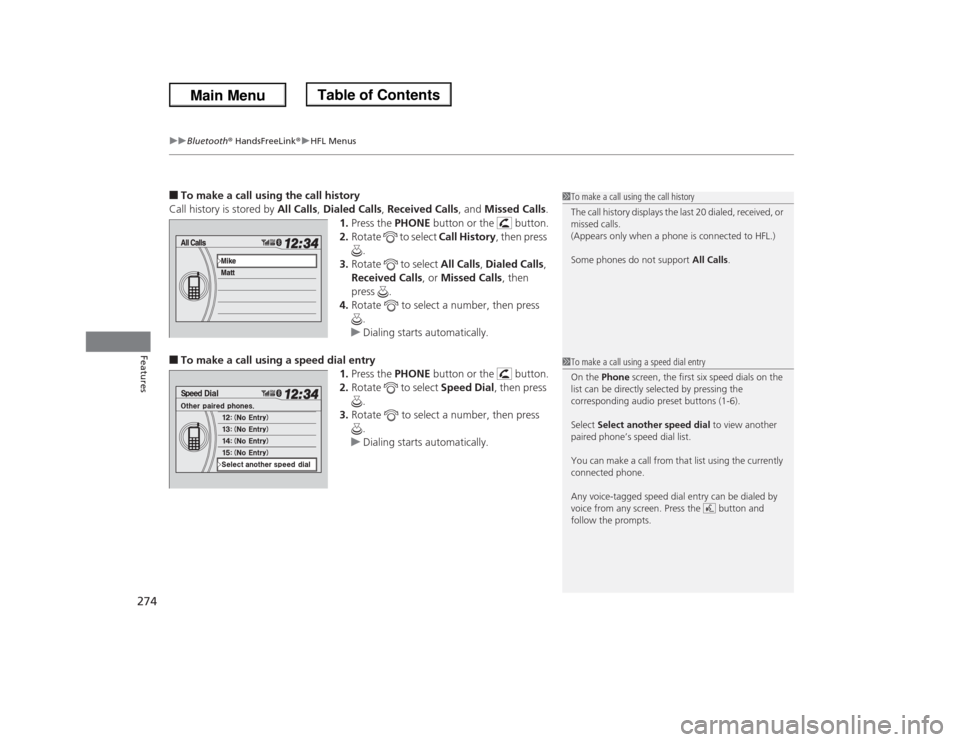
■To make a call using the call history
Call history is stored by All Calls, Dialed Calls, Received Calls, and Missed Calls.
1.Press the PHONE button or the button.
2.Rotate to select Call History, then press
.
3.Rotate to select All Calls, Dialed Calls,
Received Calls, or Missed Calls, then
press .
4.Rotate to select a number, then press
.
uDialing starts automatically.■To make a call using a speed dial entry
1.Press the PHONE button or the button.
2.Rotate to select Speed Dial, then press
.
3.Rotate to select a number, then press
.
uDialing starts automatically.
1To make a call using the call history
The call history displays the last 20 dialed, received, or
missed calls.
(Appears only when a phone is connected to HFL.)
Some phones do not support All Calls.1To make a call using a speed dial entry
On the Phone screen, the first six speed dials on the
list can be directly selected by pressing the
corresponding audio preset buttons (1-6).
Select Select another speed dial to view another
paired phone’s speed dial list.
You can make a call from that list using the currently
connected phone.
Any voice-tagged speed dial entry can be dialed by
voice from any screen. Press the button and
follow the prompts.
Page 328 of 433

327
Continued
Maintenance
Maintenance Minder™If the engine oil life is less than 15%, you will see the Maintenance Minder messages
appear on the information display
* or the multi-information display
* every time you
turn the ignition switch to ON
(w
. The messages notify you when to change the
engine oil, or when to bring your vehicle to a dealer for indicated maintenance
services.
To Use Maintenance Minder
TM
1.Turn the ignition switch to ON
(w
.
2.Press the (Select/Reset) knob repeatedly
until the engine oil life appears on the
information display.
The Maintenance Minder indicator ( ) stays
on in the instrument panel after the engine oil
life becomes 0%. Have the indicated
maintenance done by a dealer immediately.
■
Displaying the Engine Oil LifeModels with information display
1Displaying the Engine Oil Life
Based on the engine operating conditions, the
remaining engine oil life is calculated and displayed
as a percentage.
Displayed Engine Oil
Life (%)
Calculated Engine Oil
Life (%)
100 100 to 91
90
90 to 81
80 80 to 71
70
70 to 61
60 60 to 51
50
50 to 41
40 40 to 31
30
30 to 21
20 20 to 16
15
15 to 11
10 10 to 6
5
5 to 1
00
* Not available on all models
Page 329 of 433

328
uuMaintenance Minder™uTo Use Maintenance Minder
TM
Maintenance
To switch the display, press the (Select/Reset) knob.■
Maintenance Minder Messages on the Information Display
Oil Life Display
Explanation
Information
Maintenance Minder Indicator
The engine oil life indicator starts
to appear along with other due
soon maintenance item codes
when the remaining oil life
becomes 15 percent.
The engine oil is approaching the
end of its service life.
Starts to come on when the
remaining engine oil life becomes
15 percent.
It goes off when the display is
switched.
The SERVICE message also starts
to appear along with the engine oil
life indicator and the maintenance
item codes.
The engine oil has almost reached
the end of its service life, and the
maintenance items should be
inspected and serviced as soon as
possible.
The remaining engine oil life has
passed its service life, and a
negative distance appears after
driving over 10 miles (U.S. models)
or 10 km (Canadian models). The
negative distance on the display
blinks.
The engine oil life has passed.
The maintenance items must be
inspected and serviced
immediately.
Stays on as a reminder even when
the display is switched.
Page 330 of 433

329
uuMaintenance Minder™uTo Use Maintenance Minder
TM
Continued
Maintenance
■
Maintenance Service Items
1Maintenance Service Items•Independent of the Maintenance Minder
information, replace the brake fluid every 3 years.•Inspect idle speed every 160,000 miles (256,000
km).•Adjust the valves during services A, B, 1, 2, or 3 if
they are noisy.
Maintenance Minder Message Maintenance
Minder Indicator
Sub Items Main Item
*1: If a message SERVICE does not appear more than 12 months after the display is reset, change the
engine oil every year.
# : See information on maintenance and emissions warranty.CODE
Maintenance Main Items
A
●Replace engine oil
*1
B
●Replace engine oil
*1 and oil filter
●Inspect front and rear brakes/service as necessary●Check parking brake adjustment●Inspect tie rod ends, steering gearbox, and boots●Inspect suspension components●Inspect driveshaft boots●Inspect brake hoses and lines (Including ABS/VSA)●Inspect all fluid levels and condition of fluids●Inspect exhaust system
#
●Inspect fuel lines and connections
#
*2: If you drive in dusty conditions, replace the air cleaner element every 15,000 miles (24,000 km).
*3: If you drive primarily in urban areas that have high concentrations of soot in the air from industry and
from diesel-powered vehicles, replace the dust and pollen filter every 15,000 miles (24,000 km).
*4: If you drive regularly in very high temperatures (over 110ºF, 43ºC), in very low temperatures (under
20ºF, 29ºC), replace every 60,000 miles/100,000 km.CODE
Maintenance Sub Items
1
●Rotate tires
2
●Replace air cleaner element
*2
●Replace dust and pollen filter
*3
●Inspect drive belt
3●Replace transmission fluid
4
●Replace spark plugs●Replace timing belt and inspect water pump
*4
●Inspect valve clearance
5●Replace engine coolant