Page 164 of 433
Continued
163
uuAdjusting the SeatsuRear Seats
Controls
1.Lower the head restraint to its lowest
position.
2.Move the seat to its rearmost position.
3.Fold the seat-back down.
4.Pull the lock release lever, and lift the rear
of the seat.
uTo lift the seat, grab the handle under
the rear side of the seat cushion.
5.With the front of the seat hooked to the
floor, slide the seat laterally to the outer
position until it stops.
6.Lower the seat and push the rear of the
seat-back until it locks. Make sure the seat
is latched before driving.
■
Sliding the Second Row Outer Seats Outward
1Sliding the Second Row Outer Seats Outward
When the second row outer seats are in the original
(center) position, passengers have easier access to the
third row seats. When they are in the outer position,
you can install two or three child seats in the second
row seats.
Handle
Slide
Page 165 of 433

uuAdjusting the SeatsuRear Seats
164Controls
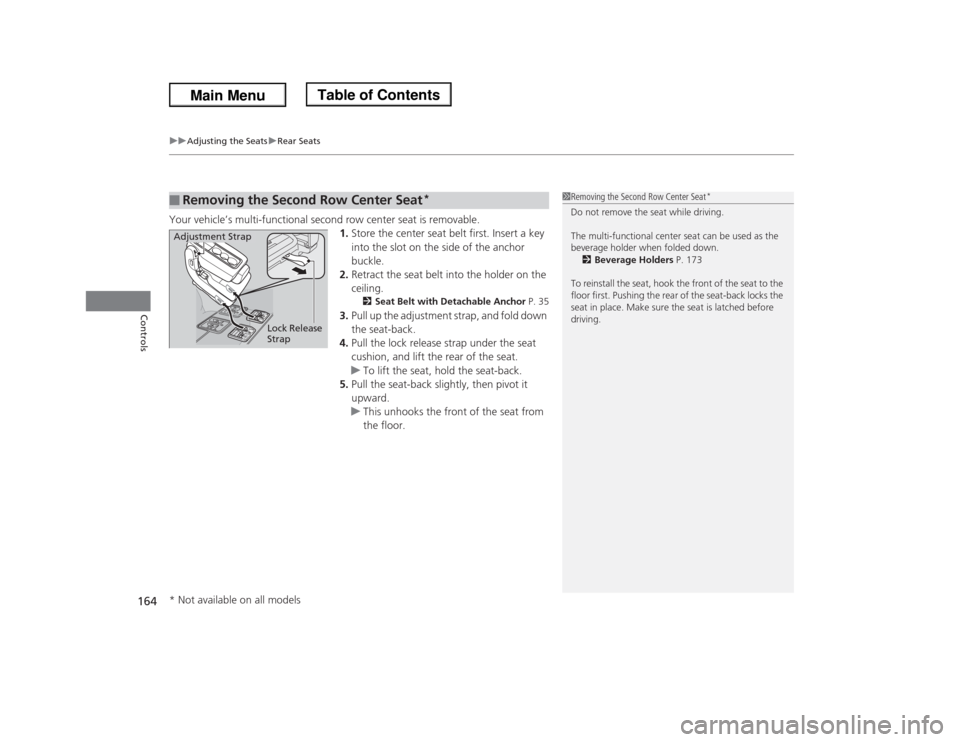
Your vehicle’s multi-functional second row center seat is removable.
1.Store the center seat belt first. Insert a key
into the slot on the side of the anchor
buckle.
2.Retract the seat belt into the holder on the
ceiling.
2Seat Belt with Detachable Anchor P. 35
3.Pull up the adjustment strap, and fold down
the seat-back.
4.Pull the lock release strap under the seat
cushion, and lift the rear of the seat.
uTo lift the seat, hold the seat-back.
5.Pull the seat-back slightly, then pivot it
upward.
uThis unhooks the front of the seat from
the floor.
■
Removing the Second Row Center Seat
*
1Removing the Second Row Center Seat
*
Do not remove the seat while driving.
The multi-functional center seat can be used as the
beverage holder when folded down.
2Beverage Holders P. 173
To reinstall the seat, hook the front of the seat to the
floor first. Pushing the rear of the seat-back locks the
seat in place. Make sure the seat is latched before
driving.
Adjustment Strap
Lock Release
Strap* Not available on all models
Page 168 of 433
167
uuAdjusting the SeatsuArmrest
Controls
Armrest
Pull down the armrest.
Pivot down the armrest all the way, then pull
it up to a desired angle.
Pull down the armrest of the center seat-back.
■
Using the Front and Second Row Outer Seat Armrest
Front seat with adjustable armrest
■
Using the Second and Third Row Seat Armrest
*
* Not available on all models
Page 175 of 433
174
uuInterior Lights/Interior Convenience ItemsuInterior Convenience Items
Controls
■Second row seat beverage holders
*
To use the beverage holder, fold the seat-
back.2Using the Second and Third Row Seat
Armrest
* P. 167
■Third row seat beverage holders
* Not available on all models
Page 379 of 433

uuCleaninguInterior Care
378Maintenance
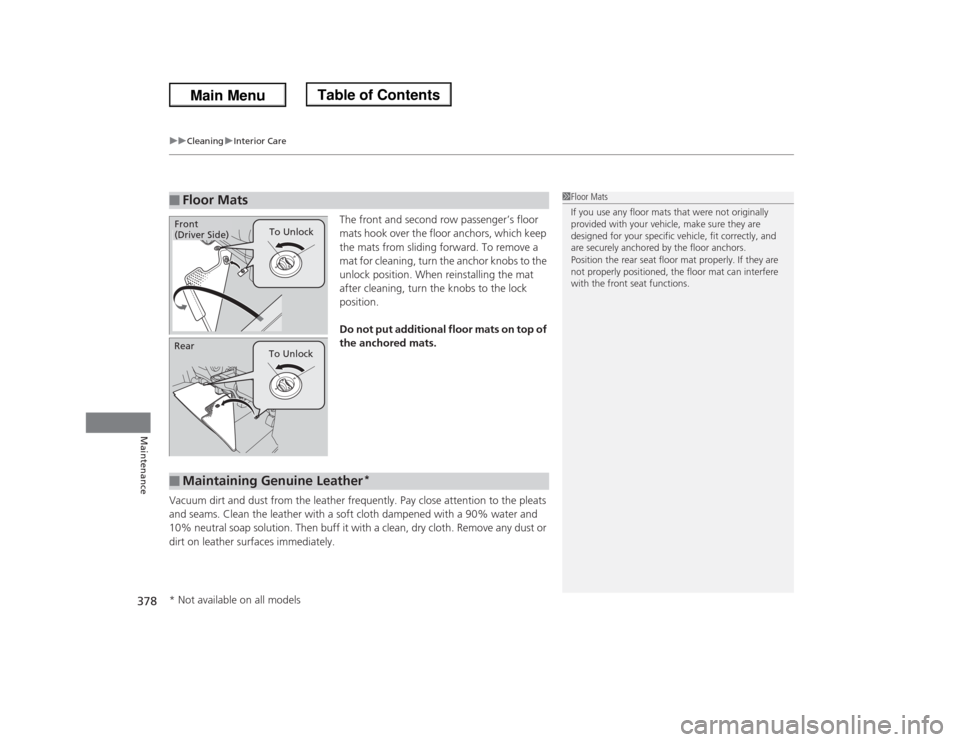
The front and second row passenger’s floor
mats hook over the floor anchors, which keep
the mats from sliding forward. To remove a
mat for cleaning, turn the anchor knobs to the
unlock position. When reinstalling the mat
after cleaning, turn the knobs to the lock
position.
Do not put additional floor mats on top of
the anchored mats.
Vacuum dirt and dust from the leather frequently. Pay close attention to the pleats
and seams. Clean the leather with a soft cloth dampened with a 90% water and
10% neutral soap solution. Then buff it with a clean, dry cloth. Remove any dust or
dirt on leather surfaces immediately.
■
Floor Mats
1Floor Mats
If you use any floor mats that were not originally
provided with your vehicle, make sure they are
designed for your specific vehicle, fit correctly, and
are securely anchored by the floor anchors.
Position the rear seat floor mat properly. If they are
not properly positioned, the floor mat can interfere
with the front seat functions.
To Unlock
Front
(Driver Side)
Rear
To Unlock■
Maintaining Genuine Leather
*
* Not available on all models
Page 383 of 433
382Handling the Unexpected
ToolsTypes of Tools
1Types of Tools
The tools were stored under the second row seat.
Wheel Nut Wrench/
Jack Handle Jack
Jack Handle BarBracketMounting Wing
Bolt (B)
Mounting Wing
Bolt (A)
Storage Bag
Page 385 of 433
384
uuIf a Tire Goes FlatuChanging a Flat Tire
Handling the Unexpected
1.Remove the floor mat under the second
row seat.
2Floor Mats P. 378
2.Pull up the floor carpet.
3.Lift up the floor lid using the handle and
remove it.
4.Take the tool case out of the spare tire well.
Take the jack and wheel nut wrench out of
the tool case.
5.Unscrew the wing bolt, and remove the
spacer cone. Then, remove the spare tire.
6.Place a wheel block or rock in front and rear
of the wheel diagonal to the flat tire.
■
Getting Ready to Replace the Flat TireFloor Carpet
Handle
Floor Lid
Spare Tire
Tool Case
Wheel
Blocks
The tire to be replaced.
Page 431 of 433

430Index
OOdometer.............................................. 87, 99
Oil (Engine)............................................... 337
Adding .................................................... 339
Checking ................................................. 338
Displaying Oil Life ............................ 327, 331
Low Oil Pressure Indicator .................. 72, 398
Recommended Engine Oil ........................ 337
Viscosity .................................................. 337
Opening/Closing
Hood ....................................................... 336
Moonroof ................................................ 139
Power Windows ...................................... 136
Sliding Door............................................. 125
Tailgate ................................................... 119
Outside Temperature Display............ 89, 100
Overheating.............................................. 396PPanic Mode............................................... 135
Parking...................................................... 312
Parking Brake............................................ 308
Parking Brake and Brake System
Indicator............................................ 72, 400
Parking Sensor System.............................. 313
Passenger Airbag Off Indicator................. 51
Passing Indicators..................................... 141
Power Sliding Door................................... 127
Power Tailgate.......................................... 121
Power Windows........................................ 136Precautions While Driving....................... 293
Rain ........................................................ 293
Pregnant Women....................................... 37
Puncture (Tire).......................................... 383
RRadiator.................................................... 343
Radio (AM/FM)......................................... 200
Radio Data System (RDS)......................... 203
Range.............................................. 88, 92, 99
RDS (Radio Data System)......................... 203
Readiness Codes (Emissions Testing)....... 417
Rear Defogger/Heated Door Mirror
Button..................................................... 147
Rear Entertainment System..................... 236
Rear Seats (Folding Down).............. 161, 165
Rearview Camera..................................... 317
Rearview Mirror....................................... 151
Refueling.................................................. 318
Fuel Gauge................................................ 86
Gasoline .......................................... 318, 412
Low Fuel Indicator ..................................... 75
Regulations............................... 303, 365, 415
Remote Transmitter................................. 111
Removable Center Console...................... 170
Removing a Second Row Outer Seat...... 162
Removing the Second Row
Center Seat............................................. 164
Replacement
Battery ............................................ 372, 374Bulbs ...................................................... 347
Fuses ...................... 403, 404, 405, 406, 407
Tires........................................................ 368
Wiper Blade Rubber ................................ 358
Reporting Safety Defects......................... 416
Resetting a Trip Meter......................... 88, 99
SSafe Driving................................................ 25
Safety Check............................................... 29
Safety Labels.............................................. 69
Safety Message.......................................... 23
Seat Belts.................................................... 30
Adjusting the Shoulder Anchor ........... 34, 35
Automatic Seat Belt Tensioners ................. 32
Checking .................................................. 38
Fastening .................................................. 33
Installing a Child Seat with a Lap/Shoulder
Seat Belt ................................................. 62
Pregnant Women...................................... 37
Reminder .................................................. 31
Warning Indicator ............................... 31, 75
Seat Heaters............................................. 180
Seats.......................................................... 153
Adjusting ................................................ 153
Front Seats.............................................. 153
Rear Seats ............................................... 161
Seat Heaters ........................................... 180