Page 369 of 433
368
uuChecking and Maintaining TiresuTire and Wheel Replacement
Maintenance
Tire and Wheel ReplacementReplace your tires with radials of the same size, load range, speed rating, and
maximum cold tire pressure rating (as shown on the tire’s sidewall). Using tires of a
different size or construction can cause the ABS and VSA® (vehicle stability assist)
system to work incorrectly.
It is best to replace all four tires at the same time. If that isn’t possible, replace the
front or rear tires in pairs.
If you replace a wheel, only use TPMS specified wheels approved for your vehicle.
Make sure that the wheel’s specifications match those of the original wheels.
1Tire and Wheel Replacement
3
WARNING
Installing improper tires on your vehicle can
affect handling and stability. This can cause
a crash in which you can be seriously hurt or
killed.
Always use the size and type of tires
recommended in this owner’s manual.
Page 375 of 433
374Maintenance
Remote Control and Wireless Headphone Care
*
Replacing the BatteryIf it takes several pushes on the remote control buttons to operate the rear
entertainment system.
1.Remove the cover.
2.Make sure to replace the battery with the
correct polarity.■
Remote ControlModels with Rear Entertainment System
1Replacing the BatteryNOTICEAn improperly disposed of battery can damage the
environment. Always confirm local regulations for
battery disposal.
Replacement batteries are commercially available or
at a dealer.
Battery type: BR3032
* Not available on all models
Page 379 of 433

uuCleaninguInterior Care
378Maintenance
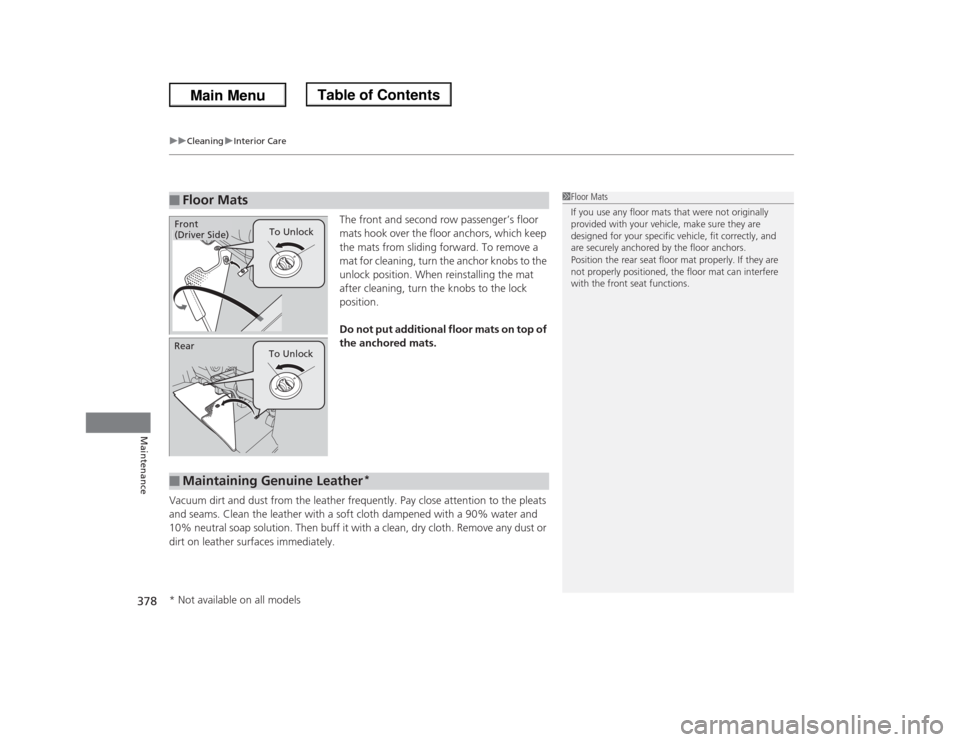
The front and second row passenger’s floor
mats hook over the floor anchors, which keep
the mats from sliding forward. To remove a
mat for cleaning, turn the anchor knobs to the
unlock position. When reinstalling the mat
after cleaning, turn the knobs to the lock
position.
Do not put additional floor mats on top of
the anchored mats.
Vacuum dirt and dust from the leather frequently. Pay close attention to the pleats
and seams. Clean the leather with a soft cloth dampened with a 90% water and
10% neutral soap solution. Then buff it with a clean, dry cloth. Remove any dust or
dirt on leather surfaces immediately.
■
Floor Mats
1Floor Mats
If you use any floor mats that were not originally
provided with your vehicle, make sure they are
designed for your specific vehicle, fit correctly, and
are securely anchored by the floor anchors.
Position the rear seat floor mat properly. If they are
not properly positioned, the floor mat can interfere
with the front seat functions.
To Unlock
Front
(Driver Side)
Rear
To Unlock■
Maintaining Genuine Leather
*
* Not available on all models
Page 381 of 433

uuCleaninguExterior Care
380Maintenance
A good coat of automotive body wax helps protect your vehicle’s paint from the
elements. Wax will wear off over time and expose your vehicle’s paint to the
elements, so reapply as necessary.
If you get gasoline, oil, engine coolant, or battery fluid on resin coated parts, they
may be stained or the coating may peel. Promptly wipe it away using a soft cloth and
clean water.
Wipe using a glass cleaner.
Aluminum is susceptible to deterioration caused by salt and other road
contaminants. Use a sponge and mild detergent to wipe away promptly.
Be careful not to use harsh chemicals (including some commercial wheel cleaners) or
a stiff brush. They can damage the clear coat of the aluminum alloy wheels that
helps keep the aluminum from corroding and tarnishing.■
Applying Wax
■
Maintaining the Bumpers and Other Resin Coated Parts
■
Cleaning the Window
■
Maintaining Aluminum Wheels
*
1Applying WaxNOTICEChemical solvents and strong cleaners can damage
the paint, metal, and plastic on your vehicle. Wipe up
spills immediately.1Maintaining the Bumpers and Other Resin Coated Parts
Ask a dealer about the correct coating material when
you want to repair the painted surface of the parts
made of resin.1Cleaning the Window
Wires are mounted to the inside of the rear window.
Wipe along the same direction as the wires with a
soft cloth so as not to damage them.
* Not available on all models
Page 384 of 433

383
Continued
Handling the Unexpected
If a Tire Goes FlatChanging a Flat TireIf a tire goes flat while driving, grasp the steering wheel firmly, and brake gradually
to reduce speed. Then, stop in a safe place. Replace the flat tire with a compact
spare tire. Go to a dealer as soon as possible to have the full-size tire repaired or
replaced.
1.Park the vehicle on firm, level, non-slippery surface and apply the parking brake.
2.Move the shift lever to
(P
.
3.Turn on the hazard warning lights and turn the ignition switch to LOCK
(0
.
1Changing a Flat Tire
Periodically check the tire pressure of the compact
spare. It should be set to the specified pressure.
Specified Pressure: 60 psi (420 kPa, 4.2 kgf/cm
2)
When driving with the compact spare tire, keep the
vehicle speed under 50 mph (80 km/h). Replace with
a full-size tire as soon as possible.
The compact spare tire and wheel in your vehicle are
specifically for this model.
Do not use them with another vehicle.
Do not use another type of compact spare tire or
wheel with your vehicle.
Do not mount tire chains on a compact spare tire.
If a chain-mounted front tire goes flat, remove one of
the full-size rear tires and replace it with the compact
spare tire. Remove the flat front tire and replace it
with the full-size tire that was removed from the rear.
Mount the tire chains on the front tire.
Do not use a puncture-repairing agent on a flat tire,
as it can damage the tire pressure sensor.
U.S. models only
Page 385 of 433
384
uuIf a Tire Goes FlatuChanging a Flat Tire
Handling the Unexpected
1.Remove the floor mat under the second
row seat.
2Floor Mats P. 378
2.Pull up the floor carpet.
3.Lift up the floor lid using the handle and
remove it.
4.Take the tool case out of the spare tire well.
Take the jack and wheel nut wrench out of
the tool case.
5.Unscrew the wing bolt, and remove the
spacer cone. Then, remove the spare tire.
6.Place a wheel block or rock in front and rear
of the wheel diagonal to the flat tire.
■
Getting Ready to Replace the Flat TireFloor Carpet
Handle
Floor Lid
Spare Tire
Tool Case
Wheel
Blocks
The tire to be replaced.
Page 399 of 433

398Handling the Unexpected
Indicator, Coming On/BlinkingIf the Low Oil Pressure Indicator Comes On
■Reasons for the indicator to come on
Comes on when the engine oil pressure is low.■What to do as soon as the indicator comes on
1.Immediately park the vehicle on level ground in a safe place.
2.If necessary, turn the hazard warning lights on.■What to do after parking the vehicle
1.Stop the engine and let it sit for about three minutes.
2.Open the hood and check the oil level.
uAdd oil as necessary.2Oil Check P. 338
3.Start the engine and check the low oil pressure indicator.
uThe light goes out: Start driving again.
uThe light does not go out within 10 seconds: Stop the engine and
contact a dealer for repairs immediately.
If the Charging System Indicator Comes On
■Reasons for the indicator to come on
Comes on when the battery is not being charged.■What to do when the indicator comes on
Turn off the heating and cooling system
*/climate control system
*, rear
defogger, and other electrical systems, and immediately contact a dealer
for repairs.
1If the Low Oil Pressure Indicator Comes OnNOTICERunning the engine with low oil pressure can cause
serious mechanical damage almost immediately.1If the Charging System Indicator Comes On
If you need to stop temporarily, do not turn off the
engine. Restarting the engine may rapidly discharge
the battery.
* Not available on all models
Page 405 of 433
404
uuFusesuFuse Locations
Handling the Unexpected
Located near the battery. Push the tabs to
open the box.■
Engine Compartment Fuse Box
(Secondary)
■Circuit protected and fuse rating
Circuit Protected
Amps
1
Battery
125 A
2-1
Fan Main 60 A
2-2
Passenger’s Side Fuse Box 2 50 A
2-3
Rear Blower 30 A
2-4
FI Main 30 A
2-5
VSA Motor 40 A
2-6
Stop & Horn, Hazard 30 A
2-7
VSA FSR 30 A
2-8
Battery Management
System Main30 A
3-1
Driver’s Side Fuse Box 2
50 A
3-2
IG1 Main
50 A
3-3
Rear Fuse Box 1
60 A
3-4
Passenger’s Side Fuse Box 1
50 A
3-5
Driver’s Side Fuse Box 1
50 A
3-6
Primary Under-hood Fuse
Box Main
60 A
3-7
Front Blower
40 A
3-8
Passenger’s Side Power
Slide Door Motor
*
40 A
4
−−
5
−
−
6 Rear Window Defogger 40 A
7
−
−
8Battery Management
System7.5 A
9
Stop & Horn
20 A
10 Hazard 15 A
11
Interior Lights
7.5 A
Circuit Protected
Amps
* Not available on all models