Page 124 of 286

123
uuAudio SystemuUSB Adapter Cable*
Features
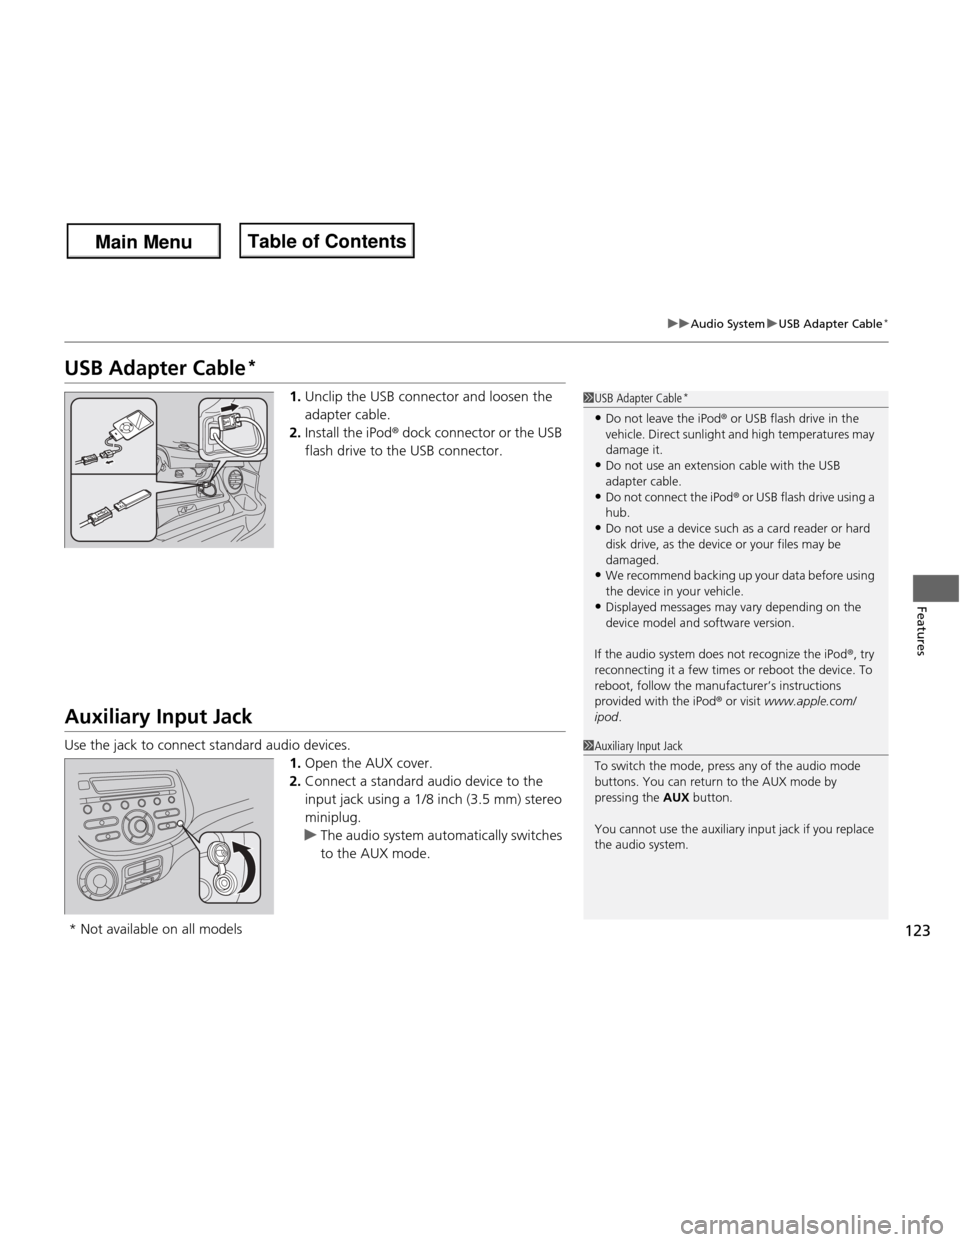
USB Adapter Cable *
1.Unclip the USB connector and loosen the adapter cable.
2. Install the iPod ® dock connector or the USB
flash drive to the USB connector.
Auxiliary Input Jack
Use the jack to connect standard audio devices. 1.Open the AUX cover.
2. Connect a standard audio device to the
input jack using a 1/8 inch (3.5 mm) stereo
miniplug.
uThe audio system automatically switches
to the AUX mode.
1USB Adapter Cable *
• Do not leave the iPod ® or USB flash drive in the
vehicle. Direct sunlight and high temperatures may damage it.
• Do not use an extension cable with the USB
adapter cable.
• Do not connect the iPod ® or USB flash drive using a
hub.
• Do not use a device such as a card reader or hard
disk drive, as the device or your files may be damaged.
• We recommend backing up your data before using
the device in your vehicle.
• Displayed messages may vary depending on the
device model and software version.
If the audio system does not recognize the iPod ®, try
reconnecting it a few times or reboot the device. To
reboot, follow the manufacturer’s instructions
provided with the iPod ® or visit www.apple.com/
ipod .
1Auxiliary Input Jack
To switch the mode, press any of the audio mode
buttons. You can return to the AUX mode by pressing the AUX button.
You cannot use the auxiliary input jack if you replace
the audio system.
* Not available on all models
Main Menu
Main MenuTable of Contents
Page 126 of 286
125
Features
Audio System Basic Operation
To use the audio system function, the ignition switch must be in ACCESSORY (q or
ON
(w .
Use the selector knob to access some audio
functions. Selector knob: Rotate left or right to scroll
through the available ch oices. Press to set
your selection. button: Press to go back to the previous
display.
1Audio System Basic Operation
These indications are used to show how to operate
the selector knob.
Rotate to select.
Press to enter.
ButtonSelector Knob
Main Menu
Main MenuTable of Contents
Page 127 of 286
126
uuAudio System Basic OperationuAdjusting the Sound
Features
Adjusting the SoundPress the (sound) button, and rotate
to adjust the setting.
Each time you press the button, a sound
mode switches as follows.
1Adjusting the Sound
When the adjustment level reaches the center, you
will see C in the display.
The SVC has four modes: OFF, LOW , MID , and
HIGH .
SVC adjusts the volume level based on the vehicle
speed. As you go faster, audio volume increases. As
you slow down, audio volume decreases.
BASS is selectable. Selector Knob
Button
Speed-sensitive Volume Compensation
Main Menu
Main MenuTable of Contents
Page 128 of 286

127
uuAudio System Basic OperationuPlaying the FM/AM Radio
Continued
Features
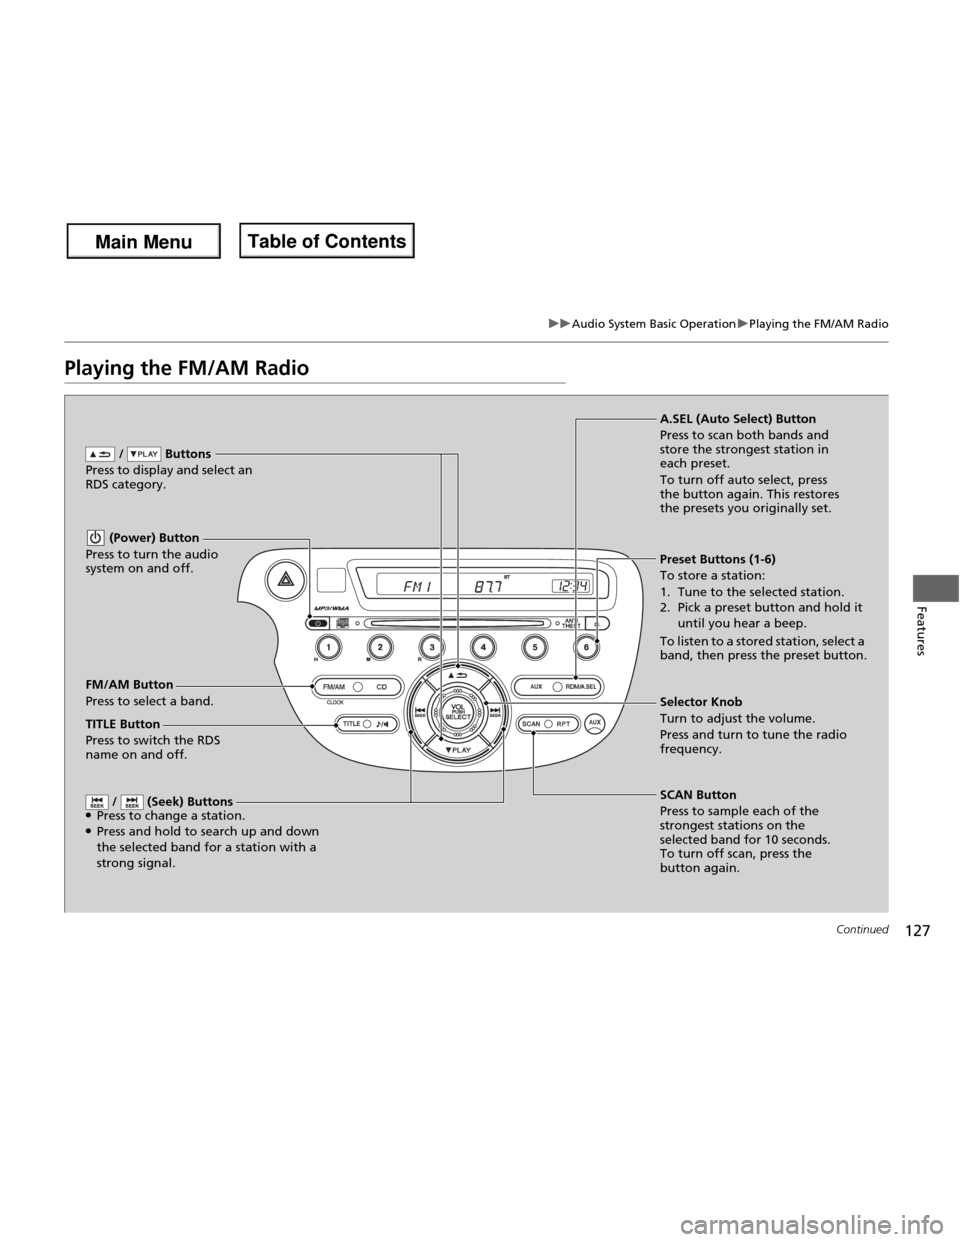
Playing the FM/AM Radio
FM/AM Button
Press to select a band. / Buttons
Press to display and select an
RDS category.
SCAN Button
Press to sample each of the
strongest stations on the
selected band for 10 seconds.
To turn off scan, press the
button again.
(Power) Button
Press to turn the audio
system on and off.
Preset Buttons (1-6) To store a station:
1. Tune to the selected station.
2. Pick a preset button and hold it until you hear a beep.
To listen to a stored station, select a
band, then press the preset button.
/ (Seek) Buttons
● Press to change a station.
● Press and hold to search up and down the selected band for a station with a
strong signal.
Selector Knob
Turn to adjust the volume.
Press and turn to tune the radio
frequency.
A.SEL (Auto Select) Button
Press to scan both bands and
store the strongest station in each preset.
To turn off auto select, press
the button again. This restores
the presets you originally set.
TITLE Button
Press to switch the RDS
name on and off.
Main Menu
Main MenuTable of Contents
Page 131 of 286

uuAudio System Basic OperationuPlaying a CD
130
Features
1. Press to switch the display to a folder list.
2. Rotate to select a folder.
3. Press to change the display to a list of
files in that folder.
4. Rotate to select a file, then press .
■How to Select a File from a Folder with the Selector Knob (MP3/WMA)1Playing a CD
NOTICE
Do not use CDs with adhesive labels. The label can cause the CD to jam in the unit.
WMA files protected by digital rights management
(DRM) cannot be played.
The audio system displays UNSUPPORTED, then
skips to the next file.
Text data appears on the display under the following circumstances: • When you select a new folder, file, or track.
• When you change the audio mode to CD.
• When you insert a CD.
The display shows up to 31 characters of text data.
Press and hold the TITLE button to see additional
characters. indicates that the text data continues.
The display goes back to the previous screen if you
press and hold the button again.
If you eject the CD but do not remove it from the slot,
the system reloads the CD automatically after several
seconds.
Track Selection
Folder Selection
Main Menu
Main MenuTable of Contents
Page 135 of 286
uuAudio System Basic OperationuPlaying a USB Flash Drive*
134
Features
1. Press to switch the display to a folder list.
2. Rotate to select a folder.
3. Press to change the display to a list of
files in that folder.
4. Rotate to select a file, then press .
■How to Select a File from a Folder with the Selector Knob1Playing a USB Flash Drive *
Use the recommended USB flash drives. 2 General Information on the Audio System
P. 137
Files in WMA format protected by digital rights
management (DRM) are not played.
The audio system displays UNPLAYABLE FILE, and
then skips to the next file.
If there is a problem, you may see an error message
on the audio display.
2 iPod ®/USB Flash Drive *
P. 136
Track Selection
Folder Selection
* Not available on all models
Main Menu
Main MenuTable of Contents
Page 143 of 286

142
uuBluetooth® HandsFreeLink ®*uHFL Menus
Features
HFL Menus
The ignition switch must be in ACCESSORY
(q
or ON (w to use HFL.
To use HFL, you must first pair your Bluetooth-compatible cell phone to the system while the vehicle is parked.
Press the (HFL Talk) button each time you give a command
“Set pairing code”
Pair a phone to the system.
Edit the name of a paired phone.
Delete a paired phone from the system.
Hear a list of all phones paired to the system.
Hear which paired phone is currently linked to the system.
Search for another phone that has been paired.
Set the pairing code to either “Fixed” or “Random.”
Say a phone number.
Say a name after a phonebook entry is stored.
Redial the last number called.
Transfer a call from HFL to your phone or from your phone to HFL.
Mute your voice to the person at the other end of the call.
Send numbers or names during a call. “Pair”
“Edit”
“Delete”
“List”
“Status”
“Next phone”
e.g.:
“123-456-####”
e.g.: “Jim Smith”
“Phone setup”
“Call” /“Dial”
“Transfer”
“Mute”
“Send”
“Redial”
Main Menu
Main MenuTable of Contents
Page 144 of 286

143
uuBluetooth® HandsFreeLink ®*uHFL Menus
Continued
Features
“Change passcode”
Store a phonebook entry.
Edit the number of an existing phonebook entry. Delete a phonebook entry.
Hear a list of all stored phonebook entries.Transfer contacts from your phone to HFL.
Apply a security passcode to the system that must be input at each key
cycle to access the system.
Change your security passcode.
Set how you want to be notified of an incoming call.
Set to automatically transfer calls from your phone to HFL when you
enter the vehicle.
Switch the system language between English and French.
Hear a tutorial for general rules on using the system.
Hear a list of available commands and additional information describing each command. “Store”
“Edit”
“Delete”
“List”
“Receive contact”
*
“Security”
“Call notification”
“Auto transfer”
“Phonebook”
“System setup”
“Change language”
“Tutorial”
“Hands-free help”
Clear the system of all paired phones, phonebook entries, and security passcode.
“Clear”
* Not available on all models
Main Menu
Main MenuTable of Contents