Page 244 of 573
Continued243
uuAudio System Basic OperationuPlaying Hard Disc Drive (HDD) Audio
Features
The songs on music CDs are automatically recorded by factory default to the HDD
the first time you play each disc. You can then play the songs directly from the HDD. 1.Press the MENU button.
2. Rotate to select Cancel Record to HDD , then press .
1. Press the MENU button.
2. Rotate to select Rec to HDD, then press .
■Recording a Music CD to HDD1Recording a Music CD to HDD
You can add tracks to user playlists, where you can
mix and match tracks from other CDs recorded on
the HDD.
2 Editing an Album or Playlist P. 246
2 Editing Track Information P. 249
If you stop the engine or the power system is turned
off while recording a CD, there may be pauses
between songs when you play back from the HDD.
Repeat, random, and scan functions are not available
during recording.
You can play music from other sources (e.g., XM,
HDD, etc.) while recording.
Please note that there is no compensation offered in
the case of unsuccessful recording of audio data or
the loss of audio data due to any cause whatsoever.
Clearing the HDD
Any music tracks stored on the HDD can be deleted. 2 Deleting all HDD Data P. 317
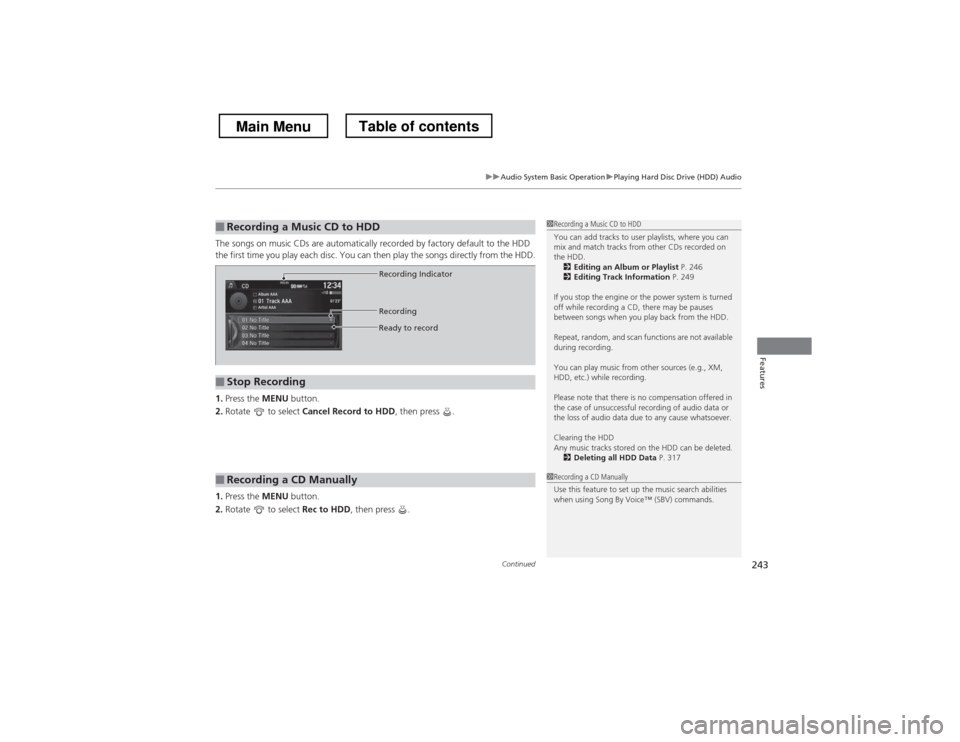
■Stop Recording
■Recording a CD Manually
Recording Indicator
Recording
Ready to record
1Recording a CD Manually
Use this feature to set up the music search abilities
when using Song By Voice
Page 282 of 573
281
Continued
Features
Customized Features *
Use the audio/information screen to customize certain features. ■
How to customize
With the ignition switch in ON
(w *1
, press and hold the DISP button, then rotate
to select Audio Settings , Phone Settings , Camera Settings , Vehicle Settings ,
System Settings or Info Settings and press .
*1: Models with the smart entry system have an ENGINE START/STOP button instead of an
ignition switch.
1Customized Features *
When you customize settings, make sure that the
vehicle is at a complete stop and shift to
(P .
To customize other features, rotate , and press . 2 List of customizable options P. 294
Models without navigation system
Models without navigation system
DISP Button
Audio/Information Screen
MENU/SEL
(Selector) Knob
* Not available on all models
Main MenuTable of contents
Page 283 of 573
uuCustomized Features*u
282
Features
With the ignition switch in ON (w*1
, press the SETTINGS button. Rotate to
select Audio Settings , Phone Settings , Camera Settings , Vehicle Settings ,
System Settings , Info Settings , or Navi Settings and press .
*1: Models with the smart entry system have an ENGINE START/STOP button instead of an
ignition switch.
Models with navigation system
SETTINGS Button
Audio/Information Screen
Interface Dial
1Customized Features *
When you customize setting, make sure that the
vehicle is at a complete stop and shift to
(P .
To customize other features, rotate , move , , or , and press .
2 List of customizable options P. 304
Models with navigation system
* Not available on all models
Main MenuTable of contents
Page 299 of 573
298
uuCustomized Features*u
Features
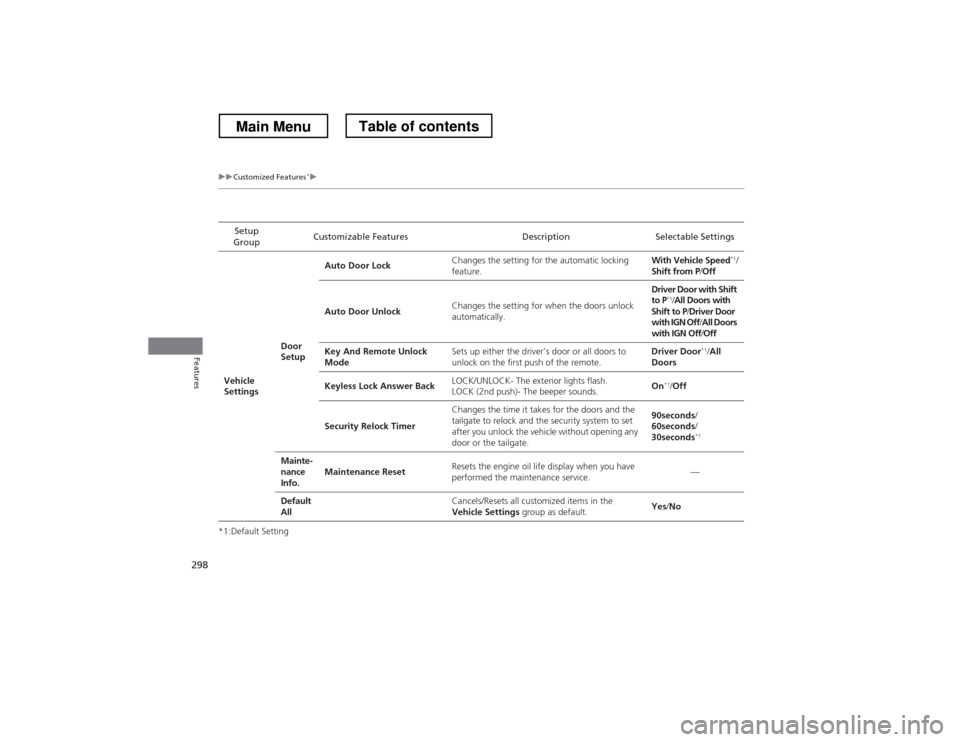
*1:Default SettingSetup
Group Customizable Features Description Selectable Settings
Vehicle
Settings Door
SetupAuto Door Lock
Changes the setting for the automatic locking feature. With Vehicle Speed
*1
/
Shift from P /Off
Auto Door Unlock Changes the setting for when the doors unlock
automatically. Driver Door with Shift
to P
*1
/All Doors with
Shift to P /Driver Door
with IGN Off /All Doors
with IGN Off /Off
Key And Remote Unlock
Mode Sets up either the driver’s door or all doors to
unlock on the first push of the remote. Driver Door
*1
/All
Doors
Keyless Lock Answer Back LOCK/UNLOCK- The exterior lights flash.
LOCK (2nd push)- The beeper sounds. On
*1
/Off
Security Relock Timer Changes the time it takes for the doors and the
tailgate to relock and the security system to set
after you unlock the vehicle without opening any
door or the tailgate. 90seconds
/
60seconds /
30seconds *1
Mainte-
nance
Info. Maintenance Reset
Resets the engine oil life display when you have
performed the maintenance service. —
Default All
Cancels/Resets all customized items in the
Vehicle Settings group as default. Yes
/No
Main MenuTable of contents
Page 310 of 573
309
uuCustomized Features*u
Continued
Features
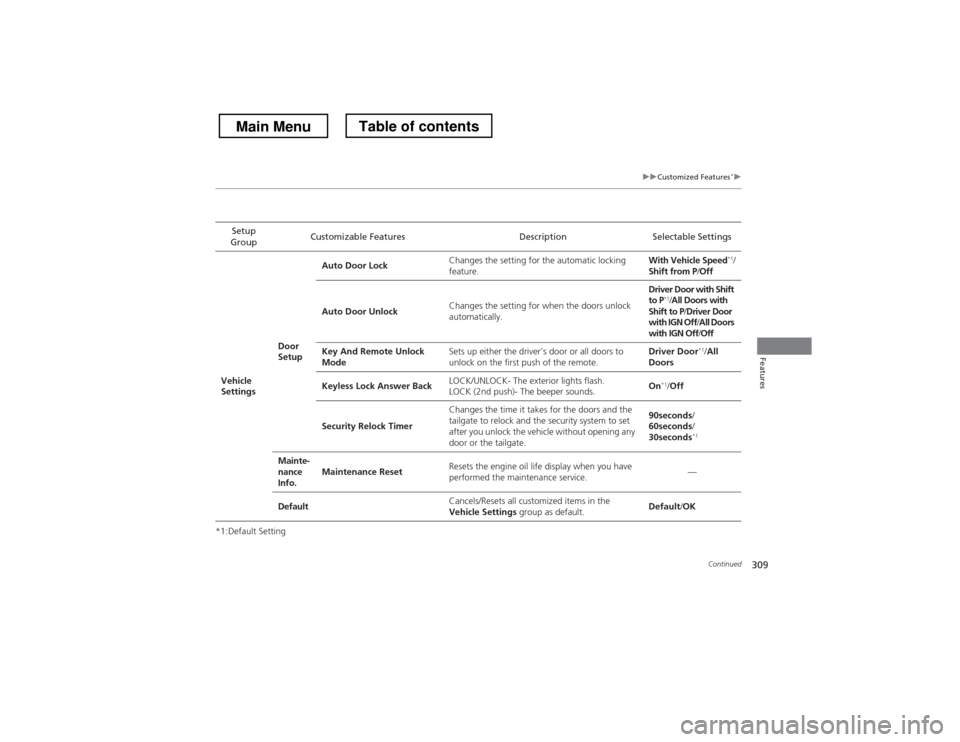
*1:Default SettingSetup
Group Customizable Features Description Selectable Settings
Vehicle
Settings Door
SetupAuto Door Lock
Changes the setting for the automatic locking
feature. With Vehicle Speed
*1
/
Shift from P /Off
Auto Door Unlock Changes the setting for when the doors unlock
automatically. Driver Door with Shift to P
*1
/All Doors with
Shift to P /Driver Door
with IGN Off /All Doors
with IGN Off /Off
Key And Remote Unlock
Mode Sets up either the driver’s door or all doors to
unlock on the first push of the remote. Driver Door
*1
/All
Doors
Keyless Lock Answer Back LOCK/UNLOCK- The exterior lights flash.
LOCK (2nd push)- The beeper sounds. On
*1
/Off
Security Relock Timer Changes the time it takes for the doors and the
tailgate to relock and the security system to set
after you unlock the vehicle without opening any
door or the tailgate. 90seconds
/
60seconds /
30seconds *1
Mainte-
nance
Info. Maintenance Reset
Resets the engine oil life display when you have
performed the maintenance service. —
Default Cancels/Resets all customized items in the
Vehicle Settings
group as default. Default
/OK
Main MenuTable of contents
Page 335 of 573
334
uuBluetooth® HandsFreeLink ®uHFL Menus
Features
HFL Menus
The ignition switch must be in ACCESSORY
(q or ON (w*1
to use HFL.
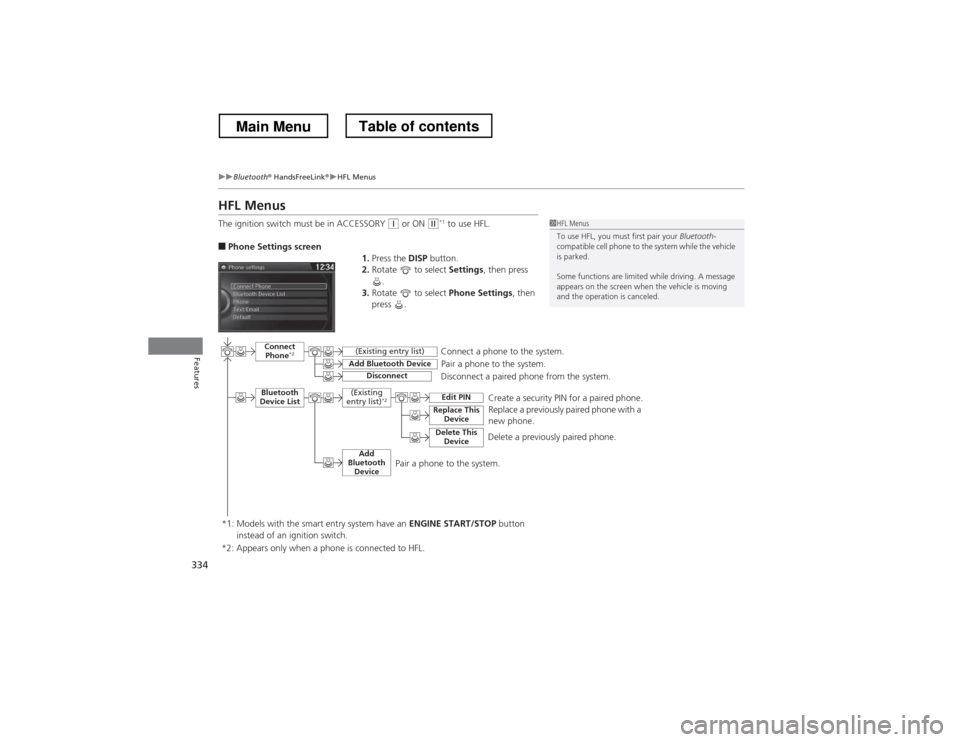
■ Phone Settings screen
1.Press the DISP button.
2. Rotate to select Settings, then press
.
3. Rotate to select Phone Settings, then
press .1HFL Menus
To use HFL, you must first pair your Bluetooth-
compatible cell phone to the system while the vehicle is parked.
Some functions are limited while driving. A message
appears on the screen when the vehicle is moving
and the operation is canceled.
Pair a phone to the system.
Replace a previously paired phone with a
new phone.
Connect
Phone *2
Bluetooth
Device List
Add Bluetooth Device
Edit PIN
(Existing entry list)
Disconnect
Connect a phone to the system.
Disconnect a paired phone from the system.
*1: Models with the smart entry system have an ENGINE START/STOP button
instead of an ignition switch. (Existing
entry list) *2
Replace This
Device
Delete This DeviceDelete a previously paired phone.Create a security PIN for a paired phone.
Add
Bluetooth Device
*2: Appears only when a phone is connected to HFL.
Pair a phone to the system.
Main MenuTable of contents
Page 370 of 573
369
uuBluetooth® HandsFreeLink ®uHFL Menus
Continued
Features
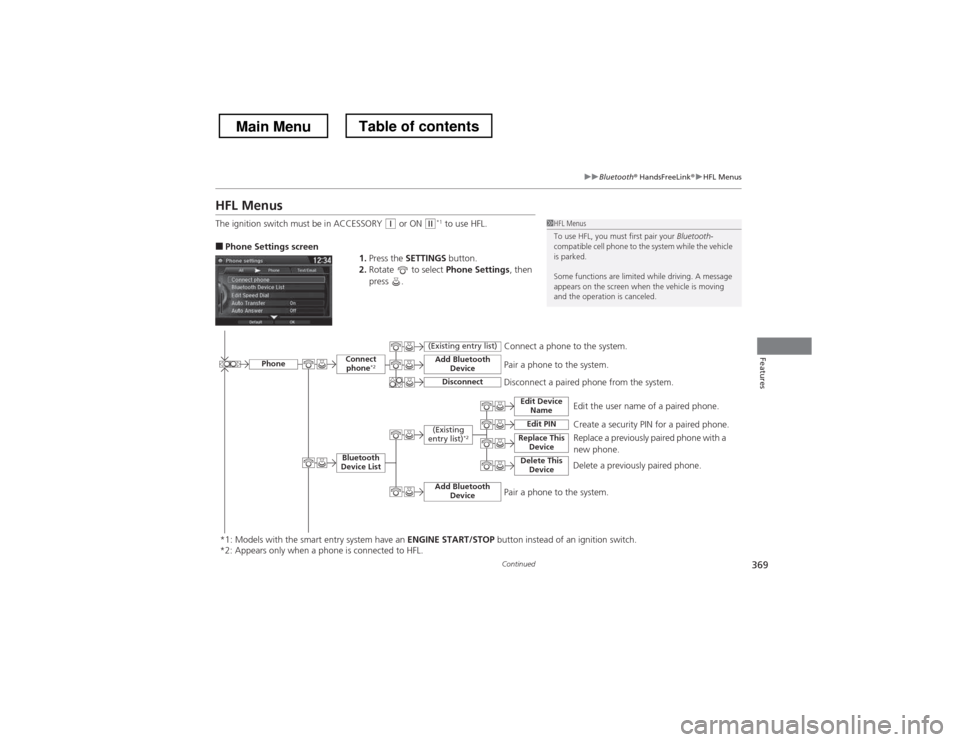
HFL Menus
The ignition switch must be in ACCESSORY
(q or ON (w*1
to use HFL.
■ Phone Settings screen
1.Press the SETTINGS button.
2. Rotate to select Phone Settings, then
press .1HFL Menus
To use HFL, you must first pair your Bluetooth-
compatible cell phone to the system while the vehicle is parked.
Some functions are limited while driving. A message
appears on the screen when the vehicle is moving
and the operation is canceled.
Edit the user name of a paired phone.
PhoneEdit Device
Name
Connect phone *2
Bluetooth
Device List
(Existing
entry list) *2
Replace This
Device
Add Bluetooth Device
Disconnect a paired phone from the system.Connect a phone to the system.Disconnect
(Existing entry list)
Pair a phone to the system.
Edit PIN
Create a security PIN for a paired phone.Replace a previously paired phone with a
new phone.
Delete This Device
Delete a previously paired phone.
Add Bluetooth DevicePair a phone to the system.
*1: Models with the smart entry system have an ENGINE START/STOP button instead of an ignition switch.
*2: Appears only when a phone is connected to HFL.
Main MenuTable of contents
Page 408 of 573
407
Features
Compass*
When you turn the ignition switch to ON (w
*1
, the compass self-calibrates, and the
compass display appears.
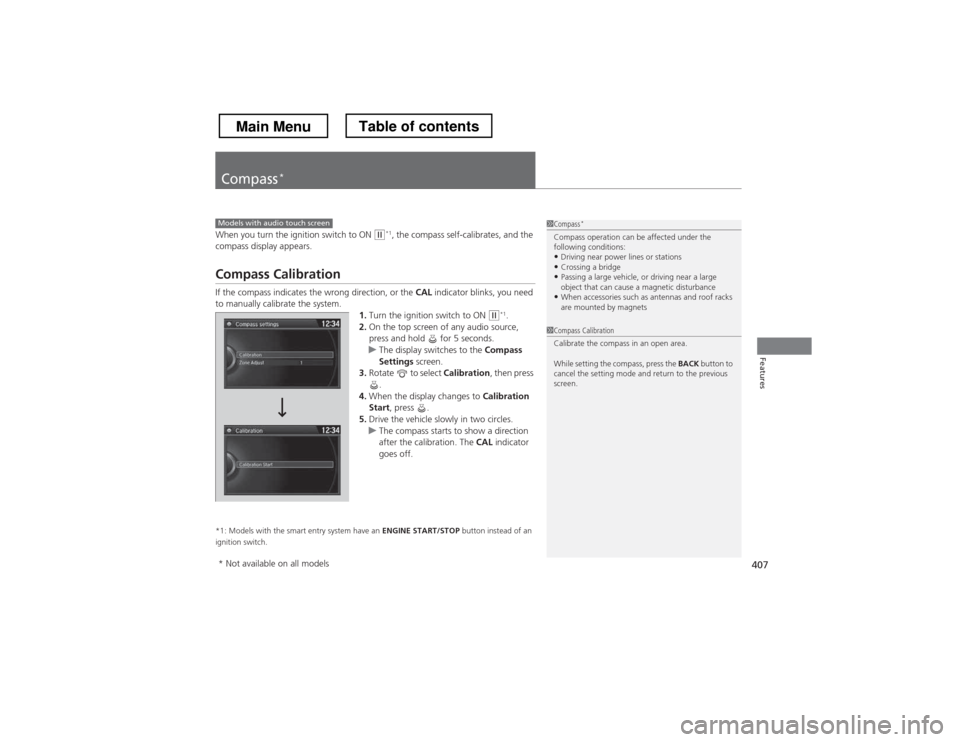
Compass Calibration
If the compass indicates the wrong direction, or the CAL indicator blinks, you need
to manually calibrate the system.
1.Turn the ignition switch to ON
(w *1
.
2. On the top screen of any audio source,
press and hold for 5 seconds.
uThe display switches to the Compass
Settings screen.
3. Rotate to select Calibration, then press
.
4. When the display changes to Calibration
Start , press .
5. Drive the vehicle slowly in two circles.
uThe compass starts to show a direction
after the calibration. The CAL indicator
goes off.
*1: Models with the smart entry system have an ENGINE START/STOP button instead of an
ignition switch.
Models with audio touch screen1Compass *
Compass operation can be affected under the
following conditions: • Driving near power lines or stations
• Crossing a bridge
• Passing a large vehicle, or driving near a large
object that can cause a magnetic disturbance
• When accessories such as antennas and roof racks
are mounted by magnets
1Compass Calibration
Calibrate the compass in an open area.
While setting the compass, press the BACK button to
cancel the setting mode and return to the previous
screen.
* Not available on all models
Main MenuTable of contents