Page 1 of 346

ContentsThis owner’s manual should be considered a permanent part of the
vehicle and should remain with the vehicle when it is sold.
This owner’s manual covers all models of your vehicle. You may find
descriptions of equipment and features that are not on your
particular model.
Images throughout this owner’s manual (including the front cover)
represent features and equipment that are available on some, but
not all, models. Your particular model may not have some of these
features.
This owner’s manual is for vehicles sold in the United States and
Canada.
The information and specifications included in this publication were
in effect at the time of approval for printing. Honda Motor Co., Ltd.
reserves the right, however, to discontinue or change specifications
or design at any time without notice and without incurring any
obligation.
2Safe Driving P. 27For Safe Driving P. 28 Seat Belts P. 32 Airbags P. 392Instrument Panel P. 67Indicators P. 68
Gauges and intelligent Multi-Information Display (i-MID) P. 82
2Controls P. 103Setting the Clock P. 104 Locking and Unlocking the Doors P. 105
Operating the Switches Around the Steering Wheel P. 119
Interior Lights/Interior Convenience Items P. 1342Features P. 143Audio System P. 144 Audio System Basic Operation P. 147
Bluetooth® HandsFreeLink® P. 1752Driving P. 207Before Driving P. 208 Towing a Trailer P. 213
Rearview Camera P. 245 Refueling P. 246 Fuel Economy P. 2492Maintenance P. 251Before Performing Maintenance P. 252 Maintenance Minder
TM P. 255
Checking and Maintaining Wiper Blades P. 277
Climate Control System Maintenance P. 290
2Handling the Unexpected P. 295Tools P. 296 If a Tire Goes Flat P. 297
Overheating P. 315 Indicator, Coming On/Blinking P. 3172Information P. 325Specifications P. 326 Identification Numbers P. 328
Emissions Testing P. 331 Warranty Coverages P. 333
Page 5 of 346
Visual Index
4Quick Reference Guide
❙Hood Release Handle (P 260)
❙Power Window Switches
(P 117)
❙Power Door Lock Master Switch
(P 110)
❙Door Mirror Controls
(P 128)
❙Parking Brake
(P 240)
❙Auxiliary Input Jack
(P 146)
❙Glove Box
(P 135)
❙Shift Lever
Automatic Transmission (CVT) (P 219)❙Interior Fuse Box
(P 322)
❙Trunk Release
(P 112)
❙Driver’s Front Airbag
(P 42)
❙Fuel Fill Door Release Handle
(P 247)
❙Driver’s Pocket
❙Rearview Mirror
(P 128)
❙Passenger’s Front Airbag (P 42)❙Accessory Power Socket (P 137)
Page 8 of 346
7Quick Reference Guide
❙High-Mount Brake Light
(P 276)
❙Opening/Closing the Trunk
(P 112)
❙Emergency Trunk Release Lever (P 114)❙How to Refuel
(P 247)
❙Brake/Taillights
(P 275)
❙Rear Turn Signal Lights
(P 274)
❙Rear Side Marker Lights
(P 275)
❙Back-Up Lights
(P 274)
❙Taillights
(P275)
❙Rearview Camera
(P245)
❙Rear License Plate Lights
(P 276)
Page 9 of 346
8Quick Reference Guide
Eco Assist SystemAmbient Meter●Changes color to reflect your driving
style.
Green: Fuel efficient driving
Blue green: Moderate acceleration/
deceleration
Blue: Aggressive acceleration/
deceleration
●The ambient meter color changes in
accordance with your brake or
accelerator pedal operation.
ECON Button
(P221)
ECON Mode Indicator
(P76) Helps maximize fuel economy.
Comes on when the ECON mode is on.
The message is displayed for a few seconds
when the ECON mode is on.
Page 10 of 346

9Quick Reference Guide
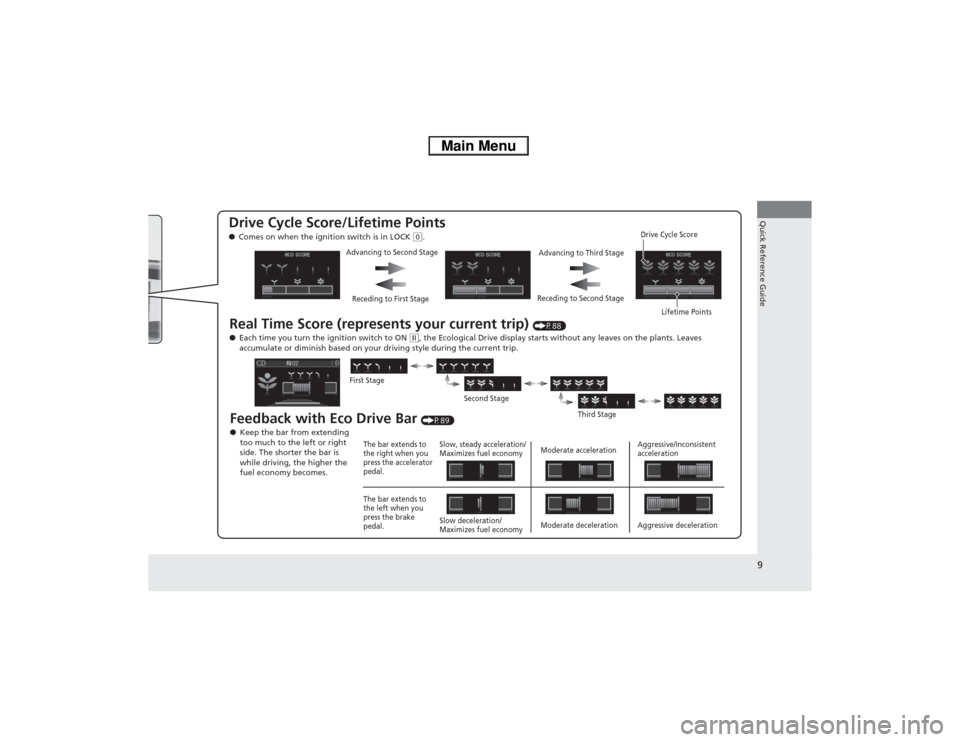
Drive Cycle Score/Lifetime Points ●Comes on when the ignition switch is in LOCK
(0.
Real Time Score (represents your current trip)
(P88)
●Each time you turn the ignition switch to ON
(w, the Ecological Drive display starts without any leaves on the plants. Leaves
accumulate or diminish based on your driving style during the current trip.
Feedback with Eco Drive Bar
(P89)
Advancing to Second Stage
Advancing to Third Stage
Receding to Second Stage
Receding to First StageDrive Cycle Score
Lifetime Points
The bar extends to
the right when you
press the accelerator
pedal.
The bar extends to
the left when you
press the brake
pedal.Slow, steady acceleration/
Maximizes fuel economy
Slow deceleration/
Maximizes fuel economyModerate deceleration Moderate accelerationAggressive/Inconsistent
acceleration
Aggressive deceleration First Stage
Second Stage
Third Stage
●Keep the bar from extending
too much to the left or right
side. The shorter the bar is
while driving, the higher the
fuel economy becomes.
Page 11 of 346

10Quick Reference Guide
The Honda IMA SystemThe main power source for the Honda IMA system is the gasoline engine.
The electric motor assists the engine to improve fuel economy, based on
current operating conditions.
Tips to Improve Fuel Economy To help your vehicle’s fuel economy:
●Avoid aggressive acceleration/braking
●Monitor the ambient meter and the Eco drive bar
displayed on the intelligent multi-information
display.
It reflects your driving style. (P8, 88)
Start-up/Low speed cruise/
Aggressive acceleration
●The electric motor assists the
engine.Low speed cruise
●Only IMA motor is
powering the vehicle and
IMA battery is discharging.
Slow acceleration/High
speed cruise
●Only the engine powers
the vehicle.Deceleration
●The IMA system charges
the IMA battery.
Stop
●Auto Idle Stop is in
operation.
Vehicle
Speed
TimeEco Drive Bar
Display
IMA
SystemIMA
System IMA
System
IMA
System
IMA
System
Electric
Motor
AssistEngine
ONElectric
Motor
AssistElectric
Motor
OFF
Charging Engine
OFFEngine
ON
Engine
OFF
Engine
OFF
IMA
BatteryIMA
BatteryIMA
Battery
IMA
Battery
IMA
Battery FuelFuelFuel
Fuel
Fuel
Electric
Motor
OFF
Page 14 of 346

13Quick Reference Guide
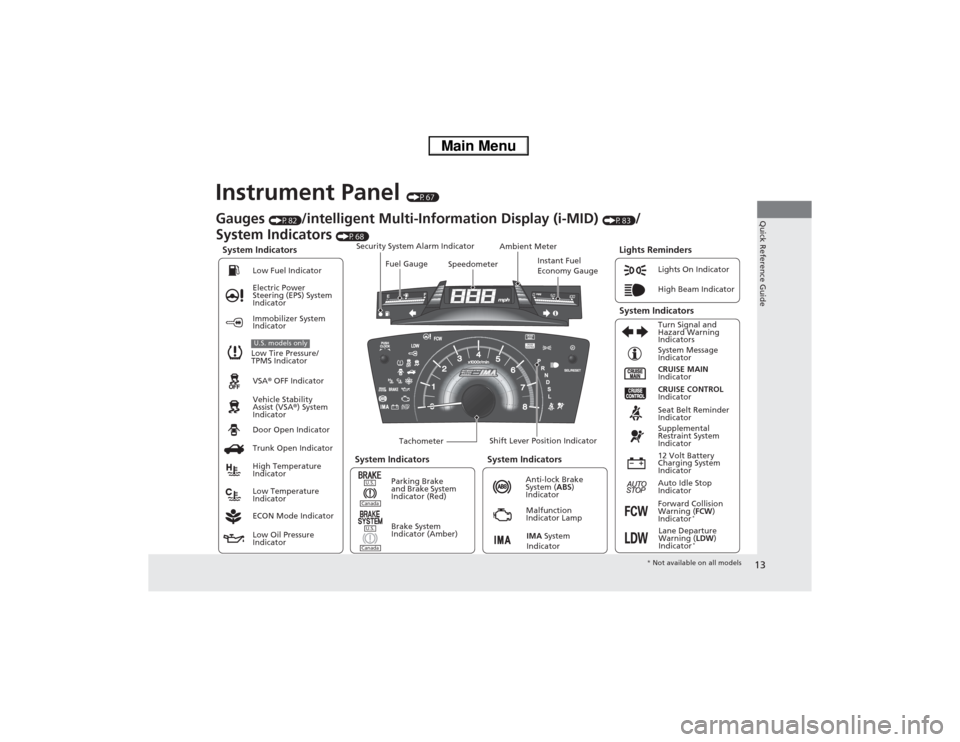
Instrument Panel
(P67)
System Indicators
Malfunction
Indicator Lamp
Low Oil Pressure
IndicatorAnti-lock Brake
System (ABS)
Indicator Vehicle Stability
Assist (VSA®) System
Indicator VSA® OFF Indicator Electric Power
Steering (EPS) System
IndicatorLights On Indicator
High Beam Indicator
Immobilizer System
Indicator
Seat Belt Reminder
Indicator
Lights Reminders
CRUISE MAIN
Indicator System Message
Indicator
Brake System
Indicator (Amber)Supplemental
Restraint System
Indicator
Forward Collision
Warning (FCW)
Indicator
*
Door Open Indicator
TachometerInstant Fuel
Economy Gauge Speedometer Fuel Gauge Security System Alarm Indicator
Shift Lever Position Indicator Low Fuel Indicator
Gauges
(P82)
/intelligent Multi-Information Display (i-MID)
(P83)
/
System Indicators
(P68)
Trunk Open Indicator
ECON Mode IndicatorTurn Signal and
Hazard Warning
Indicators
High Temperature
Indicator
Low Temperature
IndicatorAmbient Meter
System Indicators System Indicators
Low Tire Pressure/
TPMS IndicatorU.S. models only
Parking Brake
and Brake System
Indicator (Red)
IMA System
Indicator
CRUISE CONTROL
Indicator
System Indicators
12 Volt Battery
Charging System
Indicator
Auto Idle Stop
Indicator
U.S.CanadaU.S.Canada
Lane Departure
Warning (LDW)
Indicator
*
* Not available on all models
Page 20 of 346

19Quick Reference Guide
VSA® OFF Button
(P236)
●The vehicle stability assist (VSA®) system
helps stabilize the vehicle during
cornering, and helps maintain traction
while accelerating on loose or slippery
road surfaces.
●VSA® comes on automatically every time
you start the engine.
●To turn VSA® on or off, press and hold
the button until you hear a beep.
Cruise Control
(P225)
●Cruise control allows you to maintain a
set speed without keeping your foot on
the accelerator pedal.
●To use cruise control, press the CRUISE
button, then press –/SET button once you
have achieved the desired speed (above
25 mph or 40 km/h).
Tire Pressure Monitoring
System (TPMS)
(P237)
●TPMS monitors tire pressure.
●TPMS is turned on automatically every
time you start the engine.
U.S. models only
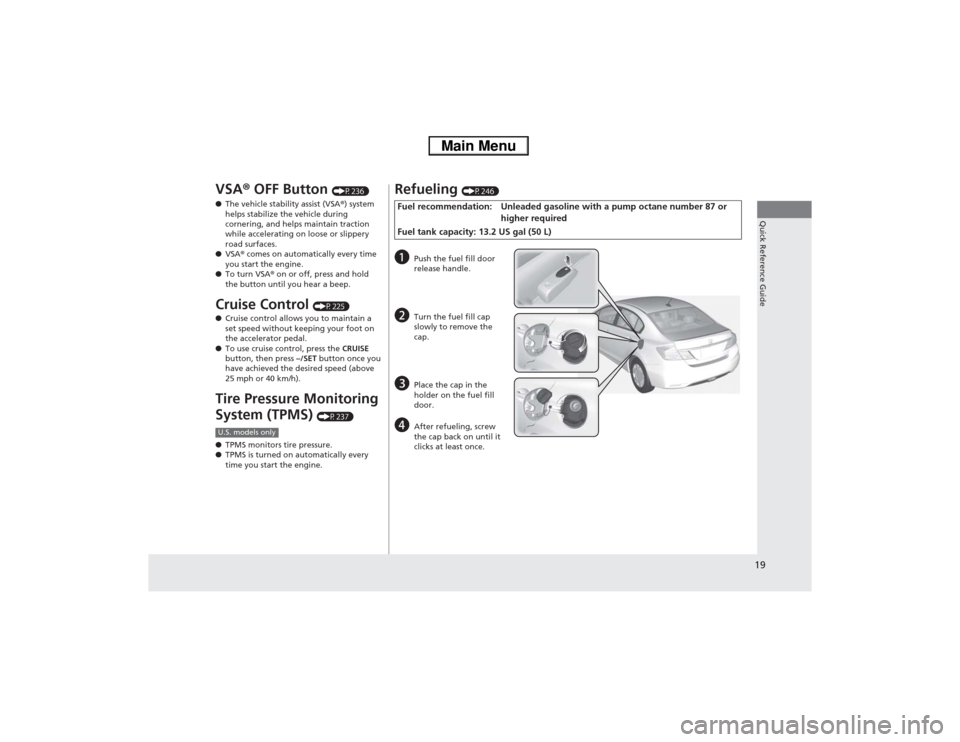
Refueling
(P246)
Fuel recommendation: Unleaded gasoline with a pump octane number 87 or
higher required
Fuel tank capacity: 13.2 US gal (50 L)a
Push the fuel fill door
release handle.
b
Turn the fuel fill cap
slowly to remove the
cap.
c
Place the cap in the
holder on the fuel fill
door.
d
After refueling, screw
the cap back on until it
clicks at least once.