Page 1 of 346

ContentsThis owner’s manual should be considered a permanent part of the
vehicle and should remain with the vehicle when it is sold.
This owner’s manual covers all models of your vehicle. You may find
descriptions of equipment and features that are not on your
particular model.
Images throughout this owner’s manual (including the front cover)
represent features and equipment that are available on some, but
not all, models. Your particular model may not have some of these
features.
This owner’s manual is for vehicles sold in the United States and
Canada.
The information and specifications included in this publication were
in effect at the time of approval for printing. Honda Motor Co., Ltd.
reserves the right, however, to discontinue or change specifications
or design at any time without notice and without incurring any
obligation.
2Safe Driving P. 27For Safe Driving P. 28 Seat Belts P. 32 Airbags P. 392Instrument Panel P. 67Indicators P. 68
Gauges and intelligent Multi-Information Display (i-MID) P. 82
2Controls P. 103Setting the Clock P. 104 Locking and Unlocking the Doors P. 105
Operating the Switches Around the Steering Wheel P. 119
Interior Lights/Interior Convenience Items P. 1342Features P. 143Audio System P. 144 Audio System Basic Operation P. 147
Bluetooth® HandsFreeLink® P. 1752Driving P. 207Before Driving P. 208 Towing a Trailer P. 213
Rearview Camera P. 245 Refueling P. 246 Fuel Economy P. 2492Maintenance P. 251Before Performing Maintenance P. 252 Maintenance Minder
TM P. 255
Checking and Maintaining Wiper Blades P. 277
Climate Control System Maintenance P. 290
2Handling the Unexpected P. 295Tools P. 296 If a Tire Goes Flat P. 297
Overheating P. 315 Indicator, Coming On/Blinking P. 3172Information P. 325Specifications P. 326 Identification Numbers P. 328
Emissions Testing P. 331 Warranty Coverages P. 333
Page 4 of 346
3Quick Reference Guide
❙Km/Mile Change Knob
(P 82)
❙Headlights/Turn Signals
(P 120)
❙
(Select/Reset) Knob
(P 83)
❙
(Display/Information) Button
(P 83)
❙Wipers/Washers
(P 124)
❙Cruise Control Buttons
(P 225)
❙MENU Button
(P 91)
❙SOURCE Button
(P 91)
❙(+ / (- / / Buttons
(P 91)
❙Navigation System Voice Control Buttons
*
() See Navigation System Manual❙Bluetooth® HandsFreeLink® System
Voice Control Buttons
(P 175)
❙Horn (Press an area around .)❙Brightness Control
(P 125)
❙CLOCK Knob
(P 104)
* Not available on all models
Page 93 of 346
92
uuGauges and intelligent Multi-Information Display (i-MID)uintelligent Multi-Information Display (i-MID)
Instrument Panel
■Customization flow
Press the MENU button.
1Customized Features
You can exit the customizing screen at any time by
pressing the MENU button.
Vehicle MenuVehicle InformationOdometer/Trip MeterAdjust Clock
*
Fuel Consumption HistoryMaintenance infoTrip Meter ResetSelect Trip/Odometer
* Not available on all models
Page 96 of 346
95
uuGauges and intelligent Multi-Information Display (i-MID)uintelligent Multi-Information Display (i-MID)
Continued
Instrument Panel
■List of customizable options
*1: Models without navigation system
*2: Default SettingSetup Group Customizable Features Description Selectable settingsVehicle
Information
Fuel Consumption
History
Show the fuel consumption history.
—
Maintenance
Information
Reset the Maintenance Minder
TM.
No/Yes
Odometer/
Trip MeterTrip Meter ResetReset the trip meter.Trip A/Trip B
Select Trip/OdometerSwitch between odometer, trip meter A, and trip
meter B.Odometer/Trip A/Trip B
Adjust
Clock
*1
Select Time Display
Select time display 12 hour or 24 hour and adjust
the time.
12 h
*2/24 h
Page 97 of 346

96
uuGauges and intelligent Multi-Information Display (i-MID)uintelligent Multi-Information Display (i-MID)
Instrument Panel
*1: Models with navigation system
*2: Default Setting
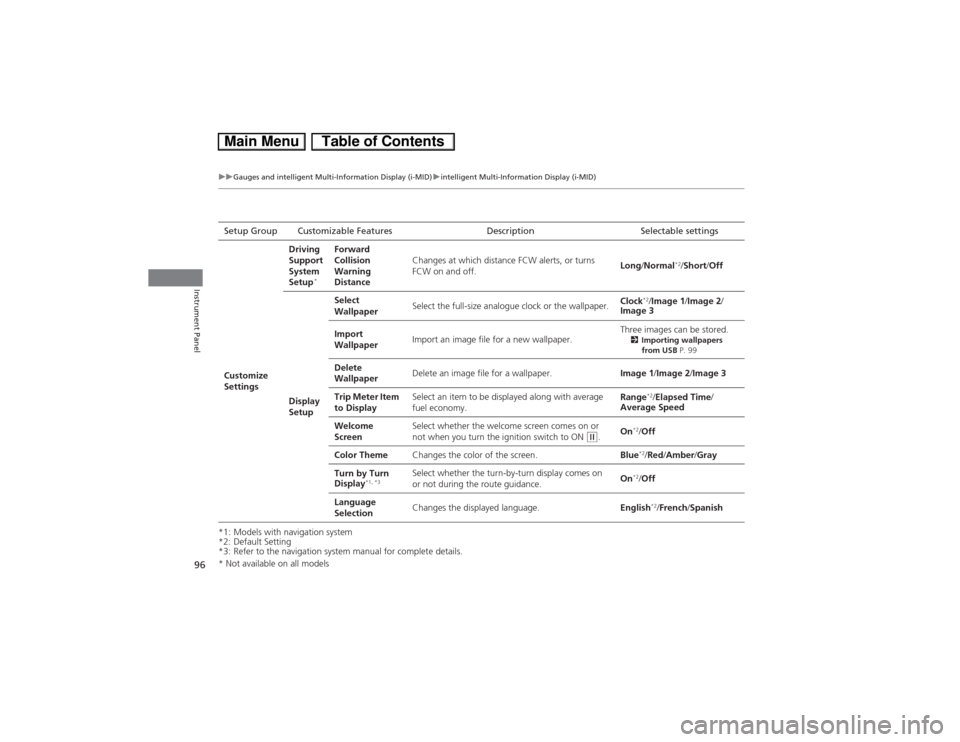
*3: Refer to the navigation system manual for complete details.Setup Group Customizable Features Description Selectable settings
Customize
SettingsDriving
Support
System
Setup
*
Forward
Collision
Warning
DistanceChanges at which distance FCW alerts, or turns
FCW on and off.Long/Normal
*2/Short/Off
Display
SetupSelect
WallpaperSelect the full-size analogue clock or the wallpaper.Clock
*2/Image 1/Image 2/
Image 3
Import
WallpaperImport an image file for a new wallpaper.Three images can be stored.
2Importing wallpapers
from USB P. 99
Delete
WallpaperDelete an image file for a wallpaper.Image 1/Image 2/Image 3
Trip Meter Item
to DisplaySelect an item to be displayed along with average
fuel economy.Range
*2/Elapsed Time/
Average Speed
Welcome
ScreenSelect whether the welcome screen comes on or
not when you turn the ignition switch to ON
(w.On
*2/Off
Color ThemeChanges the color of the screen.Blue*2/Red/Amber/Gray
Turn by Turn
Display
*1, *3
Select whether the turn-by-turn display comes on
or not during the route guidance.On
*2/Off
Language
SelectionChanges the displayed language.English*2/French/Spanish
* Not available on all models
Page 100 of 346

Continued
99
uuGauges and intelligent Multi-Information Display (i-MID)uintelligent Multi-Information Display (i-MID)
Instrument Panel
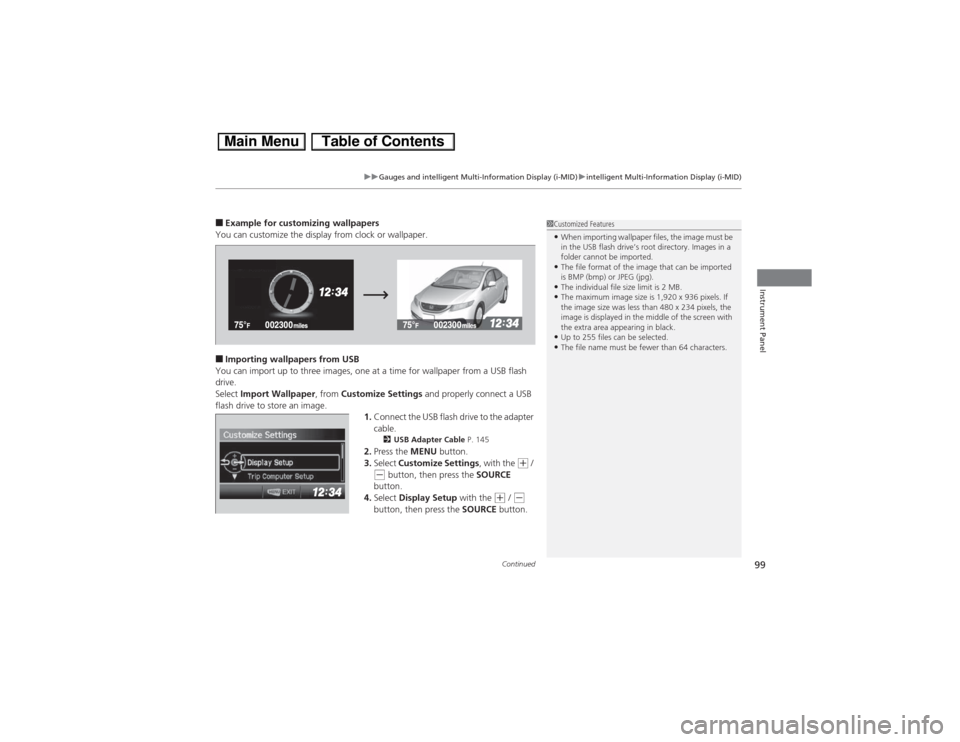
■Example for customizing wallpapers
You can customize the display from clock or wallpaper.■Importing wallpapers from USB
You can import up to three images, one at a time for wallpaper from a USB flash
drive.
Select Import Wallpaper, from Customize Settings and properly connect a USB
flash drive to store an image.
1.Connect the USB flash drive to the adapter
cable.
2USB Adapter Cable P. 145
2.Press the MENU button.
3.Select Customize Settings, with the
(+ /
(- button, then press the SOURCE
button.
4.Select Display Setup with the
(+ / (-
button, then press the SOURCE button.
1Customized Features•When importing wallpaper files, the image must be
in the USB flash drive’s root directory. Images in a
folder cannot be imported.•The file format of the image that can be imported
is BMP (bmp) or JPEG (jpg).•The individual file size limit is 2 MB.•The maximum image size is 1,920 x 936 pixels. If
the image size was less than 480 x 234 pixels, the
image is displayed in the middle of the screen with
the extra area appearing in black.•Up to 255 files can be selected.•The file name must be fewer than 64 characters.
Page 104 of 346

103
Controls
This chapter explains how to operate the various controls necessary for driving.
Setting the Clock.............................. 104
Locking and Unlocking the Doors
Key Types and Functions .................. 105
Locking/Unlocking the Doors from the
Outside .......................................... 107
Locking/Unlocking the Doors from the
Inside ............................................. 109
Childproof Door Locks ..................... 110
Auto Door Locking/Unlocking .......... 111
Opening and Closing the Trunk....... 112
Security System
Immobilizer System .......................... 115
Security System Alarm ...................... 115Opening and Closing the Windows..... 117
Operating the Switches Around the
Steering Wheel
Ignition Switch ................................. 119
Turn Signals ..................................... 120
Light Switches.................................. 120
Daytime Running Lights ................... 123
Wipers and Washers ........................ 124
Brightness Control ........................... 125
Rear Defogger/Heated Door Mirror
*
Button ........................................... 126
Adjusting the Steering Wheel........... 127Adjusting the Mirrors
Interior Rearview Mirror ................... 128
Power Door Mirrors ......................... 128
Adjusting the Seats
Adjusting the Seat Positions ............. 129
Interior Lights/Interior Convenience
Items
Interior Lights .................................. 134
Interior Convenience Items .............. 135
Climate Control System
Using Automatic Climate Control .... 140
Automatic Climate Control Sensors ...... 142
* Not available on all models
Page 105 of 346
104Controls
Setting the ClockClockYou can adjust the time in the clock display, using the CLOCK knob with the ignition
switch in ON
(w.
1.Press the CLOCK knob to access the clock
adjustment mode screen.
2.Turn the CLOCK knob to adjust the hours.
3.Press the CLOCK knob. The display
switches to minute adjustment.
4.Turn the CLOCK knob to adjust the
minutes.
5.Press the CLOCK knob to complete clock
adjustment.
Models without navigation system
1Clock
You can customize the clock display to show the 12
hour clock or 24 hour clock.
2Customized Features P. 91
The clock is automatically updated through the
navigation system, so the time does not need to be
adjusted.Models with navigation system
CLOCK Knob