Page 221 of 346
uuWhen DrivinguShifting
220Driving
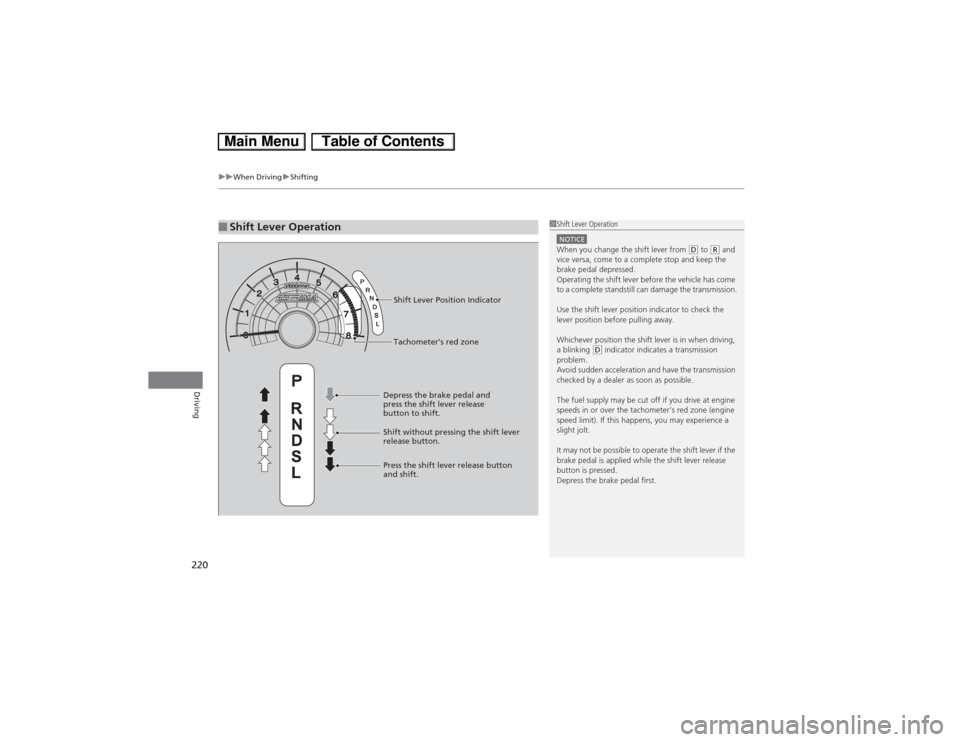
■Shift Lever Operation
1Shift Lever OperationNOTICEWhen you change the shift lever from
(D to (R and
vice versa, come to a complete stop and keep the
brake pedal depressed.
Operating the shift lever before the vehicle has come
to a complete standstill can damage the transmission.
Use the shift lever position indicator to check the
lever position before pulling away.
Whichever position the shift lever is in when driving,
a blinking
(D indicator indicates a transmission
problem.
Avoid sudden acceleration and have the transmission
checked by a dealer as soon as possible.
The fuel supply may be cut off if you drive at engine
speeds in or over the tachometer’s red zone (engine
speed limit). If this happens, you may experience a
slight jolt.
It may not be possible to operate the shift lever if the
brake pedal is applied while the shift lever release
button is pressed.
Depress the brake pedal first.
Tachometer’s red zone Shift Lever Position Indicator
Depress the brake pedal and
press the shift lever release
button to shift.
Shift without pressing the shift lever
release button.
Press the shift lever release button
and shift.
Page 224 of 346
Continued
223
uuWhen DrivinguAuto Idle Stop
Driving
The vehicle stops with the shift lever in
(D and the brake pedal depressed.
■Auto idle stop does not activate when:
•The low temperature indicator is on.
•The IMA battery charge is low.
•The bars of the electric motor power flow monitor do not move when
accelerating or decelerating.
•The transmission fluid temperature is low.
•The vehicle comes to a stop again before the vehicle speed reaches 9 mph (15
km/h) after the engine starts.
•Stopped on a steep incline.
•The shift lever is in a position other than
(D or
(N.
■Auto idle stop may not activate when:
•Even if the set temperature and the actual interior temperature are around the
same ambient conditions (strong sunlight, high or low temperature, etc.) can
prevent Auto Idle Stop from activating.
•The vehicle is stopped by braking suddenly.■Auto Idle Stop Activates When:
1Auto Idle Stop Activates When:
The Auto Idle Stop may also activate when the brake
pedal is depressed, and the vehicle slows down to a
speed below 6 mph (10 km/h).
Page 225 of 346
224
uuWhen DrivinguAuto Idle Stop
Driving
The brake pedal is released.■The engine restarts even if the brake pedal is depressed when:
•The shift position is changed to
(R or
(L.
•The accelerator pedal is depressed.
•The pressure to the brake pedal is reduced and the vehicle starts moving while
stopped on an incline.
•The IMA battery charge becomes low.
•The low temperature indicator comes on.
•Ambient conditions that may differentiate the interior temperature from the set
temperature can also be the cause to start the engine.
■The Engine Automatically Restarts When:
Page 226 of 346
225
uuWhen DrivinguCruise Control
Continued
Driving
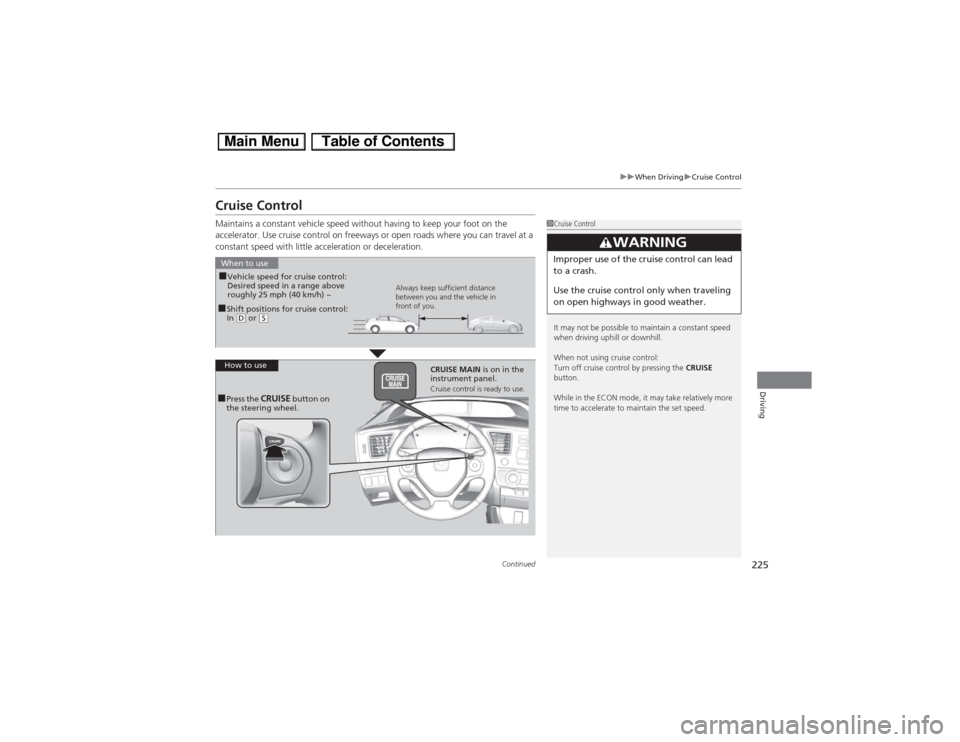
Cruise ControlMaintains a constant vehicle speed without having to keep your foot on the
accelerator. Use cruise control on freeways or open roads where you can travel at a
constant speed with little acceleration or deceleration.
1Cruise Control
It may not be possible to maintain a constant speed
when driving uphill or downhill.
When not using cruise control:
Turn off cruise control by pressing the CRUISE
button.
While in the ECON mode, it may take relatively more
time to accelerate to maintain the set speed.
3
WARNING
Improper use of the cruise control can lead
to a crash.
Use the cruise control only when traveling
on open highways in good weather.
■Shift positions for cruise control:
In (D or
(S
When to use
Always keep sufficient distance
between you and the vehicle in
front of you.
■Vehicle speed for cruise control:
Desired speed in a range above
roughly 25 mph (40 km/h) ~
How to use
CRUISE MAIN is on in the
instrument panel.
Cruise control is ready to use.
■Press the
CRUISE
button on
the steering wheel.
Page 242 of 346
241
uuBrakinguBrake System
Driving
Your vehicle is equipped with front disc brakes. The brakes on the rear wheels are
drum. A vacuum power assist helps reduce the effort needed on the brake pedal.
The brake assist system increases the stopping force when you depress the brake
pedal hard in an emergency situation. The anti-lock brake system (ABS) helps you
retain steering control when braking very hard.2Brake Assist System P. 243
2Anti-lock Brake System (ABS) P. 242■Foot Brake
1Foot Brake
Check the brakes after driving through deep water,
or if there is a buildup of road surface water. If
necessary, dry the brakes by lightly depressing the
pedal several times.
If you hear a continuous metallic friction sound when
applying the brakes, the brake pads need to be
replaced. Have the vehicle checked by a dealer.
Constantly using the brake pedal while going down a
long hill builds up heat, which reduces the brake
effectiveness. Apply engine braking by taking your
foot off the accelerator pedal and downshifting to a
lower speed position.
Do not rest your foot on the brake pedal while
driving, as it will lightly apply the brakes and cause
them to lose effectiveness over time and reduce pad
life. It will also confuse drivers behind you.
Page 245 of 346
244Driving
Parking Your VehicleWhen Stopped1.Depress the brake pedal firmly.
2.Firmly apply the parking brake.
3.Move the shift lever from
(D to
(P.
4.Turn off the engine.
Always set the parking brake firmly, in particular if you are parked on an incline.
1Parking Your Vehicle
Do not park your vehicle near flammable objects,
such as dry grass, oil, or timber.
Heat from the exhaust can cause a fire.1When StoppedNOTICEThe following can damage the transmission:•Depressing the accelerator and brake pedals
simultaneously.•Holding the vehicle in place when facing uphill by
depressing the accelerator pedal.•Moving the shift lever into
(P before the vehicle
stops completely.
Raise the wiper arms when snow is expected.
Page 246 of 346
245Driving
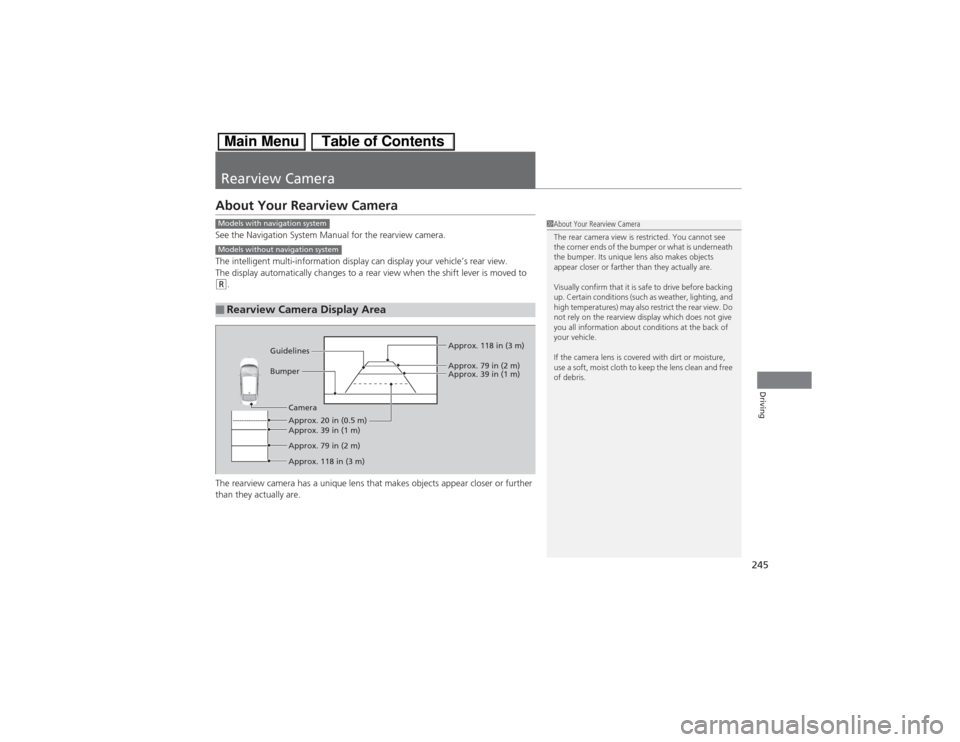
Rearview CameraAbout Your Rearview CameraSee the Navigation System Manual for the rearview camera.
The intelligent multi-information display can display your vehicle’s rear view.
The display automatically changes to a rear view when the shift lever is moved to (R.
The rearview camera has a unique lens that makes objects appear closer or further
than they actually are.■Rearview Camera Display Area
1About Your Rearview Camera
The rear camera view is restricted. You cannot see
the corner ends of the bumper or what is underneath
the bumper. Its unique lens also makes objects
appear closer or farther than they actually are.
Visually confirm that it is safe to drive before backing
up. Certain conditions (such as weather, lighting, and
high temperatures) may also restrict the rear view. Do
not rely on the rearview display which does not give
you all information about conditions at the back of
your vehicle.
If the camera lens is covered with dirt or moisture,
use a soft, moist cloth to keep the lens clean and free
of debris.
Models with navigation systemModels without navigation system
Guidelines
Bumper
Camera
Approx. 20 in (0.5 m)
Approx. 39 in (1 m)
Approx. 79 in (2 m)
Approx. 118 in (3 m)Approx. 118 in (3 m)
Approx. 39 in (1 m) Approx. 79 in (2 m)
Page 296 of 346

295
Handling the Unexpected
This chapter explains how to handle unexpected troubles.
Tools
Types of Tools .................................. 296
If a Tire Goes Flat
Temporarily Repairing a Flat Tire....... 297
Changing a Flat Tire ......................... 305
Engine Does Not Start
Checking the Engine ........................ 311
Jump Starting.................................... 312
Shift Lever Does Not Move.............. 314
Overheating
How to Handle Overheating ............. 315Indicator, Coming On/Blinking
If the Low Oil Pressure Indicator Comes
On................................................ 317If the 12 Volt Battery Charging System
Indicator Comes On ....................... 317
If the Malfunction Indicator Lamp Comes
On or Blinks ..................................... 318
If the Brake System Indicator (Red) Comes
On...................................................... 319If the EPS System Indicator Comes On .. 319If the IMA Indicator Comes On......... 320If the Low Tire Pressure/TPMS Indicator
Comes On or Blinks ....................... 320
Fuses
Fuse Locations ................................. 321
Inspecting and Changing Fuses ........ 323
Emergency Towing........................... 324