2013 FORD TRANSIT CONNECT ignition
[x] Cancel search: ignitionPage 170 of 321

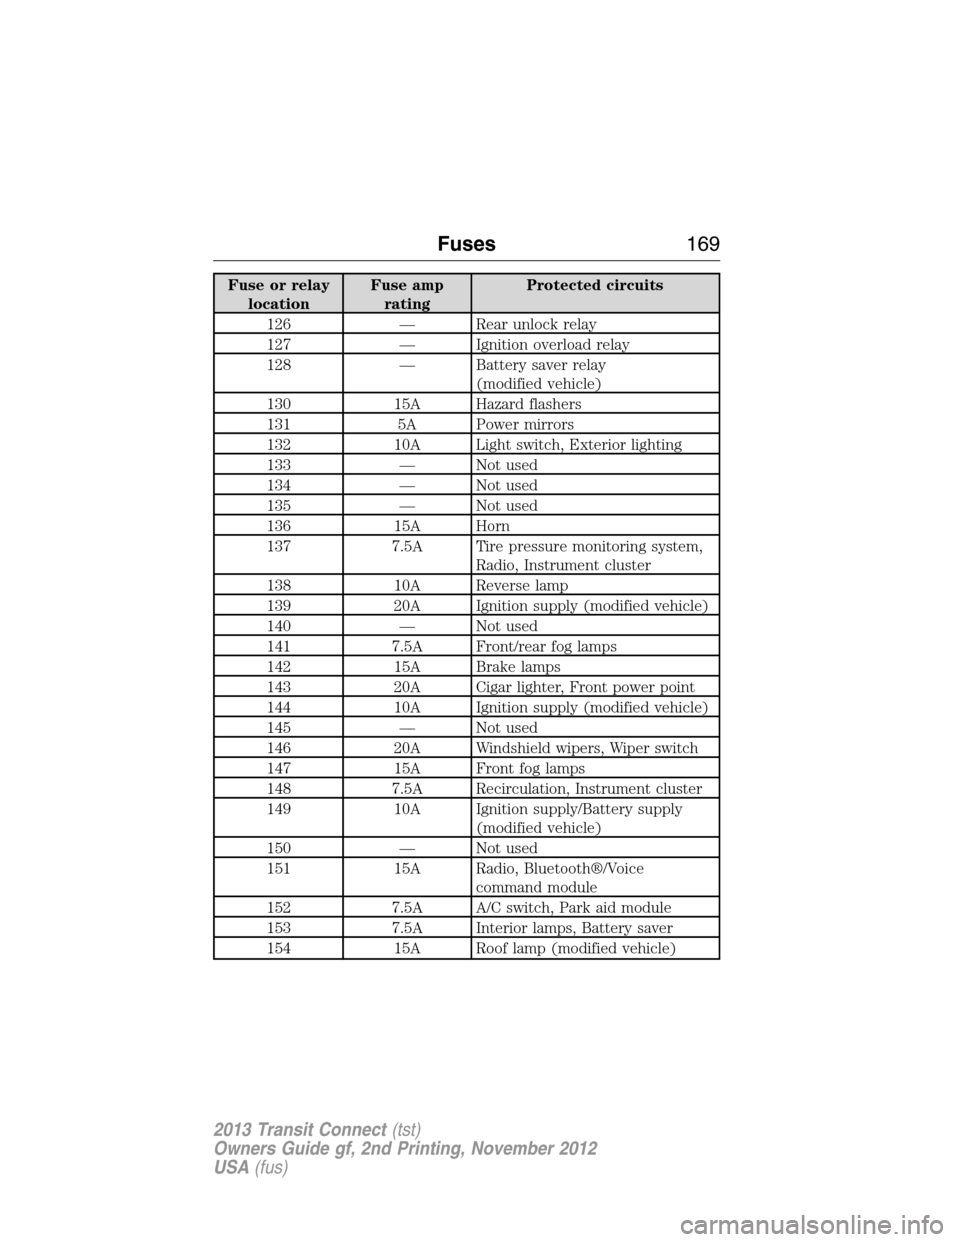
Fuse or relay
locationFuse amp
ratingProtected circuits
126 — Rear unlock relay
127 — Ignition overload relay
128 — Battery saver relay
(modified vehicle)
130 15A Hazard flashers
131 5A Power mirrors
132 10A Light switch, Exterior lighting
133 — Not used
134 — Not used
135 — Not used
136 15A Horn
137 7.5A Tire pressure monitoring system,
Radio, Instrument cluster
138 10A Reverse lamp
139 20A Ignition supply (modified vehicle)
140 — Not used
141 7.5A Front/rear fog lamps
142 15A Brake lamps
143 20A Cigar lighter, Front power point
144 10A Ignition supply (modified vehicle)
145 — Not used
146 20A Windshield wipers, Wiper switch
147 15A Front fog lamps
148 7.5A Recirculation, Instrument cluster
149 10A Ignition supply/Battery supply
(modified vehicle)
150 — Not used
151 15A Radio, Bluetooth®/Voice
command module
152 7.5A A/C switch, Park aid module
153 7.5A Interior lamps, Battery saver
154 15A Roof lamp (modified vehicle)
Fuses169
2013 Transit Connect(tst)
Owners Guide gf, 2nd Printing, November 2012
USA(fus)
Page 204 of 321

WAXING
•Wash the vehicle first.
•Use a quality wax that does not contain abrasives.
•Do not allow paint sealant to come in contact with any non-body
(low-gloss black) colored trim, such as grained door handles, roof
racks, bumpers, side moldings, mirror housings or the windshield cowl
area. The paint sealant will grey or stain the parts over time.
REPAIRING MINOR PAINT DAMAGE
Your authorized dealer has touch-up paint to match your vehicle’s color.
Take your color code (printed on a sticker in the driver’s door jamb) to
your authorized dealer to make sure you get the correct color.
•Remove particles, such as bird droppings, tree sap, insect deposits, tar
spots, road salt and industrial fallout, before repairing paint chips.
•Always read the instructions before using the products.
CLEANING THE ENGINE
Engines are more efficient when they are clean because grease and dirt
buildup keep the engine warmer than normal.
When washing:
•Take care when using a power washer to clean the engine. The
high-pressure fluid could penetrate the sealed parts and cause
damage.
•Do not spray a hot engine with cold water to avoid cracking the
engine block or other engine components.
•Spray Motorcraft® Engine Shampoo and Degreaser on all parts that
require cleaning and pressure rinse clean. In Canada, use Motorcraft®
Engine Shampoo.
•Never wash or rinse the engine while it is hot or running; water in the
running engine may cause internal damage.
•Never wash or rinse any ignition coil, spark plug wire or spark plug
well, or the area in and around these locations.
•Cover the battery, power distribution box, and air filter assembly to
prevent water damage when cleaning the engine.
Vehicle Care203
2013 Transit Connect(tst)
Owners Guide gf, 2nd Printing, November 2012
USA(fus)
Page 234 of 321

Tire pressure monitoring system reset procedure
WARNING:To determine the required pressure for your vehicle,
refer to the Safety Compliance Certification Label or Tire Label
located on the B-Pillar or the edge of the driver’s door. SeeVehicle
loadingin this chapter for more information.
Note:The system reset procedure needs to be performed after each tire
rotation.
Overview
To provide the vehicle’s load carrying capability, this vehicle requires
different recommended tire pressures in the front tires as compared to
the rear tires. The tire pressure monitoring system equipped on these
vehicles is designed to illuminate the low tire pressure warning light at
two different pressures; one for the front tires and one for the rear tires.
Since tires need to be rotated to provide consistent performance and
maximum tire life, the tire pressure monitoring system needs to know
when the tires are rotated to determine which set of tires are on the
front and which are on the rear. With this information, the system can
detect and properly warn of low tire pressures.
System reset tips:
•To reduce the chances of interference from another vehicle, the
system reset procedure should be performed at least three feet
(one meter) away from another Ford Motor Company vehicle
undergoing the system reset procedure at the same time.
•Do not wait more than two minutes between resetting each tire sensor
or the system will time-out and the entire procedure will have to be
repeated on all four wheels.
•A double horn chirp indicates the need to repeat the procedure.
Performing the system reset procedure
Read the entire procedure before attempting.
1. Drive the vehicle above 20 mph (32 km/h) for at least two minutes
and then park in a safe location where you can easily get to all four tires
and have access to an air pump.
2. Place the ignition in the off position and keep the key in the ignition.
3. Cycle the ignition to the on position with the engine off.
4. Turn the hazard flashers on then off three times. This must be
accomplished within 10 seconds.
Wheels and Tires233
2013 Transit Connect(tst)
Owners Guide gf, 2nd Printing, November 2012
USA(fus)
Page 235 of 321

If the reset mode has been entered successfully, the horn will sound
once and the system indicator will flash. If this does not occur, please try
again starting at step 2.
If after repeated attempts to enter the reset mode, the horn does not
sound and the system indicator does not flash, seek service from your
authorized dealer.
5.Note:Train the system sensors in the tires using the following system
reset sequence starting with the left front tire in the following clockwise
order:
•Left front (Driver’s side front tire)
•Right front (Passenger’s side front tire)
•Right rear (Passenger’s side rear tire)
•Left rear (Driver’s side rear tire)
6. Remove the valve cap from the valve stem on the left front tire;
decrease the air pressure until the horn sounds.
Note:The single horn chirp confirms that the sensor identification code
has been learned by the module for this position. If a double horn is
heard, the reset procedure was unsuccessful, and must be repeated.
7. Remove the valve cap from the valve stem on the right front tire;
decrease the air pressure until the horn sounds.
8. Remove the valve cap from the valve stem on the right rear tire;
decrease the air pressure until the horn sounds.
9. Remove the valve cap from the valve stem on the left rear tire;
decrease the air pressure until the horn sounds.
Training is complete after the horn sounds for the last tire trained
(driver’s side rear tire) and the system indicator stops flashing.
10. Turn the ignition off. If two short horn beeps are heard, the reset
procedure was unsuccessful and must be repeated.
If after repeating the procedure and two short beeps are heard when the
ignition is turned to off, seek assistance from your authorized dealer.
11. Set all four tires to the recommended air pressure as indicated on
the Safety Compliance Certification Label or Tire Label located on the
B-Pillar or the edge of the driver’s door.
234Wheels and Tires
2013 Transit Connect(tst)
Owners Guide gf, 2nd Printing, November 2012
USA(fus)
Page 244 of 321

ENGINE SPECIFICATIONS
Engine 2.0L I4 engine
Cubic inches 121
Required fuel Minimum 87 octane
Firing order 1–3–4–2
Ignition system C.O.P
Compression ratio 10.0:1
Spark plug gap .051 inch +/- .002
(1.3 mm +/- .05)
Engine drivebelt routing
Capacities and Specifications243
2013 Transit Connect(tst)
Owners Guide gf, 2nd Printing, November 2012
USA(fus)
Page 276 of 321

•Speak naturally, without long pauses between words.
•At any time you can interrupt the system while it is speaking by
pressing the voice icon.
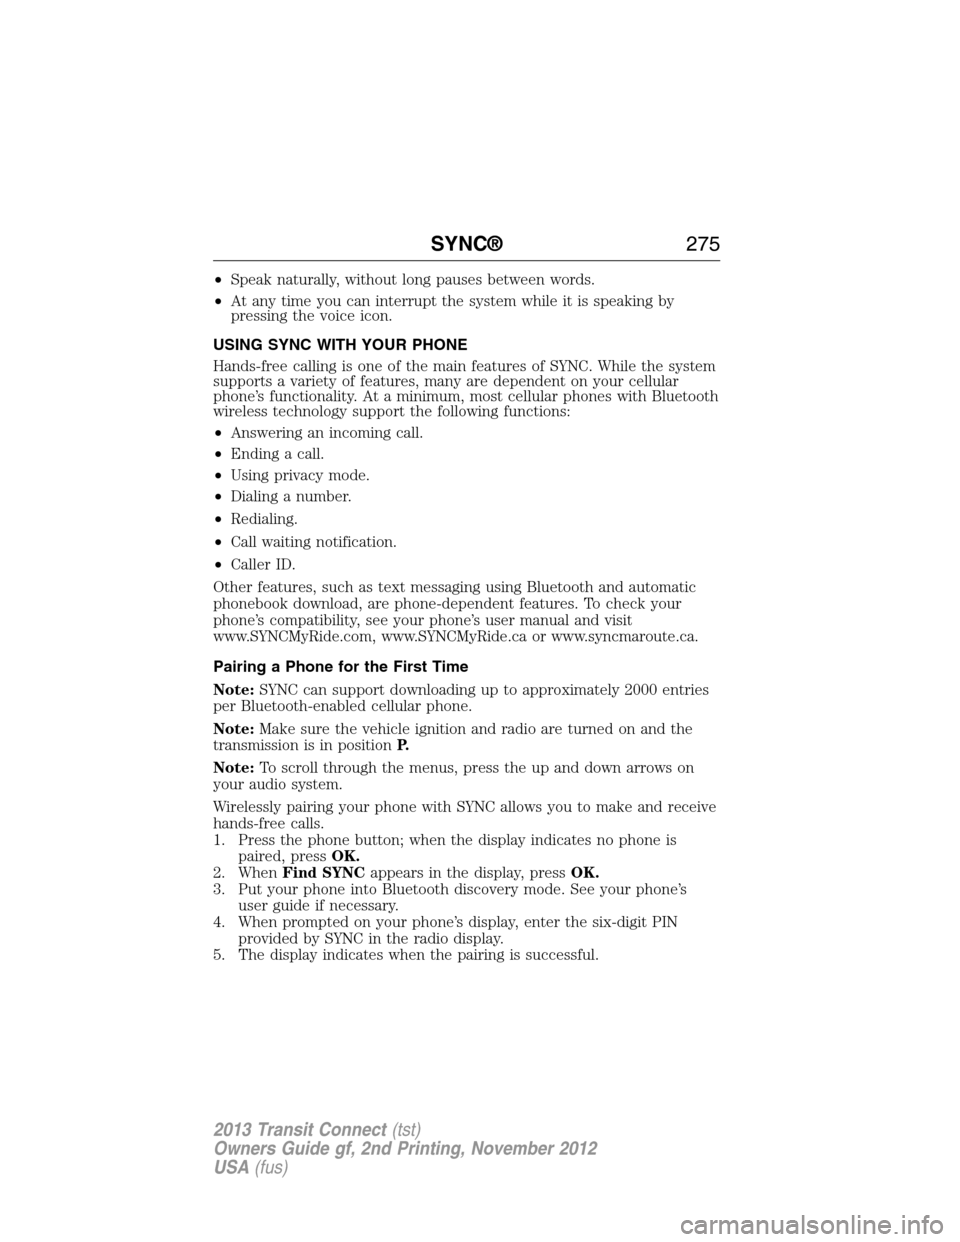
USING SYNC WITH YOUR PHONE
Hands-free calling is one of the main features of SYNC. While the system
supports a variety of features, many are dependent on your cellular
phone’s functionality. At a minimum, most cellular phones with Bluetooth
wireless technology support the following functions:
•Answering an incoming call.
•Ending a call.
•Using privacy mode.
•Dialing a number.
•Redialing.
•Call waiting notification.
•Caller ID.
Other features, such as text messaging using Bluetooth and automatic
phonebook download, are phone-dependent features. To check your
phone’s compatibility, see your phone’s user manual and visit
www.SYNCMyRide.com, www.SYNCMyRide.ca or www.syncmaroute.ca.
Pairing a Phone for the First Time
Note:SYNC can support downloading up to approximately 2000 entries
per Bluetooth-enabled cellular phone.
Note:Make sure the vehicle ignition and radio are turned on and the
transmission is in positionP.
Note:To scroll through the menus, press the up and down arrows on
your audio system.
Wirelessly pairing your phone with SYNC allows you to make and receive
hands-free calls.
1. Press the phone button; when the display indicates no phone is
paired, pressOK.
2. WhenFind SYNCappears in the display, pressOK.
3. Put your phone into Bluetooth discovery mode. See your phone’s
user guide if necessary.
4. When prompted on your phone’s display, enter the six-digit PIN
provided by SYNC in the radio display.
5. The display indicates when the pairing is successful.
SYNC®275
2013 Transit Connect(tst)
Owners Guide gf, 2nd Printing, November 2012
USA(fus)
Page 277 of 321

Depending on your phone’s capability and your market, the system may
prompt you with questions such as setting the current phone as the
primary phone (the phone SYNC automatically tries to connect with first
upon vehicle start-up), downloading your phone book, etc.
Pairing Subsequent Phones
Note:To scroll through the menus, press the up and down arrows on
your audio system.
Note:Make sure the vehicle ignition and radio are turned on and that
the transmission is in positionP.
1. Press the phone button and scroll until System Settings is selected.
2. Press OK and scroll until Bluetooth Devices is selected and press OK.
3. Scroll until Add Bluetooth Device is selected and press OK.
4. When Find SYNC appears in the display, press OK.
5. Put your phone into Bluetooth discovery mode. See your phone’s
user guide if necessary.
6. When prompted on your phone’s display, enter the six-digit PIN
provided by SYNC in the radio display. The display indicates when
the pairing is successful.
7. The system then prompts with questions such as if you would like to
set the current phone as the primary phone (the phone SYNC
automatically tries to connect with first upon vehicle start-up),
download your phone book, etc.
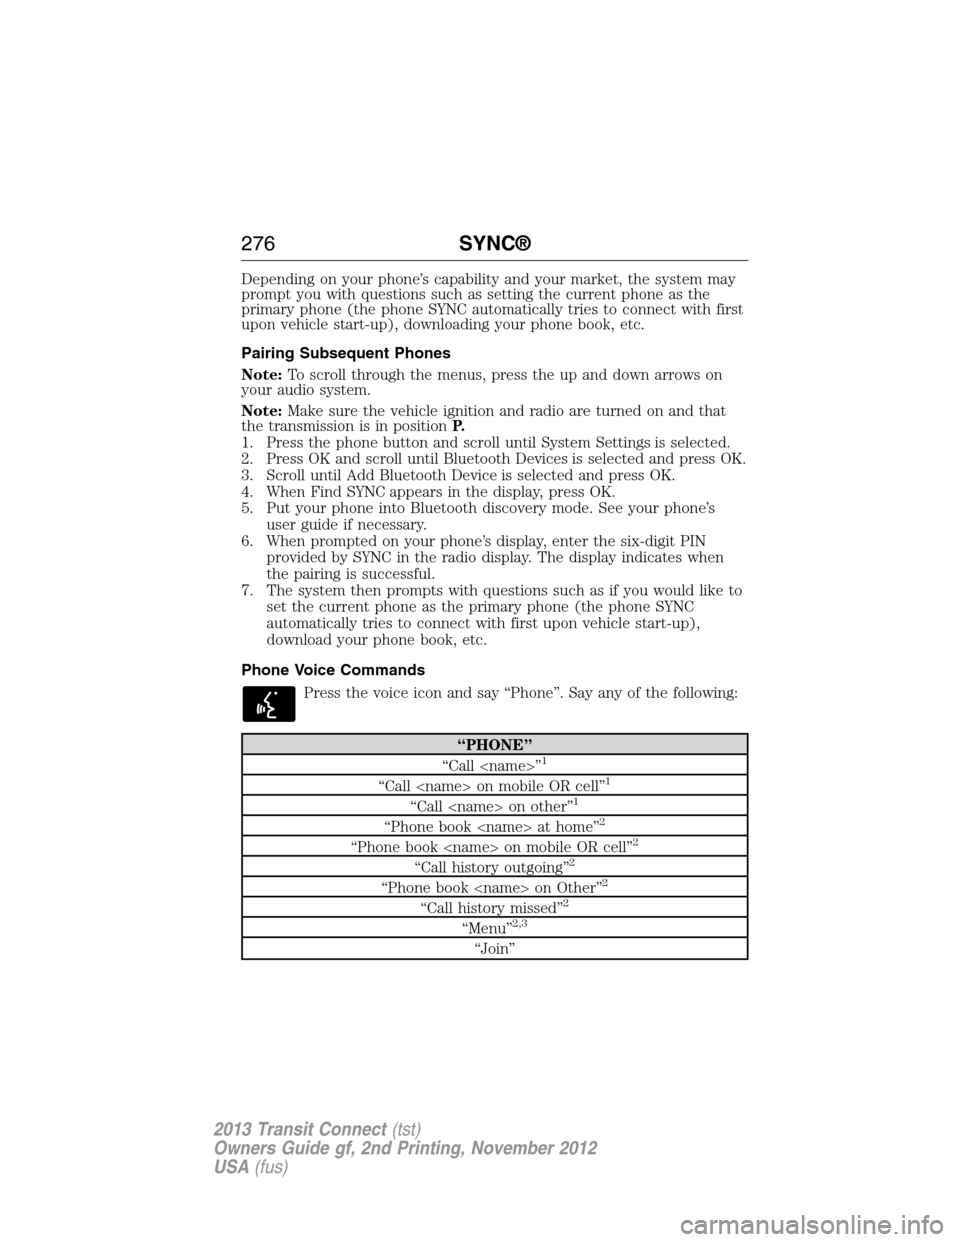
Phone Voice Commands
Press the voice icon and say “Phone”. Say any of the following:
“PHONE”
“Call
“Call
“Call
“Phone book
“Phone book
“Call history outgoing”2
“Phone book
“Call history missed”2
“Menu”2,3
“Join”
276SYNC®
2013 Transit Connect(tst)
Owners Guide gf, 2nd Printing, November 2012
USA(fus)
Page 284 of 321

Note:SYNC does not automatically download all of your unread text
messages at every ignition cycle (as it does with call history and
phonebook if automatic download is set to on).
Returnexits the current menu when you press OK.
If you selectSend Text Message?:
1. Press OK to select. If the system detects your phone does not
support this feature, Unsupported appears in the display and SYNC
returns to the main menu.
2. Scroll to cycle through the message options in the following chart.
3. Press OK when the desired selection is in the display. The system
now needs to know who to send the message to.
4. Scroll to cycle through Phonebook or Call History entries. You can
also select Enter Number to audibly enter a desired number.
5. Press OK to enter the desired menu and scroll to select the specific
contact.
6. Press OK when the contact appears and press OK again to confirm
when the system asks if you would like to send the message. Each
text message is sent with the following signature: “This message was
sent from my
Pre-defined text message options
Can’t talk right now
Call me
Call you later
Be there in 10 minutes
Be there in 20 minutes
Ye s
No
Why?
Thanks
Where R you?
I need more directions
I love you
Too funny
Can’t wait to see you
I’m stuck in traffic
SYNC®283
2013 Transit Connect(tst)
Owners Guide gf, 2nd Printing, November 2012
USA(fus)