2013 FORD FUSION (AMERICAS) brake
[x] Cancel search: brakePage 249 of 458
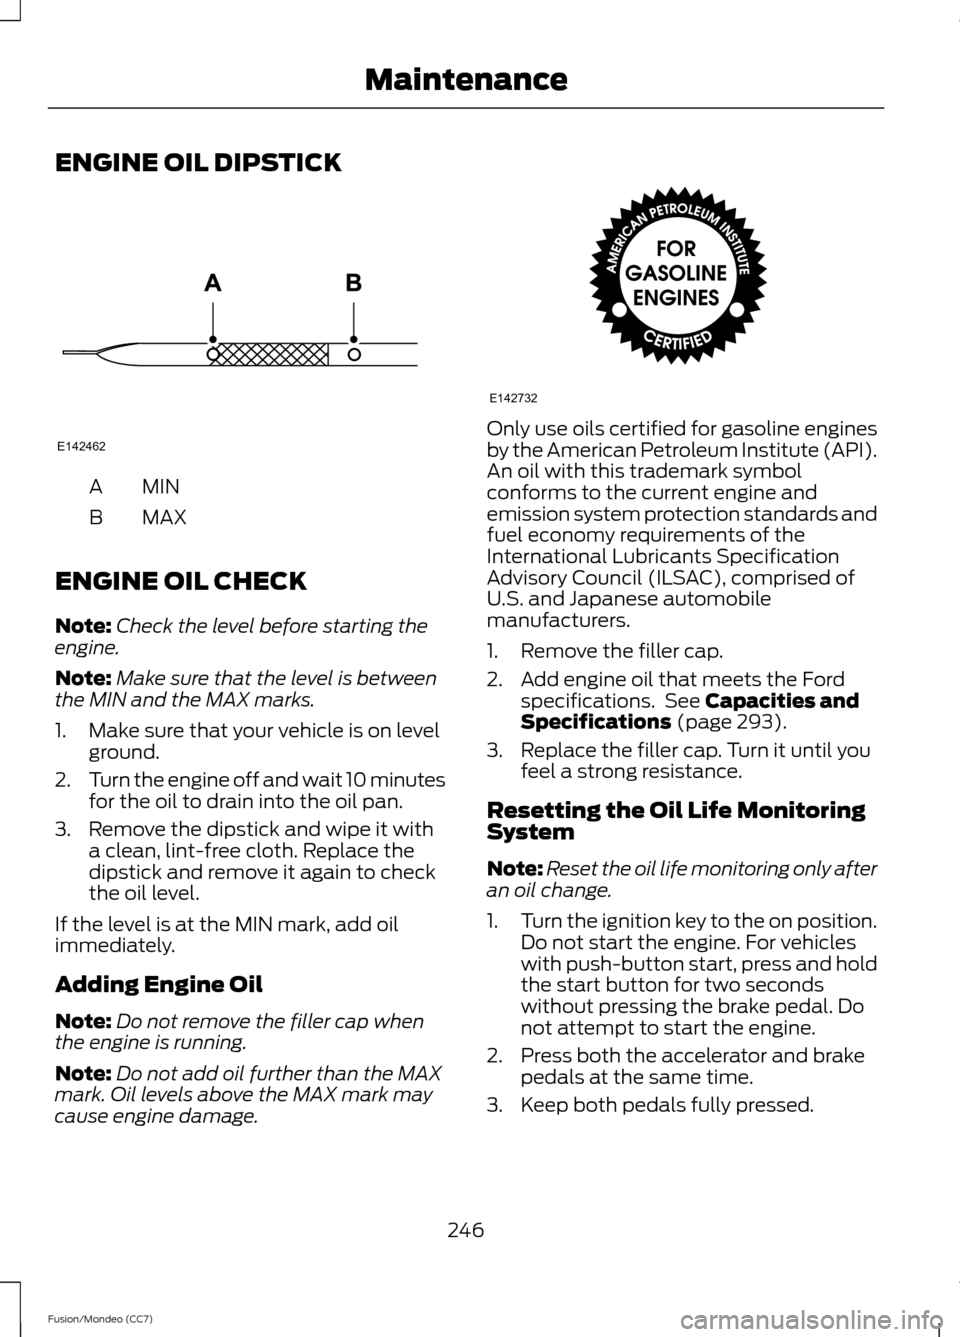
ENGINE OIL DIPSTICK
MINA
MAX
B
ENGINE OIL CHECK
Note: Check the level before starting the
engine.
Note: Make sure that the level is between
the MIN and the MAX marks.
1. Make sure that your vehicle is on level ground.
2. Turn the engine off and wait 10 minutes
for the oil to drain into the oil pan.
3. Remove the dipstick and wipe it with a clean, lint-free cloth. Replace the
dipstick and remove it again to check
the oil level.
If the level is at the MIN mark, add oil
immediately.
Adding Engine Oil
Note: Do not remove the filler cap when
the engine is running.
Note: Do not add oil further than the MAX
mark. Oil levels above the MAX mark may
cause engine damage. Only use oils certified for gasoline engines
by the American Petroleum Institute (API).
An oil with this trademark symbol
conforms to the current engine and
emission system protection standards and
fuel economy requirements of the
International Lubricants Specification
Advisory Council (ILSAC), comprised of
U.S. and Japanese automobile
manufacturers.
1. Remove the filler cap.
2. Add engine oil that meets the Ford
specifications. See Capacities and
Specifications (page 293).
3. Replace the filler cap. Turn it until you feel a strong resistance.
Resetting the Oil Life Monitoring
System
Note: Reset the oil life monitoring only after
an oil change.
1. Turn the ignition key to the on position.
Do not start the engine. For vehicles
with push-button start, press and hold
the start button for two seconds
without pressing the brake pedal. Do
not attempt to start the engine.
2. Press both the accelerator and brake pedals at the same time.
3. Keep both pedals fully pressed.
246
Fusion/Mondeo (CC7) MaintenanceE142462 E142732
Page 250 of 458

4. After three seconds, the Service: Oil
reset in prog. message will be
displayed.
5. After 25 seconds, the Service: Oil reset
complete message will be displayed.
6. Release both the accelerator and brake
pedals.
7. The Service: Oil reset complete message will no longer be displayed.
8. Rotate the key to the off position. For vehicles with push-button start, press
the start button to turn the vehicle off
completely.
ENGINE COOLANT CHECK
Checking the Engine Coolant
When the engine is cold, check the
concentration and level of the engine
coolant at the intervals listed in the
scheduled maintenance information. See
Capacities and Specifications (page
293).
Note: Make sure that the level is between
the MIN and MAX marks on the coolant
reservoir.
Note: Coolant expands when it is hot. The
level may extend beyond the MAX mark
Note: If the level is at the MIN mark, below
the MIN mark, or empty, add coolant
immediately. See
Adding Engine Coolant
in this chapter.
The coolant concentration should be
maintained within 48% to 50%, which
equates to a freeze point between -30 F
degrees (-34 C) and -34 F (-37 C). Note:
For best results, coolant
concentration should be tested with a
refractometer such as Rotunda tool
300-ROB75240 available from your
authorized dealer. Ford does not
recommend the use of hydrometers or
coolant test strips for measuring coolant
concentrations.
Note: Automotive fluids are not
interchangeable. Do not use engine coolant
or antifreeze or windshield washer fluid
outside of its specified function and vehicle
location.
Adding Engine Coolant WARNINGS
Do not add engine coolant when the
engine is hot. Steam and scalding
liquids released from a hot cooling
system can burn you badly. Also, you can
be burned if you spill coolant on hot engine
parts. Do not put engine coolant in the
windshield washer fluid container. If
sprayed on the windshield, engine
coolant could make it difficult to see
through the windshield. To reduce the risk of personal injury,
make sure the engine is cool before
unscrewing the coolant pressure
relief cap. The cooling system is under
pressure; steam and hot liquid can come
out forcefully when the cap is loosened
slightly. Do not add coolant further than the
MAX mark.
Note:
Do not use stop leak pellets, cooling
system sealants, or additives as they can
cause damage to the engine cooling or
heating systems. This damage would not
be covered under your vehicle ’s warranty.
247
Fusion/Mondeo (CC7) Maintenance
Page 252 of 458

Vehicles driven year-round in non-extreme
climates should use prediluted engine
coolant for optimum cooling system and
engine protection.
What you Should Know About Fail-
Safe Cooling
If the engine coolant supply is depleted,
this feature allows the vehicle to be driven
temporarily before incremental component
damage is incurred. The
“fail-safe”
distance depends on ambient
temperatures, vehicle load and terrain.
How Fail-Safe Cooling Works
If the engine begins to overheat, the engine
coolant temperature gauge will move to
the red (hot) area and: A high engine temperature
message will appear in the
information display.
The service engine soon
indicator will illuminate.
If the engine reaches a preset
over-temperature condition, the engine
will automatically switch to alternating
cylinder operation. Each disabled cylinder
acts as an air pump and cools the engine.
When this occurs the vehicle will still
operate. However:
• The engine power will be limited.
• The air conditioning system will be
disabled.
Continued operation will increase the
engine temperature and the engine will
completely shut down, causing steering
and braking effort to increase.
Once the engine temperature cools, the
engine can be re-started. Take your vehicle
to an authorized dealer as soon as possible
to minimize engine damage. When Fail-Safe Mode Is Activated WARNINGS
Fail-safe mode is for use during
emergencies only. Operate the
vehicle in fail-safe mode only as long
as necessary to bring the vehicle to rest in
a safe location and seek immediate repairs.
When in fail-safe mode, the vehicle will
have limited power, will not be able to
maintain high-speed operation, and may
completely shut down without warning,
potentially losing engine power, power
steering assist, and power brake assist,
which may increase the possibility of a
crash resulting in serious injury. Never remove the coolant reservoir
cap while the engine is running or hot.
You have limited engine power when in the
fail-safe mode, so drive the vehicle with
caution. The vehicle will not be able to
maintain high-speed operation and the
engine will run rough. Remember that the
engine is capable of completely shutting
down automatically to prevent engine
damage, therefore:
1. Pull off the road as soon as safely
possible and turn off the engine.
2. Arrange for the vehicle to be taken to an authorized dealer.
3. If this is not possible, wait a short period for the engine to cool.
4. Check the coolant level and replenish if low.
5. Re-start the engine and take your vehicle to an authorized dealer.
Note: Driving the vehicle without repairing
the engine problem increases the chance of
engine damage. Take your vehicle to an
authorized dealer as soon as possible.
249
Fusion/Mondeo (CC7) Maintenance
Page 253 of 458

AUTOMATIC TRANSMISSION
FLUID CHECK
Note:
Transmission fluid should be checked
by an authorized dealer. If required, fluid
should be added by an authorized dealer.
The automatic transmission does not have
a transmission fluid dipstick.
Have an authorized dealer check and
change the transmission fluid and filter at
the correct service interval. See
Scheduled Maintenance (page 428). Your
transmission does not consume fluid.
However, the fluid level should be checked
if the transmission is not working properly,
(i.e., if the transmission slips or shifts
slowly) or if you notice some sign of fluid
leakage.
Do not use supplemental transmission
fluid additives, treatments or cleaning
agents. The use of these materials may
affect transmission operation and result
in damage to internal transmission
components.
BRAKE FLUID CHECK
Note: The clutch and brake system can be
filled at the brake master cylinder reservoir.
Fluid levels between the MIN and MAX
lines are within the normal operating range;
there is no need to add fluid.
If the fluid levels are outside of the normal
operating range, the performance of the
system could be compromised; seek
service from your authorized dealer
immediately. POWER STEERING FLUID
CHECK
Your vehicle is equipped with an electric
power steering (EPS) system. There is no
fluid reservoir to check or fill.
FUEL FILTER
Your vehicle is equipped with a lifetime
fuel filter that is integrated with the fuel
tank. Regular maintenance or replacement
is not needed.
WASHER FLUID CHECK
WARNING
If you operate your vehicle in
temperatures below 40°F (5°C), use
washer fluid with antifreeze
protection. Failure to use washer fluid with
antifreeze protection in cold weather could
result in impaired windshield vision and
increase the risk of injury or accident. Add fluid to fill the reservoir if the level is
low. Only use a washer fluid that meets
Ford specifications. See
Capacities and
Specifications (page 293).
State or local regulations on volatile
organic compounds may restrict the use
of methanol, a common windshield washer
antifreeze additive. Washer fluids
containing non-methanol antifreeze
agents should be used only if they provide
cold weather protection without damaging
the vehicle ’s paint finish, wiper blades or
washer system.
250
Fusion/Mondeo (CC7) Maintenance
Page 255 of 458

presets, are also maintained in memory by
power from the low voltage battery. When
a technician disconnects and connects the
low voltage battery, these settings are
erased. Complete the following procedure
in order to restore the settings:
1. With the vehicle at a complete stop,
set the parking brake.
2. Shift the transmission into P.
3. Turn off all accessories.
4. Step on the brake pedal and start the vehicle.
5. Run the engine until it reaches normal operating temperature. While the
engine is warming up, complete the
following: Reset the clock. See Audio
System (page 105). Reset the power
windows bounce-back feature. See
Windows and Mirrors
(page 72).
Reset the radio station presets. See
Audio System
(page 105).
6. Allow the engine to idle for at least one
minute. If the engine turns off, step on
the accelerator to start the engine.
7. While the engine is running, step on the
brake pedal and shift the transmission
to N.
8. Allow the engine to run for at least one
minute by pressing on the accelerator
pedal.
9. Drive the vehicle at least 10 miles (16 kilometers) to completely relearn the
idle and fuel trim strategy.
Note: If you do not allow the engine to
relearn the idle and fuel trim strategy, the
idle quality of your vehicle may be adversely
affected until the engine computer
eventually relearns the idle trim and fuel
trim strategy. Note:
Always dispose of automotive
batteries in a responsible manner. Follow
your local authorized standards for disposal.
Call your local authorized recycling center
to find out more about recycling automotive
batteries.
Note: It is recommended that the negative
battery cable terminal be disconnected from
the battery if you plan to store your vehicle
for an extended period of time.
CHECKING THE WIPER
BLADES Run the tip of your fingers over the edge of
the blade to check for roughness.
Clean the wiper blades with washer fluid
or water applied with a soft sponge or
cloth.
CHANGING THE WIPER
BLADES
The wiper arms can be manually moved
when the ignition is off. This allows for ease
of blade replacement and cleaning under
the blades.
252
Fusion/Mondeo (CC7) MaintenanceE142463
Page 261 of 458
Replacing the Headlamp Bulbs
WARNING
Handle a halogen headlamp bulb
carefully and keep out of children
’s
reach. Grasp the bulb by only its
plastic base and do not touch the glass.
The oil from your hand could cause the
bulb to break the next time the headlamps
are operated. Note:
If the bulb is accidentally touched, it
should be cleaned with rubbing alcohol
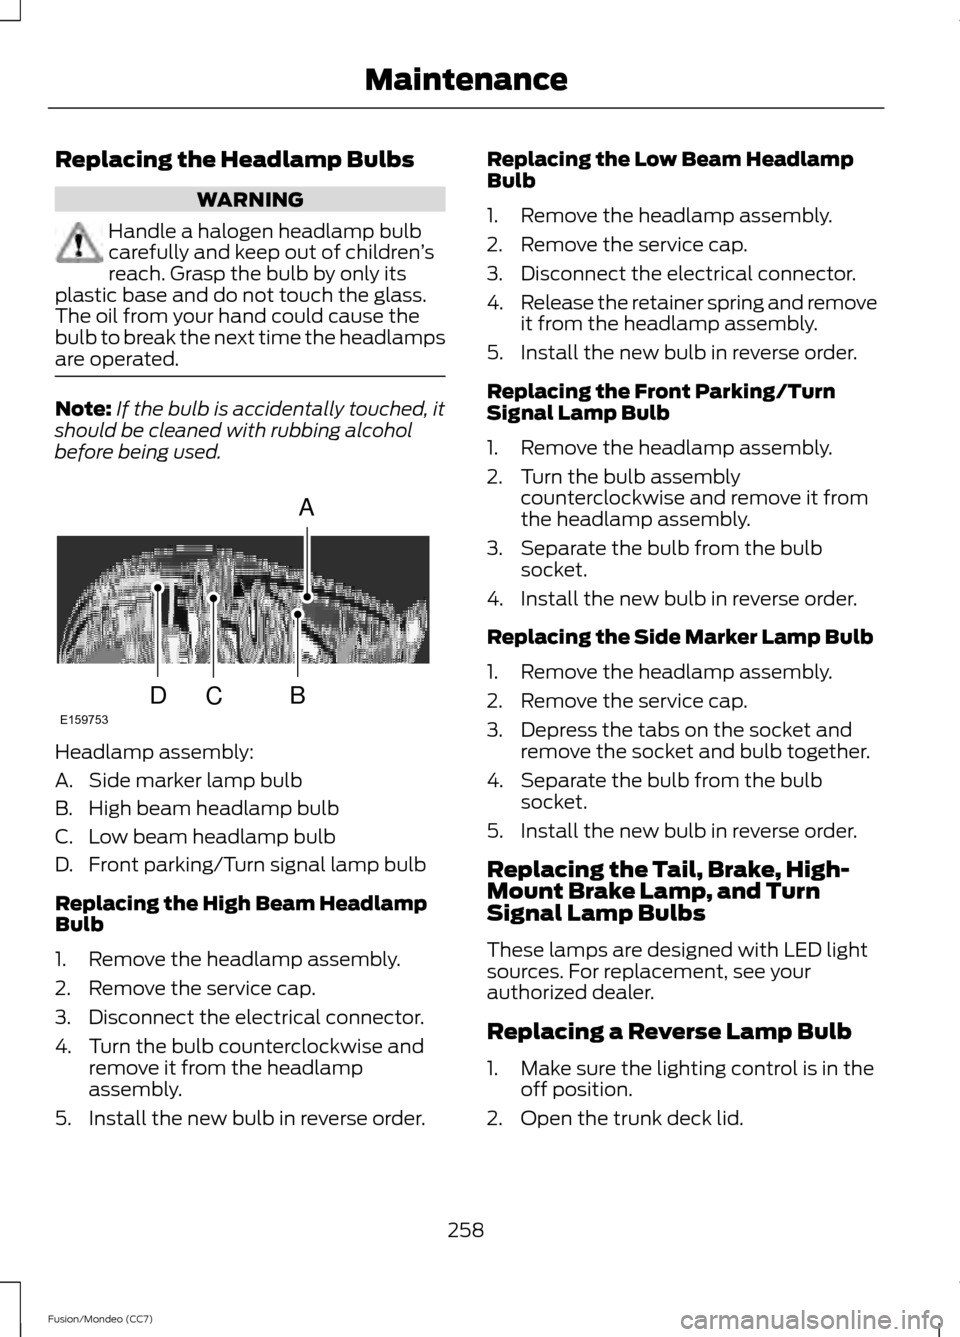
before being used. Headlamp assembly:
A. Side marker lamp bulb
B. High beam headlamp bulb
C. Low beam headlamp bulb
D. Front parking/Turn signal lamp bulb
Replacing the High Beam Headlamp
Bulb
1. Remove the headlamp assembly.
2. Remove the service cap.
3. Disconnect the electrical connector.
4. Turn the bulb counterclockwise and
remove it from the headlamp
assembly.
5. Install the new bulb in reverse order. Replacing the Low Beam Headlamp
Bulb
1. Remove the headlamp assembly.
2. Remove the service cap.
3. Disconnect the electrical connector.
4.
Release the retainer spring and remove
it from the headlamp assembly.
5. Install the new bulb in reverse order.
Replacing the Front Parking/Turn
Signal Lamp Bulb
1. Remove the headlamp assembly.
2. Turn the bulb assembly counterclockwise and remove it from
the headlamp assembly.
3. Separate the bulb from the bulb socket.
4. Install the new bulb in reverse order.
Replacing the Side Marker Lamp Bulb
1. Remove the headlamp assembly.
2. Remove the service cap.
3. Depress the tabs on the socket and remove the socket and bulb together.
4. Separate the bulb from the bulb socket.
5. Install the new bulb in reverse order.
Replacing the Tail, Brake, High-
Mount Brake Lamp, and Turn
Signal Lamp Bulbs
These lamps are designed with LED light
sources. For replacement, see your
authorized dealer.
Replacing a Reverse Lamp Bulb
1. Make sure the lighting control is in the off position.
2. Open the trunk deck lid.
258
Fusion/Mondeo (CC7) MaintenanceA
BCDE159753
Page 263 of 458
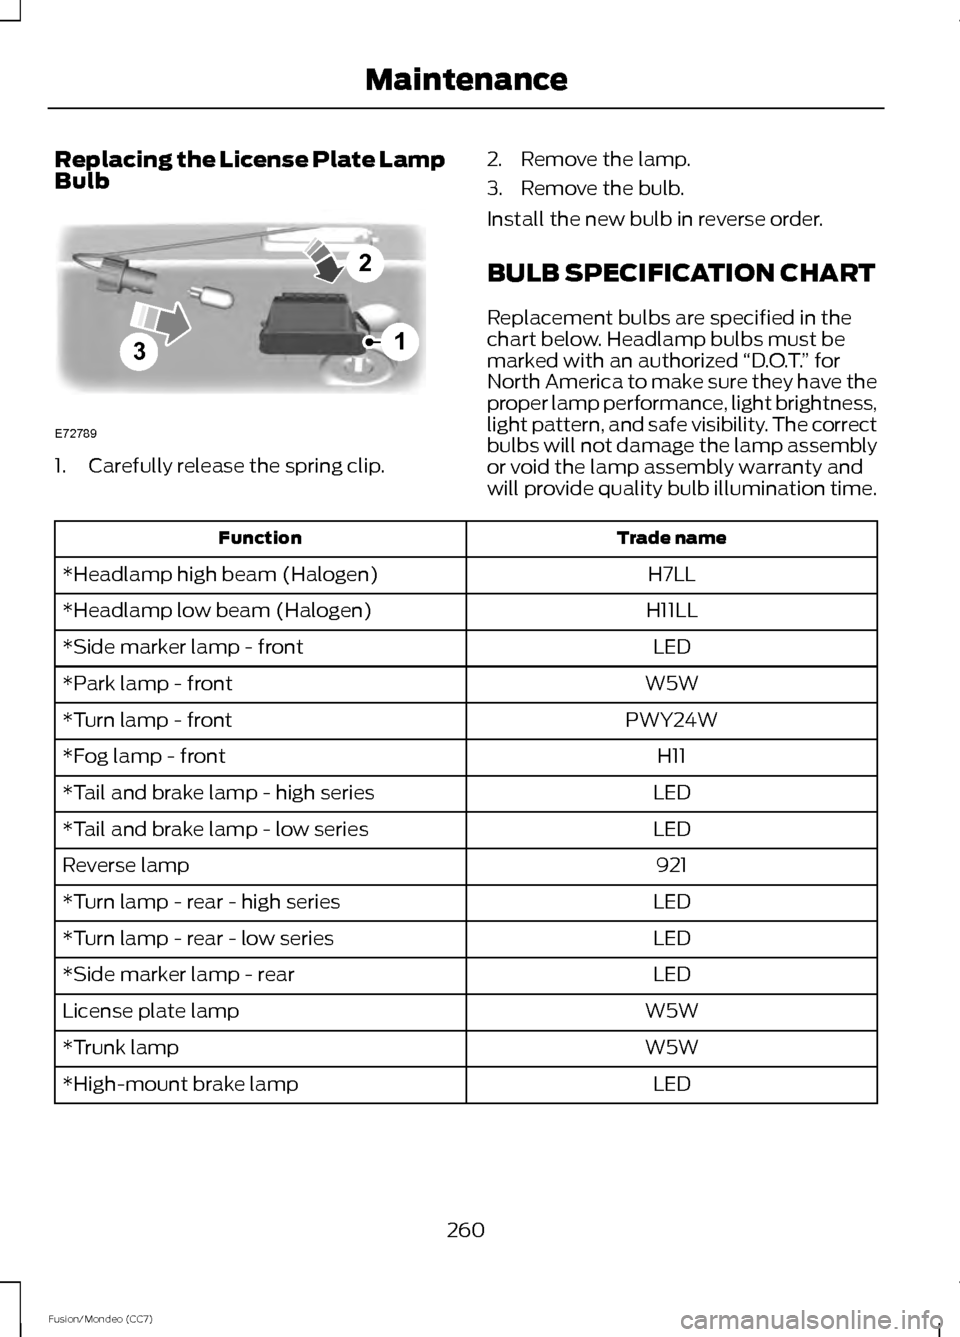
Replacing the License Plate Lamp
Bulb
1. Carefully release the spring clip.
2. Remove the lamp.
3. Remove the bulb.
Install the new bulb in reverse order.
BULB SPECIFICATION CHART
Replacement bulbs are specified in the
chart below. Headlamp bulbs must be
marked with an authorized
“D.O.T.” for
North America to make sure they have the
proper lamp performance, light brightness,
light pattern, and safe visibility. The correct
bulbs will not damage the lamp assembly
or void the lamp assembly warranty and
will provide quality bulb illumination time. Trade name
Function
H7LL
*Headlamp high beam (Halogen)
H11LL
*Headlamp low beam (Halogen)
LED
*Side marker lamp - front
W5W
*Park lamp - front
PWY24W
*Turn lamp - front
H11
*Fog lamp - front
LED
*Tail and brake lamp - high series
LED
*Tail and brake lamp - low series
921
Reverse lamp
LED
*Turn lamp - rear - high series
LED
*Turn lamp - rear - low series
LED
*Side marker lamp - rear
W5W
License plate lamp
W5W
*Trunk lamp
LED
*High-mount brake lamp
260
Fusion/Mondeo (CC7) Maintenance3
2
1
E72789
Page 269 of 458
4.
Remove the soaked cloth and if it is not
soiled badly, use this cloth to clean the
area by using a rubbing motion for 60
seconds.
5. Following this, wipe area dry with a clean, white, cotton cloth.
CLEANING LEATHER SEATS (IF
EQUIPPED)
For routine cleaning, wipe the surface with
a soft, damp cloth. For more thorough
cleaning, wipe the surface with a mild soap
and water solution. Dry the area with a soft
cloth. In Canada, use Motorcraft® Vinyl
Cleaner.
If the leather cannot be completely
cleaned using a mild soap and water
solution, the leather may be cleaned using
a commercially available leather cleaning
product designed for automotive interiors.
Note: To check for compatibility, first test
any cleaner or stain remover on an
inconspicuous part of the leather.
You should:
• remove dust and loose dirt with a
vacuum cleaner.
• clean spills and stains as quickly as
possible.
• To check for compatibility, first test any
cleaner or stain remover on an
inconspicuous part of the leather.
Do not use the following products as these
may damage the leather:
• oil/petroleum-based leather
conditioners.
• household cleaners.
• alcohol solutions.
• solvents or cleaners intended for
rubber, vinyl and plastics. CLEANING THE ALLOY
WHEELS
Note:
Do not apply a cleaning chemical to
warm or hot wheel rims and covers.
Note: Some automatic car washes may
cause damage to the finish on your wheel
rims and covers.
Note: Industrial-strength or heavy-duty
cleaners in combination with brush agitation
to remove brake dust and dirt, could wear
away the clear coat finish over a period time.
Note: Do not use hydrofluoric acid-based
or high caustic-based wheel cleaners, steel
wool, fuels or strong household detergents.
Note: If you intend parking your vehicle for
an extended period after cleaning the
wheels with a wheel cleaner, drive your
vehicle for a few minutes before doing so.
This will reduce the risk of increased
corrosion of the brake discs.
Alloy wheels and wheel covers are coated
with a clear coat paint finish. To maintain
their condition we recommend that you:
• Clean the wheels weekly, with the
recommended Ford service wheel and
tire cleaner. Apply using
manufacturer's instructions. Use
Motorcraft® Wheel and Tire Cleaner
(ZC-37-A).
• Use a sponge to remove heavy
deposits of dirt and brake dust
accumulation.
• Rinse thoroughly with a strong stream
of water when you have completed the
cleaning process.
• To remove tar and grease, use
Motorcraft® Bug and Tar Remover
(ZC-42).
266
Fusion/Mondeo (CC7) Vehicle Care