2013 FORD FUSION (AMERICAS) tow bar
[x] Cancel search: tow barPage 134 of 458

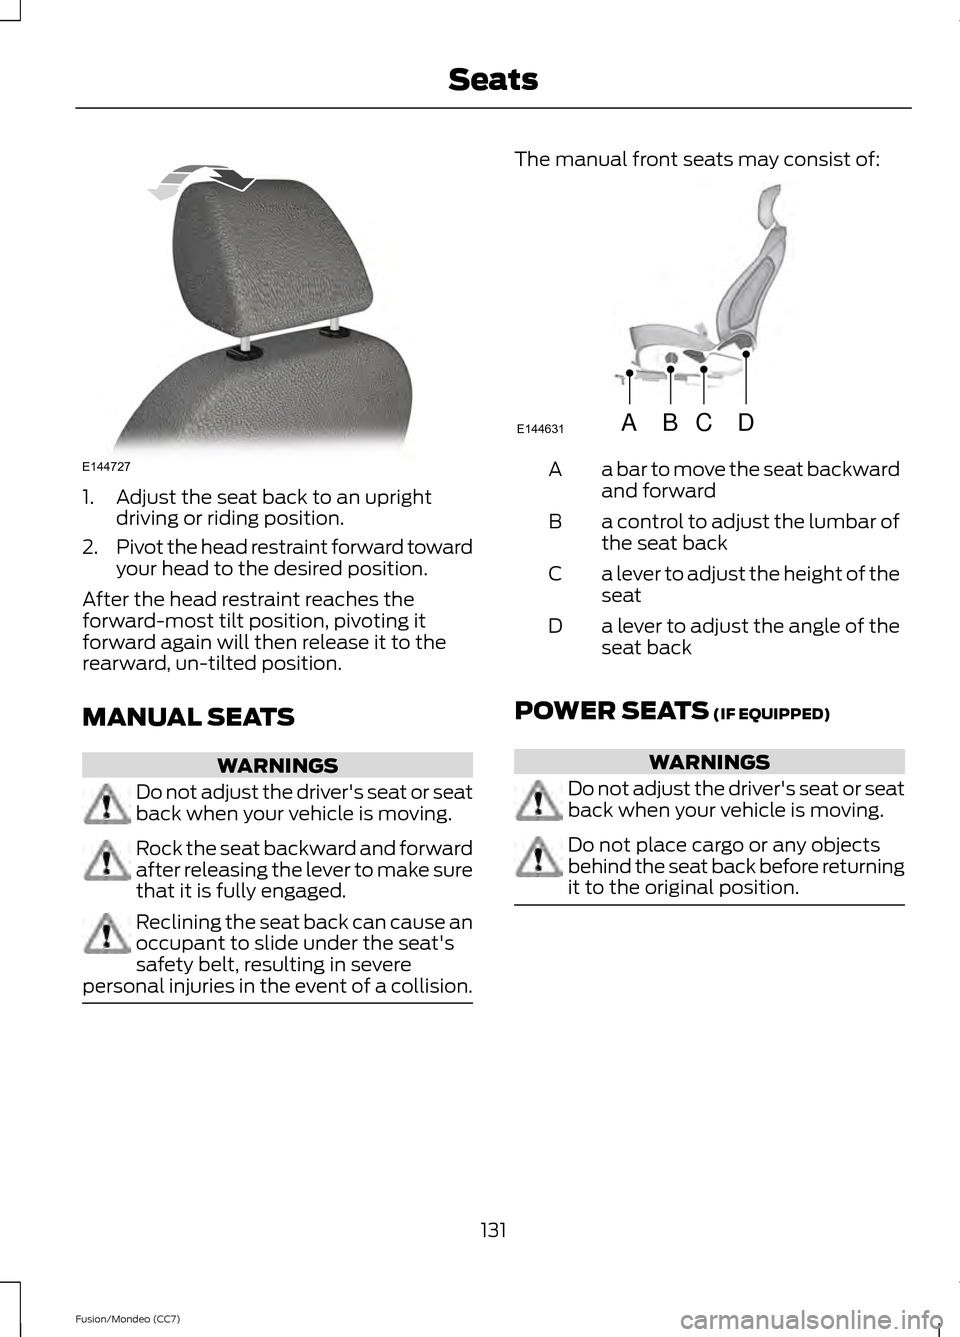
1. Adjust the seat back to an upright
driving or riding position.
2. Pivot the head restraint forward toward
your head to the desired position.
After the head restraint reaches the
forward-most tilt position, pivoting it
forward again will then release it to the
rearward, un-tilted position.
MANUAL SEATS WARNINGS
Do not adjust the driver's seat or seat
back when your vehicle is moving.
Rock the seat backward and forward
after releasing the lever to make sure
that it is fully engaged.
Reclining the seat back can cause an
occupant to slide under the seat's
safety belt, resulting in severe
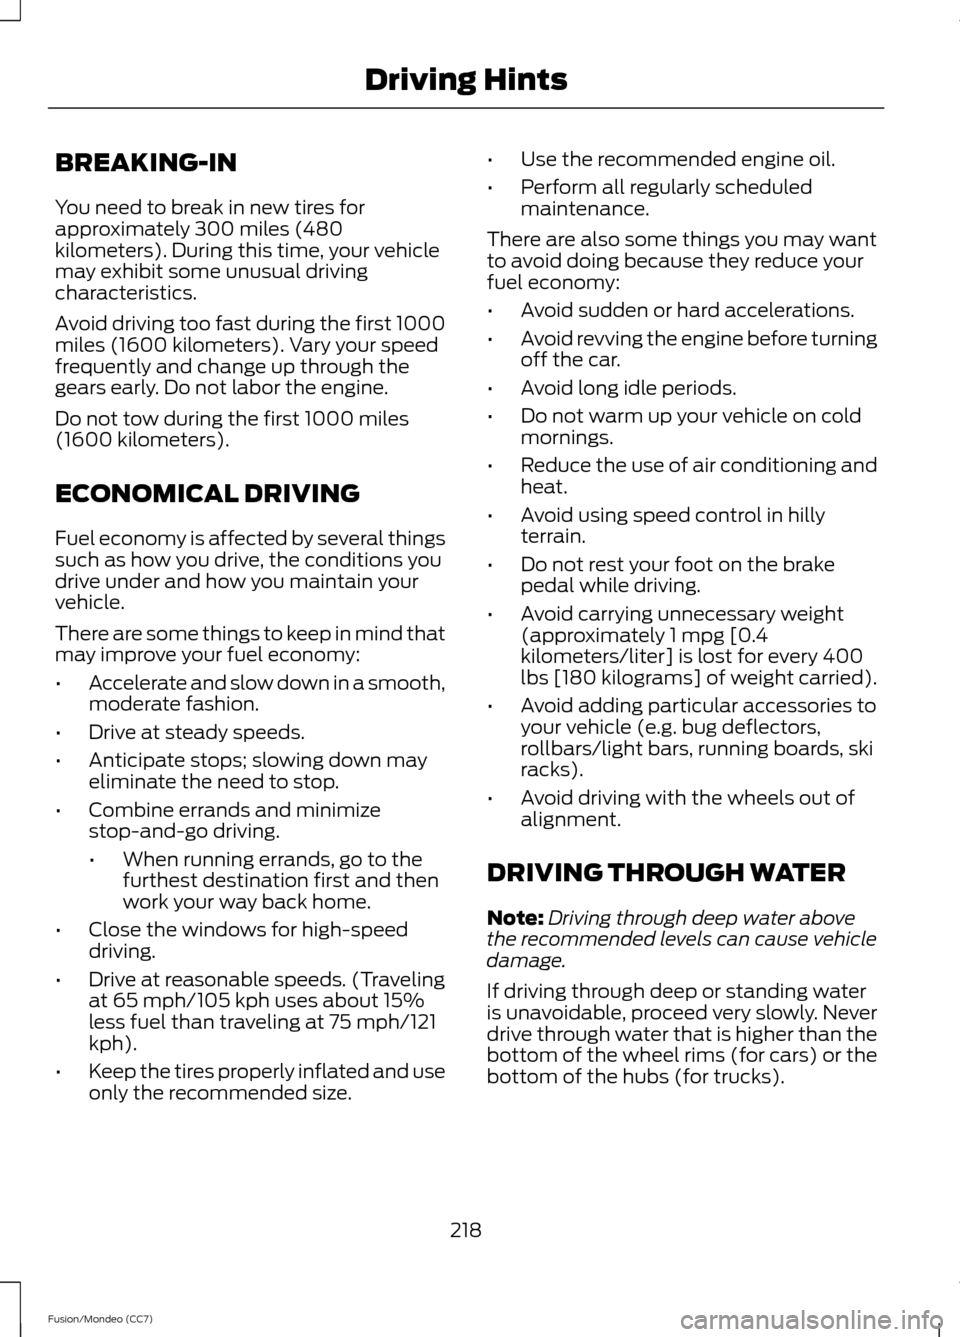
personal injuries in the event of a collision. The manual front seats may consist of:
a bar to move the seat backward
and forward
A
a control to adjust the lumbar of
the seat back
B
a lever to adjust the height of the
seat
C
a lever to adjust the angle of the
seat back
D
POWER SEATS (IF EQUIPPED) WARNINGS
Do not adjust the driver's seat or seat
back when your vehicle is moving.
Do not place cargo or any objects
behind the seat back before returning
it to the original position.
131
Fusion/Mondeo (CC7) SeatsE144727 ABCD
E144631
Page 197 of 458

The status bar will travel from left to right
as the calculated alertness level
decreases. As the rest icon is approached
the color turns from green to yellow and
then finally red when a rest break should
be taken.
•
Green - No rest required.
• Yellow - First (temporary) warning.
• Red - Second warning.
Note: If you have recently received a
warning; you should consider resting, even
if the current assessment is with the typical
range.
Note: The alertness level will be shown in
grey if the camera sensor cannot track the
road lane markings or if the vehicle speed
drops below approximately 40 mph (65
km/h).
Resetting the System
You can reset the system by either:
• Switching the ignition off and on.
• Stopping the vehicle and then opening
and closing the driver ’s door.
LANE KEEPING SYSTEM (IF
EQUIPPED) WARNING
The system is designed to aid the
driver. It is not intended to replace
the driver
’s attention and judgment.
The driver is still responsible to drive with
due care and attention. Note:
The system needs to be activated by
the driver at each key cycle.
Note: The system works above 40 mph (64
km/h).
Note: The system works as long as one lane
marking can be detected by the camera. Note:
If the camera is blocked or if the
windshield is damaged, the system may not
function.
Note: When Aid mode is on and the system
detects no driver steering activity for a short
continuous period of time, the system alerts
the driver to put their hands on the steering
wheel. The system may detect a light
grip/touch on the steering wheel as hands
off driving.
The system detects unintentional drifting
toward the outside of the lane and alerts
and/or aids the driver to stay in the lane
through the steering system and
instrument cluster display. The system
automatically detects and tracks the road
lane markings using a camera that is
mounted behind the interior rear view
mirror.
Switching the System On and Off
Note: The system defaults to off each time
the vehicle is started, unless a MyKey® is
detected. If a MyKey® is detected, the
system is defaulted to on and the Alert
mode is automatically selected.
Note: If a MyKey® is detected, pressing the
button will not affect the on/off status of
the system. Only the Mode, Sensitivity and
Intensity settings can be changed when a
MyKey® is present. To turn the system on, press the
button located on the left
steering wheel stalk. The button
must be pressed each time the vehicle is
started. The system can be turned off by
pressing the button again.
194
Fusion/Mondeo (CC7) Driving Aids
Page 215 of 458

TOWING A TRAILER
WARNINGS
Do not exceed the GVWR or the
GAWR specified on the certification
label.
Towing trailers beyond the maximum
recommended gross trailer weight
exceeds the limit of your vehicle and
could result in engine damage,
transmission damage, structural damage,
loss of vehicle control, vehicle rollover and
personal injury. Note:
Your vehicle may have electrical
items, such as fuses or relays, related to
towing. See Fuses (page 231).
Your vehicle may have electrical items,
such as fuses or relays, related to towing.
See the Fuses chapter.
Your vehicle's load capacity designation
is by weight, not by volume, so you cannot
necessarily use all available space when
loading a vehicle.
Towing a trailer places an extra load on
your vehicle's engine, transmission, axle,
brakes, tires and suspension. Inspect these
components periodically during, and after,
any towing operation.
Load Placement
To help minimize how trailer movement
affects your vehicle when driving:
• Load the heaviest items closest to the
trailer floor.
• Load the heaviest items centered
between the left and right side trailer
tires. •
Load the heaviest items above the
trailer axles or just slightly forward
toward the trailer tongue. Do not allow
the final trailer tongue weight to go
above or below 10-15% of the loaded
trailer weight.
• Select a tow bar with the correct rise
or drop. When both the loaded vehicle
and trailer are connected, the trailer
frame should be level, or slightly angled
down toward your vehicle, when
viewed from the side.
When driving with a trailer or payload, a
slight takeoff vibration or shudder may be
present due to the increased payload
weight. Additional information regarding
proper trailer loading and setting your
vehicle up for towing is located in the Load
Carrying chapter. See
Load Limit (page
205). You can also find the information in
the RV & Trailer Towing Guide, available
at an authorized dealer.
RECOMMENDED TOWING
WEIGHTS
Note: Do not exceed the trailer weight for
your vehicle configuration listed in the chart
below.
Note: Make sure to take into consideration
trailer frontal area. Do not exceed 20 feet 2
(1.86 meters 2
).
Note: For high altitude operation, reduce
the gross combined weight by 2% per 1000
feet (300 meters) starting at the 1000 foot
(300 meter) elevation point.
Note: Certain states require electric trailer
brakes for trailers over a specified weight.
Be sure to check state regulations for this
specified weight. The maximum trailer
weights listed may be limited to this
specified weight, as the vehicle ’s electrical
system may not include the wiring
connector needed to activate electric trailer
brakes.
212
Fusion/Mondeo (CC7) Towing
Page 221 of 458

BREAKING-IN
You need to break in new tires for
approximately 300 miles (480
kilometers). During this time, your vehicle
may exhibit some unusual driving
characteristics.
Avoid driving too fast during the first 1000
miles (1600 kilometers). Vary your speed
frequently and change up through the
gears early. Do not labor the engine.
Do not tow during the first 1000 miles
(1600 kilometers).
ECONOMICAL DRIVING
Fuel economy is affected by several things
such as how you drive, the conditions you
drive under and how you maintain your
vehicle.
There are some things to keep in mind that
may improve your fuel economy:
•
Accelerate and slow down in a smooth,
moderate fashion.
• Drive at steady speeds.
• Anticipate stops; slowing down may
eliminate the need to stop.
• Combine errands and minimize
stop-and-go driving.
•When running errands, go to the
furthest destination first and then
work your way back home.
• Close the windows for high-speed
driving.
• Drive at reasonable speeds. (Traveling
at 65 mph/105 kph uses about 15%
less fuel than traveling at 75 mph/121
kph).
• Keep the tires properly inflated and use
only the recommended size. •
Use the recommended engine oil.
• Perform all regularly scheduled
maintenance.
There are also some things you may want
to avoid doing because they reduce your
fuel economy:
• Avoid sudden or hard accelerations.
• Avoid revving the engine before turning
off the car.
• Avoid long idle periods.
• Do not warm up your vehicle on cold
mornings.
• Reduce the use of air conditioning and
heat.
• Avoid using speed control in hilly
terrain.
• Do not rest your foot on the brake
pedal while driving.
• Avoid carrying unnecessary weight
(approximately 1 mpg [0.4
kilometers/liter] is lost for every 400
lbs [180 kilograms] of weight carried).
• Avoid adding particular accessories to
your vehicle (e.g. bug deflectors,
rollbars/light bars, running boards, ski
racks).
• Avoid driving with the wheels out of
alignment.
DRIVING THROUGH WATER
Note: Driving through deep water above
the recommended levels can cause vehicle
damage.
If driving through deep or standing water
is unavoidable, proceed very slowly. Never
drive through water that is higher than the
bottom of the wheel rims (for cars) or the
bottom of the hubs (for trucks).
218
Fusion/Mondeo (CC7) Driving Hints
Page 411 of 458

Map Mode
Press the green bar in the upper right area
of the touchscreen to view map mode. Map
mode shows advanced viewing comprised
of both 2D city maps as well as 3D
landmarks (when available).
2D city maps show detailed outlines of
buildings, visible land use and land
elements and detailed railway
infrastructure for the most essential cities
around the globe. These maps also contain
features, such as town blocks, building
footprints, and railways.
3D landmarks appear as clear, visible
objects that are typically recognizable and
have a certain tourist value. The 3D
landmarks appear in 3D map mode only.
Coverage varies, and improves with
updated map releases.
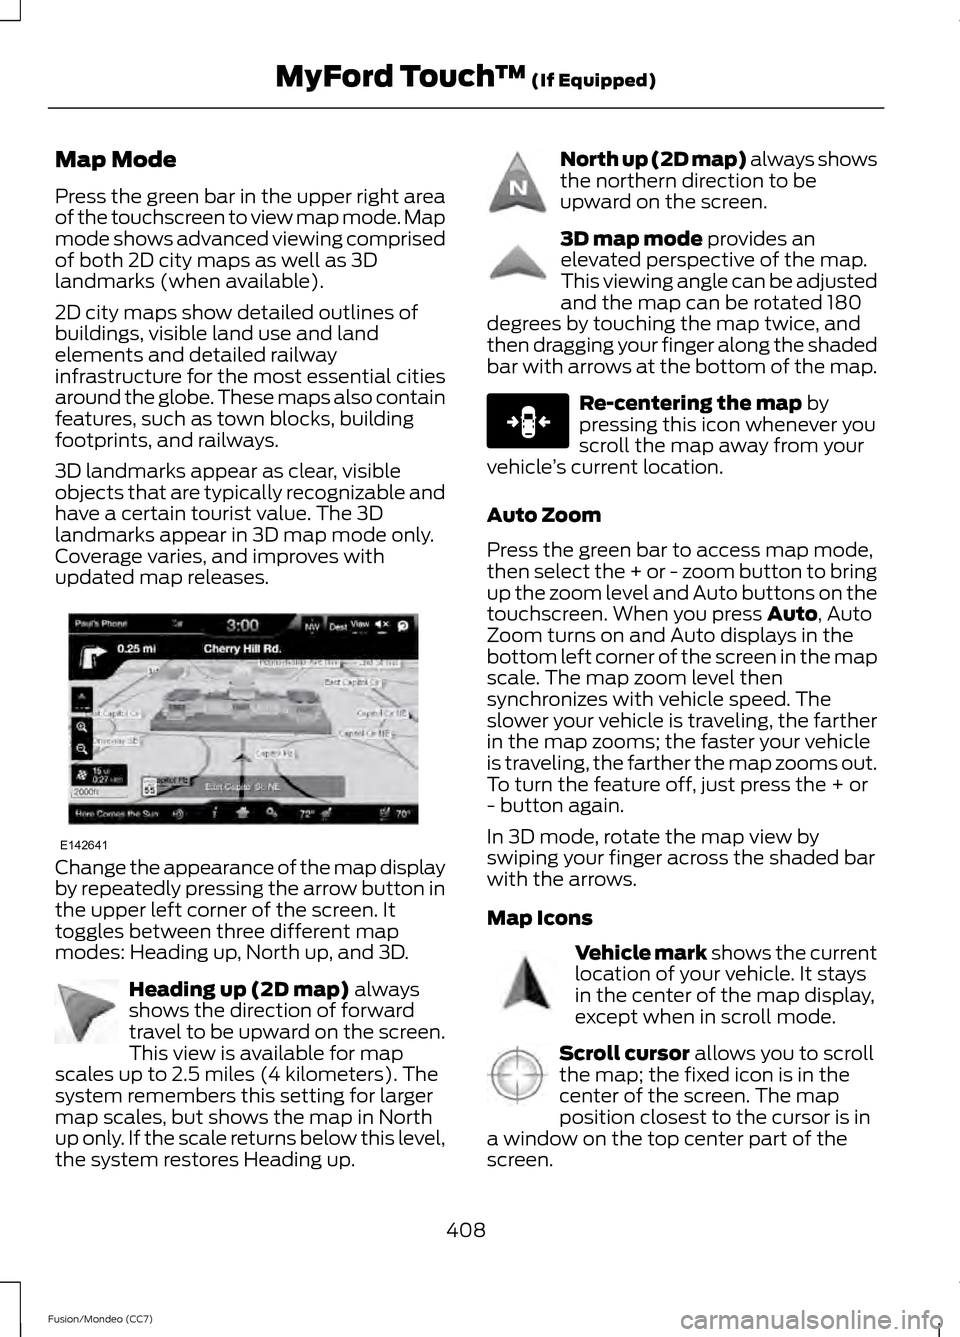
Change the appearance of the map display
by repeatedly pressing the arrow button in
the upper left corner of the screen. It
toggles between three different map
modes: Heading up, North up, and 3D.
Heading up (2D map) always
shows the direction of forward
travel to be upward on the screen.
This view is available for map
scales up to 2.5 miles (4 kilometers). The
system remembers this setting for larger
map scales, but shows the map in North
up only. If the scale returns below this level,
the system restores Heading up. North up (2D map) always shows
the northern direction to be
upward on the screen.
3D map mode
provides an
elevated perspective of the map.
This viewing angle can be adjusted
and the map can be rotated 180
degrees by touching the map twice, and
then dragging your finger along the shaded
bar with arrows at the bottom of the map. Re-centering the map
by
pressing this icon whenever you
scroll the map away from your
vehicle ’s current location.
Auto Zoom
Press the green bar to access map mode,
then select the + or - zoom button to bring
up the zoom level and Auto buttons on the
touchscreen. When you press
Auto, Auto
Zoom turns on and Auto displays in the
bottom left corner of the screen in the map
scale. The map zoom level then
synchronizes with vehicle speed. The
slower your vehicle is traveling, the farther
in the map zooms; the faster your vehicle
is traveling, the farther the map zooms out.
To turn the feature off, just press the + or
- button again.
In 3D mode, rotate the map view by
swiping your finger across the shaded bar
with the arrows.
Map Icons Vehicle mark
shows the current
location of your vehicle. It stays
in the center of the map display,
except when in scroll mode. Scroll cursor
allows you to scroll
the map; the fixed icon is in the
center of the screen. The map
position closest to the cursor is in
a window on the top center part of the
screen.
408
Fusion/Mondeo (CC7) MyFord Touch
™
(If Equipped)E142641 E142642 E142643 E142644 E146188 E142646 E142647