2013 FORD F650 ABS
[x] Cancel search: ABSPage 21 of 378

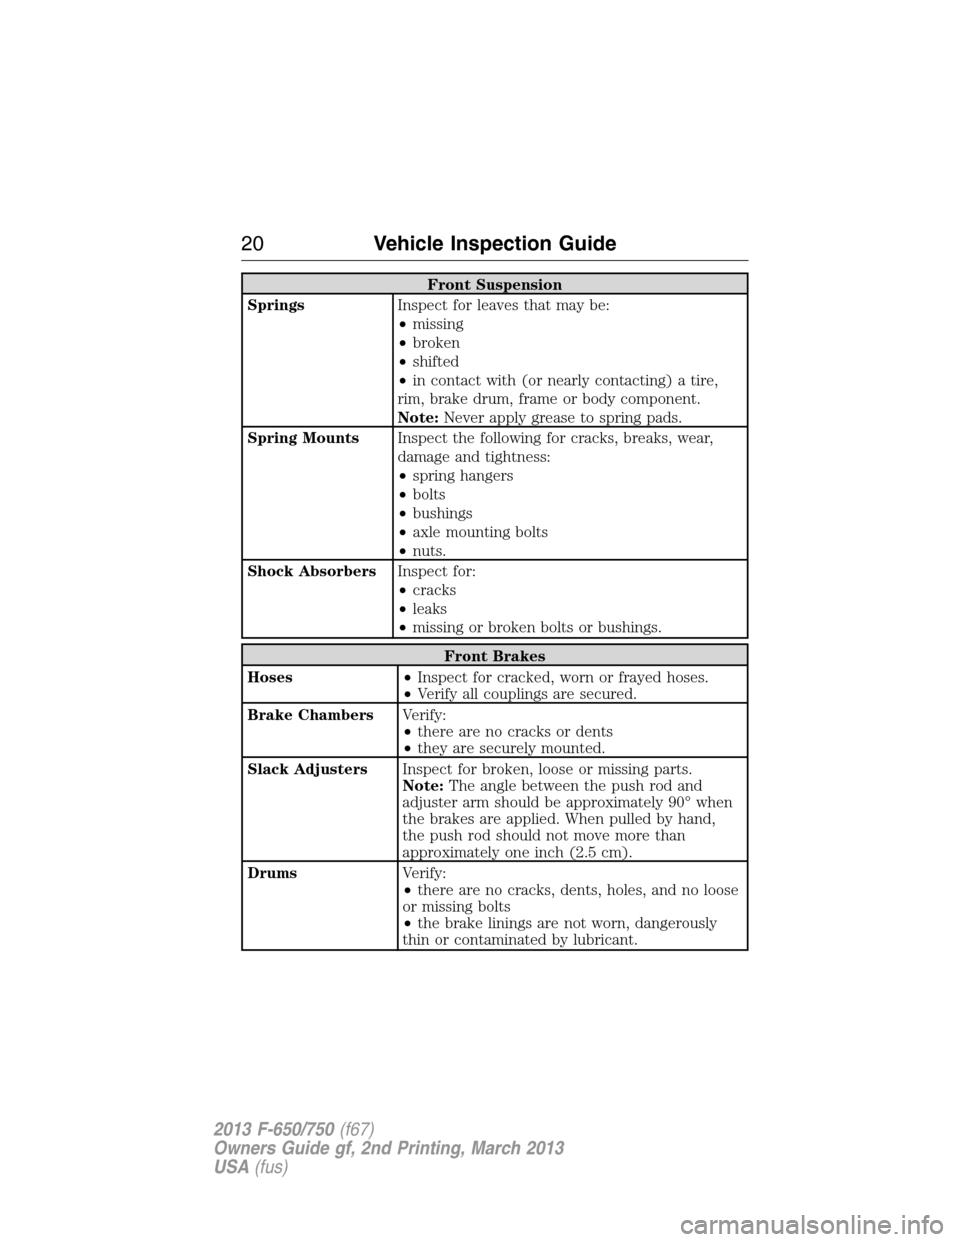
Front Suspension
SpringsInspect for leaves that may be:
•missing
•broken
•shifted
•in contact with (or nearly contacting) a tire,
rim, brake drum, frame or body component.
Note:Never apply grease to spring pads.
Spring MountsInspect the following for cracks, breaks, wear,
damage and tightness:
•spring hangers
•bolts
•bushings
•axle mounting bolts
•nuts.
Shock AbsorbersInspect for:
•cracks
•leaks
•missing or broken bolts or bushings.
Front Brakes
Hoses•Inspect for cracked, worn or frayed hoses.
•Verify all couplings are secured.
Brake ChambersVerify:
•there are no cracks or dents
•they are securely mounted.
Slack AdjustersInspect for broken, loose or missing parts.
Note:The angle between the push rod and
adjuster arm should be approximately 90° when
the brakes are applied. When pulled by hand,
the push rod should not move more than
approximately one inch (2.5 cm).
DrumsVerify:
•there are no cracks, dents, holes, and no loose
or missing bolts
•the brake linings are not worn, dangerously
thin or contaminated by lubricant.
20Vehicle Inspection Guide
2013 F-650/750(f67)
Owners Guide gf, 2nd Printing, March 2013
USA(fus)
Page 24 of 378

Tractor-Coupling System
Mounting BoltsInspect for loose or missing mounting brackets,
clamps, bolts or nuts. Both fifth-wheel and slide
mounting must be solidly attached.
PlatformInspect for cracks or breaks in the platform
structure.
Safety LatchVerify safety latch is engaged.
Release ArmVerify:
•the safety latch is in the engaged position
•any safety latch is in place.
Kingpin and
ApronVerify:
•the kingpin is not bent or worn
•the apron lies flat on the fifth-wheel skid plate
•the visible part of the apron is not bent, worn,
cracked or broken.
Rear Suspension
Springs•Inspect for broken or shifted leaves or leaves
that are in contact with (or nearly contacting) a
tire, rim, brake drum, frame or body component.
•Inspect for missing or broken leaves in the leaf
spring.
Spring MountsInspect for:
•cracked or broken spring hangers
•broken, missing or loose bolts
•missing or damaged bushings
•broken, loose or missing axle mounting parts.
Torsion Arm and
Shock Absorbers•Verify torsion arm is not cracked, broken or
missing.
•Inspect the shock absorber for cracks or leaks.
There should be no missing or broken mounting
bolts or worn bushings.
Vehicle Inspection Guide23
2013 F-650/750(f67)
Owners Guide gf, 2nd Printing, March 2013
USA(fus)
Page 69 of 378

Gauge Package (If Equipped)
Your vehicle may be equipped with an optional gauge package which has
one of the following configurations:
1.Transmission temperature
gauge:Displays the
transmission temperature at the
transmission sump.
2.Hourmeter:Displays the hours
of engine run time.
3.Voltmeter:Displays electrical
system voltage.
WARNING LAMPS AND INDICATORS
The following warning lamps and indicators alert you to a vehicle
condition that may become serious. Some lamps illuminate when you
start your vehicle to make sure they work. If any lamps remain on after
starting your vehicle, see the respective system warning lamp for further
information.
Note:Some warning indicators appear in the information display and
function the same as a warning lamp but do not display when you start
your vehicle.
Anti-Lock Braking System
If it illuminates when you are driving, this indicates a
malfunction. You continue to have the normal braking system
(without ABS) unless the brake warning lamp is also
illuminated. Have the system checked by your authorized dealer.
Brake System
To confirm the brake system warning light is functional, it
momentarily illuminates when the ignition is turned to the on
position when the engine is not running, or in a position
between on and start.
If the brake system warning light does not illuminate at this time, seek
service immediately from your authorized dealer.
68Instrument Cluster
2013 F-650/750(f67)
Owners Guide gf, 2nd Printing, March 2013
USA(fus)
Page 73 of 378

Stop Engine (diesel engine only)
This red lamp illuminates when the engine needs to be stopped
(as soon as it can be safely done). If the lamp begins flashing,
automatic engine shutdown may take place in as little as
20 seconds.
WARNING:In the event of engine shutdown, make sure the
vehicle is safely off the road and the problem is remedied prior to
returning to the road. Failure to remove the vehicle from the road
could result in an accident, causing serious injury or death.
If the engine shuts down, it can be restarted and operated for
30 seconds at a time, or until the problem is corrected. For more
information, seeEngine automatic shutdown warning light or chime
in theDrivingchapter, and your engine operator’s manual.
See your engine operator’s manual for specific information regarding this
feature. Drivers of electronically-controlled engines should know the
extent of the warning engine shutdown system before operating the
vehicle.
Traction Control (diesel engine only)
It illuminates and flashes slowly if the Off Road or Mud/Snow
mode is selected. It illuminates and flashes rapidly during a
traction control event.
Trailer Anti-Lock Braking System (ABS)
It illuminates briefly when the ignition is switched on and only
when a PLC trailer or a PLC diagnostic tool is connected. If the
light fails to illuminate, remains on after the vehicle is started
or continues to flash, have the system serviced immediately.
Wait to Start (diesel engine only)
It illuminates when the air intake heater is in operation and
special starting procedures are required.
WARNING:If equipped with an air intake heater, DO NOT use
ether or any other starting fluids. The use of starting fluids
(ether) in an engine equipped with an air intake heater could result in
damage and/or personal injury.
72Instrument Cluster
2013 F-650/750(f67)
Owners Guide gf, 2nd Printing, March 2013
USA(fus)
Page 93 of 378

HEAD RESTRAINTS
WARNING:To minimize the risk of neck injury in the event of a
crash, you and the passenger occupants should not sit in or
operate the vehicle, until the head restraint is placed in its proper
position. Never adjust the head restraint while the vehicle is in motion.
WARNING:The adjustable head restraint is a safety device.
Whenever possible it should be installed and properly adjusted
when the seat is occupied.
WARNING:Install the head restraint properly to minimize the
risk of neck injury in the event of a crash.
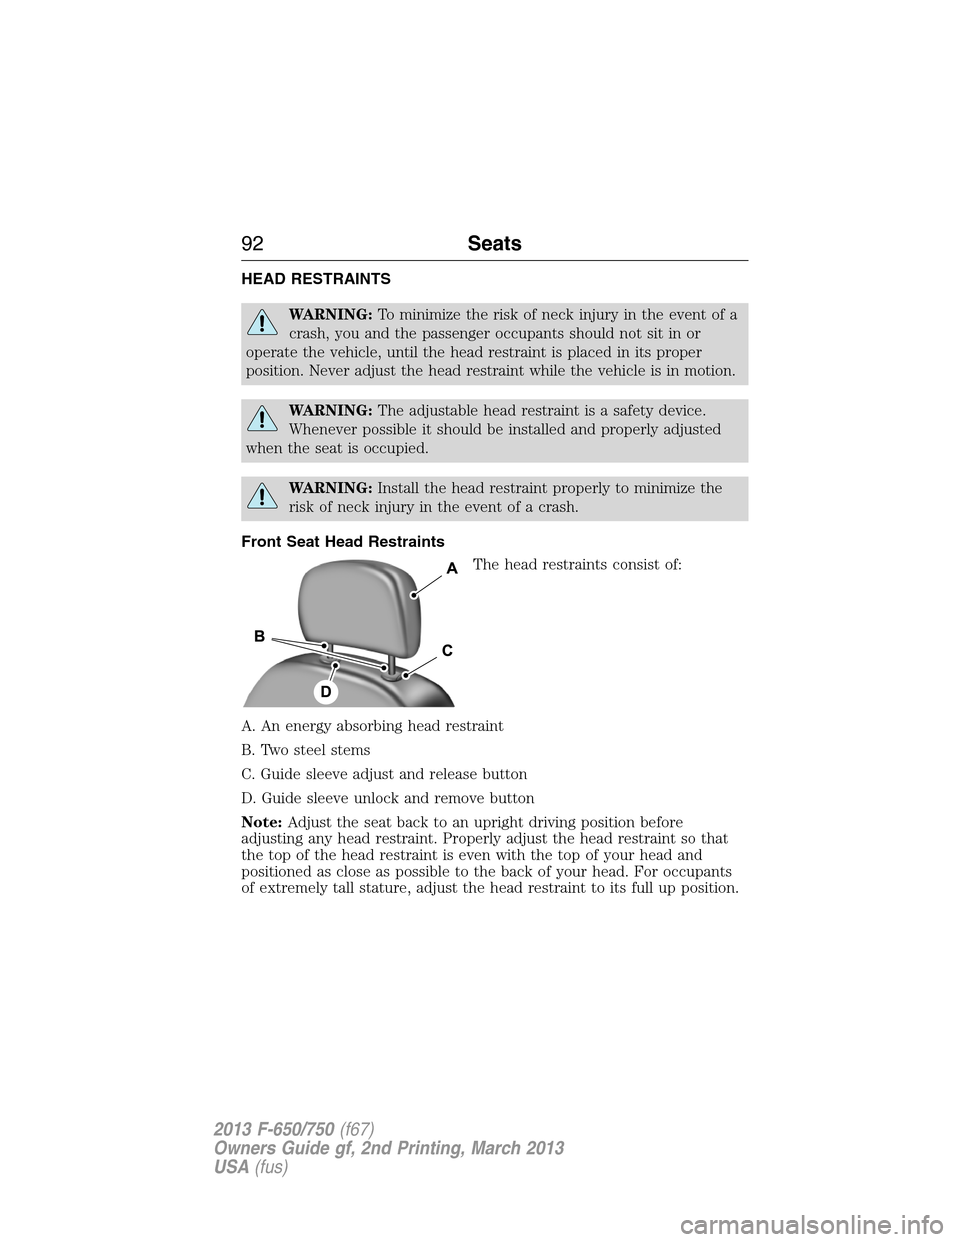
Front Seat Head Restraints
The head restraints consist of:
A. An energy absorbing head restraint
B. Two steel stems
C. Guide sleeve adjust and release button
D. Guide sleeve unlock and remove button
Note:Adjust the seat back to an upright driving position before
adjusting any head restraint. Properly adjust the head restraint so that
the top of the head restraint is even with the top of your head and
positioned as close as possible to the back of your head. For occupants
of extremely tall stature, adjust the head restraint to its full up position.
92Seats
2013 F-650/750(f67)
Owners Guide gf, 2nd Printing, March 2013
USA(fus)
Page 94 of 378

Front Row Center, Outboard (Crew Cab), and Rear Seat Center
(Crew Cab) Head Restraints
Your vehicle may be equipped with
head restraints that are
non-adjustable.
The non-adjustable head restraints consist of:
A. An energy absorbing head restraint
B. Two steel stems
C. Guide sleeve unlock and remove buttons
Rear Head Restraints (SuperCab)
The SuperCab has rear outboard head restraints that are not removable
and are bolted to the back wall.
Adjusting the Head Restraints
Raise
Pull up the head restraint.
Lower
1. Press and hold button C.
2. Push down on the head restraint.
Remove - Front Seat Head Restraints
1. Pull up the head restraint until it reaches the highest adjustment
position.
2. Press and hold buttons C and D.
3. Pull up the head restraint.
Seats93
2013 F-650/750(f67)
Owners Guide gf, 2nd Printing, March 2013
USA(fus)
Page 115 of 378

•Avoid getting fuel liquid in your eyes. If fuel is splashed in the eyes,
remove contact lenses (if worn), flush with water for 15 minutes and
seek medical attention. Failure to seek proper medical attention could
lead to permanent injury.
•Fuels can also be harmful if absorbed through the skin. If fuel is
splashed on the skin or clothing, promptly remove contaminated
clothing and wash skin thoroughly with soap and water. Repeated or
prolonged skin contact with fuel liquid or vapor causes skin irritation.
•Be particularly careful if you are taking Antabuse or other forms of
disulfiram for the treatment of alcoholism. Breathing gasoline vapors,
or skin contact could cause an adverse reaction. In sensitive
individuals, serious personal injury or sickness may result. If fuel is
splashed on the skin, promptly wash skin thoroughly with soap and
water. Consult a physician immediately if you experience an adverse
reaction.
CHOOSING THE RIGHT FUEL
Note:Use of any fuel other than those recommended may cause
powertrain damage, a loss of vehicle performance, and repairs may not
be covered under warranty.
Gasoline Engine
Use only UNLEADED fuel or UNLEADED fuel blended with a maximum
of 15% ethanol. Do not use fuel ethanol (E85), diesel fuel, fuel-methanol,
leaded fuel or any other fuel because it could damage or impair the
emission control system. The use of leaded fuel is prohibited by law.
Diesel Engine
WARNING:Using low sulfur (16-500 ppm) or high sulfur
(greater than 500 ppm) diesel fuel in a diesel engine designed to
use only Ultra Low Sulfur Diesel fuel increases the likelihood of engine
oil dilution with fuel which may lead to major engine damage.
WARNING:Using low sulfur (16-500 ppm) or high sulfur
(greater than 500 ppm) diesel fuel in a diesel engine designed to
use only Ultra Low Sulfur Diesel fuel causes certain emission
components to malfunction which may also cause the Service Engine
Soon light to illuminate indicating an emissions-related concern.
11 4Fuel and Refueling
2013 F-650/750(f67)
Owners Guide gf, 2nd Printing, March 2013
USA(fus)
Page 119 of 378

Fuel Filler Cap
WARNING:The fuel system may be under pressure. If the fuel
filler cap is venting vapor or if you hear a hissing sound, wait
until it stops before completely removing the fuel filler cap. Otherwise,
fuel may spray out and injure you or others.
WARNING:If you do not use the proper fuel filler cap, excessive
pressure or vacuum in the fuel tank may damage the fuel system
or cause the fuel cap to disengage in a crash, which may result in
possible personal injury.
Note:If you must replace the fuel filler cap, replace it with a fuel filler
cap that is designed for your vehicle. The customer warranty may be
void for any damage to the fuel tank or fuel system if the correct
genuine Ford, Motorcraft® or other certified fuel filler cap is not used.
Your fuel tank filler cap has an indexed design with a
1�4–turn on and off
feature. When fueling your vehicle:
1. Turn the engine off.
2. Carefully turn the filler cap counterclockwise until it spins off.
3. Pull to remove the cap from the fuel filler pipe.
4. To install the cap, align the tabs on the cap with the notches on the
filler pipe.
5. Turn the filler cap clockwise a
1�4–turn until it clicks at least once.
If the check fuel cap light appears in the instrument cluster and stays on
after you start the engine, the fuel filler cap may not be properly
installed.
If the fuel cap light remains on, at the next opportunity, safely pull off of
the road, remove the fuel filler cap, align the cap properly and reinstall
it. The check fuel cap light may not reset immediately; it may take
several driving cycles for the indicators to turn off. A driving cycle
consists of an engine start-up (after four or more hours with the engine
off) followed by normal city and highway driving.
FUEL CONSUMPTION
Filling the Tank
The advertised capacity is the indicated capacity and the empty reserve
combined. Indicated capacity is the difference in the amount of fuel in a
full tank and a tank when the fuel gauge indicates empty. Empty reserve
is the amount of fuel in the tank after the fuel gauge indicates empty.
11 8Fuel and Refueling
2013 F-650/750(f67)
Owners Guide gf, 2nd Printing, March 2013
USA(fus)