Page 124 of 577
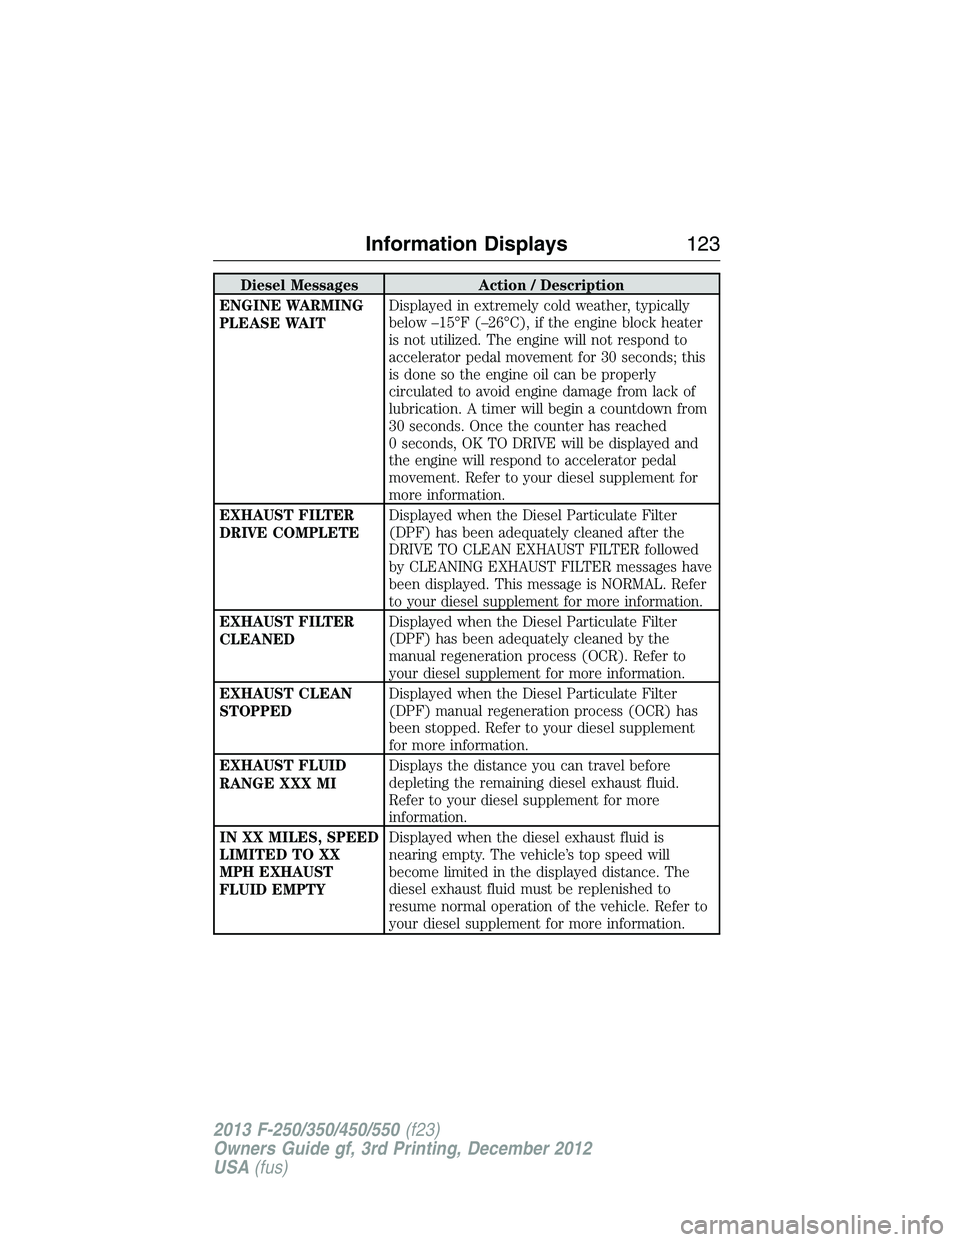
Diesel Messages Action / Description
ENGINE WARMING
PLEASE WAITDisplayed in extremely cold weather, typically
below –15°F (–26°C), if the engine block heater
is not utilized. The engine will not respond to
accelerator pedal movement for 30 seconds; this
is done so the engine oil can be properly
circulated to avoid engine damage from lack of
lubrication. A timer will begin a countdown from
30 seconds. Once the counter has reached
0 seconds, OK TO DRIVE will be displayed and
the engine will respond to accelerator pedal
movement. Refer to your diesel supplement for
more information.
EXHAUST FILTER
DRIVE COMPLETEDisplayed when the Diesel Particulate Filter
(DPF) has been adequately cleaned after the
DRIVE TO CLEAN EXHAUST FILTER followed
by CLEANING EXHAUST FILTER messages have
been displayed. This message is NORMAL. Refer
to your diesel supplement for more information.
EXHAUST FILTER
CLEANEDDisplayed when the Diesel Particulate Filter
(DPF) has been adequately cleaned by the
manual regeneration process (OCR). Refer to
your diesel supplement for more information.
EXHAUST CLEAN
STOPPEDDisplayed when the Diesel Particulate Filter
(DPF) manual regeneration process (OCR) has
been stopped. Refer to your diesel supplement
for more information.
EXHAUST FLUID
RANGE XXX MIDisplays the distance you can travel before
depleting the remaining diesel exhaust fluid.
Refer to your diesel supplement for more
information.
IN XX MILES, SPEED
LIMITED TO XX
MPH EXHAUST
FLUID EMPTYDisplayed when the diesel exhaust fluid is
nearing empty. The vehicle’s top speed will
become limited in the displayed distance. The
diesel exhaust fluid must be replenished to
resume normal operation of the vehicle. Refer to
your diesel supplement for more information.
Information Displays123
2013 F-250/350/450/550(f23)
Owners Guide gf, 3rd Printing, December 2012
USA(fus)
Page 128 of 577
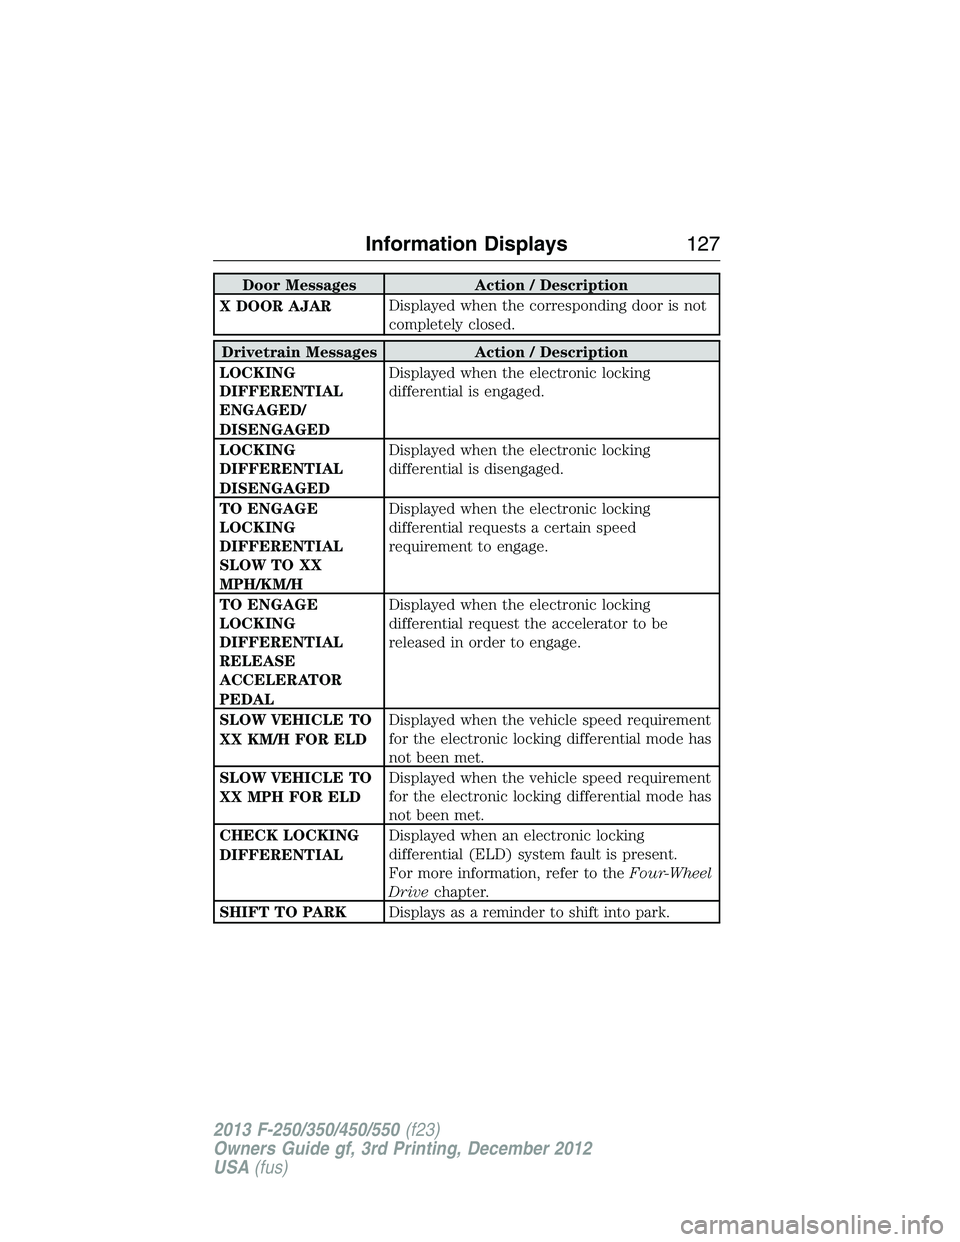
Door Messages Action / Description
X DOOR AJARDisplayed when the corresponding door is not
completely closed.
Drivetrain Messages Action / Description
LOCKING
DIFFERENTIAL
ENGAGED/
DISENGAGEDDisplayed when the electronic locking
differential is engaged.
LOCKING
DIFFERENTIAL
DISENGAGEDDisplayed when the electronic locking
differential is disengaged.
TO ENGAGE
LOCKING
DIFFERENTIAL
SLOW TO XX
MPH/KM/HDisplayed when the electronic locking
differential requests a certain speed
requirement to engage.
TO ENGAGE
LOCKING
DIFFERENTIAL
RELEASE
ACCELERATOR
PEDALDisplayed when the electronic locking
differential request the accelerator to be
released in order to engage.
SLOW VEHICLE TO
XX KM/H FOR ELDDisplayed when the vehicle speed requirement
for the electronic locking differential mode has
not been met.
SLOW VEHICLE TO
XX MPH FOR ELDDisplayed when the vehicle speed requirement
for the electronic locking differential mode has
not been met.
CHECK LOCKING
DIFFERENTIALDisplayed when an electronic locking
differential (ELD) system fault is present.
For more information, refer to theFour-Wheel
Drivechapter.
SHIFT TO PARKDisplays as a reminder to shift into park.
Information Displays127
2013 F-250/350/450/550(f23)
Owners Guide gf, 3rd Printing, December 2012
USA(fus)
Page 137 of 577
AM/FM
WARNING:Driving while distracted can result in loss of vehicle
control, crash and injury. We strongly recommend that you use
extreme caution when using any device that may take your focus off
the road. Your primary responsibility is the safe operation of your
vehicle. We recommend against the use of any hand-held device while
driving and encourage the use of voice-operated systems when possible.
Make sure you are aware of all applicable local laws that may affect the
use of electronic devices while driving.
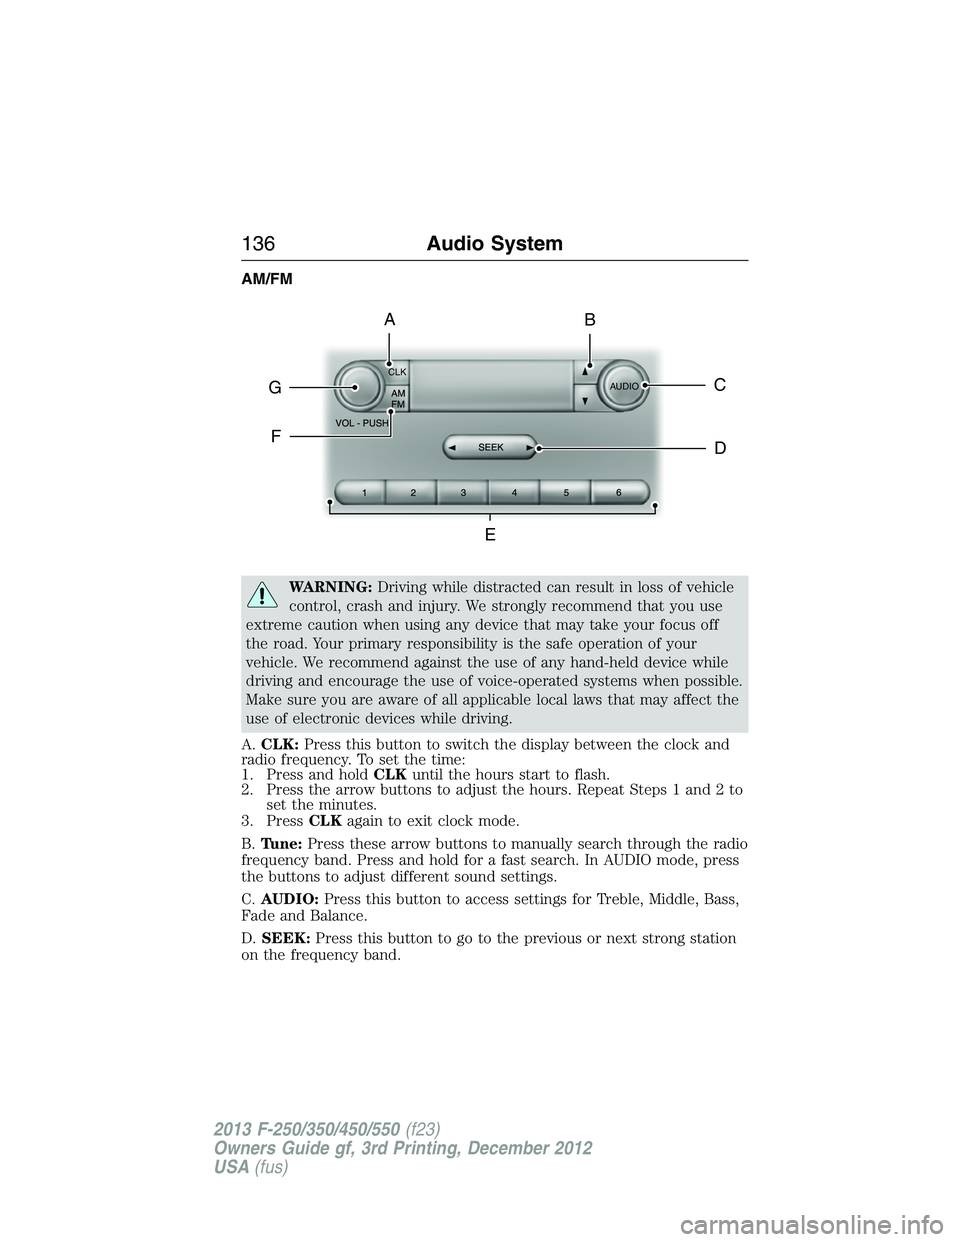
A.CLK:Press this button to switch the display between the clock and
radio frequency. To set the time:
1. Press and holdCLKuntil the hours start to flash.
2. Press the arrow buttons to adjust the hours. Repeat Steps 1 and 2 to
set the minutes.
3. PressCLKagain to exit clock mode.
B.Tune:Press these arrow buttons to manually search through the radio
frequency band. Press and hold for a fast search. In AUDIO mode, press
the buttons to adjust different sound settings.
C.AUDIO:Press this button to access settings for Treble, Middle, Bass,
Fade and Balance.
D.SEEK:Press this button to go to the previous or next strong station
on the frequency band.
CLK
AUDIOC
EG
F
BA
D
136Audio System
2013 F-250/350/450/550(f23)
Owners Guide gf, 3rd Printing, December 2012
USA(fus)
Page 146 of 577
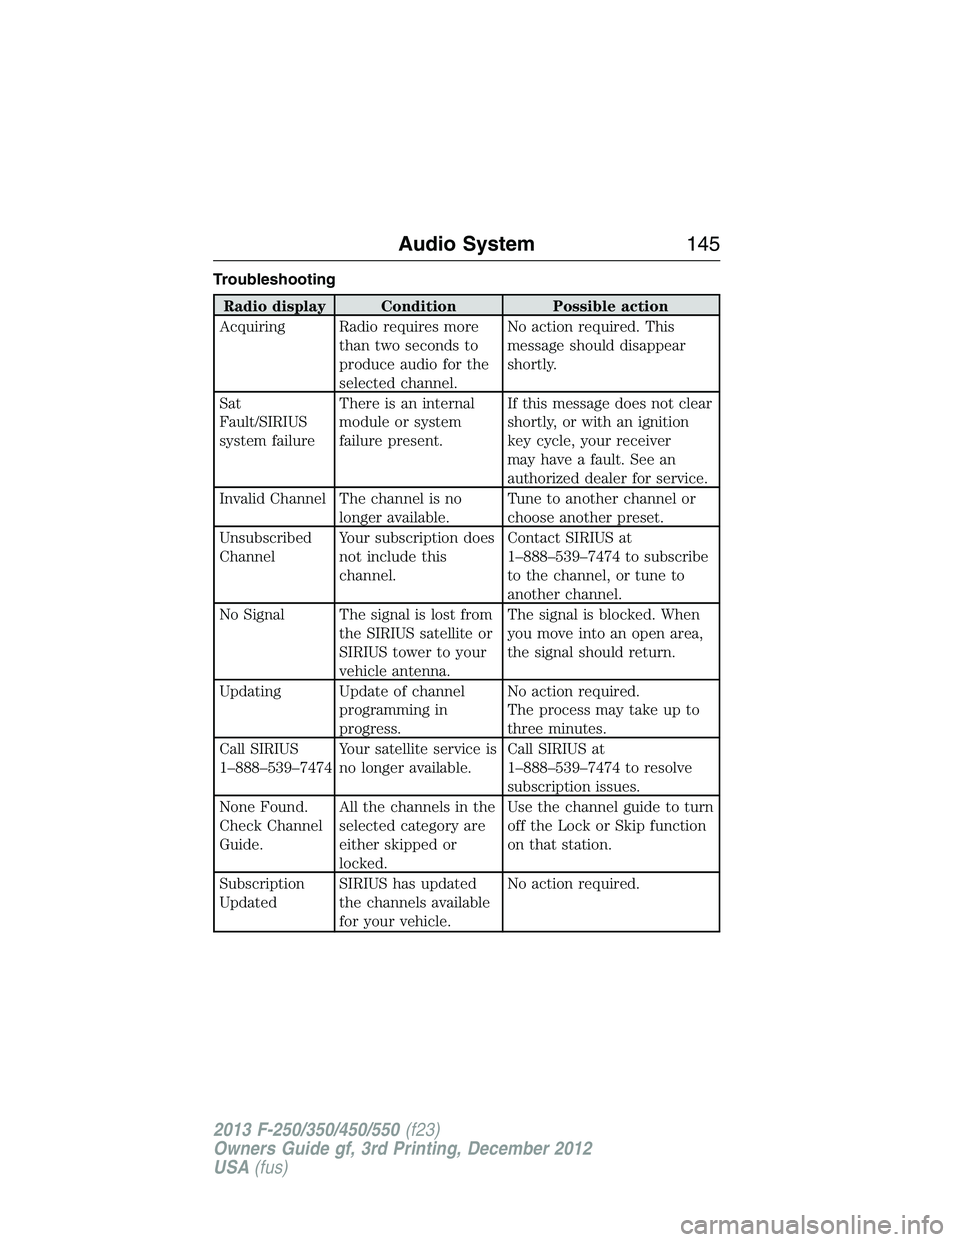
Troubleshooting
Radio display Condition Possible action
Acquiring Radio requires more
than two seconds to
produce audio for the
selected channel.No action required. This
message should disappear
shortly.
Sat
Fault/SIRIUS
system failureThere is an internal
module or system
failure present.If this message does not clear
shortly, or with an ignition
key cycle, your receiver
may have a fault. See an
authorized dealer for service.
Invalid Channel The channel is no
longer available.Tune to another channel or
choose another preset.
Unsubscribed
ChannelYour subscription does
not include this
channel.Contact SIRIUS at
1–888–539–7474 to subscribe
to the channel, or tune to
another channel.
No Signal The signal is lost from
the SIRIUS satellite or
SIRIUS tower to your
vehicle antenna.The signal is blocked. When
you move into an open area,
the signal should return.
Updating Update of channel
programming in
progress.No action required.
The process may take up to
three minutes.
Call SIRIUS
1–888–539–7474Your satellite service is
no longer available.Call SIRIUS at
1–888–539–7474 to resolve
subscription issues.
None Found.
Check Channel
Guide.All the channels in the
selected category are
either skipped or
locked.Use the channel guide to turn
off the Lock or Skip function
on that station.
Subscription
UpdatedSIRIUS has updated
the channels available
for your vehicle.No action required.
Audio System145
2013 F-250/350/450/550(f23)
Owners Guide gf, 3rd Printing, December 2012
USA(fus)
Page 156 of 577
HEAD RESTRAINTS
WARNING:To minimize the risk of neck injury in the event of
a crash, you and the passenger occupants should not sit in or
operate the vehicle, until the head restraint is placed in its proper
position. Never adjust the head restraint while the vehicle is in motion.
WARNING:The adjustable head restraint is a safety device.
Whenever possible it should be installed and properly adjusted
when the seat is occupied.
WARNING:Install the head restraint properly to minimize the
risk of neck injury in the event of a crash.
Note:Adjust the seat back to an upright driving or riding position before
adjusting any head restraint. Properly adjust the head restraint so that
the top of the head restraint is even with the top of your head and
positioned as close as possible to the back of your head. For occupants
of extremely tall stature, adjust the head restraint to its full up position.
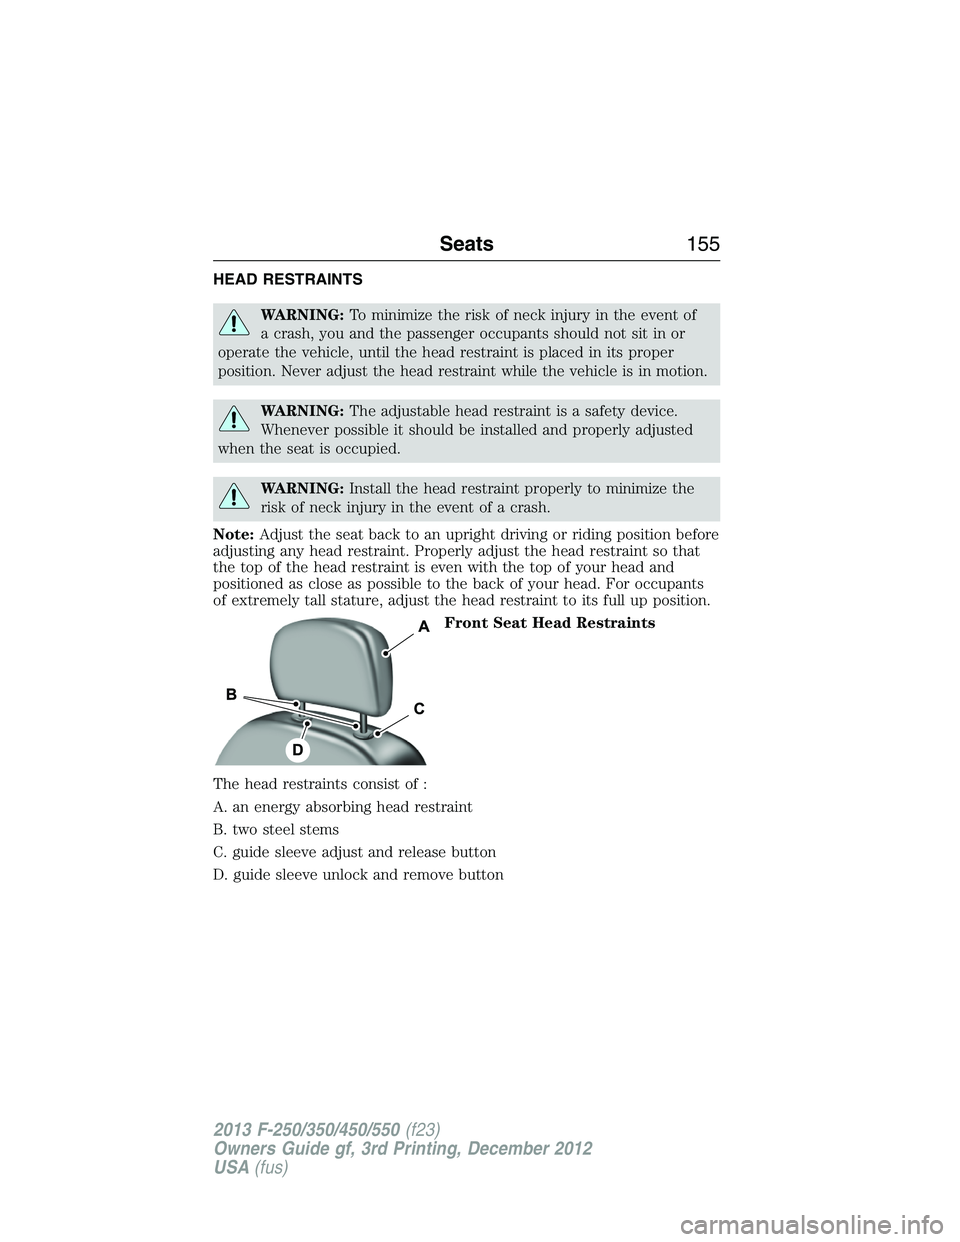
Front Seat Head Restraints
The head restraints consist of :
A. an energy absorbing head restraint
B. two steel stems
C. guide sleeve adjust and release button
D. guide sleeve unlock and remove button
Seats155
2013 F-250/350/450/550(f23)
Owners Guide gf, 3rd Printing, December 2012
USA(fus)
Page 157 of 577
Adjusting the Head Restraint
Raise: Pull up the head restraint.
Lower:
1. Press and hold button C.
2. Push down on the head restraint.
Remove:
1. Pull up the head restraint until it reaches the highest adjustment
position.
2. Press and hold buttons C and D.
3. Pull up the head restraint.
Reinstall: Align the steel stems into the guide sleeves and push the head
restraint down until it locks.
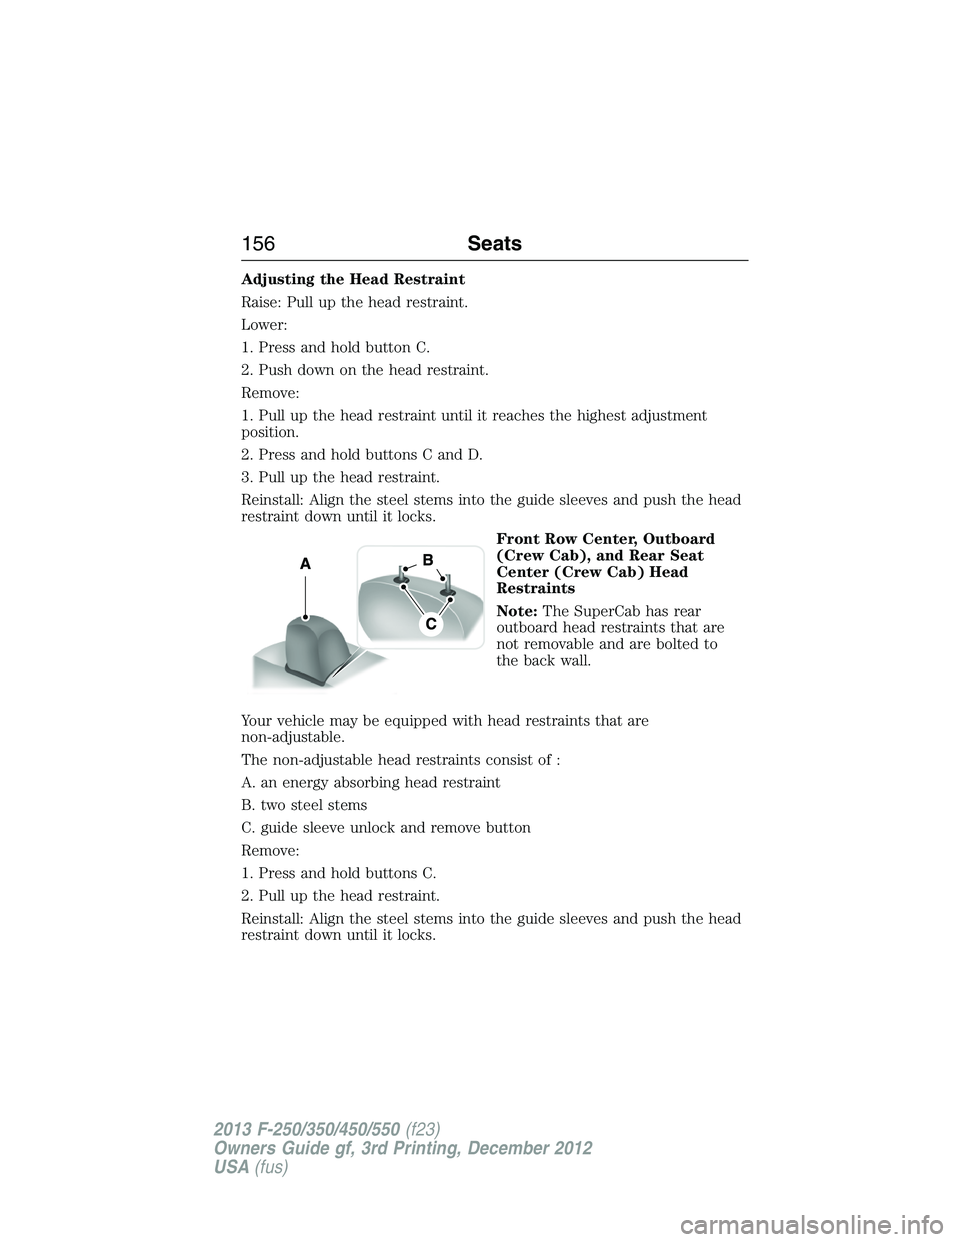
Front Row Center, Outboard
(Crew Cab), and Rear Seat
Center (Crew Cab) Head
Restraints
Note:The SuperCab has rear
outboard head restraints that are
not removable and are bolted to
the back wall.
Your vehicle may be equipped with head restraints that are
non-adjustable.
The non-adjustable head restraints consist of :
A. an energy absorbing head restraint
B. two steel stems
C. guide sleeve unlock and remove button
Remove:
1. Press and hold buttons C.
2. Pull up the head restraint.
Reinstall: Align the steel stems into the guide sleeves and push the head
restraint down until it locks.
156Seats
2013 F-250/350/450/550(f23)
Owners Guide gf, 3rd Printing, December 2012
USA(fus)
Page 161 of 577
MEMORY FUNCTION (IF EQUIPPED)
This system allows automatic positioning of the driver seat, power
mirrors, and adjustable pedals to two programmable positions.
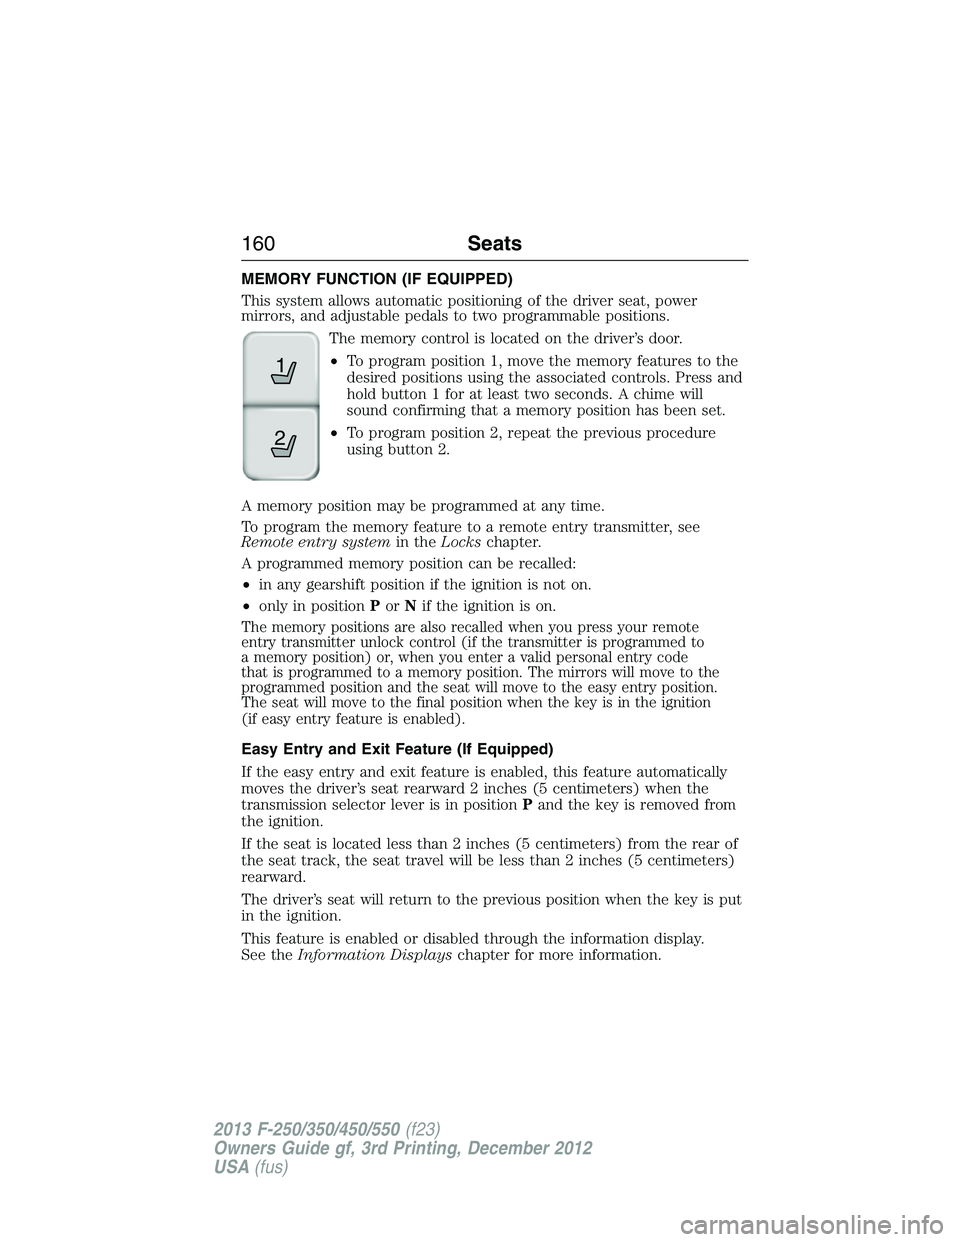
The memory control is located on the driver’s door.
•To program position 1, move the memory features to the
desired positions using the associated controls. Press and
hold button 1 for at least two seconds. A chime will
sound confirming that a memory position has been set.
•To program position 2, repeat the previous procedure
using button 2.
A memory position may be programmed at any time.
To program the memory feature to a remote entry transmitter, see
Remote entry systemin theLockschapter.
A programmed memory position can be recalled:
•in any gearshift position if the ignition is not on.
•only in positionPorNif the ignition is on.
The memory positions are also recalled when you press your remote
entry transmitter unlock control (if the transmitter is programmed to
a memory position) or, when you enter a valid personal entry code
that is programmed to a memory position. The mirrors will move to the
programmed position and the seat will move to the easy entry position.
The seat will move to the final position when the key is in the ignition
(if easy entry feature is enabled).
Easy Entry and Exit Feature (If Equipped)
If the easy entry and exit feature is enabled, this feature automatically
moves the driver’s seat rearward 2 inches (5 centimeters) when the
transmission selector lever is in positionPand the key is removed from
the ignition.
If the seat is located less than 2 inches (5 centimeters) from the rear of
the seat track, the seat travel will be less than 2 inches (5 centimeters)
rearward.
The driver’s seat will return to the previous position when the key is put
in the ignition.
This feature is enabled or disabled through the information display.
See theInformation Displayschapter for more information.
21
160Seats
2013 F-250/350/450/550(f23)
Owners Guide gf, 3rd Printing, December 2012
USA(fus)
Page 162 of 577
REAR SEATS
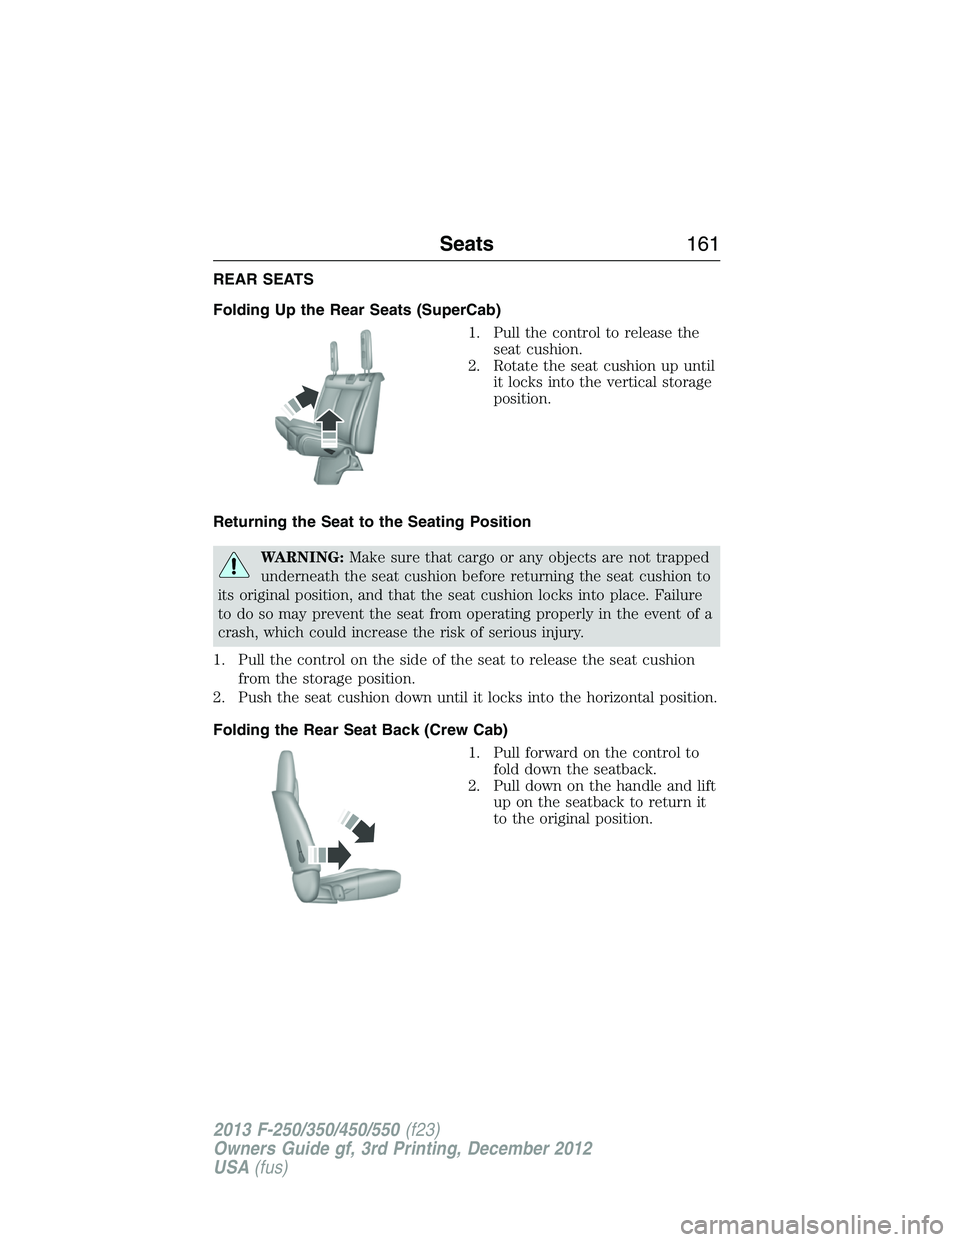
Folding Up the Rear Seats (SuperCab)
1. Pull the control to release the
seat cushion.
2. Rotate the seat cushion up until
it locks into the vertical storage
position.
Returning the Seat to the Seating Position
WARNING:Make sure that cargo or any objects are not trapped
underneath the seat cushion before returning the seat cushion to
its original position, and that the seat cushion locks into place. Failure
to do so may prevent the seat from operating properly in the event of a
crash, which could increase the risk of serious injury.
1. Pull the control on the side of the seat to release the seat cushion
from the storage position.
2. Push the seat cushion down until it locks into the horizontal position.
Folding the Rear Seat Back (Crew Cab)
1. Pull forward on the control to
fold down the seatback.
2. Pull down on the handle and lift
up on the seatback to return it
to the original position.
Seats161
2013 F-250/350/450/550(f23)
Owners Guide gf, 3rd Printing, December 2012
USA(fus)