2013 FORD F250 reset
[x] Cancel search: resetPage 363 of 577

Tire Rotation
WARNING:If the tire label shows different tire pressures for
the front and rear tires and the vehicle is equipped with a tire
pressure monitoring system, then the settings for the system sensors
need to be updated. Always perform the system reset procedure after
tire rotation. If the system is not reset, it may not provide a low tire
pressure warning when necessary. See the TPMS reset procedure in
this chapter.
Note:If your tires show uneven wear ask an authorized dealer to check
for and correct any wheel misalignment, tire imbalance or mechanical
problem involved before tire rotation.
Note:Your vehicle may be equipped with a dissimilar spare tire and
wheel assembly. A dissimilar spare tire and wheel assembly is defined as
a spare tire or wheel that is different in brand, size or appearance from
the road tires and wheels. If you have a dissimilar spare tire and wheel
assembly, it is intended for temporary use only and should not be used
in a tire rotation.
Note:After having your tires rotated, inflation pressure must be checked
and adjusted to the vehicle requirements.
Rotating your tires at the recommended interval (as indicated in the
scheduled maintenance information) will help your tires wear more
evenly, providing better tire performance and longer tire life.
•
Rear-wheel drive vehicles/
Four-wheel drive vehicles
(front tires at top of diagram)
362Wheels and Tires
2013 F-250/350/450/550(f23)
Owners Guide gf, 3rd Printing, December 2012
USA(fus)
Page 370 of 577

Tire Pressure Monitoring System Reset Procedure
WARNING:To determine the required pressure(s) for your
vehicle, see the Safety Compliance Certification Label (affixed to
either the door hinge pillar, door-latch post, or the door edge that
meets the door-latch post, next to the driver’s seating position), or Tire
Label located on the B-Pillar or the edge of the driver’s door. SeeLoad
Carryingfor more information.
Note:The tire pressure monitoring system reset procedure needs to be
performed after each tire rotation on vehicles that require different
recommended tire pressures in the front tires as compared to the rear
tires.
Overview
To provide the vehicle’s load carrying capability, some vehicles require
different recommended tire pressures in the front tires as compared to
the rear tires. The tire pressure monitoring system equipped on these
vehicles is designed to illuminate the low tire pressure warning light at
two different pressures; one for the front tires and one for the rear tires.
Since tires need to be rotated to provide consistent performance and
maximum tire life, the tire pressure monitoring system needs to know
when the tires are rotated to determine which set of tires are on the
front and which are on the rear. With this information, the system can
detect and properly warn of low tire pressures.
System reset tips:
•To reduce the chances of interference from another vehicle, the
system reset procedure should be performed at least three feet (one
meter) away from another Ford Motor Company vehicle undergoing
the system reset procedure at the same time.
•Do not wait more than two minutes between resetting each tire sensor
or the system will time-out and the entire procedure will have to be
repeated on all four wheels.
•A double horn chirp indicates the need to repeat the procedure.
Wheels and Tires369
2013 F-250/350/450/550(f23)
Owners Guide gf, 3rd Printing, December 2012
USA(fus)
Page 371 of 577

Performing the System Reset Procedure
Read the entire procedure before attempting.
1. Drive the vehicle above 20 mph (32 km/h) for at least two minutes
and then park in a safe location where you can easily get to all four tires
and have access to an air pump.
2. Place the ignition in the off position and keep the key in the ignition.
3. Cycle the ignition to the on position with the engine off.
4. Turn the hazard flashers on then off three times. This must be
accomplished within 10 seconds.
If the reset mode has been entered successfully, the horn will sound
once, the system indicator will flash and a message is shown in the
information display (if equipped). If this does not occur, please try again
starting at Step 2.
If after repeated attempts to enter the reset mode, the horn does not
sound, the system indicator does not flash and no message is shown in the
information display (if equipped), seek service from your authorized dealer.
5.Note:Train the tire pressure monitoring system sensors in the tires
using the following system reset sequence starting with the left front tire
in the following clockwise order:
•Left front (Driver’s side front tire)
•Right front (Passenger’s side front tire)
•Right rear (Passenger’s side rear tire)
•Left rear (Driver’s side rear tire)
6. Remove the valve cap from the valve stem on the left front tire;
decrease the air pressure until the horn sounds.
Note:The single horn chirp confirms that the sensor identification code
has been learned by the module for this position. If a double horn is
heard, the reset procedure was unsuccessful, and must be repeated.
7. Remove the valve cap from the valve stem on the right front tire;
decrease the air pressure until the horn sounds.
8. Remove the valve cap from the valve stem on the right rear tire;
decrease the air pressure until the horn sounds.
9. Remove the valve cap from the valve stem on the left rear tire;
decrease the air pressure until the horn sounds.
Training is complete after the horn sounds for the last tire trained
(driver’s side rear tire), the system indicator stops flashing, and a
message is shown in the information display (if equipped).
370Wheels and Tires
2013 F-250/350/450/550(f23)
Owners Guide gf, 3rd Printing, December 2012
USA(fus)
Page 372 of 577

10. Turn the ignition off. If two short horn beeps are heard, the reset
procedure was unsuccessful and must be repeated.
If after repeating the procedure and two short beeps are heard when the
ignition is turned to off, seek assistance from your authorized dealer.
11. Set all four tires to the recommended air pressure as indicated on
the Safety Compliance Certification Label (affixed to either the door
hinge pillar, door-latch post, or the door edge that meets the door-latch
post, next to the driver’s seating position) or Tire Label located on the
B-Pillar or the edge of the driver’s door. SeeLoad Carryingfor more
information.
CHANGING A ROAD WHEEL
WARNING:The use of tire sealants may damage your tire
pressure monitoring system and should not be used. However, if
you must use a sealant, the tire pressure monitoring system sensor and
valve stem on the wheel must be replaced by an authorized Ford dealer.
WARNING:SeeTire Pressure Monitoring Systemin this
chapter for important information. If the tire pressure monitor
sensor becomes damaged, it will no longer function.
Note:
If your vehicle is equipped with the tire pressure monitoring system,
the indicator light will illuminate when the spare tire is in use. To restore
the full function of the monitoring system, all road wheels equipped with
tire pressure monitoring sensors must be mounted on the vehicle.
If you get a flat tire while driving, do not apply the brake heavily.
Instead, gradually decrease your speed. Hold the steering wheel firmly
and slowly move to a safe place on the side of the road.
If your vehicle is equipped with the tire pressure monitoring system,
have a flat serviced by an authorized dealer in order to prevent damage
to the system sensors. SeeTire Pressure Monitoring Systemin this
chapter. Replace the spare tire with a road tire as soon as possible.
During repairing or replacing of the flat tire, have the authorized dealer
inspect the system sensor for damage.
Wheels and Tires371
2013 F-250/350/450/550(f23)
Owners Guide gf, 3rd Printing, December 2012
USA(fus)
Page 424 of 577

The cellular profile, media device index, and development log remain in
the vehicle unless you delete them and are generally accessible only in
the vehicle when the cellular phone or media player is connected. If you
no longer plan to use the system or the vehicle, we recommend you
perform a Master Reset to erase all stored information.
System data cannot be accessed without special equipment and access to
the vehicle’s SYNC module. Ford Motor Company and Ford of Canada do
not access the system data for any purpose other than as described absent
consent, a court order, or where required by law enforcement, other
government authorities, or other third parties acting with lawful authority.
Other parties may seek to access the information independently of Ford
Motor Company and Ford of Canada. For further privacy information, see
the sections on 911 Assist, Vehicle Health Report, and Traffic, Directions
and Information.
USING VOICE RECOGNITION
This system helps you control many features using voice commands.
This allows you to keep your hands on the wheel and focus on what is in
front of you.
Initiating a Voice Session
Push the voice icon; a tone sounds and Listening appears in the
display. Say any of the following:
Say: If you want to:
“Phone” Make calls.
“USB”
Access the device connected to your USB port.
“Bluetooth Audio” Stream audio from your phone.
“Line in” Access the device connected to the auxiliary
input jack.
“Cancel” Cancel the requested action.
“SYNC” Return to the main menu.
“Voice settings”
Adjust the level of voice interaction and
feedback.
“Vehicle Health Report” Run a vehicle health report.*
“Services” Access the SYNC Services portal.*
“Mobile apps” Access mobile applications.*
“Help” Hear a list of voice commands available in the
current mode.
*If equipped, U.S. only.
SYNC®423
2013 F-250/350/450/550(f23)
Owners Guide gf, 3rd Printing, December 2012
USA(fus)
Page 433 of 577

When you select: You can:
Text Message1Enables you to send, download and delete
text messages.
Phone Settings
1Allows you to view your phone’s status, set
ring tones, select your message notification,
change phone book entries and automatically
download your cellular phone among other
features.
SYNC Services
3Access the SYNC services portal where you
can request various types of information,
traffic reports and directions.
911 Assist
4Place an emergency call to a 911 operator for
you after an accident (if the feature is used
properly).
Vehicle Health
Report
3Create and receive a diagnostic report card on
your vehicle.
Mobile Apps
3Interact with SYNC-capable mobile
applications on your smartphone.
System SettingsAccess Bluetooth Devices menu listings
(add, connect, set as primary, on/off, delete)
as well as Advanced menu listings (prompts,
languages, defaults, master reset, install
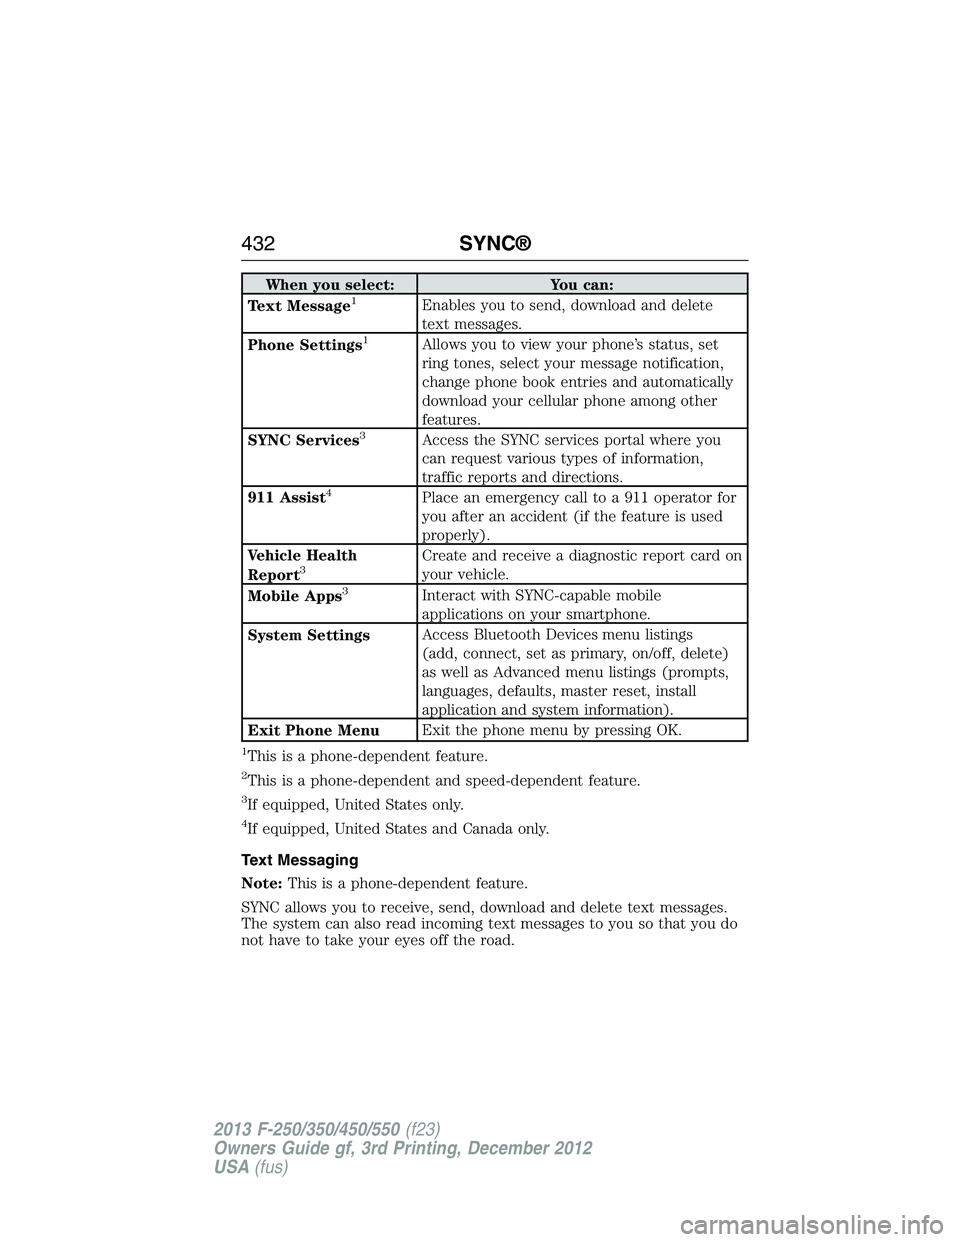
application and system information).
Exit Phone MenuExit the phone menu by pressing OK.
1This is a phone-dependent feature.
2This is a phone-dependent and speed-dependent feature.
3If equipped, United States only.
4If equipped, United States and Canada only.
Text Messaging
Note:This is a phone-dependent feature.
SYNC allows you to receive, send, download and delete text messages.
The system can also read incoming text messages to you so that you do
not have to take your eyes off the road.
432SYNC®
2013 F-250/350/450/550(f23)
Owners Guide gf, 3rd Printing, December 2012
USA(fus)
Page 438 of 577

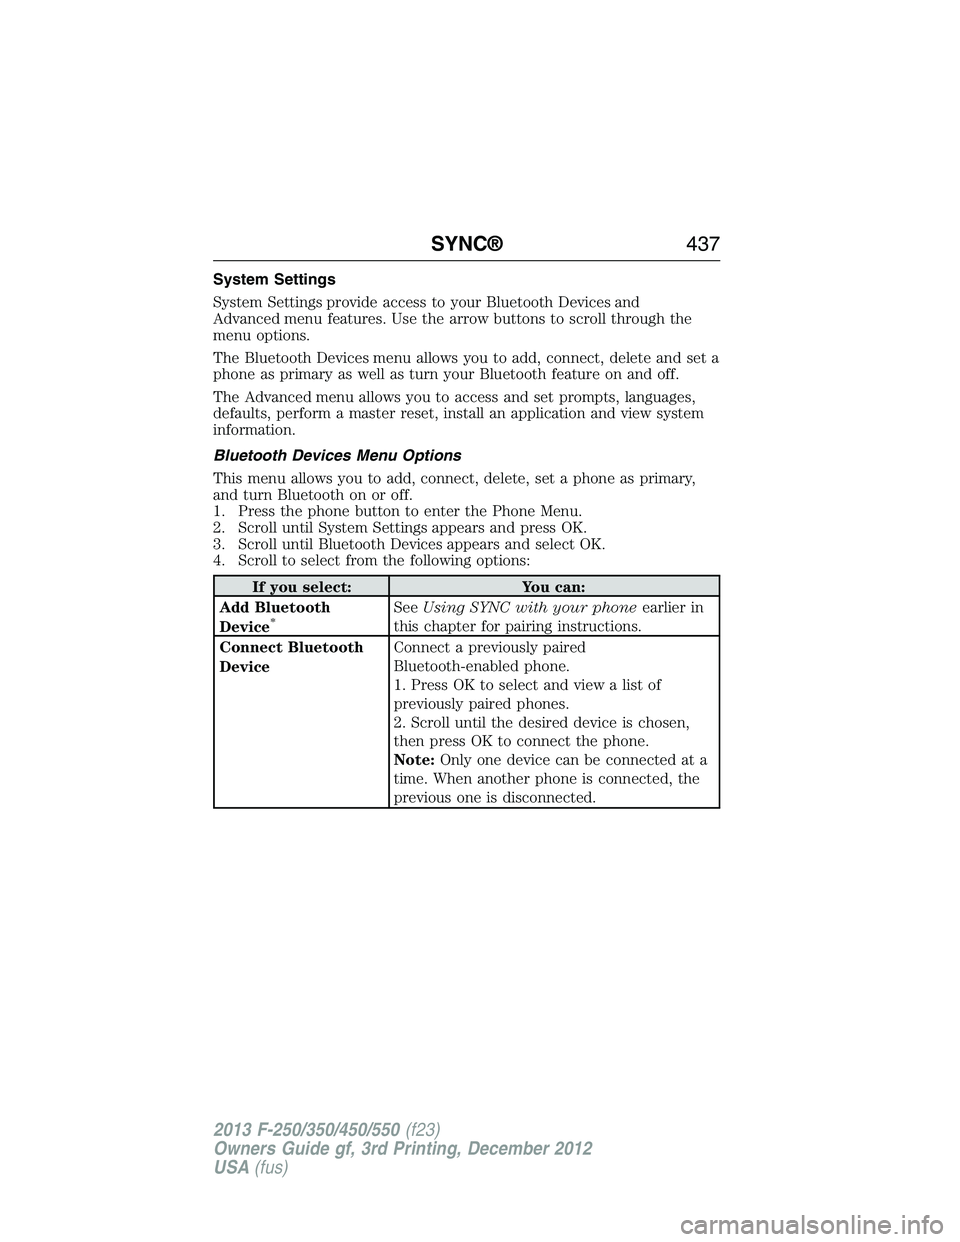
System Settings
System Settings provide access to your Bluetooth Devices and
Advanced menu features. Use the arrow buttons to scroll through the
menu options.
The Bluetooth Devices menu allows you to add, connect, delete and set a
phone as primary as well as turn your Bluetooth feature on and off.
The Advanced menu allows you to access and set prompts, languages,
defaults, perform a master reset, install an application and view system
information.
Bluetooth Devices Menu Options
This menu allows you to add, connect, delete, set a phone as primary,
and turn Bluetooth on or off.
1. Press the phone button to enter the Phone Menu.
2. Scroll until System Settings appears and press OK.
3. Scroll until Bluetooth Devices appears and select OK.
4. Scroll to select from the following options:
If you select: You can:
Add Bluetooth
Device
*SeeUsing SYNC with your phoneearlier in
this chapter for pairing instructions.
Connect Bluetooth
DeviceConnect a previously paired
Bluetooth-enabled phone.
1. Press OK to select and view a list of
previously paired phones.
2. Scroll until the desired device is chosen,
then press OK to connect the phone.
Note:Only one device can be connected at a
time. When another phone is connected, the
previous one is disconnected.
SYNC®437
2013 F-250/350/450/550(f23)
Owners Guide gf, 3rd Printing, December 2012
USA(fus)
Page 440 of 577

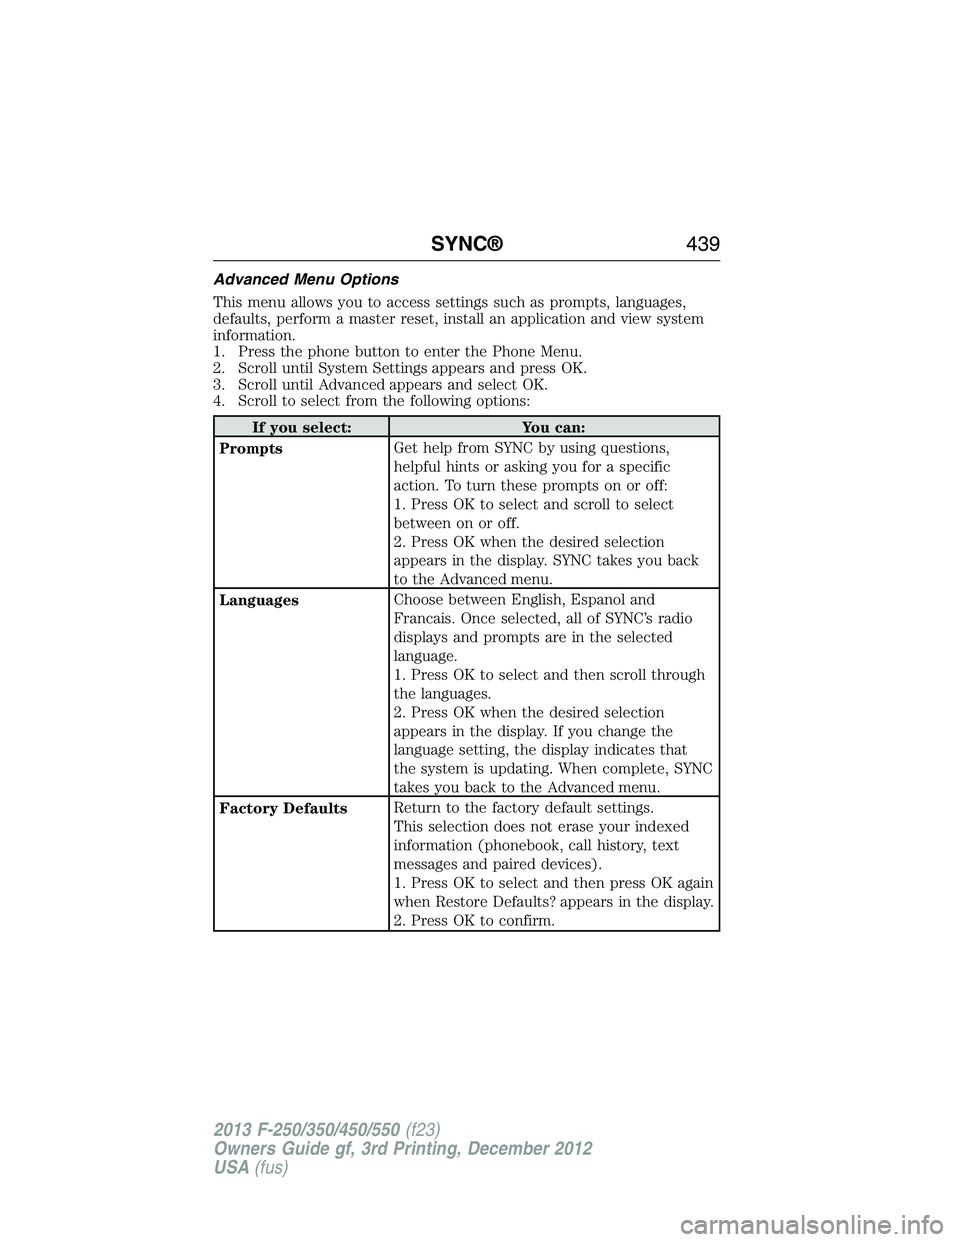
Advanced Menu Options
This menu allows you to access settings such as prompts, languages,
defaults, perform a master reset, install an application and view system
information.
1. Press the phone button to enter the Phone Menu.
2. Scroll until System Settings appears and press OK.
3. Scroll until Advanced appears and select OK.
4. Scroll to select from the following options:
If you select: You can:
PromptsGet help from SYNC by using questions,
helpful hints or asking you for a specific
action. To turn these prompts on or off:
1. Press OK to select and scroll to select
between on or off.
2. Press OK when the desired selection
appears in the display. SYNC takes you back
to the Advanced menu.
LanguagesChoose between English, Espanol and
Francais. Once selected, all of SYNC’s radio
displays and prompts are in the selected
language.
1. Press OK to select and then scroll through
the languages.
2. Press OK when the desired selection
appears in the display. If you change the
language setting, the display indicates that
the system is updating. When complete, SYNC
takes you back to the Advanced menu.
Factory DefaultsReturn to the factory default settings.
This selection does not erase your indexed
information (phonebook, call history, text
messages and paired devices).
1. Press OK to select and then press OK again
when Restore Defaults? appears in the display.
2. Press OK to confirm.
SYNC®439
2013 F-250/350/450/550(f23)
Owners Guide gf, 3rd Printing, December 2012
USA(fus)