2013 FORD F250 parking brake
[x] Cancel search: parking brakePage 304 of 577
Working with the Engine Off
1. Set the parking brake and shift toP(Park).
2. Turn off the engine and remove the key (if equipped).
3. Block the wheels.
Working with the Engine On
WARNING:To reduce the risk of vehicle damage or personal
burn injuries, do not start your engine with the air cleaner
removed and do not remove it while the engine is running.
1. Set the parking brake and shift to positionP.
2. Block the wheels.
OPENING AND CLOSING THE HOOD
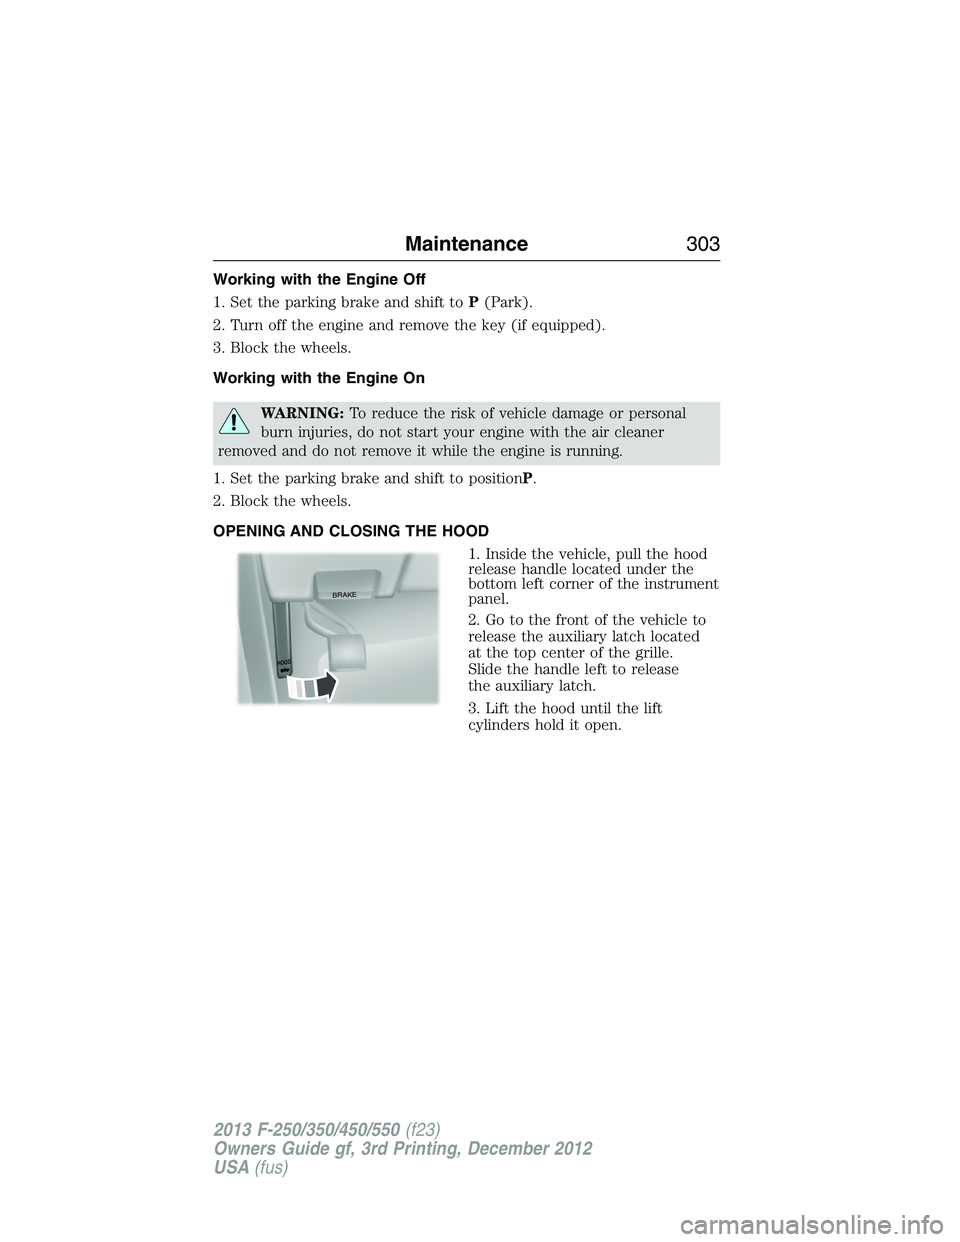
1. Inside the vehicle, pull the hood
release handle located under the
bottom left corner of the instrument
panel.
2. Go to the front of the vehicle to
release the auxiliary latch located
at the top center of the grille.
Slide the handle left to release
the auxiliary latch.
3. Lift the hood until the lift
cylinders hold it open.
BRAKE
HOOD
Maintenance303
2013 F-250/350/450/550(f23)
Owners Guide gf, 3rd Printing, December 2012
USA(fus)
Page 307 of 577
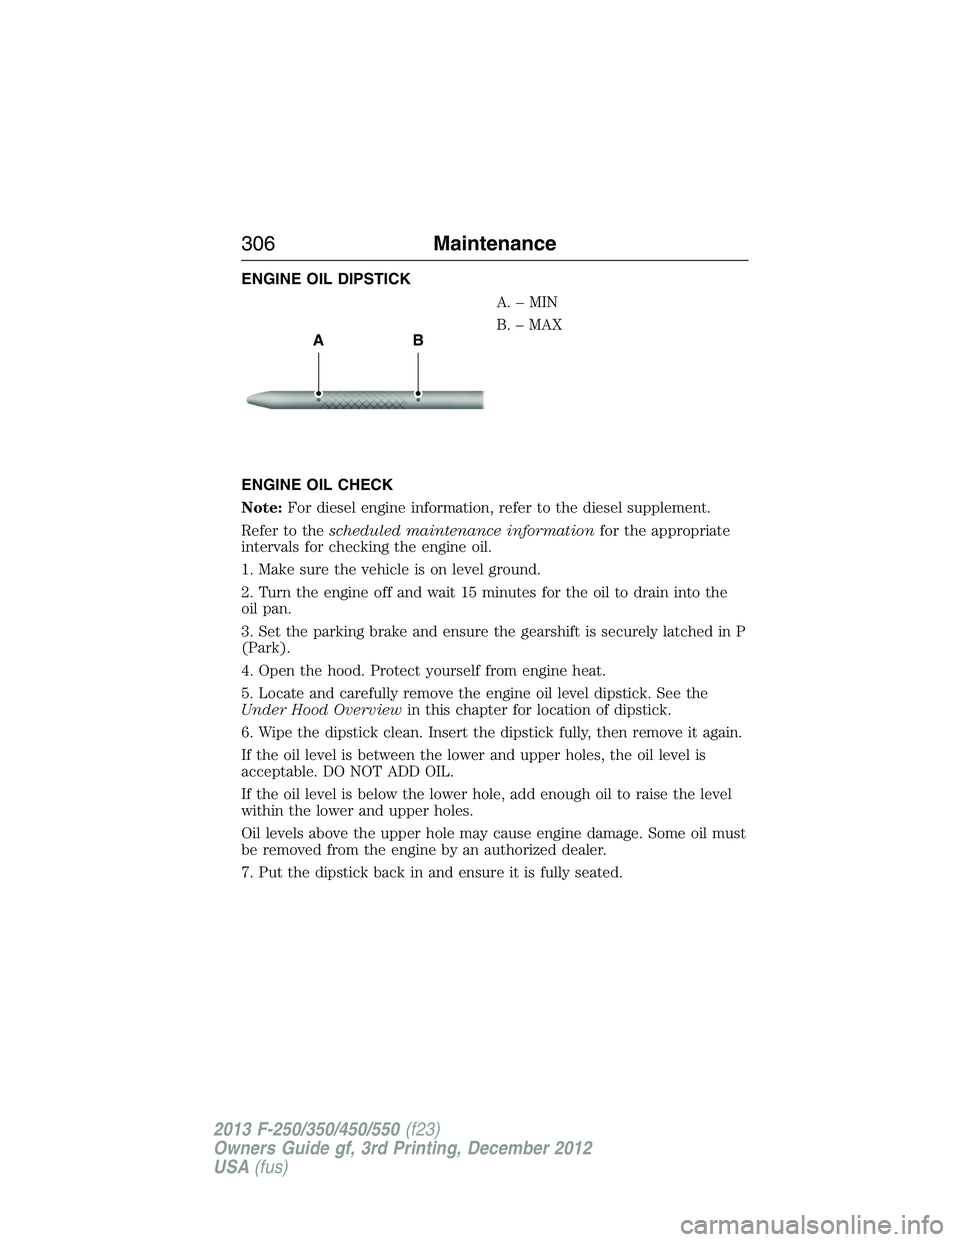
ENGINE OIL DIPSTICK
A.–MIN
B. – MAX
ENGINE OIL CHECK
Note:For diesel engine information, refer to the diesel supplement.
Refer to thescheduled maintenance informationfor the appropriate
intervals for checking the engine oil.
1. Make sure the vehicle is on level ground.
2. Turn the engine off and wait 15 minutes for the oil to drain into the
oil pan.
3. Set the parking brake and ensure the gearshift is securely latched in P
(Park).
4. Open the hood. Protect yourself from engine heat.
5. Locate and carefully remove the engine oil level dipstick. See the
Under Hood Overviewin this chapter for location of dipstick.
6. Wipe the dipstick clean. Insert the dipstick fully, then remove it again.
If the oil level is between the lower and upper holes, the oil level is
acceptable. DO NOT ADD OIL.
If the oil level is below the lower hole, add enough oil to raise the level
within the lower and upper holes.
Oil levels above the upper hole may cause engine damage. Some oil must
be removed from the engine by an authorized dealer.
7. Put the dipstick back in and ensure it is fully seated.
AB
306Maintenance
2013 F-250/350/450/550(f23)
Owners Guide gf, 3rd Printing, December 2012
USA(fus)
Page 314 of 577
TRANSMISSION FLUID CHECK
Checking Automatic Transmission Fluid (If Equipped)
Refer to yourScheduled Maintenance Informationfor scheduled
intervals for fluid checks and changes. Your transmission does not
consume fluid. However, the fluid level should be checked if the
transmission is not working properly, i.e., if the transmission slips
or shifts slowly or if you notice some sign of fluid leakage.
Automatic transmission fluid expands when warmed. To obtain an
accurate fluid check, drive the vehicle until it is at normal operating
temperature (approximately 20 miles [30 km]). Verify that the
transmission fluid temperature gauge, located on the instrument
cluster, is within normal range.
1. Drive the vehicle 20 miles (30 km) or until it reaches normal operating
temperature.
2. Park the vehicle on a level surface and engage the parking brake.
3. With the engine running, parking brake engaged and your foot on the
brake pedal, move the gearshift lever through all of the gear ranges.
Allow sufficient time for each gear to engage.
4. Latch the gearshift lever in P (Park) and leave the engine running.
5. Remove the dipstick, wiping it clean with a clean, dry lint free rag.
If necessary, refer toUnder Hood Overviewin this chapter for the
location of the dipstick.
6. Install the dipstick making sure it is fully seated in the filler tube.
7. Remove the dipstick and inspect the fluid level. The fluid should be
in the designated area for normal operating temperature or ambient
temperature.
Your vehicle is equipped with one of the following dipsticks.
Maintenance313
2013 F-250/350/450/550(f23)
Owners Guide gf, 3rd Printing, December 2012
USA(fus)
Page 320 of 577
WARNING:Keep batteries out of reach of children. Batteries
contain sulfuric acid. Avoid contact with skin, eyes or clothing.
Shield your eyes when working near the battery to protect against
possible splashing of acid solution. In case of acid contact with skin or
eyes, flush immediately with water for a minimum of 15 minutes and
get prompt medical attention. If acid is swallowed, call a physician
immediately.
WARNING:Battery posts, terminals and related accessories
contain lead and lead compounds. Wash hands after handling.
Note:If your battery has a cover/shield, make sure it is reinstalled after
the battery has been cleaned or replaced.
Note:Electrical or electronic accessories or components added to
the vehicle by the dealer or the owner may adversely affect battery
performance and durability.
Your vehicle is equipped with a Motorcraft® maintenance-free battery
which normally does not require additional water during its life of
service.
For longer, trouble-free operation, keep the top of the battery clean and
dry. Also, make certain the battery cables are always tightly fastened to
the battery terminals.
If you see any corrosion on the battery or terminals, remove the cables
from the terminals and clean with a wire brush. You can neutralize the
acid with a solution of baking soda and water.
It is recommended that the negative battery cable terminal be
disconnected from the battery if you plan to store your vehicle for an
extended period of time. This will minimize the discharge of your battery
during storage.
Because your vehicle’s engine is electronically controlled by a computer,
some control conditions are maintained by power from the battery. When
the battery is disconnected or a new battery is installed, the engine must
relearn its idle and fuel trim strategy for optimum driveability and
performance. Flexible fuel vehicles (FFV) must also relearn the ethanol
content of the fuel for optimum driveability and performance. To begin
this process:
1. With the vehicle at a complete stop, set the parking brake.
2. Put the gearshift in P (Park), turn off all accessories and start the
engine.
Maintenance319
2013 F-250/350/450/550(f23)
Owners Guide gf, 3rd Printing, December 2012
USA(fus)
Page 321 of 577
3. Run the engine until it reaches normal operating temperature.
4. Allow the engine to idle for at least one minute.
5. Turn the A/C on and allow the engine to idle for at least one minute.
6. Release the parking brake. With your foot on the brake pedal and with
the A/C on, put the vehicle in D (Drive) and allow the engine to idle for
at least one minute.
Note:If you do not allow the engine to relearn its idle trim, the idle
quality of your vehicle may be adversely affected until the idle trim is
eventually relearned.
7. Drive the vehicle to complete the relearning process.
•The vehicle may need to be driven 10 miles (16 kilometers) or more
to relearn the idle and fuel trim strategy along with the ethanol
content for flexible fuel vehicles.
•For flexible fuel vehicles, if you are operating on E85, you may
experience poor starts or an inability to start the engine and
driveability problems until the fuel trim and ethanol content
have been relearned.
If the battery has been disconnected or a new battery has been installed,
the clock and radio settings must be reset once the battery is reconnected.
•Always dispose of automotive
batteries in a responsible manner.
Follow your local authorized
standards for disposal. Call your
local authorized recycling center
to find out more about recycling
automotive batteries.
L
E
A
D
RETURN
RECYCLE
320Maintenance
2013 F-250/350/450/550(f23)
Owners Guide gf, 3rd Printing, December 2012
USA(fus)
Page 343 of 577
Battery
•Check and recharge as necessary. Keep connections clean.
•If storing your vehicle for more than 30 days without recharging the
battery, it may be advisable to disconnect the battery cables to ensure
battery charge is maintained for quick starting.
Note:If battery cables are disconnected, it will be necessary to reset
memory features.
Brakes
•Make sure brakes and parking brake are fully released.
Tires
•Maintain recommended air pressure.
Miscellaneous
•Make sure all linkages, cables, levers and pins under vehicle are
covered with grease to prevent rust.
•Move vehicles at least 25 feet (8 meters) every 15 days to lubricate
working parts and prevent corrosion.
Removing Vehicle from Storage
When your vehicle is ready to come out of storage, do the following:
•Wash your vehicle to remove any dirt or grease film build-up on
window surfaces.
•Check windshield wipers for any deterioration.
•Check under the hood for any foreign material that may have collected
during storage (mice/squirrel nests).
•Check the exhaust for any foreign material that may have collected
during storage.
•Check tire pressures and set tire inflation per the Tire Label.
•Check brake pedal operation. Drive the vehicle 15 feet (4.5 meters)
back and forth to remove rust build-up.
•Check fluid levels (including coolant, oil and gas) to make sure there
are no leaks and fluids are at recommended levels.
•If the battery was removed, clean the battery cable ends and inspect.
Contact your authorized dealer if you have any concerns or issues.
342Vehicle Care
2013 F-250/350/450/550(f23)
Owners Guide gf, 3rd Printing, December 2012
USA(fus)
Page 377 of 577
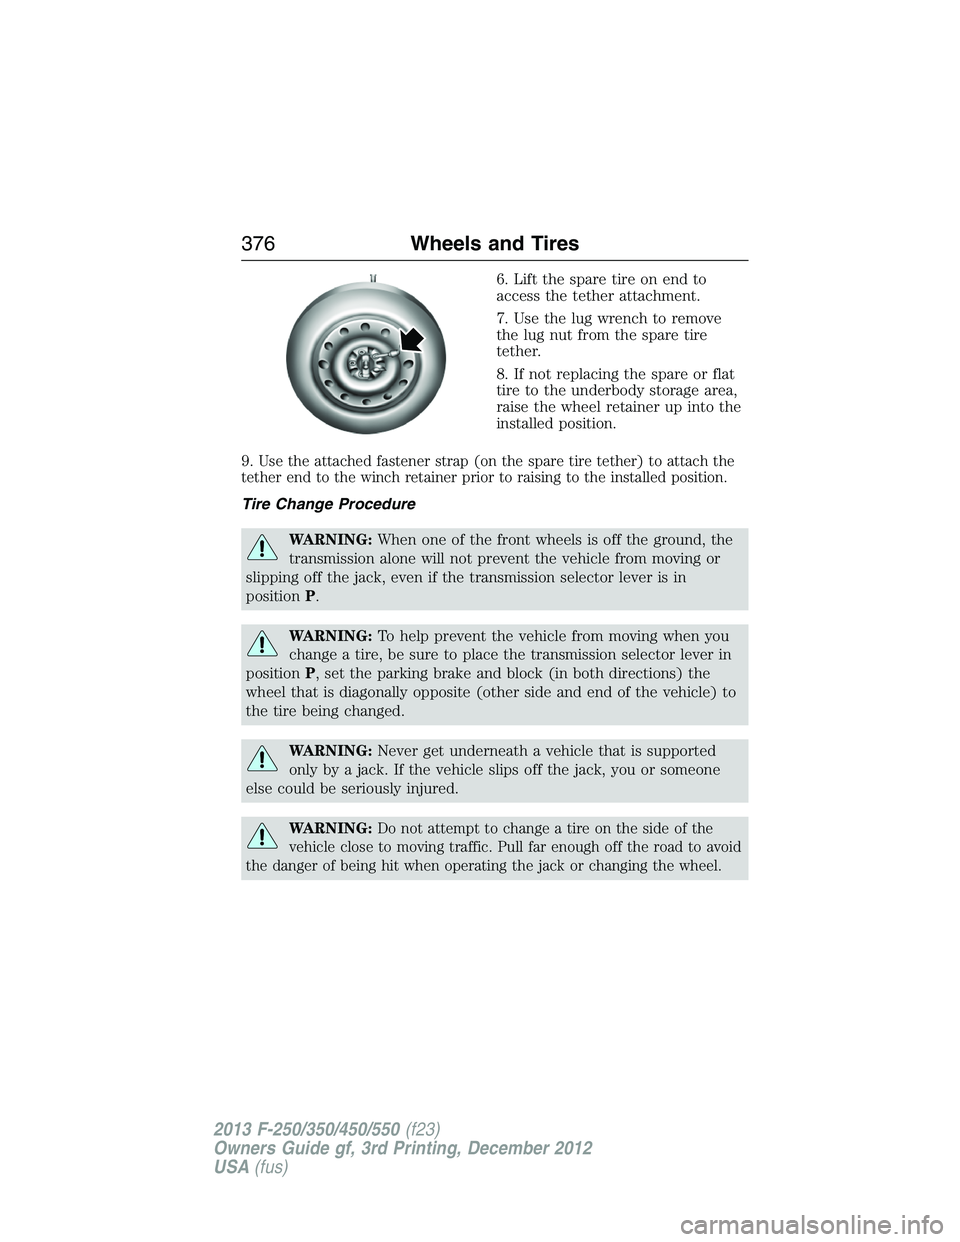
6. Lift the spare tire on end to
access the tether attachment.
7. Use the lug wrench to remove
the lug nut from the spare tire
tether.
8. If not replacing the spare or flat
tire to the underbody storage area,
raise the wheel retainer up into the
installed position.
9.
Use the attached fastener strap (on the spare tire tether) to attach the
tether end to the winch retainer prior to raising to the installed position.
Tire Change Procedure
WARNING:When one of the front wheels is off the ground, the
transmission alone will not prevent the vehicle from moving or
slipping off the jack, even if the transmission selector lever is in
positionP.
WARNING:To help prevent the vehicle from moving when you
change a tire, be sure to place the transmission selector lever in
positionP, set the parking brake and block (in both directions) the
wheel that is diagonally opposite (other side and end of the vehicle) to
the tire being changed.
WARNING:Never get underneath a vehicle that is supported
only by a jack. If the vehicle slips off the jack, you or someone
else could be seriously injured.
WARNING:Do not attempt to change a tire on the side of the
vehicle close to moving traffic. Pull far enough off the road to avoid
the danger of being hit when operating the jack or changing the wheel.
376Wheels and Tires
2013 F-250/350/450/550(f23)
Owners Guide gf, 3rd Printing, December 2012
USA(fus)
Page 393 of 577
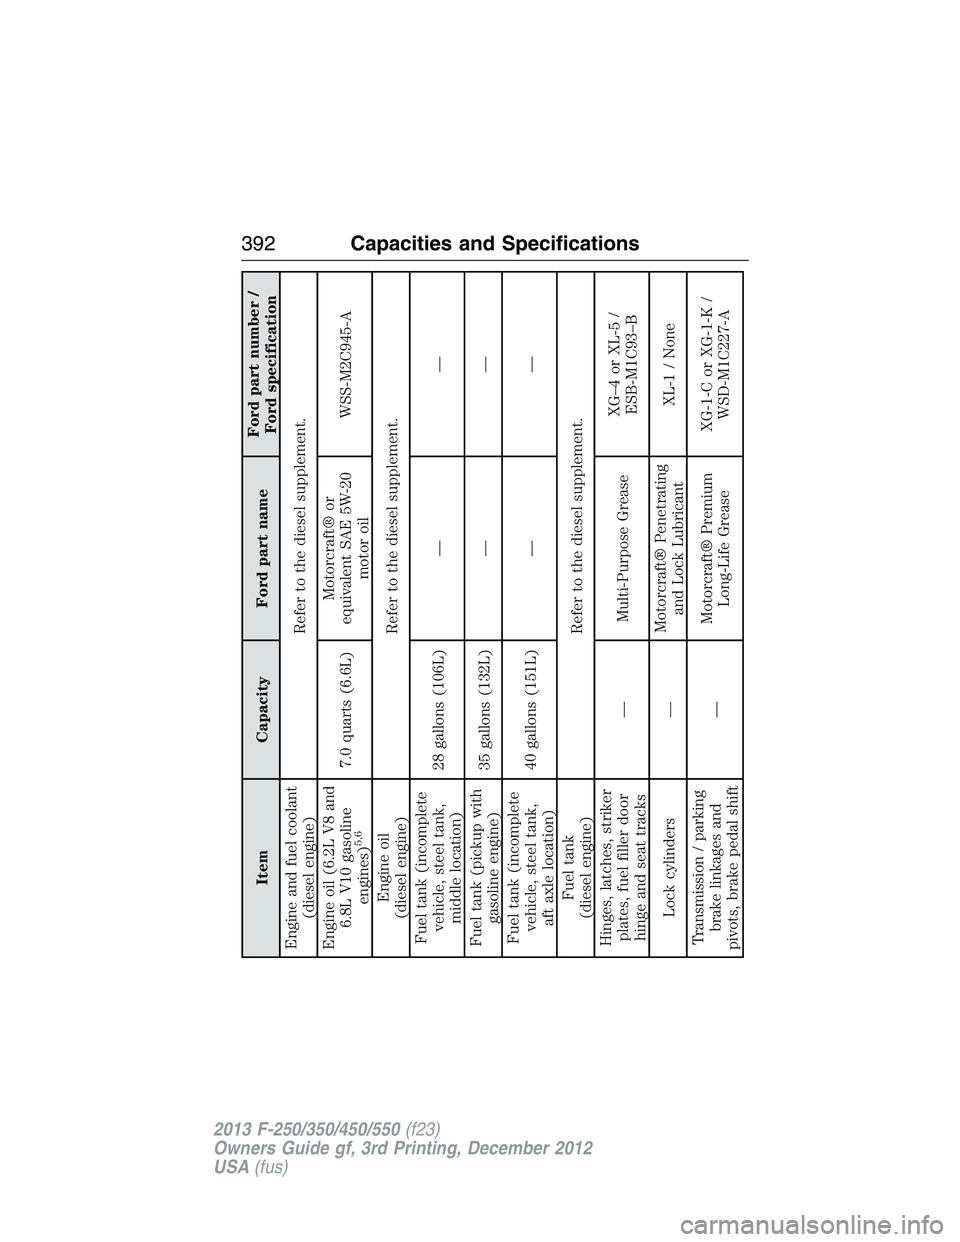
Item Capacity Ford part nameFord part number /
Ford specification
Engine and fuel coolant
(diesel engine)Refer to the diesel supplement.
Engine oil (6.2L V8 and
6.8L V10 gasoline
engines)
5,6
7.0 quarts (6.6L)Motorcraft® or
equivalent SAE 5W-20
motor oilWSS-M2C945-A
Engine oil
(diesel engine)Refer to the diesel supplement.
Fuel tank (incomplete
vehicle, steel tank,
middle location)28 gallons (106L) — —
Fuel tank (pickup with
gasoline engine)35 gallons (132L) — —
Fuel tank (incomplete
vehicle, steel tank,
aft axle location)40 gallons (151L) — —
Fuel tank
(diesel engine)Refer to the diesel supplement.
Hinges, latches, striker
plates, fuel filler door
hinge and seat tracks— Multi-Purpose GreaseXG–4 or XL-5 /
ESB-M1C93–B
Lock cylinders —Motorcraft® Penetrating
and Lock LubricantXL-1 / None
Transmission / parking
brake linkages and
pivots, brake pedal shift—Motorcraft® Premium
Long-Life GreaseXG-1-C or XG-1-K /
WSD-M1C227-A
392Capacities and Specifications
2013 F-250/350/450/550(f23)
Owners Guide gf, 3rd Printing, December 2012
USA(fus)