2013 FORD F250 turn signal
[x] Cancel search: turn signalPage 174 of 577
Note:Make sure you keep the original remote control transmitter for
use in other vehicles as well as for future system programming.
Note:We recommend that upon the sale or lease termination of your
vehicle, you erase the programmed function buttons for security reasons.
SeeErasing the function button codeslater in this section.
Note:You can program a maximum of three devices. To change or
replace any of the three devices after it has been initially programmed,
you must first erase the current settings. SeeErasing the function
button codeslater in this section.
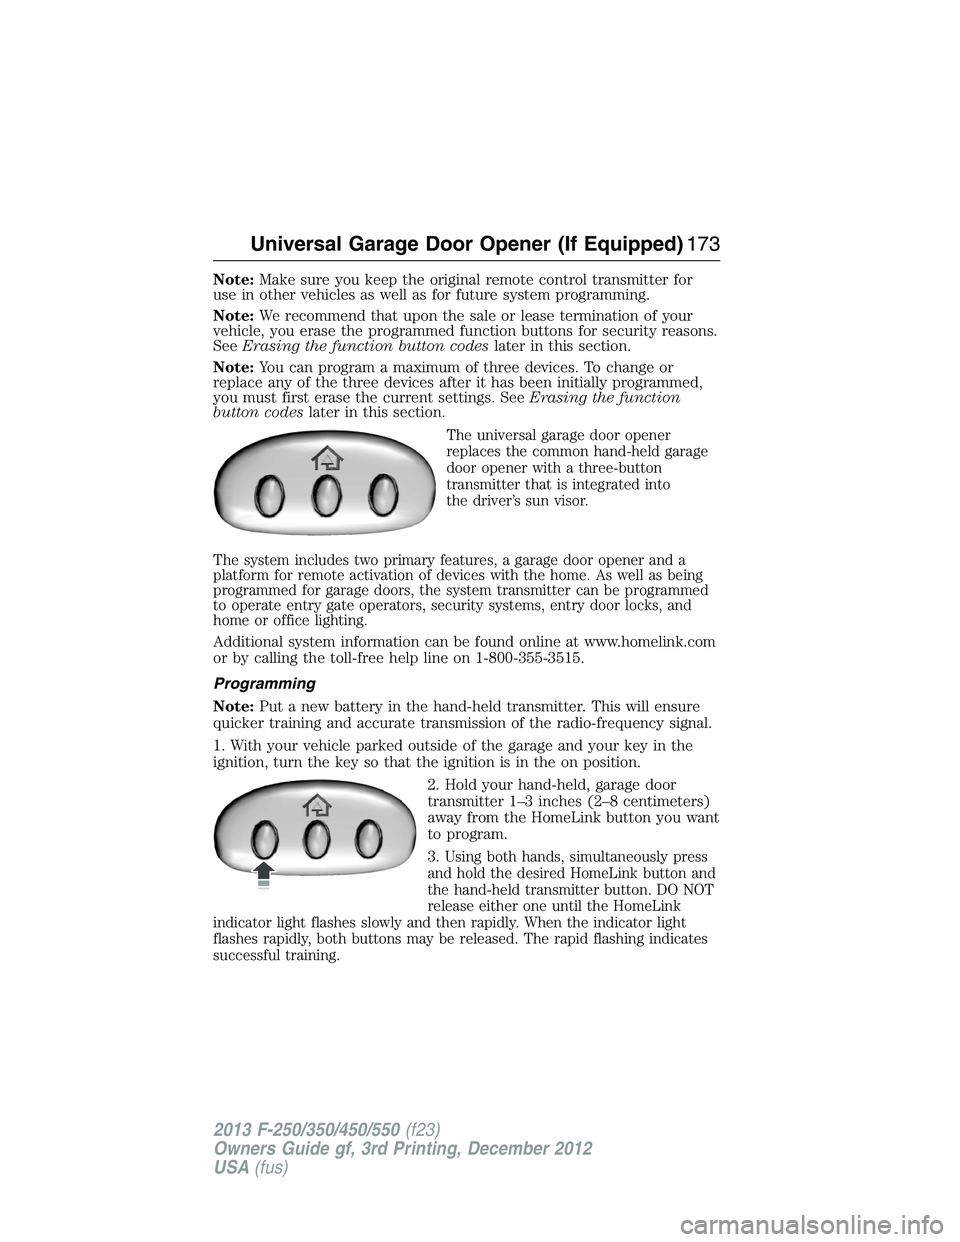
The universal garage door opener
replaces the common hand-held garage
door opener with a three-button
transmitter that is integrated into
the driver’s sun visor.
The system includes two primary features, a garage door opener and a
platform for remote activation of devices with the home. As well as being
programmed for garage doors, the system transmitter can be programmed
to operate entry gate operators, security systems, entry door locks, and
home or office lighting.
Additional system information can be found online at www.homelink.com
or by calling the toll-free help line on 1-800-355-3515.
Programming
Note:Put a new battery in the hand-held transmitter. This will ensure
quicker training and accurate transmission of the radio-frequency signal.
1. With your vehicle parked outside of the garage and your key in the
ignition, turn the key so that the ignition is in the on position.
2. Hold your hand-held, garage door
transmitter 1–3 inches (2–8 centimeters)
away from the HomeLink button you want
to program.
3.
Using both hands, simultaneously press
and hold the desired HomeLink button and
the hand-held transmitter button. DO NOT
release either one until the HomeLink
indicator light flashes slowly and then rapidly. When the indicator light
flashes rapidly, both buttons may be released. The rapid flashing indicates
successful training.
Universal Garage Door Opener (If Equipped)173
2013 F-250/350/450/550(f23)
Owners Guide gf, 3rd Printing, December 2012
USA(fus)
Page 175 of 577
4. Press and hold the HomeLink button you programmed for five
seconds, then release. You may need to do this twice to activate the
door. If your garage door does not operate, watch the HomeLink
indicator light.
If the indicator light stays on, the programming is complete. Press and
release the programmed HomeLink button, and then begin programming
your garage door opener. See below for Steps5–7.
If the indicator light flashes rapidly for two seconds and then turns to
a constant light, the HomeLink button is not programmed yet. Do the
following:
Press and hold the HomeLink button while you press and release the
hand-held transmitter button every two seconds. The HomeLink
indicator light will flash slowly and then rapidly once the HomeLink
function button recognizes and accepts the hand-held transmitter’s
radio frequency signal.
After programming the HomeLink button, follow Steps5–7aslisted
below to program your garage door opener.
Note:You may need a ladder to reach the unit
and you may need to remove the cover or
lamp lens on your garage door opener.
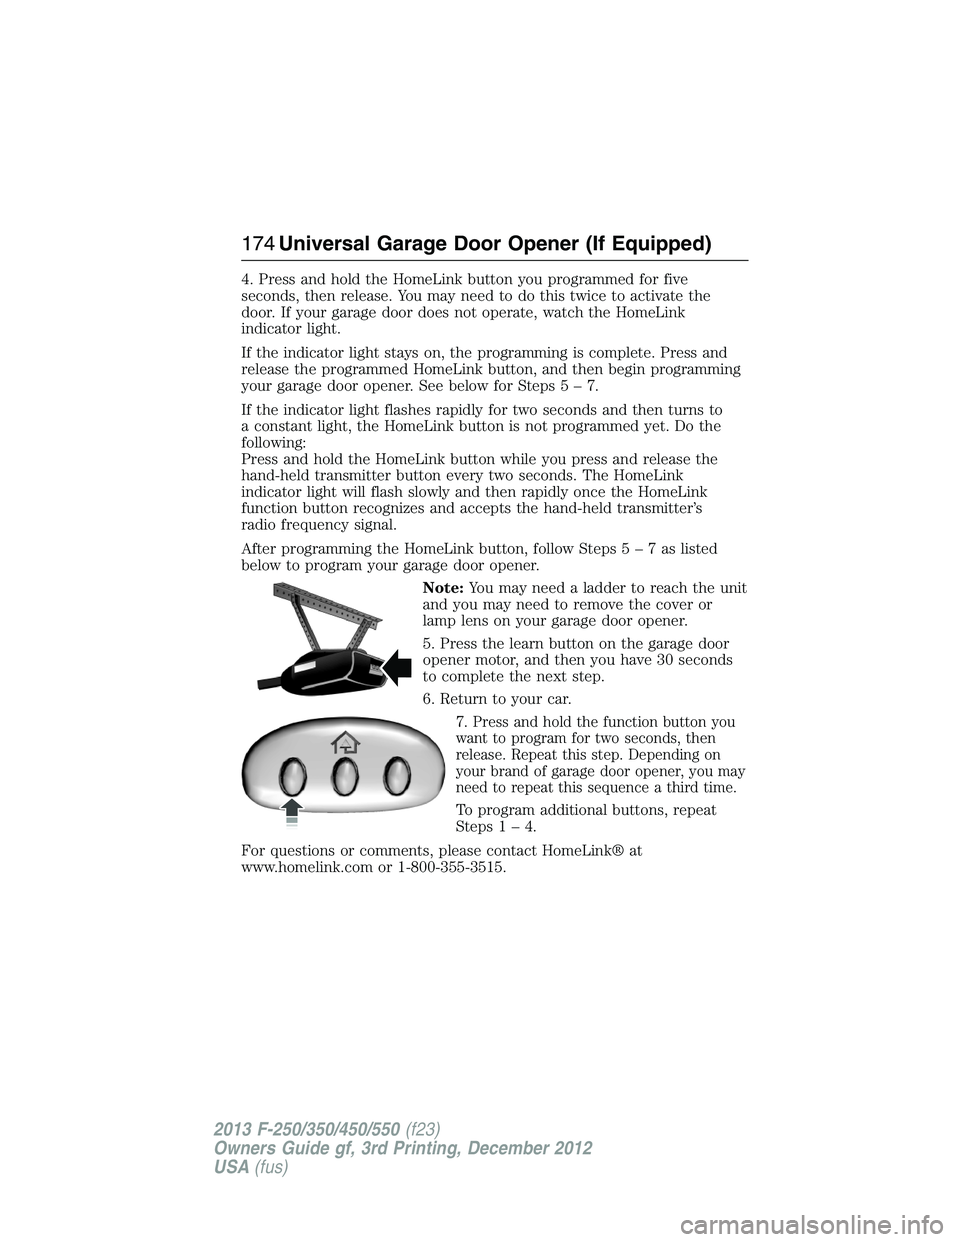
5. Press the learn button on the garage door
opener motor, and then you have 30 seconds
to complete the next step.
6. Return to your car.
7.
Press and hold the function button you
want to program for two seconds, then
release. Repeat this step. Depending on
your brand of garage door opener, you may
need to repeat this sequence a third time.
To program additional buttons, repeat
Steps1–4.
For questions or comments, please contact HomeLink® at
www.homelink.com or 1-800-355-3515.
174Universal Garage Door Opener (If Equipped)
2013 F-250/350/450/550(f23)
Owners Guide gf, 3rd Printing, December 2012
USA(fus)
Page 264 of 577
Trailer Lamps
WARNING:Never connect any trailer lamp wiring to the
vehicle’s tail lamp wiring; this may damage the electrical system
resulting in a fire. Contact an authorized dealer as soon as possible for
assistance in proper trailer tow wiring installation. Additional electrical
equipment may be required.
Trailer lamps are required on most towed vehicles. Make sure all running
lights, brake lights, turn signals and hazard lights are working.
Using a Step Bumper (If Equipped)
The rear bumper is equipped with an integral hitch and only requires a
ball with a one-inch (25.4 millimeter) shank diameter. The bumper has a
5000-pound (2268 kilogram) trailer weight and a 500-pound (227 kilogram)
tongue weight capacity.
If it is necessary to relocate the hitch ball position, you must install a
frame-mounted trailer hitch.
Before Towing a Trailer
Practice turning, stopping and backing up to get the feel of your
vehicle-trailer combination before starting on a trip. When turning,
make wider turns so the trailer wheels clear curbs and other obstacles.
When Towing a Trailer
•Do not drive faster than 70 mph (113 km/h) during the first 500 miles
(800 kilometers).
•Do not make full-throttle starts.
•Check your hitch, electrical connections and trailer wheel lug nuts
thoroughly after you have traveled 50 miles (80 kilometers).
•When stopped in congested or heavy traffic during hot weather, place
the gearshift in positionPto aid engine and transmission cooling and
to help A/C performance.
•Turn off the speed control with heavy loads or in hilly terrain.
The speed control may turn off automatically when you are towing
on long, steep grades.
•Shift to a lower gear when driving down a long or steep hill. Do not
apply the brakes continuously, as they may overheat and become less
effective.
Towing263
2013 F-250/350/450/550(f23)
Owners Guide gf, 3rd Printing, December 2012
USA(fus)
Page 296 of 577
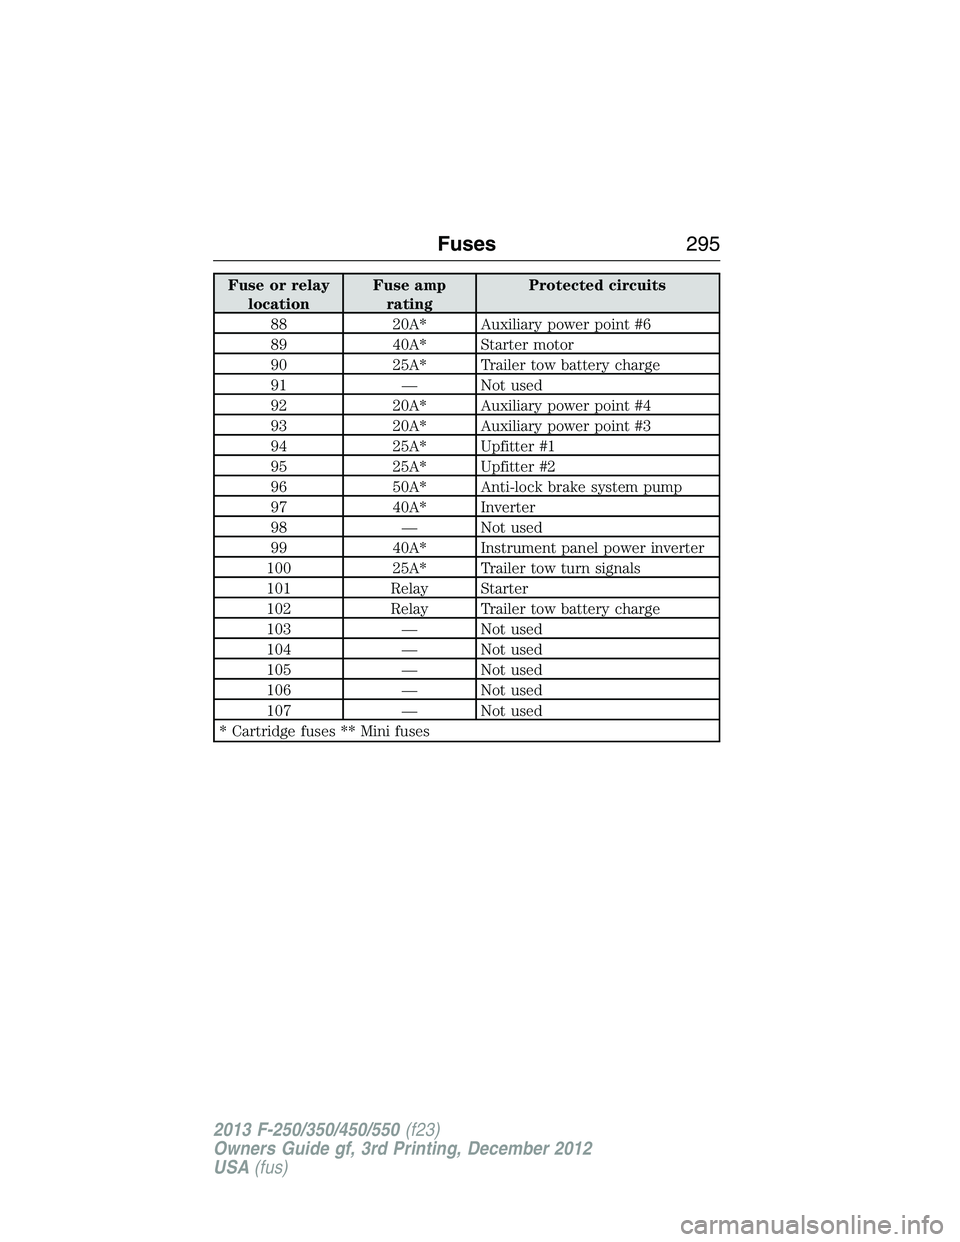
Fuse or relay
locationFuse amp
ratingProtected circuits
88 20A* Auxiliary power point #6
89 40A* Starter motor
90 25A* Trailer tow battery charge
91 — Not used
92 20A* Auxiliary power point #4
93 20A* Auxiliary power point #3
94 25A* Upfitter #1
95 25A* Upfitter #2
96 50A* Anti-lock brake system pump
97 40A* Inverter
98 — Not used
99 40A* Instrument panel power inverter
100 25A* Trailer tow turn signals
101 Relay Starter
102 Relay Trailer tow battery charge
103 — Not used
104 — Not used
105 — Not used
106 — Not used
107 — Not used
* Cartridge fuses ** Mini fuses
Fuses295
2013 F-250/350/450/550(f23)
Owners Guide gf, 3rd Printing, December 2012
USA(fus)
Page 299 of 577
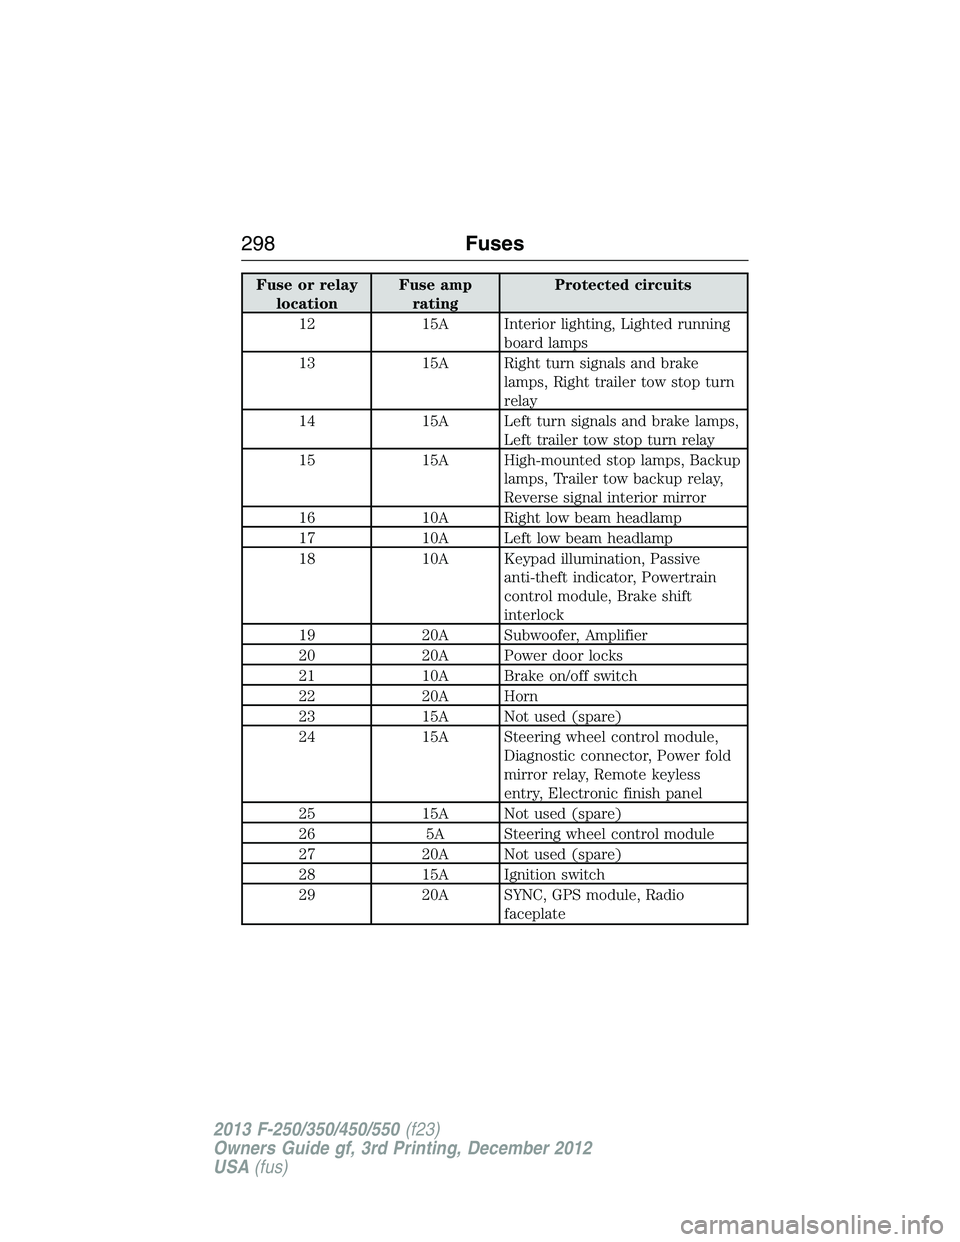
Fuse or relay
locationFuse amp
ratingProtected circuits
12 15A Interior lighting, Lighted running
board lamps
13 15A Right turn signals and brake
lamps, Right trailer tow stop turn
relay
14 15A Left turn signals and brake lamps,
Left trailer tow stop turn relay
15 15A High-mounted stop lamps, Backup
lamps, Trailer tow backup relay,
Reverse signal interior mirror
16 10A Right low beam headlamp
17 10A Left low beam headlamp
18 10A Keypad illumination, Passive
anti-theft indicator, Powertrain
control module, Brake shift
interlock
19 20A Subwoofer, Amplifier
20 20A Power door locks
21 10A Brake on/off switch
22 20A Horn
23 15A Not used (spare)
24 15A Steering wheel control module,
Diagnostic connector, Power fold
mirror relay, Remote keyless
entry, Electronic finish panel
25 15A Not used (spare)
26 5A Steering wheel control module
27 20A Not used (spare)
28 15A Ignition switch
29 20A SYNC, GPS module, Radio
faceplate
298Fuses
2013 F-250/350/450/550(f23)
Owners Guide gf, 3rd Printing, December 2012
USA(fus)
Page 332 of 577
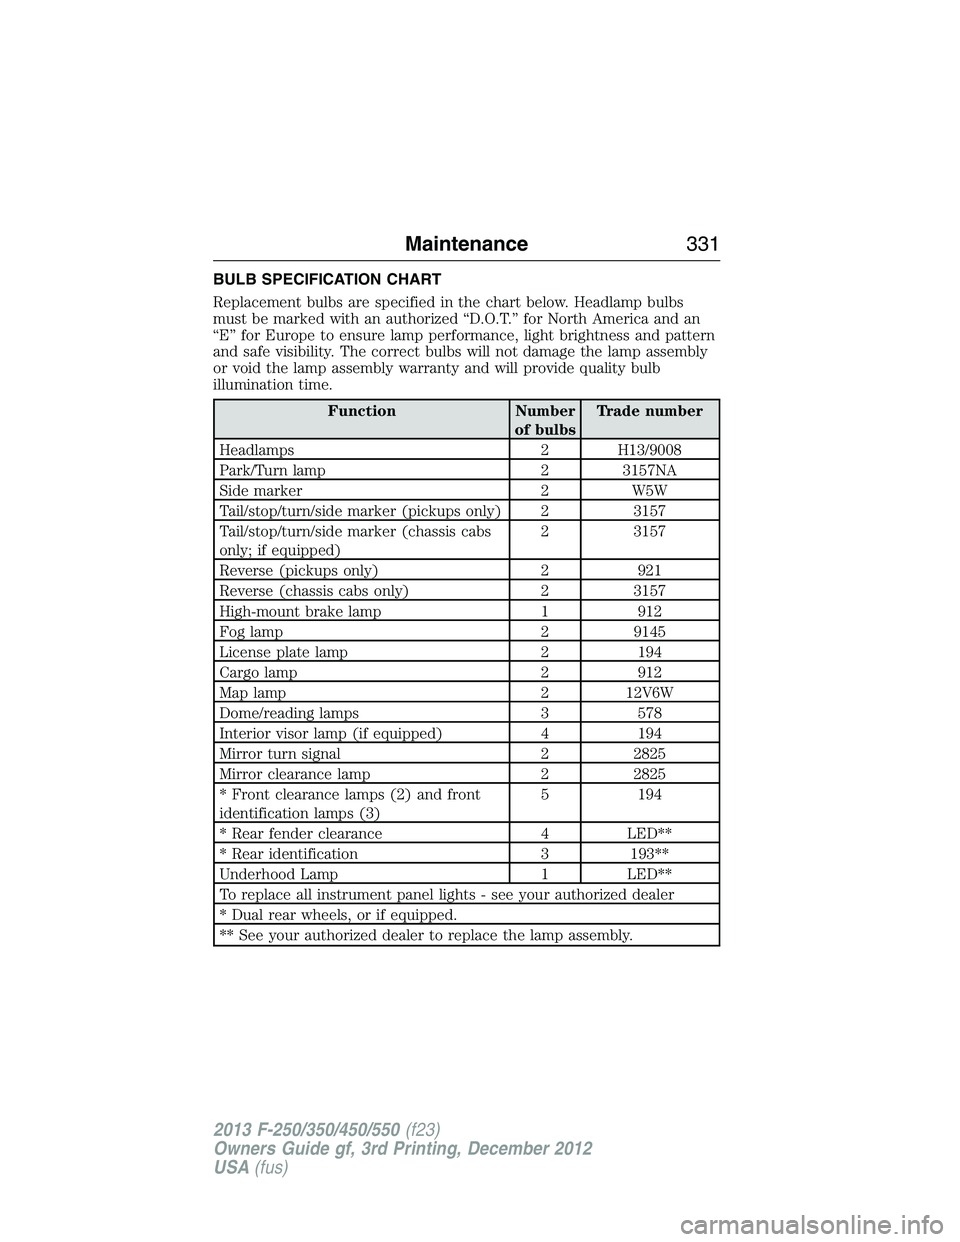
BULB SPECIFICATION CHART
Replacement bulbs are specified in the chart below. Headlamp bulbs
must be marked with an authorized “D.O.T.” for North America and an
“E” for Europe to ensure lamp performance, light brightness and pattern
and safe visibility. The correct bulbs will not damage the lamp assembly
or void the lamp assembly warranty and will provide quality bulb
illumination time.
Function Number
of bulbsTrade number
Headlamps 2 H13/9008
Park/Turn lamp 2 3157NA
Side marker 2 W5W
Tail/stop/turn/side marker (pickups only) 2 3157
Tail/stop/turn/side marker (chassis cabs
only; if equipped)2 3157
Reverse (pickups only) 2 921
Reverse (chassis cabs only) 2 3157
High-mount brake lamp 1 912
Fog lamp 2 9145
License plate lamp 2 194
Cargo lamp 2 912
Map lamp 2 12V6W
Dome/reading lamps 3 578
Interior visor lamp (if equipped) 4 194
Mirror turn signal 2 2825
Mirror clearance lamp 2 2825
* Front clearance lamps (2) and front
identification lamps (3)5 194
* Rear fender clearance 4 LED**
* Rear identification 3 193**
Underhood Lamp 1 LED**
To replace all instrument panel lights - see your authorized dealer
* Dual rear wheels, or if equipped.
** See your authorized dealer to replace the lamp assembly.
Maintenance331
2013 F-250/350/450/550(f23)
Owners Guide gf, 3rd Printing, December 2012
USA(fus)
Page 436 of 577
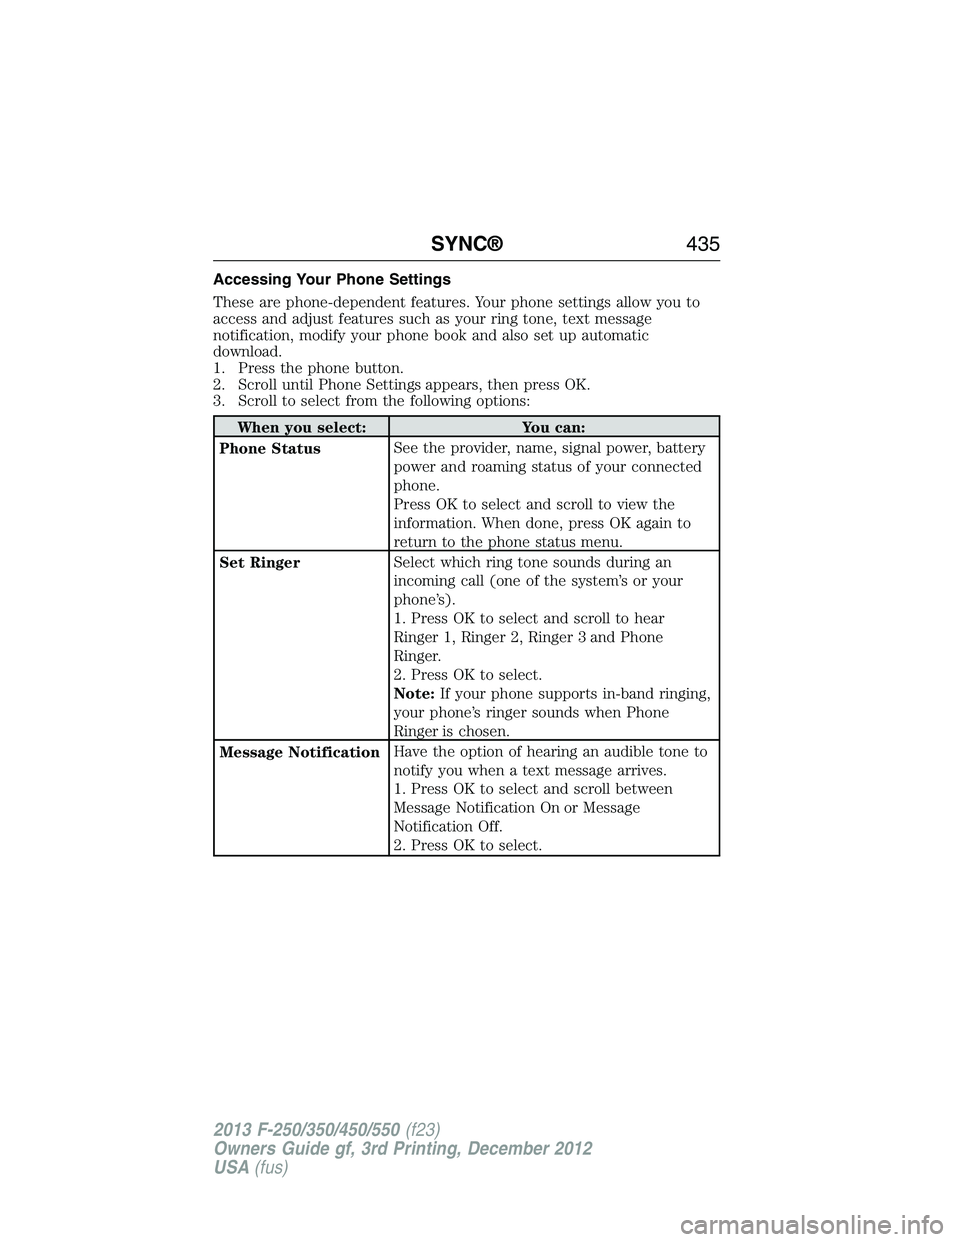
Accessing Your Phone Settings
These are phone-dependent features. Your phone settings allow you to
access and adjust features such as your ring tone, text message
notification, modify your phone book and also set up automatic
download.
1. Press the phone button.
2. Scroll until Phone Settings appears, then press OK.
3. Scroll to select from the following options:
When you select: You can:
Phone StatusSee the provider, name, signal power, battery
power and roaming status of your connected
phone.
Press OK to select and scroll to view the
information. When done, press OK again to
return to the phone status menu.
Set RingerSelect which ring tone sounds during an
incoming call (one of the system’s or your
phone’s).
1. Press OK to select and scroll to hear
Ringer 1, Ringer 2, Ringer 3 and Phone
Ringer.
2. Press OK to select.
Note:If your phone supports in-band ringing,
your phone’s ringer sounds when Phone
Ringer is chosen.
Message NotificationHave the option of hearing an audible tone to
notify you when a text message arrives.
1. Press OK to select and scroll between
Message Notification On or Message
Notification Off.
2. Press OK to select.
SYNC®435
2013 F-250/350/450/550(f23)
Owners Guide gf, 3rd Printing, December 2012
USA(fus)
Page 464 of 577
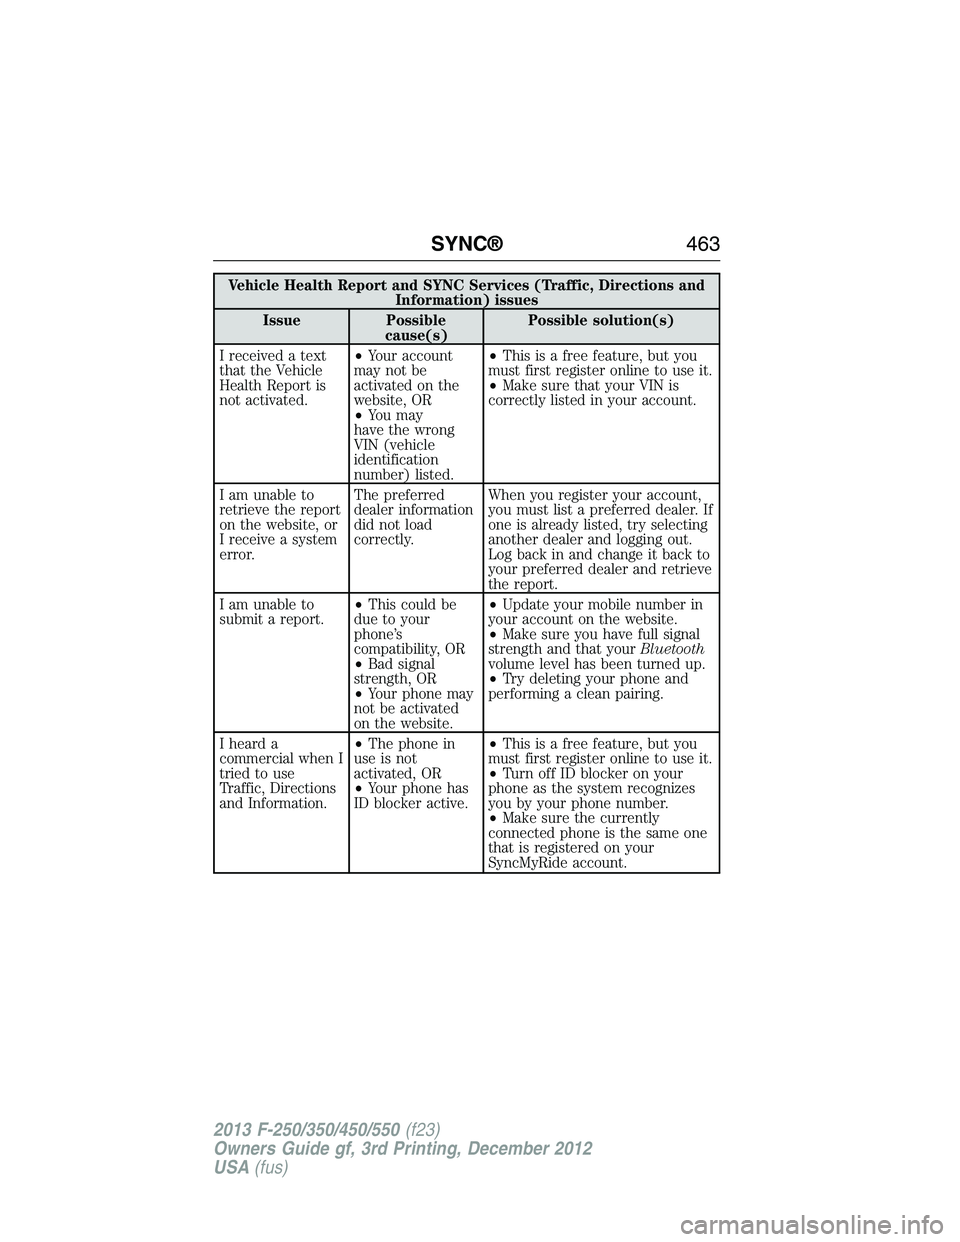
Vehicle Health Report and SYNC Services (Traffic, Directions and
Information) issues
Issue Possible
cause(s)Possible solution(s)
I received a text
that the Vehicle
Health Report is
not activated.•Your account
may not be
activated on the
website, OR
•You may
have the wrong
VIN (vehicle
identification
number) listed.•This is a free feature, but you
must first register online to use it.
•Make sure that your VIN is
correctly listed in your account.
I am unable to
retrieve the report
on the website, or
I receive a system
error.The preferred
dealer information
did not load
correctly.When you register your account,
you must list a preferred dealer. If
one is already listed, try selecting
another dealer and logging out.
Log back in and change it back to
your preferred dealer and retrieve
the report.
I am unable to
submit a report.•This could be
due to your
phone’s
compatibility, OR
•Bad signal
strength, OR
•Your phone may
not be activated
on the website.•Update your mobile number in
your account on the website.
•Make sure you have full signal
strength and that yourBluetooth
volume level has been turned up.
•Try deleting your phone and
performing a clean pairing.
I heard a
commercial when I
tried to use
Traffic, Directions
and Information.•The phone in
use is not
activated, OR
•Your phone has
ID blocker active.•This is a free feature, but you
must first register online to use it.
•Turn off ID blocker on your
phone as the system recognizes
you by your phone number.
•Make sure the currently
connected phone is the same one
that is registered on your
SyncMyRide account.
SYNC®463
2013 F-250/350/450/550(f23)
Owners Guide gf, 3rd Printing, December 2012
USA(fus)