2013 FORD F250 hood open
[x] Cancel search: hood openPage 7 of 577

Maintenance 302
General information...................................302
Opening and closing the hood............................303
Under hood overview..................................304
Engine oil dipstick....................................306
Engine oil check......................................306
Engine coolant check..................................307
Automatic transmission fluid check........................313
Brake fluid check.....................................317
Power steering fluid check..............................317
Fuel filter...........................................317
Washer fluid check....................................318
Changing the vehicle battery.............................318
Checking the wiper blades..............................321
Air filter(s).........................................323
Adjusting the headlamps................................325
Changing a bulb......................................326
Bulb specification chart.................................331
Vehicle Care 332
Cleaning products.....................................332
Cleaning the exterior..................................332
Waxing.............................................334
Repairing minor paint damage............................334
Cleaning the engine...................................334
Cleaning the windows and wiper blades.....................335
Cleaning the interior...................................335
Cleaning the instrument panel and instrument cluster lens.......336
Cleaning the alloy wheels...............................340
Vehicle storage.......................................340
6Table of Contents
2013 F-250/350/450/550(f23)
Owners Guide gf, 3rd Printing, December 2012
USA(fus)
Page 59 of 577

WARNING:All occupants of your vehicle including the driver
should always wear their safety belts even when an airbag
supplemental restraint system and curtain airbag is provided. Failure to
properly wear your safety belt could seriously increase the risk of injury
or death.
WARNING:To reduce risk of injury, do not obstruct or place
objects in the deployment path of the curtain airbag.
WARNING:If the curtain airbags have deployed, the curtain
airbags will not function again. The curtain airbags (including the
A, B and C pillar trim and headliner) must be inspected and serviced
by an authorized dealer. If the curtain airbag is not replaced, the
unrepaired area will increase the risk of injury in a crash.
The Safety Canopy will deploy during significant side crashes or when a
certain likelihood of a rollover event is detected by the rollover sensor.
The Safety Canopy is mounted to the roof side-rail sheet metal, behind
the headliner, above each row of seats. In certain sideways crashes or
rollover events, the Safety Canopy will be activated, regardless of which
seats are occupied. The Safety Canopy is designed to inflate between the
side window area and occupants to further enhance protection provided
in side impact crashes and rollover events.
The system consists of:
•safety canopy curtain airbags
located above the trim panels
over the front and rear side
windows identified by wording
on the B-pillar trim.
•a flexible headliner which opens above the side doors to allow air
curtain deployment.
•crash sensors and monitoring system with readiness
indicator. SeeCrash Sensors and Airbag Indicatorin this
chapter.
58Supplementary Restraints System
2013 F-250/350/450/550(f23)
Owners Guide gf, 3rd Printing, December 2012
USA(fus)
Page 80 of 577

ANTI-THEFT ALARM (IF EQUIPPED)
The system will warn you of unauthorized entry to your vehicle.
The turn signal lamps will flash and the horn will sound when:
•any door or the hood is opened without using the key or the remote
control
•the ignition is turned on with an invalid key.
Take all keys and remote controls to your authorized dealer if there is
any potential alarm problem with your vehicle.
Arming the Alarm
The system is ready to arm whenever the ignition is off. Lock the vehicle
to arm the alarm.
The turn signal lamps will flash once after locking the vehicle to indicate
the alarm is in the pre-armed mode and will become fully armed in
20 seconds.
Disarming the Alarm
To disarm the alarm, do any of the following:
•Press the power door unlock button within the 20-second pre-armed
mode.
•Press the unlock button on the remote control.
•Unlock the doors with the keyless entry pad.
•Turn the ignition on with a valid key.
•Press the panic button on the remote control. The alarm system will
still be armed, but this shuts off the horn and turn lamps when the
alarm is sounding.
Note:If the driver’s door is unlocked with a key, a chime will sound
when you open the door. You will have 12 seconds to disarm the alarm
using any of the actions above, otherwise the alarm will trigger.
Security79
2013 F-250/350/450/550(f23)
Owners Guide gf, 3rd Printing, December 2012
USA(fus)
Page 304 of 577

Working with the Engine Off
1. Set the parking brake and shift toP(Park).
2. Turn off the engine and remove the key (if equipped).
3. Block the wheels.
Working with the Engine On
WARNING:To reduce the risk of vehicle damage or personal
burn injuries, do not start your engine with the air cleaner
removed and do not remove it while the engine is running.
1. Set the parking brake and shift to positionP.
2. Block the wheels.
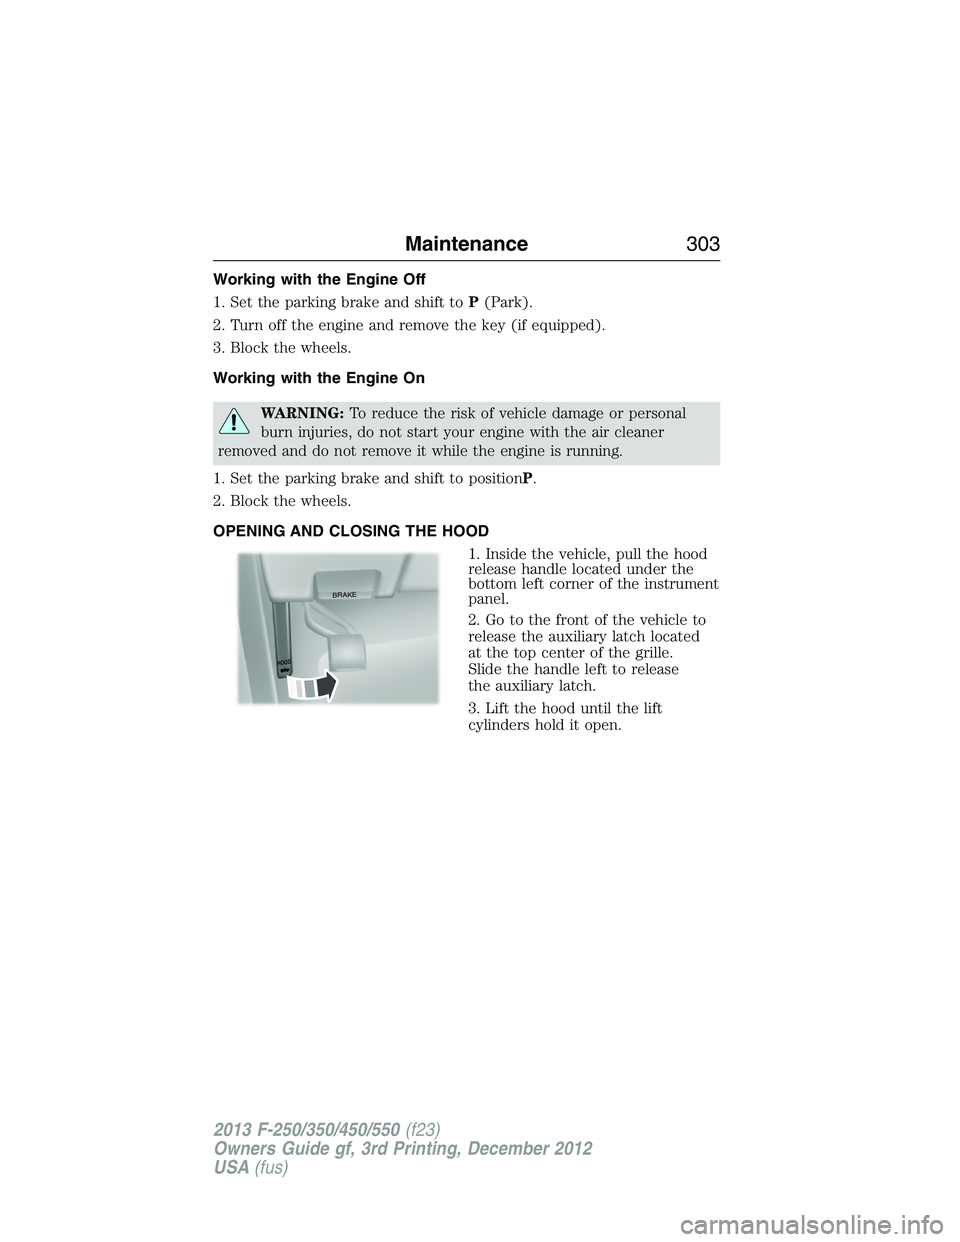
OPENING AND CLOSING THE HOOD
1. Inside the vehicle, pull the hood
release handle located under the
bottom left corner of the instrument
panel.
2. Go to the front of the vehicle to
release the auxiliary latch located
at the top center of the grille.
Slide the handle left to release
the auxiliary latch.
3. Lift the hood until the lift
cylinders hold it open.
BRAKE
HOOD
Maintenance303
2013 F-250/350/450/550(f23)
Owners Guide gf, 3rd Printing, December 2012
USA(fus)
Page 307 of 577

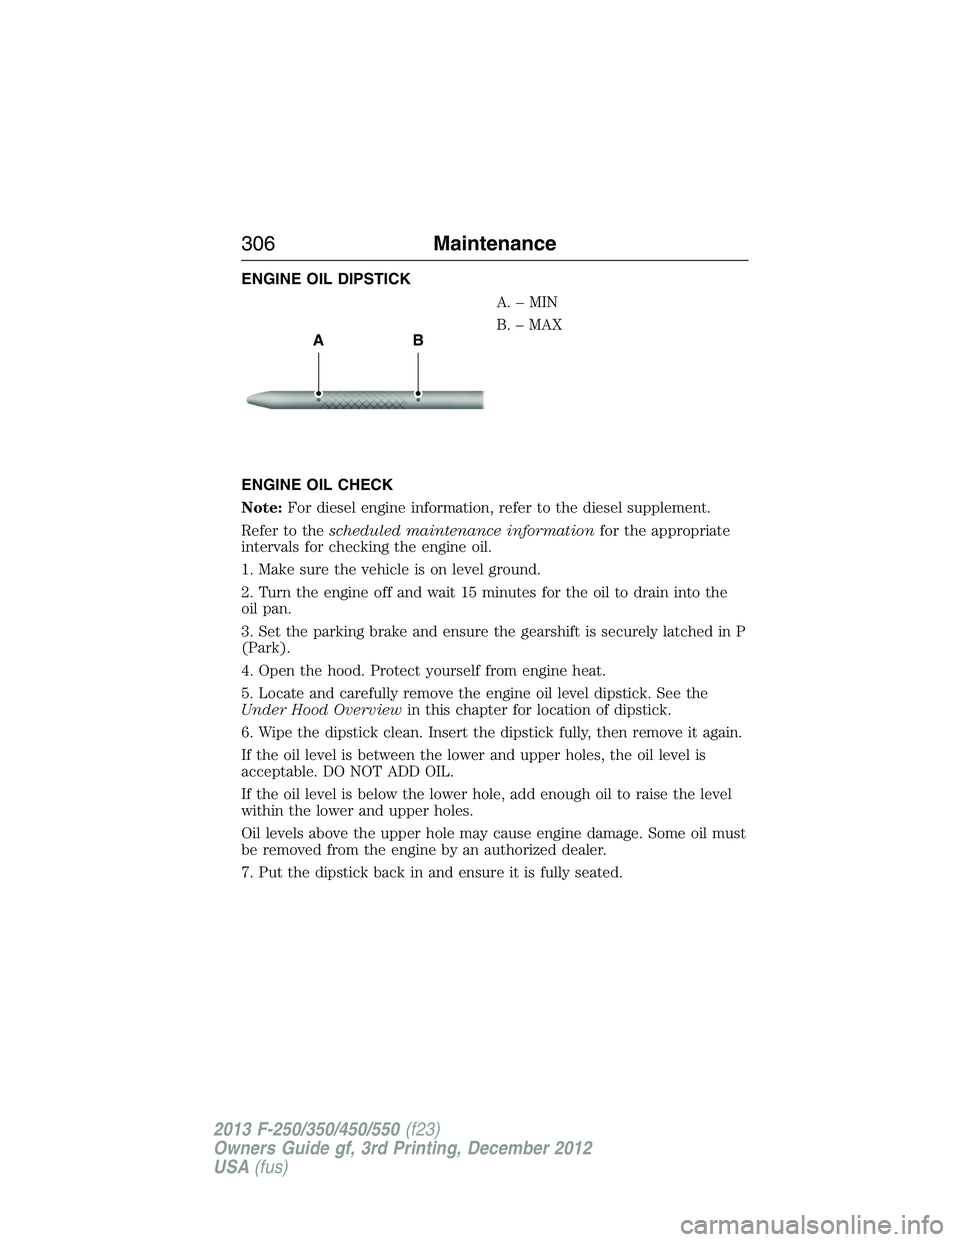
ENGINE OIL DIPSTICK
A.–MIN
B. – MAX
ENGINE OIL CHECK
Note:For diesel engine information, refer to the diesel supplement.
Refer to thescheduled maintenance informationfor the appropriate
intervals for checking the engine oil.
1. Make sure the vehicle is on level ground.
2. Turn the engine off and wait 15 minutes for the oil to drain into the
oil pan.
3. Set the parking brake and ensure the gearshift is securely latched in P
(Park).
4. Open the hood. Protect yourself from engine heat.
5. Locate and carefully remove the engine oil level dipstick. See the
Under Hood Overviewin this chapter for location of dipstick.
6. Wipe the dipstick clean. Insert the dipstick fully, then remove it again.
If the oil level is between the lower and upper holes, the oil level is
acceptable. DO NOT ADD OIL.
If the oil level is below the lower hole, add enough oil to raise the level
within the lower and upper holes.
Oil levels above the upper hole may cause engine damage. Some oil must
be removed from the engine by an authorized dealer.
7. Put the dipstick back in and ensure it is fully seated.
AB
306Maintenance
2013 F-250/350/450/550(f23)
Owners Guide gf, 3rd Printing, December 2012
USA(fus)
Page 326 of 577

10. Reconnect the mass air flow
sensor electrical connector to the
outlet tube. Make sure the locking
tab on the connector is in the
“locked” position (connector shown
from below for clarity).
ADJUSTING THE HEADLAMPS
The headlamps on your vehicle are properly aimed at the assembly plant.
If your vehicle has been in an accident, the alignment of your headlamps
should be checked by your authorized dealer.
Vertical Aim Adjustment
1. Park the vehicle directly in front of a wall or screen on a level surface,
approximately 25 feet (7.6 meters) away.
•(A) 8 feet (2.4 meters)
•(B) Center height of lamp to
ground
•(C) 25 feet (7.6 meters)
•(D) Horizontal reference line
2. Measure the height from the center of your headlamp (indicated by
a 3.0 millimeter circle on the lens) to the ground and mark an 8 foot
(2.4 meter) horizontal reference line on the vertical wall or screen at
this height (a piece of masking tape works well).
3. Turn on the low beam headlamps to illuminate the wall or screen and
open the hood. Cover one of the headlamps so no light from that lamp
hits the wall.
C
A
B
D
Maintenance325
2013 F-250/350/450/550(f23)
Owners Guide gf, 3rd Printing, December 2012
USA(fus)
Page 328 of 577

These are examples of unacceptable moisture (usually caused by a lamp
water leak):
•Water puddle inside the lamp.
•Large water droplets, drip marks or streaks present on the interior of
the lens.
Take your vehicle to a dealer for service if any of the above conditions of
unacceptable moisture are present.
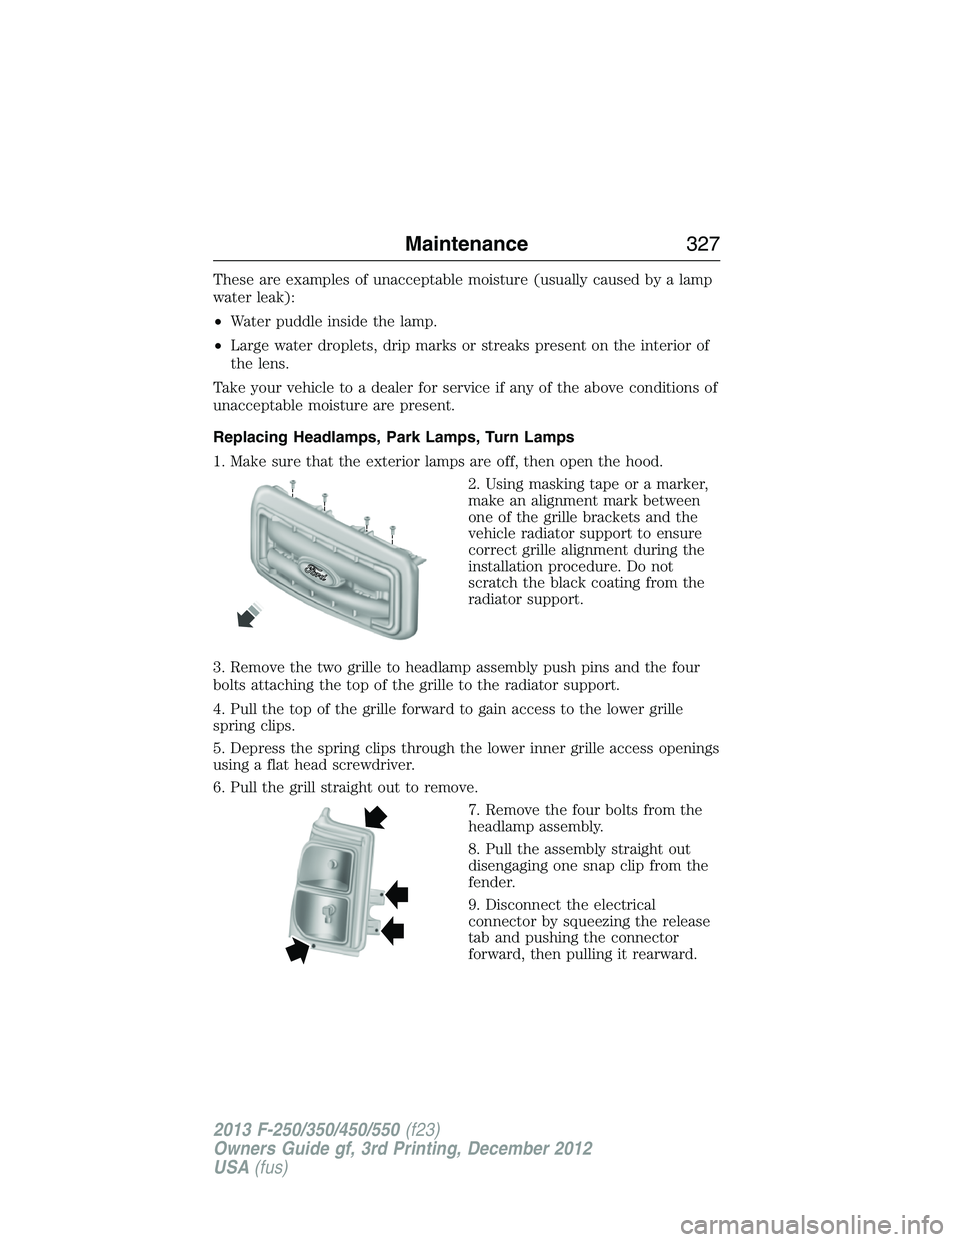
Replacing Headlamps, Park Lamps, Turn Lamps
1. Make sure that the exterior lamps are off, then open the hood.
2. Using masking tape or a marker,
make an alignment mark between
one of the grille brackets and the
vehicle radiator support to ensure
correct grille alignment during the
installation procedure. Do not
scratch the black coating from the
radiator support.
3. Remove the two grille to headlamp assembly push pins and the four
bolts attaching the top of the grille to the radiator support.
4. Pull the top of the grille forward to gain access to the lower grille
spring clips.
5. Depress the spring clips through the lower inner grille access openings
using a flat head screwdriver.
6. Pull the grill straight out to remove.
7. Remove the four bolts from the
headlamp assembly.
8. Pull the assembly straight out
disengaging one snap clip from the
fender.
9. Disconnect the electrical
connector by squeezing the release
tab and pushing the connector
forward, then pulling it rearward.
Maintenance327
2013 F-250/350/450/550(f23)
Owners Guide gf, 3rd Printing, December 2012
USA(fus)
Page 573 of 577

Fuel - flex fuel vehicle
(FFV) .................................188, 191
Fuses ..........................290–291, 296
G
Garage door opener ..........168, 172
Gas cap (see Fuel cap) ............193
Gauges .........................................97
H
Hazard flashers .........................278
HD Radio™ ...............................482
Headlamps ...................................85
aiming ......................................325
autolamp system .......................86
bulb specifications ..................331
checking alignment ................325
daytime running lights .............87
flash to pass ..............................85
high beam .................................85
replacing bulbs .......................327
turning on and off ....................85
Head restraints .........................155
Heated steering wheel ..............534
Heating ..............................146, 148
Help ............................................533
Hill descent mode .....................230
Hill start assist ..........................208
Homelink wireless control
system ........................................172
Hood ..........................................303
How to use voice commands ...473
I
Ignition ...............................183, 389Illuminated visor mirror .............95
Information displays .................104
Inspection/maintenance (I/M)
testing ........................................198
Instrument panel
cleaning ...........................336–337
cluster ........................................99
lighting up panel and
interior .......................................87
J
Jack ............................................371
positioning ...............................371
storage .....................................371
Joining two calls
(multiparty/conference call) ....429
Jump-starting your vehicle ......279
K
Keyless entry system
autolock .....................................73
keypad .......................................75
locking and unlocking doors ....76
programming entry code .........75
Keys .......................................62, 77
positions of the ignition .........183
L
Lamps ..........................................85
autolamp system .......................86
bulb replacement
specifications chart ................331
daytime running light ...............87
fog lamps ...................................88
headlamps .................................85
headlamps, flash to pass ..........85
instrument panel, dimming .....87
572Index
2013 F-250/350/450/550(f23)
Owners Guide gf, 3rd Printing, December 2012
USA(fus)