2013 FORD F250 change time
[x] Cancel search: change timePage 9 of 577
MyFord Touch® (If Equipped) 466
Privacy Information...................................472
Voice recognition.....................................472
Listening to music....................................478
Phone features.......................................500
Information Menu.....................................508
Settings............................................520
Climatefeatures......................................534
Navigation system.....................................537
Appendices 549
Index 569
The information contained in this publication was correct at the time of going to
print. In the interest of continuous development, we reserve the right to change
specifications, design or equipment at any time without notice or obligation. No
part of this publication may be reproduced, transmitted, stored in a retrieval
system or translated into any language in any form by any means without our
written permission. Errors and omissions excepted.
© Ford Motor Company 2013
8Table of Contents
2013 F-250/350/450/550(f23)
Owners Guide gf, 3rd Printing, December 2012
USA(fus)
Page 70 of 577
The key is successfully created. Make sure you label it so you can
distinguish it from the admin keys.
You can also program configurable settings for the key(s). Refer to the
Programming/Changing Optional Settingssection.
Programming/Changing Configurable Settings
Use the information display to access your configurable MyKey settings.
1. Switch the ignition on with an admin key.
2. Access the main menu on the information display controls, and select
Settings, thenMyKeyby pressingOKor>button.
3. Use the arrow buttons to get to a feature.
4. PressOKor>to make a selection.
Note:You can clear or change your MyKey settings at any time during
the same key cycle as you created the MyKey. Once you have switched
the engine off, however, you will need an admin key to change or clear
your MyKey settings.
CLEARING ALL MYKEYS
You can clear all MyKeys within the same key cycle as you created the
MyKey. If you switch your ignition off, however, you will need to use an
admin key to clear your MyKeys.
Note:When you clear your MyKeys, you remove all restrictions and
return all MyKeys to their original admin key status at once.
To clear all MyKeys of all MyKey settings, use the information display to
do the following:
For Type 1 information display settings:
1. Access the main menu of your information display and pressSETUP
untilPRESS RESET TO CLEAR MYKEYdisplays.
2. Press and release theRESETbutton. The display will showHOLD
RESET TO CONFIRM CLEAR.
3. Press and hold theRESETbutton for two seconds untilALL
MYKEYS CLEAREDdisplays.
For Type 2 information display settings:
1. Access main menu of your information display and selectSettings,
thenMyKey.
2. Scroll toClear Alland press theOKbutton.
3. Hold theOKbutton untilALL MYKEYS CLEAREDdisplays .
MyKey69
2013 F-250/350/450/550(f23)
Owners Guide gf, 3rd Printing, December 2012
USA(fus)
Page 73 of 577

LOCKING AND UNLOCKING
You can use the power door lock control or the remote control to lock
and unlock the vehicle.
Power Door Locks (If Equipped)
The power door lock control is located on the driver and front passenger
door panels.
A. Unlock
B. Lock
Remote Control
You can use the remote control anytime the vehicle is not running.
Unlocking the Doors (Two-Stage Unlock)
Press the button to unlock the driver’s door.
Press the button again within three seconds to unlock all doors.
The turn signals will flash.
Press and hold both the lock and unlock buttons on the remote control
for four seconds to disable or enable two-stage unlocking. Disabling
two-stage unlocking allows all vehicle doors to unlock with one press of
the button. The turn signals will flash twice to indicate the unlocking
mode was changed. The unlocking mode will be applied to the remote
control and keyless entry keypad (if equipped).
Locking the Doors
Press the button to lock all the doors. The turn signals will
illuminate.
Press the button again within three seconds to confirm that all the doors
are closed. The doors will lock again, the horn will chirp and the turn
signals will illuminate if all the doors are closed.
Note:If any door is not closed, or if the hood is not closed on vehicles
equipped with an anti-theft alarm or remote start, the horn will chirp
twice and the lamps will not illuminate.
AB
72Locks
2013 F-250/350/450/550(f23)
Owners Guide gf, 3rd Printing, December 2012
USA(fus)
Page 87 of 577
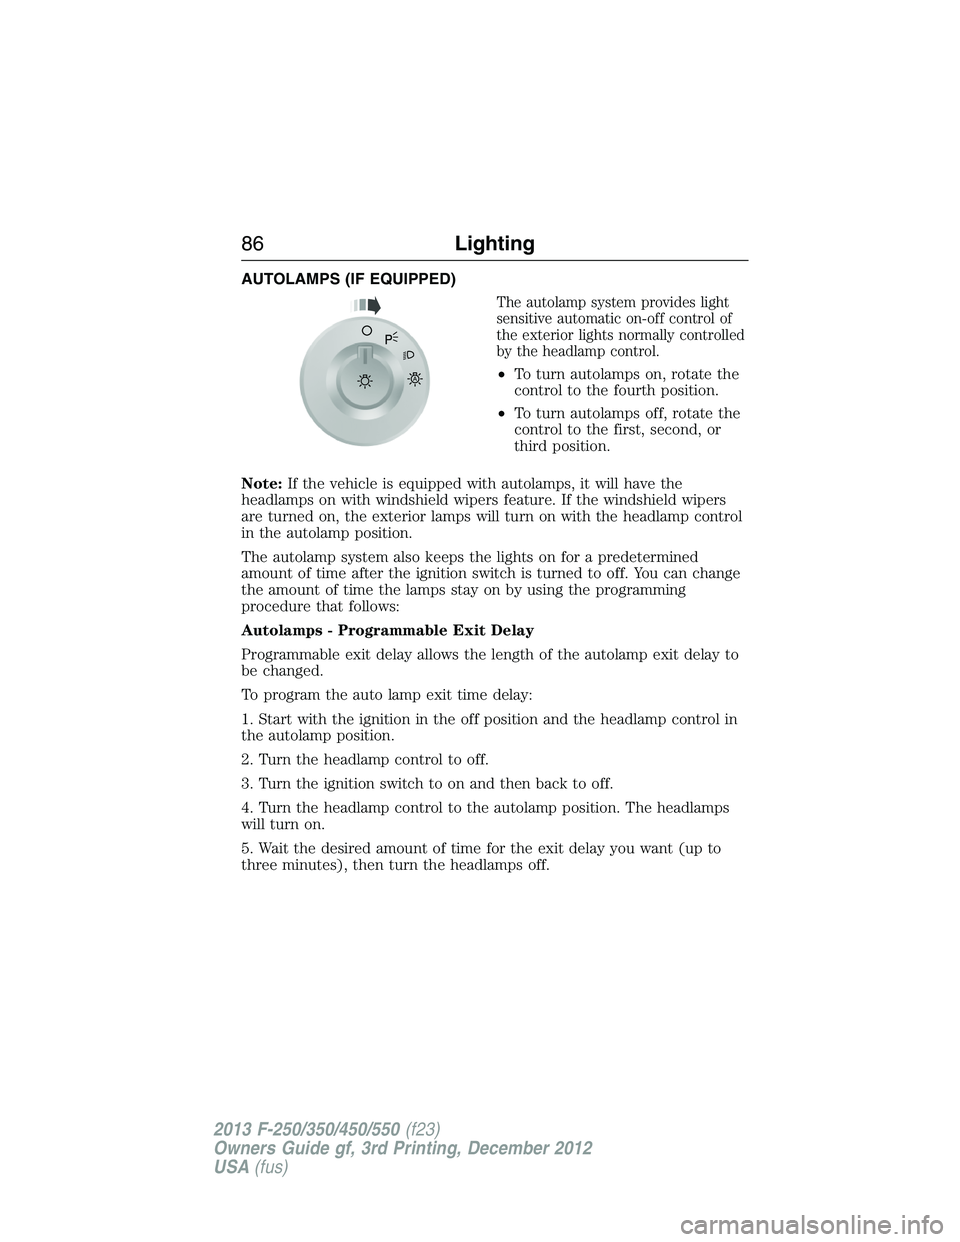
AUTOLAMPS (IF EQUIPPED)
The autolamp system provides light
sensitive automatic on-off control of
the exterior lights normally controlled
by the headlamp control.
•To turn autolamps on, rotate the
control to the fourth position.
•To turn autolamps off, rotate the
control to the first, second, or
third position.
Note:If the vehicle is equipped with autolamps, it will have the
headlamps on with windshield wipers feature. If the windshield wipers
are turned on, the exterior lamps will turn on with the headlamp control
in the autolamp position.
The autolamp system also keeps the lights on for a predetermined
amount of time after the ignition switch is turned to off. You can change
the amount of time the lamps stay on by using the programming
procedure that follows:
Autolamps - Programmable Exit Delay
Programmable exit delay allows the length of the autolamp exit delay to
be changed.
To program the auto lamp exit time delay:
1. Start with the ignition in the off position and the headlamp control in
the autolamp position.
2. Turn the headlamp control to off.
3. Turn the ignition switch to on and then back to off.
4. Turn the headlamp control to the autolamp position. The headlamps
will turn on.
5. Wait the desired amount of time for the exit delay you want (up to
three minutes), then turn the headlamps off.A
86Lighting
2013 F-250/350/450/550(f23)
Owners Guide gf, 3rd Printing, December 2012
USA(fus)
Page 89 of 577

FRONT FOG LAMPS (IF EQUIPPED)
The headlamp control also operates
the fog lamps. The fog lamps can be
turned on only when the headlamp
control is in the parking lamp
(second) position, headlamps on
(third) position, or autolamp
(fourth) position, and the high
beams are not turned on.
Pull headlamp control towards you
to turn fog lamps on. The fog lamp
indicator light will illuminate.
DIRECTION INDICATORS
The turn signal lever does not mechanically lock in the upward or
downward position when activated. The turn signal control activation and
cancellation is electronic.
•To operate the left turn signal,
push the lever down until it stops
and release.
•To operate the right turn signal,
push the lever up until it stops
and release.
•To manually cancel turn signal
operation, push the lever again in
either direction.
Lane Change
To indicate a left or right lane change:
•Push the lever up/down to the first stop position and release. The turn
signals will flash three times and stop.
•Push the lever up/down to the first stop position and hold. The turn
signals will flash for as long as the lever is held in this position.
A
OF
F
88Lighting
2013 F-250/350/450/550(f23)
Owners Guide gf, 3rd Printing, December 2012
USA(fus)
Page 107 of 577
•TIMER: Displays the trip elapsed drive time. Press and release RESET
to pause the timer. Press and hold RESET to reset the timer.
•TBC GAIN (if equipped): Displays the level of trailer brake gain or if
the trailer is not connected.
•EXHAUST FILTER (Diesel only): For more information, refer to the
Diesel exhaust system: oxidation catalyst/diesel particulate filter
systemin your diesel supplement for more information.
System Check and Vehicle Feature Customization
Press the SETUP button repeatedly to cycle the message center through
the following features:
Note:Some options may appear slightly different or not at all if the
items are optional.
Note:When returning to the SETUP menu and a non-English language
has been selected, HOLD RESET FOR ENGLISH will be displayed to
change back to English. Press and hold the RESET button to change
back to English.
SETUP
RESET FOR
SYSTEM CHECKpress the
RESET buttonOIL LIFE
EXHAUST FLUID LEVEL
(Diesel only)
ENGINE HOURS
ENGINE IDLE HOURS
CHARGING SYSTEM
DOOR
BRAKE SYSTEM
TBC GAIN = XX.X
FUEL LEVEL
MYKEY DISTANCE
MYKEY(S) PROGRAMMED
ADMIN KEYS PROGRAMMED
106Information Displays
2013 F-250/350/450/550(f23)
Owners Guide gf, 3rd Printing, December 2012
USA(fus)
Page 110 of 577
•RESET FOR CALIBRATION (if equipped): This feature calibrates the
compass.
The compass reading may be affected when you drive near large
buildings, bridges, power lines and powerful broadcast antenna.
Magnetic or metallic objects placed in, on or near the vehicle may
also affect compass accuracy. If the compass appears to be inaccurate,
a manual calibration may be necessary.
Refer toCompass zone/calibration adjustment.
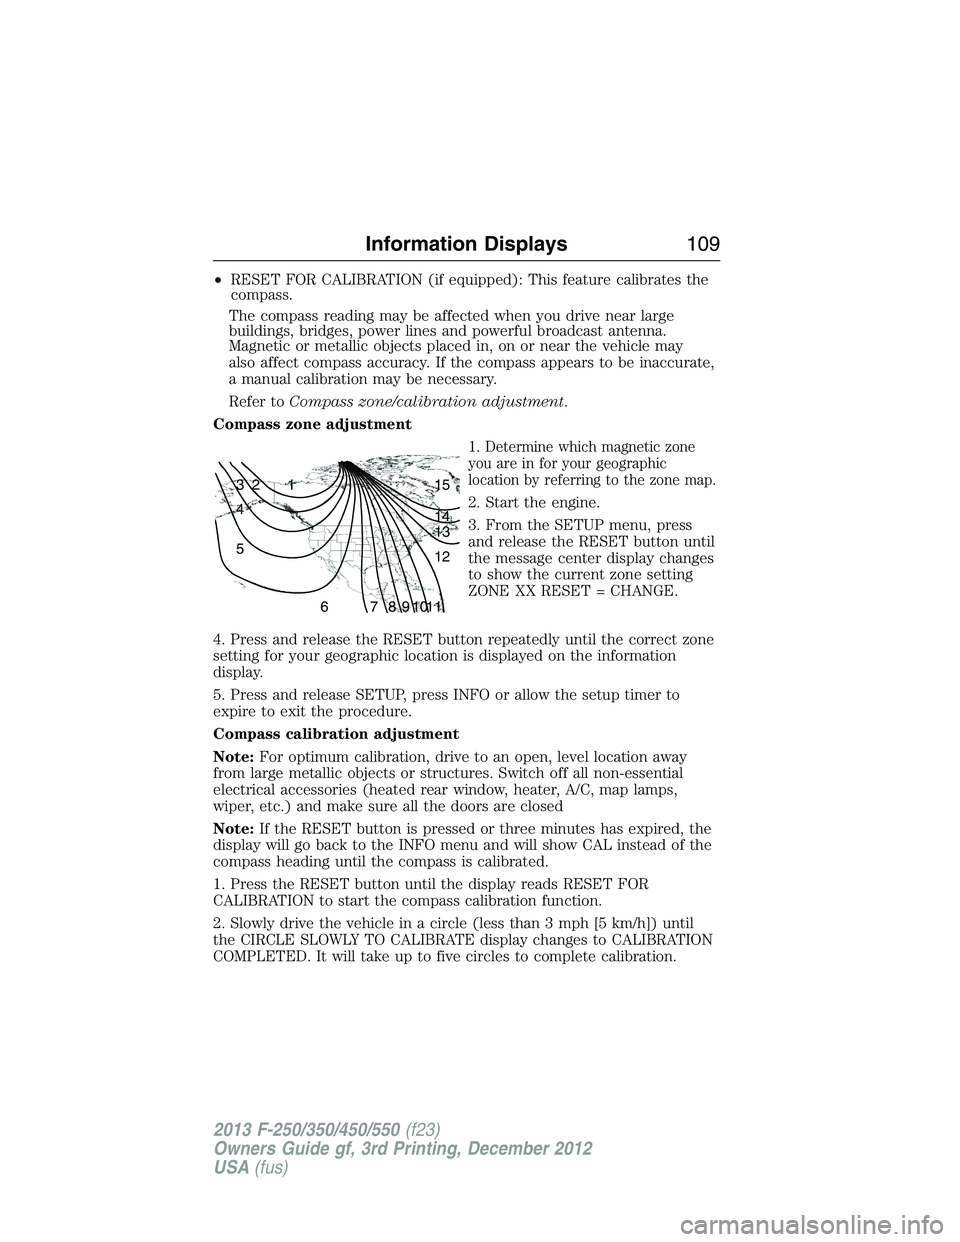
Compass zone adjustment
1.
Determine which magnetic zone
you are in for your geographic
location by referring to the zone map.
2. Start the engine.
3. From the SETUP menu, press
and release the RESET button until
the message center display changes
to show the current zone setting
ZONE XX RESET = CHANGE.
4. Press and release the RESET button repeatedly until the correct zone
setting for your geographic location is displayed on the information
display.
5. Press and release SETUP, press INFO or allow the setup timer to
expire to exit the procedure.
Compass calibration adjustment
Note:For optimum calibration, drive to an open, level location away
from large metallic objects or structures. Switch off all non-essential
electrical accessories (heated rear window, heater, A/C, map lamps,
wiper, etc.) and make sure all the doors are closed
Note:If the RESET button is pressed or three minutes has expired, the
display will go back to the INFO menu and will show CAL instead of the
compass heading until the compass is calibrated.
1. Press the RESET button until the display reads RESET FOR
CALIBRATION to start the compass calibration function.
2. Slowly drive the vehicle in a circle (less than 3 mph [5 km/h]) until
the CIRCLE SLOWLY TO CALIBRATE display changes to CALIBRATION
COMPLETED. It will take up to five circles to complete calibration.
1 2 3
4
5
6 7 8 9 101112 13 14 15
Information Displays109
2013 F-250/350/450/550(f23)
Owners Guide gf, 3rd Printing, December 2012
USA(fus)
Page 113 of 577

Trip A/ B
Use the arrow buttons to choose between the following trip
options.
Trip A/ B
Trip time
Trip distance
Fuel used
Avg MPG (L/100km)
Odometer
Press OK to pause the Trip A or B screen/press again to un-pause.
Press and hold OK to reset the currently displayed trip information.
•Trip time: shows the elapsed trip time. This timer will stop when the
vehicle is turned off and will restart when the vehicle is restarted.
•Trip distance: Registers the mileage of individual journeys.
•Fuel used: Shows the amount of fuel used for a given trip.
•Average MPG: Shows the average distance traveled per unit of fuel
used for a given trip.
Fuel Economy
Use the arrow buttons to choose the desired fuel economy
display.
Fuel Economy
Fuel Econ. Instant MPG (L/100km)
Miles (kilometers) to Empty
AVG MPG (L/100km)
Fuel Hist.: shows
fuel usage as a
bar graph based
on time. The
duration time can
be changed.Duration: 5 Minutes, 10 Minutes, 30 Minutes, Last 5
Resets. The graph is updated each minute with the
fuel economy that was achieved during the prior 5,
10, 30 minutes of driving.
11 2Information Displays
2013 F-250/350/450/550(f23)
Owners Guide gf, 3rd Printing, December 2012
USA(fus)