2013 FORD F250 set clock
[x] Cancel search: set clockPage 137 of 577
AM/FM
WARNING:Driving while distracted can result in loss of vehicle
control, crash and injury. We strongly recommend that you use
extreme caution when using any device that may take your focus off
the road. Your primary responsibility is the safe operation of your
vehicle. We recommend against the use of any hand-held device while
driving and encourage the use of voice-operated systems when possible.
Make sure you are aware of all applicable local laws that may affect the
use of electronic devices while driving.
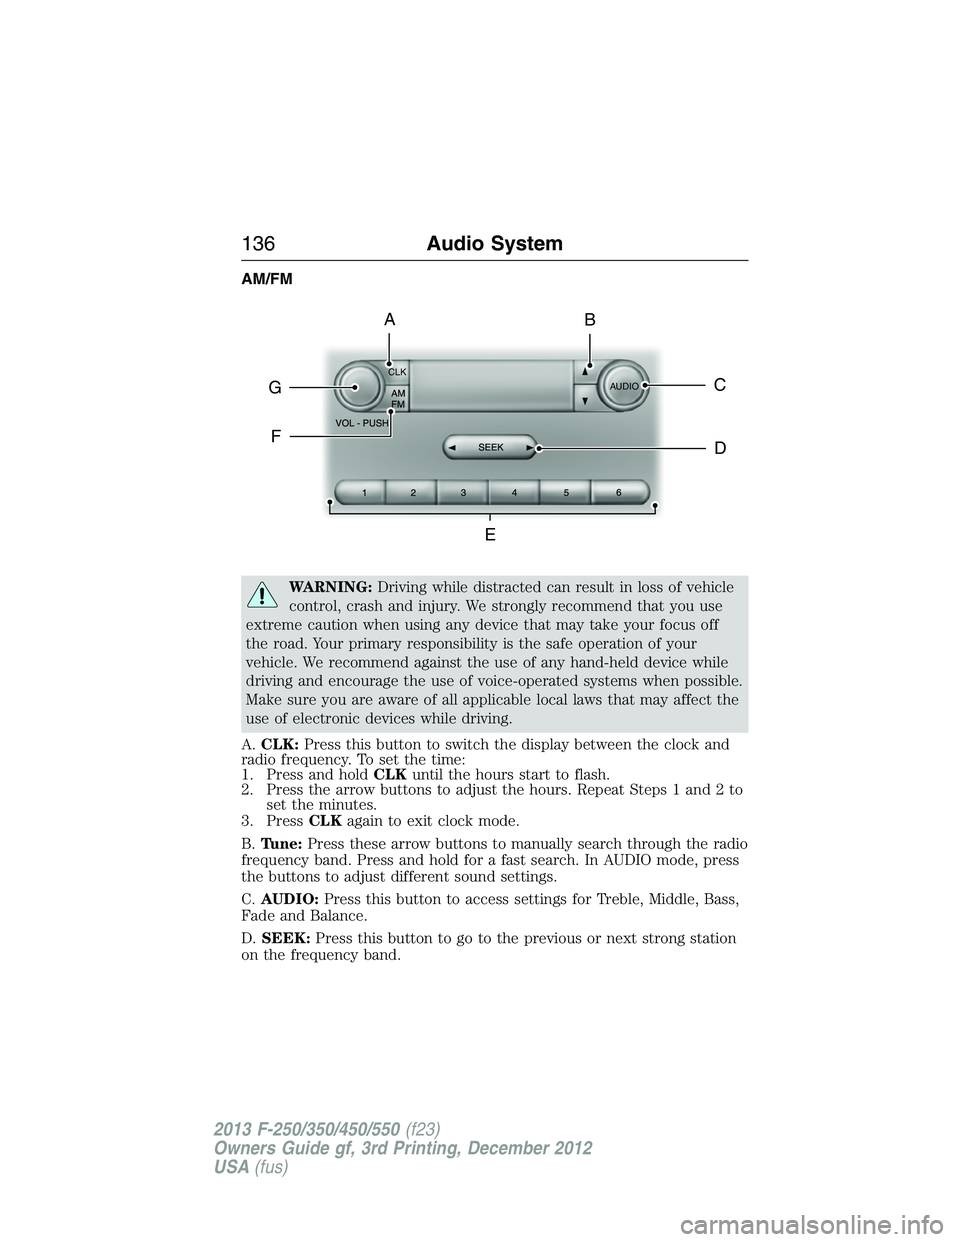
A.CLK:Press this button to switch the display between the clock and
radio frequency. To set the time:
1. Press and holdCLKuntil the hours start to flash.
2. Press the arrow buttons to adjust the hours. Repeat Steps 1 and 2 to
set the minutes.
3. PressCLKagain to exit clock mode.
B.Tune:Press these arrow buttons to manually search through the radio
frequency band. Press and hold for a fast search. In AUDIO mode, press
the buttons to adjust different sound settings.
C.AUDIO:Press this button to access settings for Treble, Middle, Bass,
Fade and Balance.
D.SEEK:Press this button to go to the previous or next strong station
on the frequency band.
CLK
AUDIOC
EG
F
BA
D
136Audio System
2013 F-250/350/450/550(f23)
Owners Guide gf, 3rd Printing, December 2012
USA(fus)
Page 193 of 577
RUNNING OUT OF FUEL
Avoid running out of fuel because this situation may have an adverse
effect on powertrain components.
If you have run out of fuel:
•You may need to cycle the ignition from off to on several times after
refueling to allow the fuel system to pump the fuel from the tank to
the engine. On restarting, cranking time will take a few seconds longer
than normal.
•Normally, adding 1 gallon (3.8L) of fuel is enough to restart the
engine. If the vehicle is out of fuel and on a steep grade, more than
1 gallon (3.8L) may be required.
•The service engine soon indicator may come on. For more information
on the service engine soon indicator, refer to theInstrument Cluster
chapter.
SeeSettingsin theInstrument Clusterchapter for information on
calculating DTE (Distance to empty).
Refilling With a Portable Fuel Container
WARNING:Do not insert the nozzle of portable fuel containers
or aftermarket funnels the fuel system. This could damage the
fuel system and its seal, and may cause fuel to run onto the ground
instead of filling the tank, which could result in serious personal injury.
WARNING:Do not try to pry open or push open the fuel system
with foreign objects. This could damage the fuel system and its
seal and cause injury to you or others.
Use the following directions when filling from a portable fuel container:
1. Remove the fuel cap by rotating it counter clockwise.
2. Slowly insert the portable fuel container into the fuel filler opening.
3. Fill the vehicle with fuel from the portable fuel container.
4. When done, remove the portable fuel container nozzle and reinstall
fuel cap. Insert fuel cap into fuel filler opening and turn clockwise until a
click is heard.
192Fuel and Refueling
2013 F-250/350/450/550(f23)
Owners Guide gf, 3rd Printing, December 2012
USA(fus)
Page 195 of 577
Note:If you must replace the fuel filler cap, replace it with a fuel filler
cap that is designed for your vehicle. The customer warranty may be
void for any damage to the fuel tank or fuel system if the correct
genuine Ford, Motorcraft® or other certified fuel filler cap is not used.
Your fuel tank filler cap has an indexed design with a 1/4th turn on and
off feature. When fueling your vehicle:
1. Turn the engine off.
2. Carefully turn the filler cap counterclockwise until it spins off.
3. Pull to remove the cap from the fuel filler pipe.
4. To install the cap, align the tabs on the cap with the notches on the
filler pipe.
5. Turn the filler cap clockwise 1/4 of a turn clockwise until it clicks at
least once.
If the Check Fuel Cap light or a Check Fuel Cap message appears in the
instrument cluster and stays on after you start the engine, the fuel filler
cap may not be properly installed.
If the fuel cap light remains on, at the next opportunity, safely pull off of
the road, remove the fuel filler cap, align the cap properly and reinstall
it. The check fuel cap light or Check fuel cap message may not reset
immediately; it may take several driving cycles for the indicators to turn
off. A driving cycle consists of an engine start-up (after four or more
hours with the engine off) followed by normal city and highway driving.
FUEL CONSUMPTION
Filling the Tank
The advertised capacity is the indicated capacity and the empty reserve
combined. Indicated capacity is the difference in the amount of fuel in a
full tank and a tank when the fuel gauge indicates empty. Empty reserve
is the amount of fuel in the tank after the fuel gauge indicates empty.
Note:The amount of usable fuel in the empty reserve varies and should
not be relied upon to increase driving range. When refueling your vehicle
after the fuel gauge indicates empty, you might not be able to refuel the
full amount of the advertised capacity of the fuel tank due to the empty
reserve still present in the tank.
194Fuel and Refueling
2013 F-250/350/450/550(f23)
Owners Guide gf, 3rd Printing, December 2012
USA(fus)
Page 211 of 577
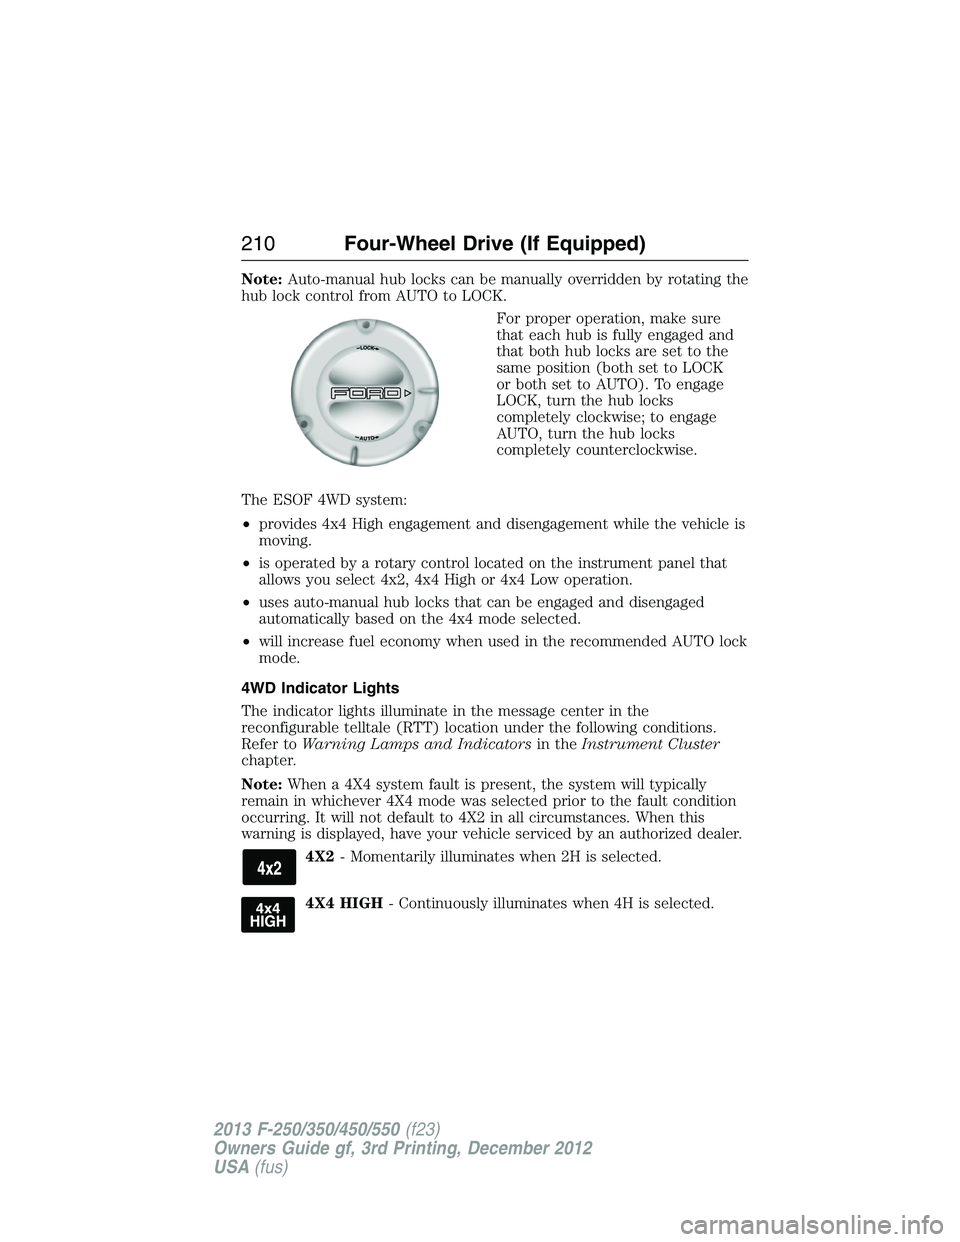
Note:Auto-manual hub locks can be manually overridden by rotating the
hub lock control from AUTO to LOCK.
For proper operation, make sure
that each hub is fully engaged and
that both hub locks are set to the
same position (both set to LOCK
or both set to AUTO). To engage
LOCK, turn the hub locks
completely clockwise; to engage
AUTO, turn the hub locks
completely counterclockwise.
The ESOF 4WD system:
•provides 4x4 High engagement and disengagement while the vehicle is
moving.
•is operated by a rotary control located on the instrument panel that
allows you select 4x2, 4x4 High or 4x4 Low operation.
•uses auto-manual hub locks that can be engaged and disengaged
automatically based on the 4x4 mode selected.
•will increase fuel economy when used in the recommended AUTO lock
mode.
4WD Indicator Lights
The indicator lights illuminate in the message center in the
reconfigurable telltale (RTT) location under the following conditions.
Refer toWarning Lamps and Indicatorsin theInstrument Cluster
chapter.
Note:When a 4X4 system fault is present, the system will typically
remain in whichever 4X4 mode was selected prior to the fault condition
occurring. It will not default to 4X2 in all circumstances. When this
warning is displayed, have your vehicle serviced by an authorized dealer.
4X2- Momentarily illuminates when 2H is selected.
4X4 HIGH- Continuously illuminates when 4H is selected.
210Four-Wheel Drive (If Equipped)
2013 F-250/350/450/550(f23)
Owners Guide gf, 3rd Printing, December 2012
USA(fus)
Page 321 of 577
3. Run the engine until it reaches normal operating temperature.
4. Allow the engine to idle for at least one minute.
5. Turn the A/C on and allow the engine to idle for at least one minute.
6. Release the parking brake. With your foot on the brake pedal and with
the A/C on, put the vehicle in D (Drive) and allow the engine to idle for
at least one minute.
Note:If you do not allow the engine to relearn its idle trim, the idle
quality of your vehicle may be adversely affected until the idle trim is
eventually relearned.
7. Drive the vehicle to complete the relearning process.
•The vehicle may need to be driven 10 miles (16 kilometers) or more
to relearn the idle and fuel trim strategy along with the ethanol
content for flexible fuel vehicles.
•For flexible fuel vehicles, if you are operating on E85, you may
experience poor starts or an inability to start the engine and
driveability problems until the fuel trim and ethanol content
have been relearned.
If the battery has been disconnected or a new battery has been installed,
the clock and radio settings must be reset once the battery is reconnected.
•Always dispose of automotive
batteries in a responsible manner.
Follow your local authorized
standards for disposal. Call your
local authorized recycling center
to find out more about recycling
automotive batteries.
L
E
A
D
RETURN
RECYCLE
320Maintenance
2013 F-250/350/450/550(f23)
Owners Guide gf, 3rd Printing, December 2012
USA(fus)
Page 371 of 577

Performing the System Reset Procedure
Read the entire procedure before attempting.
1. Drive the vehicle above 20 mph (32 km/h) for at least two minutes
and then park in a safe location where you can easily get to all four tires
and have access to an air pump.
2. Place the ignition in the off position and keep the key in the ignition.
3. Cycle the ignition to the on position with the engine off.
4. Turn the hazard flashers on then off three times. This must be
accomplished within 10 seconds.
If the reset mode has been entered successfully, the horn will sound
once, the system indicator will flash and a message is shown in the
information display (if equipped). If this does not occur, please try again
starting at Step 2.
If after repeated attempts to enter the reset mode, the horn does not
sound, the system indicator does not flash and no message is shown in the
information display (if equipped), seek service from your authorized dealer.
5.Note:Train the tire pressure monitoring system sensors in the tires
using the following system reset sequence starting with the left front tire
in the following clockwise order:
•Left front (Driver’s side front tire)
•Right front (Passenger’s side front tire)
•Right rear (Passenger’s side rear tire)
•Left rear (Driver’s side rear tire)
6. Remove the valve cap from the valve stem on the left front tire;
decrease the air pressure until the horn sounds.
Note:The single horn chirp confirms that the sensor identification code
has been learned by the module for this position. If a double horn is
heard, the reset procedure was unsuccessful, and must be repeated.
7. Remove the valve cap from the valve stem on the right front tire;
decrease the air pressure until the horn sounds.
8. Remove the valve cap from the valve stem on the right rear tire;
decrease the air pressure until the horn sounds.
9. Remove the valve cap from the valve stem on the left rear tire;
decrease the air pressure until the horn sounds.
Training is complete after the horn sounds for the last tire trained
(driver’s side rear tire), the system indicator stops flashing, and a
message is shown in the information display (if equipped).
370Wheels and Tires
2013 F-250/350/450/550(f23)
Owners Guide gf, 3rd Printing, December 2012
USA(fus)
Page 469 of 577
SETTINGS
Press to select any of the following:
•Clock
•Display
•Sound
•Vehicle
•Settings
•Help
HOME
Press to access your home screen. Depending on your vehicle’s option
package and software, your screens may vary in appearance from the
descriptions in this section. Your features may also be limited depending
on your market. Check with your authorized dealer for availability.
INFORMATION
Press to select any of the following:
•SYNC Services
•SIRIUS Travel Link
•Alerts
•Calendar
•SYNC Apps
If the icon is yellow, seeAlertsin theInformationsection of this
chapter.
ENTERTAINMENT
Press to select any of the following:
•AM
•FM
•SIRIUS
•CD
•USB
•BT Stereo
•SD Card
•A/V In
468MyFord Touch® (If Equipped)
2013 F-250/350/450/550(f23)
Owners Guide gf, 3rd Printing, December 2012
USA(fus)
Page 521 of 577
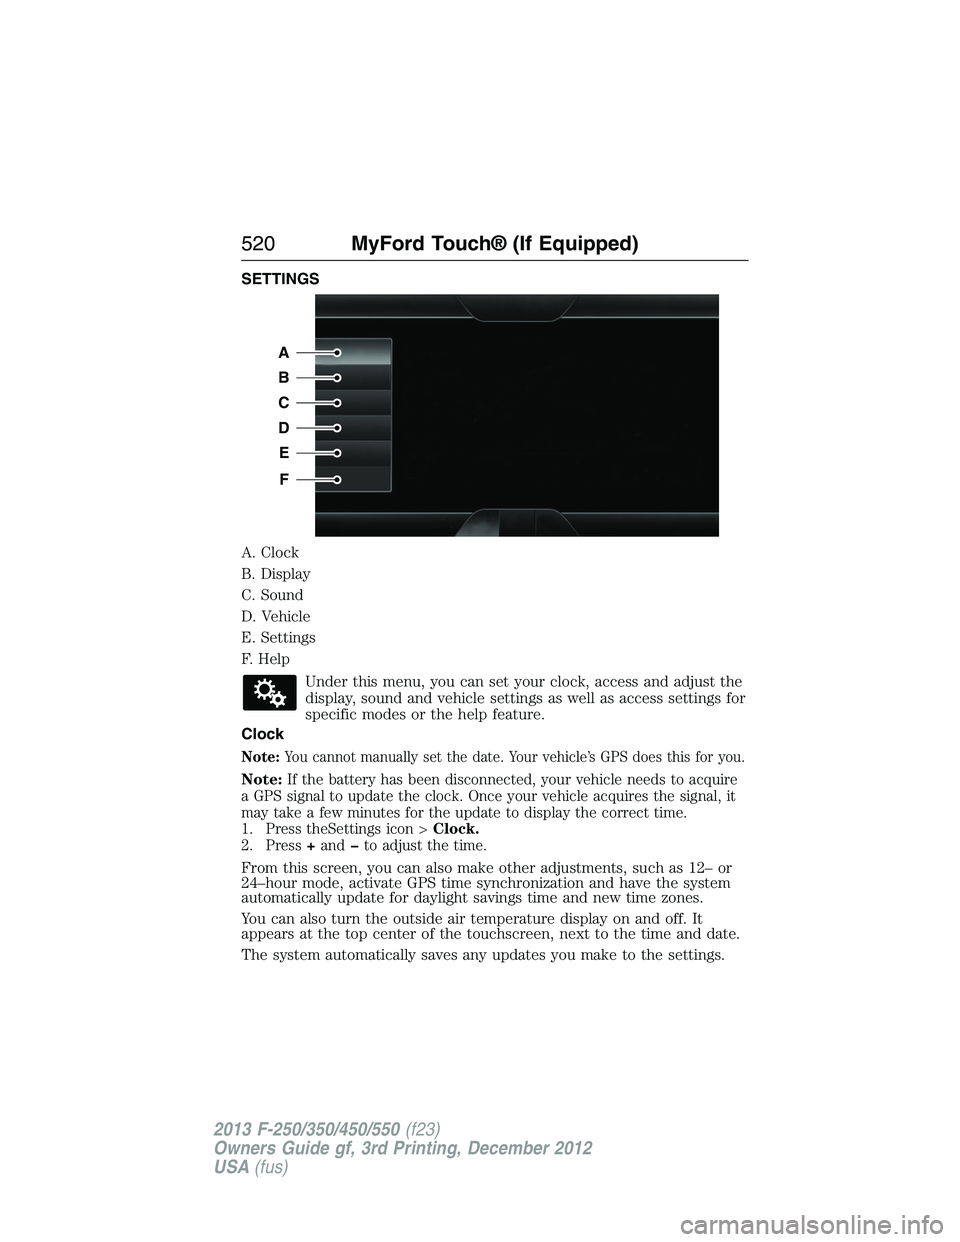
SETTINGS
A. Clock
B. Display
C. Sound
D. Vehicle
E. Settings
F. Help
Under this menu, you can set your clock, access and adjust the
display, sound and vehicle settings as well as access settings for
specific modes or the help feature.
Clock
Note:You cannot manually set the date. Your vehicle’s GPS does this for you.
Note:If the battery has been disconnected, your vehicle needs to acquire
a GPS signal to update the clock. Once your vehicle acquires the signal, it
may take a few minutes for the update to display the correct time.
1. Press theSettings icon >Clock.
2. Press+and�to adjust the time.
From this screen, you can also make other adjustments, such as 12– or
24–hour mode, activate GPS time synchronization and have the system
automatically update for daylight savings time and new time zones.
You can also turn the outside air temperature display on and off. It
appears at the top center of the touchscreen, next to the time and date.
The system automatically saves any updates you make to the settings.
A
B
C
D
E
F
520MyFord Touch® (If Equipped)
2013 F-250/350/450/550(f23)
Owners Guide gf, 3rd Printing, December 2012
USA(fus)