2013 FORD EXPEDITION suspension
[x] Cancel search: suspensionPage 338 of 497
Tire Replacement Requirements
WARNING:Only use replacement tires and wheels that are the
same size, load index, speed rating and type (such as P-metric
versus LT-metric or all-season versus all-terrain) as those originally
provided by Ford. The recommended tire and wheel size may be found on
either the Safety Compliance Certification Label (affixed to either the door
hinge pillar, door-latch post, or the door edge that meets the door-latch
post, next to the driver’s seating position), or the Tire Label which is
located on the B-Pillar or edge of the driver’s door. If this information is
not found on these labels, then you should contact your authorized dealer
as soon as possible. Use of any tire or wheel not recommended by Ford
can affect the safety and performance of your vehicle, which could result
in an increased risk of loss of vehicle control, vehicle rollover, personal
injury and death. Additionally the use of non-recommended tires and
wheels could cause steering, suspension, axle, transfer case or power
transfer unit failure. If you have questions regarding tire replacement,
contact your authorized dealer as soon as possible.
WARNING:When mounting replacement tires and wheels, you
should not exceed the maximum pressure indicated on the
sidewall of the tire to set the beads without additional precautions
listed below. If the beads do not seat at the maximum pressure
indicated, re-lubricate and try again.
When inflating the tire for mounting pressures up to 20 psi (1.38 bar)
greater than the maximum pressure on the tire sidewall, the following
precautions must be taken to protect the person mounting the tire:
1. Make sure that you have the correct tire and wheel size.
2. Lubricate the tire bead and wheel bead seat area again.
3. Stand at a minimum of 12 ft (3.66 m) away from the tire wheel
assembly.
4. Use both eye and ear protection.
For a mounting pressure more than 20 psi (1.38 bar) greater than the
maximum pressure, a Ford dealer or other tire service professional
should do the mounting.
Always inflate steel carcass tires with a remote air fill with the person
inflating standing at a minimum of 12 ft (3.66 m) away from the tire
wheel assembly.
Your vehicle is equipped with tires designed to provide a safe ride and
handling capability.
338Wheels and Tires
2013 Expedition(exd)
Owners Guide gf, 1st Printing
USA(fus)
Page 340 of 497
Tire and Wheel Alignment
A bad jolt from hitting a curb or pothole can cause the front end of your
vehicle to become misaligned or cause damage to your tires. If your
vehicle seems to pull to one side when you are driving, the wheels may
be out of alignment. Have an authorized dealer check the wheel
alignment periodically.
Wheel misalignment in the front or the rear can cause uneven and rapid
treadwear of your tires and should be corrected by an authorized dealer.
Front-wheel drive vehicles and those with an independent rear
suspension (if equipped) may require alignment of all four wheels.
The tires should also be balanced periodically. An unbalanced tire and
wheel assembly may result in irregular tire wear.
Tire Rotation
Note:If your tires show uneven wear ask an authorized dealer to check
for and correct any wheel misalignment, tire imbalance or mechanical
problem involved before tire rotation.
Note:Your vehicle may be equipped with a dissimilar spare tire and
wheel assembly. A dissimilar spare tire/wheel is defined as a spare tire or
wheel that is different in brand, size or appearance from the road tires
and wheels. If you have a dissimilar spare tire and wheel assembly, it is
intended for temporary use only and should not be used in a tire
rotation.
Note:After having your tires rotated, inflation pressure must be checked
and adjusted to the vehicle requirements.
Rotating your tires at the recommended interval (as indicated in your
scheduled maintenance) will help your tires wear more evenly, providing
better tire performance and longer tire life.
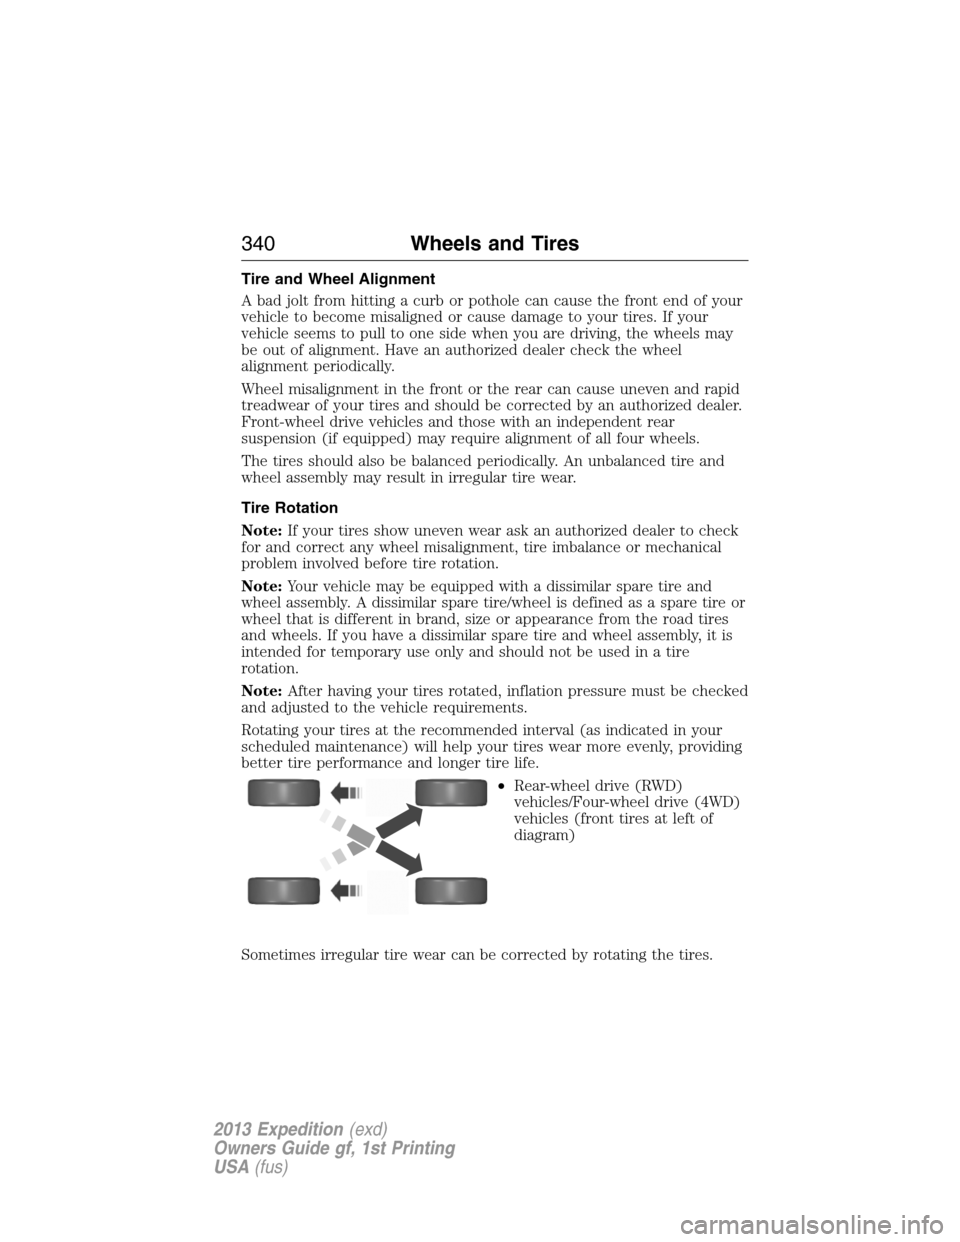
•Rear-wheel drive (RWD)
vehicles/Four-wheel drive (4WD)
vehicles (front tires at left of
diagram)
Sometimes irregular tire wear can be corrected by rotating the tires.
340Wheels and Tires
2013 Expedition(exd)
Owners Guide gf, 1st Printing
USA(fus)
Page 341 of 497
USING SNOW CHAINS
WARNING:Snow tires must be the same size, load index, speed
rating as those originally provided by Ford. Use of any tire or
wheel not recommended by Ford can affect the safety and performance
of your vehicle, which could result in an increased risk of loss of vehicle
control, vehicle rollover, personal injury and death. Additionally, the use
of non-recommended tires and wheels could cause steering, suspension,
axle or transfer case/power transfer unit failure.
Note:The suspension insulation and bumpers will help prevent vehicle
damage. Do not remove these components from your vehicle when using
snow tires and chains.
The tires on your vehicle have all-weather treads to provide traction in
rain and snow. However, in some climates, you may need to use snow
tires and chains. If you need to use chains, it is recommended that steel
wheels (of the same size and specifications) be used, as chains may chip
aluminum wheels.
Follow these guidelines when using snow tires and chains:
•If possible, avoid fully loading your vehicle.
•Use only cable type chains or chains offered by Ford as an accessory
or equivalent. Other conventional link type chains may contact and
cause damage to the vehicle’s wheel house and/or body.
•Do not install chains on the front wheels as this may interfere with
suspension components.
•Chains are not recommended for use on the P275/55R20 tire.
•Install chains securely, verifying that the chains do not touch any
wiring, brake lines or fuel lines.
•Do not exceed 30 mph (48 km/h) with tire chains on your vehicle.
•Drive cautiously. If you hear the chains rub or bang against your
vehicle, stop and retighten the chains. If this does not work, remove
the chains to prevent damage to your vehicle.
•Remove the tire chains when they are no longer needed. Do not use
tire chains on dry roads.
Wheels and Tires341
2013 Expedition(exd)
Owners Guide gf, 1st Printing
USA(fus)
Page 351 of 497

4. To remove the spare tire, turn the handle counterclockwise until the
tire is lowered to the ground and the cable is slightly slack.
5. Slide the retainer through the center of the spare tire wheel.
6. Block the wheels (both front or
both rear) on the opposite end of
the vehicle from the wheel being
changed. If on a grade, block both
wheels on the downward side of the
hill.
7. Turn off the air suspension system (if equipped). Also, turn off the
deployable running boards (if equipped). See theDriving Aidschapter.
8. Obtain the spare tire and jack tools from their storage locations.
9. Use the tip of the jack handle to remove any wheel trim.
10. Loosen each wheel lug nut one-half turn counterclockwise but do not
remove them until the wheel is raised off the ground.
11. Position the jack according to
the jack locator arrows found on the
frame and turn the jack handle and
extension tool assembly clockwise.
Note:Use the frame rail as the
jacking location point, NOT the
control arm.
Wheels and Tires351
2013 Expedition(exd)
Owners Guide gf, 1st Printing
USA(fus)
Page 353 of 497
18. Unblock the wheels.
19. Put flat tire, jack, lug wrench and tools away. Make sure the jack bag
is properly reinstalled around the jack and tools assembly tray with the
strap securely fastened. Be sure to tighten the wing nut sufficiently so it
does not rattle when you drive.
20. Turn on the air suspension system.
Stowing the Spare Tire
1. Lay the tire on the ground, near the rear of the vehicle, with the valve
stem side facing up.
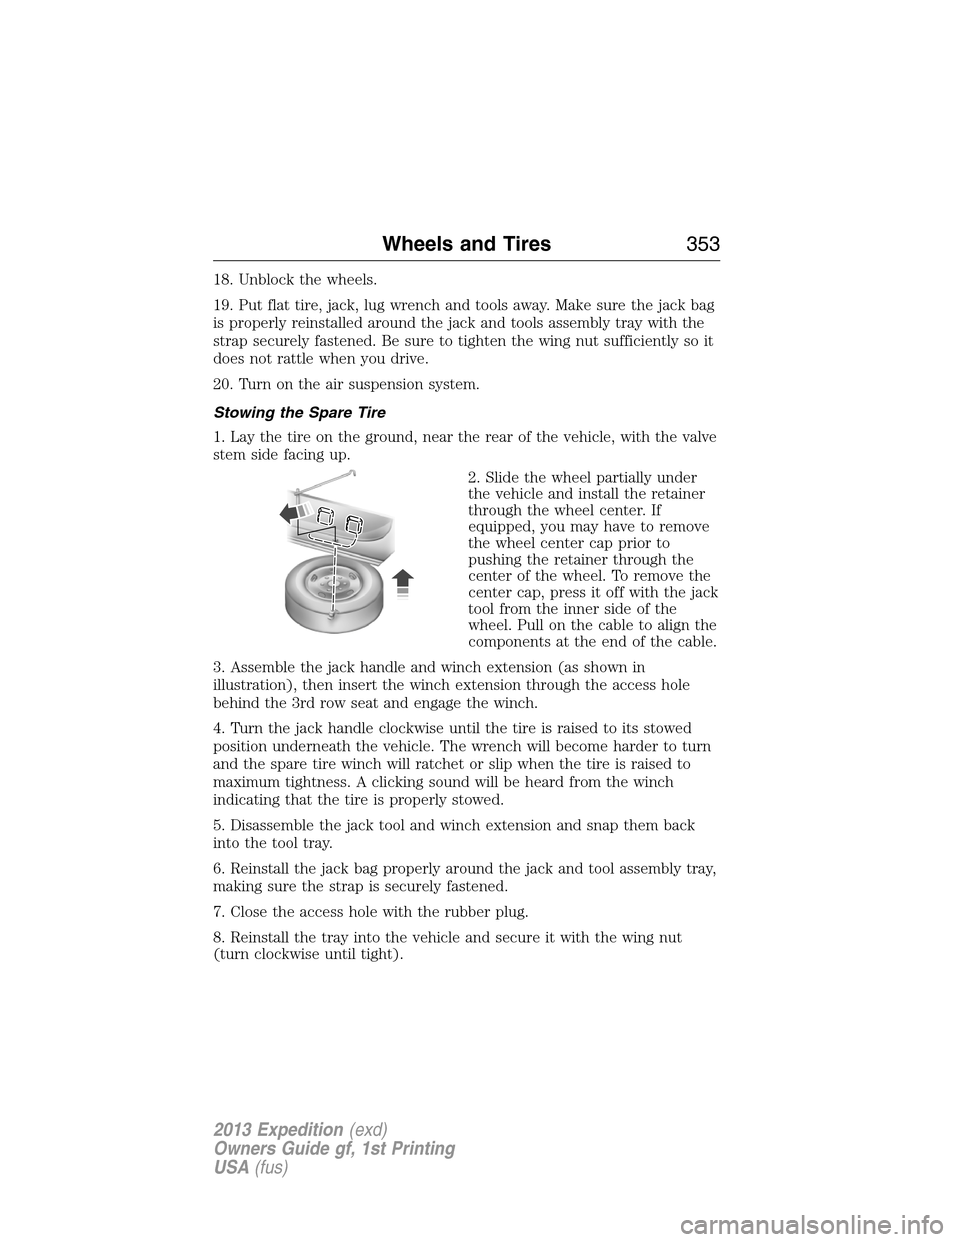
2. Slide the wheel partially under
the vehicle and install the retainer
through the wheel center. If
equipped, you may have to remove
the wheel center cap prior to
pushing the retainer through the
center of the wheel. To remove the
center cap, press it off with the jack
tool from the inner side of the
wheel. Pull on the cable to align the
components at the end of the cable.
3. Assemble the jack handle and winch extension (as shown in
illustration), then insert the winch extension through the access hole
behind the 3rd row seat and engage the winch.
4. Turn the jack handle clockwise until the tire is raised to its stowed
position underneath the vehicle. The wrench will become harder to turn
and the spare tire winch will ratchet or slip when the tire is raised to
maximum tightness. A clicking sound will be heard from the winch
indicating that the tire is properly stowed.
5. Disassemble the jack tool and winch extension and snap them back
into the tool tray.
6. Reinstall the jack bag properly around the jack and tool assembly tray,
making sure the strap is securely fastened.
7. Close the access hole with the rubber plug.
8. Reinstall the tray into the vehicle and secure it with the wing nut
(turn clockwise until tight).
Wheels and Tires353
2013 Expedition(exd)
Owners Guide gf, 1st Printing
USA(fus)
Page 371 of 497
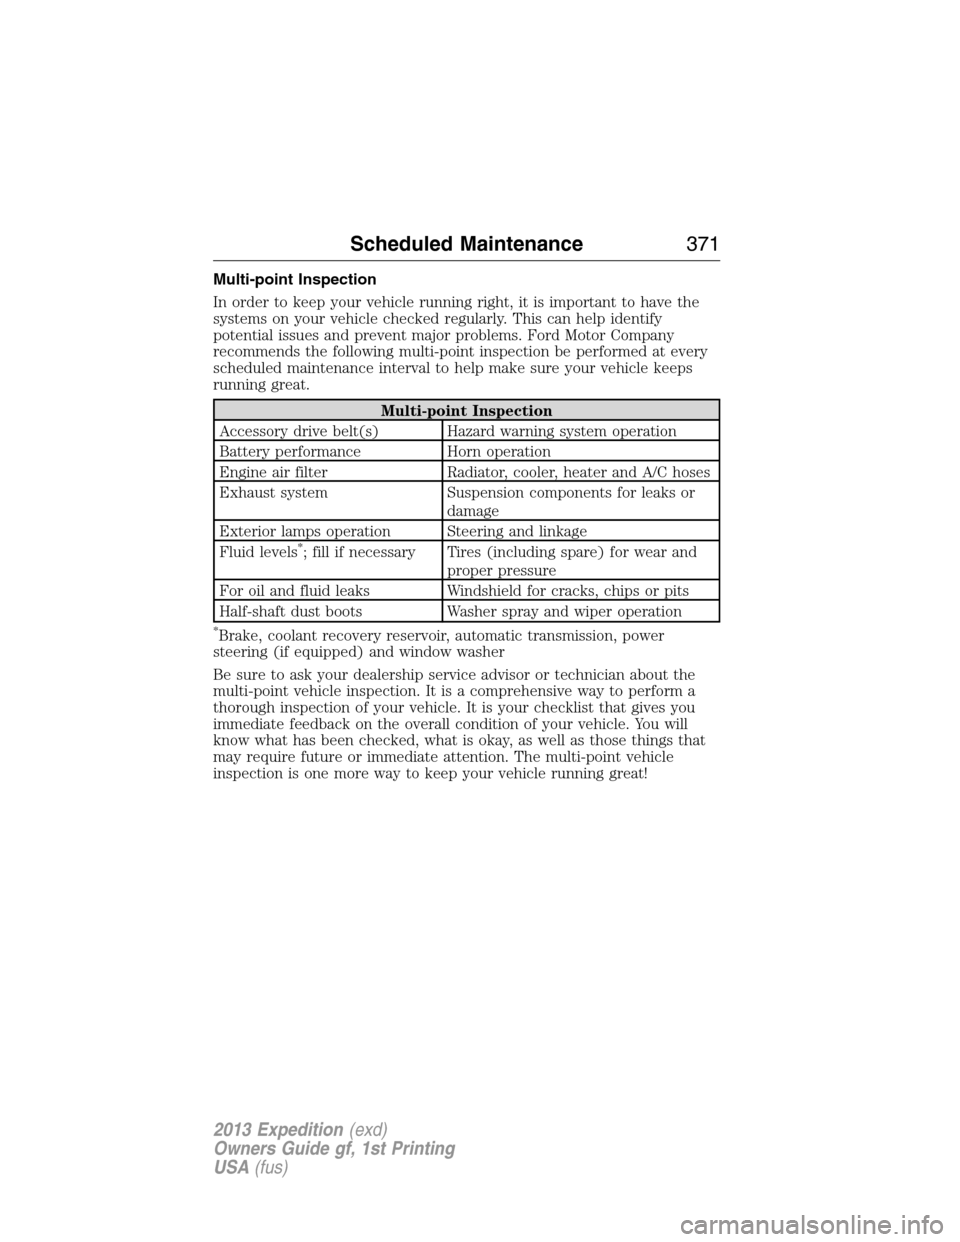
Multi-point Inspection
In order to keep your vehicle running right, it is important to have the
systems on your vehicle checked regularly. This can help identify
potential issues and prevent major problems. Ford Motor Company
recommends the following multi-point inspection be performed at every
scheduled maintenance interval to help make sure your vehicle keeps
running great.
Multi-point Inspection
Accessory drive belt(s) Hazard warning system operation
Battery performance Horn operation
Engine air filter Radiator, cooler, heater and A/C hoses
Exhaust system Suspension components for leaks or
damage
Exterior lamps operation Steering and linkage
Fluid levels
*; fill if necessary Tires (including spare) for wear and
proper pressure
For oil and fluid leaks Windshield for cracks, chips or pits
Half-shaft dust boots Washer spray and wiper operation
*Brake, coolant recovery reservoir, automatic transmission, power
steering (if equipped) and window washer
Be sure to ask your dealership service advisor or technician about the
multi-point vehicle inspection. It is a comprehensive way to perform a
thorough inspection of your vehicle. It is your checklist that gives you
immediate feedback on the overall condition of your vehicle. You will
know what has been checked, what is okay, as well as those things that
may require future or immediate attention. The multi-point vehicle
inspection is one more way to keep your vehicle running great!
Scheduled Maintenance371
2013 Expedition(exd)
Owners Guide gf, 1st Printing
USA(fus)
Page 373 of 497
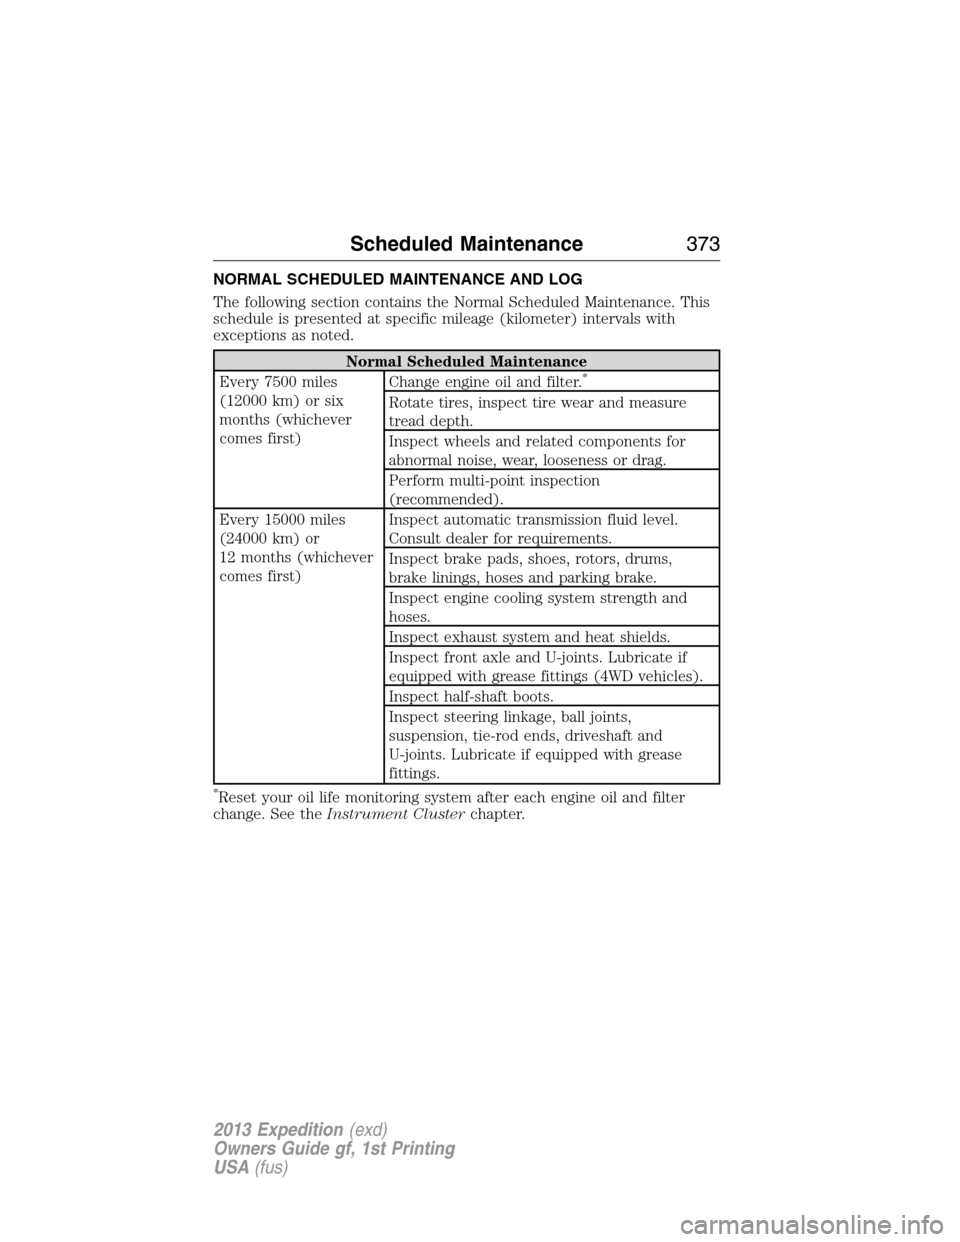
NORMAL SCHEDULED MAINTENANCE AND LOG
The following section contains the Normal Scheduled Maintenance. This
schedule is presented at specific mileage (kilometer) intervals with
exceptions as noted.
Normal Scheduled Maintenance
Every 7500 miles
(12000 km) or six
months (whichever
comes first)Change engine oil and filter.*
Rotate tires, inspect tire wear and measure
tread depth.
Inspect wheels and related components for
abnormal noise, wear, looseness or drag.
Perform multi-point inspection
(recommended).
Every 15000 miles
(24000 km) or
12 months (whichever
comes first)Inspect automatic transmission fluid level.
Consult dealer for requirements.
Inspect brake pads, shoes, rotors, drums,
brake linings, hoses and parking brake.
Inspect engine cooling system strength and
hoses.
Inspect exhaust system and heat shields.
Inspect front axle and U-joints. Lubricate if
equipped with grease fittings (4WD vehicles).
Inspect half-shaft boots.
Inspect steering linkage, ball joints,
suspension, tie-rod ends, driveshaft and
U-joints. Lubricate if equipped with grease
fittings.
*Reset your oil life monitoring system after each engine oil and filter
change. See theInstrument Clusterchapter.
Scheduled Maintenance373
2013 Expedition(exd)
Owners Guide gf, 1st Printing
USA(fus)
Page 490 of 497

911 Assist™ ..............................404
A
ABS (see Brakes) .....................225
Accessing call history/phone
book during active call .............394
Accessing the help screen .......463
Accessing the music in
your jukebox .....................457–458
Accessing your media menu
features ......................................416
Accessing your phone menu
features ......................................395
Accessory delay ..........................88
Active call menu options .........394
Advanced menu options ...402, 423
Advanced menu options
(prompts, languages, defaults,
master reset, installing
applications) ..............................402
Airbag supplemental restraint
system ..........................................45
and child safety seats ..............47
description ................................45
disposal ......................................51
driver airbag ..............................45
passenger airbag .......................45
side airbag ...........................45, 47
Air cleaner filter .......303–304, 360
Air conditioning ................146, 148
manual heating and air
conditioning system .......146, 148
Air filter .............................304, 360
Air suspension ...........................239
description ..............................239All Wheel Drive (AWD),
driving off road .........................216
Ambulance packages ..................15
AM/FM .......................................441
Antifreeze
(see Engine coolant) ................294
Anti-lock brake system
(see Brakes) ..............................225
Anti-theft system ..................73, 75
arming the system ..............73, 75
disarming a triggered system ..75
AppLink™ .................................411
Armrests ....................................178
Ashtray(s) .................................193
Audio system
Single CD ................................118
Audio system (see Radio) .......118
Automatic transmission
driving an automatic
overdrive .................................209
fluid, adding ............................298
fluid, checking ........................298
fluid, refill capacities ..............356
fluid, specification ..................356
Auxiliary input jack (Line in) ..123
Auxiliary powerpoint ................189
Axle
lubricant specifications ..........356
refill capacities ........................356
B
Battery .......................................300
acid, treating emergencies .....300
jumping a disabled battery ....270
maintenance-free ....................300
replacement, specifications ...360
490Index
2013 Expedition(exd)
Owners Guide gf, 1st Printing
USA(fus)