2013 FIAT FREEMONT reset
[x] Cancel search: resetPage 116 of 352

WARNING!
There is no anti-pinch protection when
t
he window is almost closed. To avoid
personal injury, be sure to clear your arms, hands,
fingers, and objects from the window path before
closing the window. Such entrapment may result
in serious injury.
Reset
It may be necessary at some point in time to reactivate
the Auto-up/Auto-down feature. To do so, perform
the following steps:
1. Pull the window switch up to close the window completely and continue to hold the switch up for
an additional two seconds after the window is
closed.
2. Push the window switch down firmly to the second detent to open the window completely and con-
tinue to hold the switch down for an additional two
seconds after the window is fully open.
Window Lockout Switch
The window lockout switch on the driver's door trim
panel allows you to disable the window control on the
rear doors. To disable the window controls, press and
release the window lockout button (setting it in the
down position). To enable the window controls, press and release the window lockout button again (setting it
in the up position). (fig. 90)
WIND BUFFETING
Wind buffeting can be described as the perception of
pressure on the ears or a helicopter-type sound in the
ears. Your vehicle may exhibit wind buffeting with the
windows down, or the sunroof (for versions/markets,
where provided) in certain open or partially open
positions. This is a normal occurrence and can be
minimized. If the buffeting occurs with the rear win-
dows open, then open the front and rear windows
together to minimize the buffeting. If the buffeting
occurs with the sunroof open, adjust the sunroof
opening to minimize the buffeting or open any window.
(fig. 90)
Window Lockout Switch
110
KNOWING YOUR
VEHICLE
SAFETY
S
TARTING AND
DRIVING
WARNING LIGHTSAND
MESSAGES
IN AN
EMERGENCY
SERVICING AND
CARETECHNICAL
SPECIFICATIONSCONTENTS
Page 150 of 352

STEERING WHEEL AUDIO
CONTROLS
The remote sound system controls are located on the
rear surface of the steering wheel. The left and right-
hand controls are rocker-type switches with a pushbut-
ton in the center of each switch. Reach behind the
steering wheel to access the switches. (fig. 106)
RIGHT-HAND SWITCH FUNCTIONS
Press the top of the switch to increase the volume.
Press the bottom of the switch to decrease thevolume.
Press the button in the center of the switch to change modes (i.e., AM, FM, etc.). LEFT-HAND SWITCH FUNCTIONS FOR
RADIO OPERATION
Press the top of the switch to SEEK the next listen-
able station up from the current setting.
Press the bottom of the switch to SEEK the next listenable station down from the current setting.
Press the button in the center of the switch to tune to the next preset that you have programmed.
LEFT-HAND SWITCH FUNCTIONS FOR
MEDIA (I.E., CD) OPERATION
Press the top of the switch once to listen to the next track.
Press the bottom of the switch once either to listen to the beginning of the current track or to listen to
the beginning of the previous track if it is within one
second after the current track begins to play.
Press the switch up or down twice to listen to the second track, three times to listen to the third track,
and so forth.
Press the button located in the center of the switch to change to the next preset that you have pro-
grammed.(fig. 106)Remote Sound Controls (Back View Of Steering Wheel)
144
KNOWING YOUR
VEHICLE
SAFETY
S
TARTING AND
DRIVING
WARNING LIGHTSAND
MESSAGES
IN AN
EMERGENCY
SERVICING AND
CARETECHNICAL
SPECIFICATIONSCONTENTS
Page 156 of 352
RemoteControl Button Standard Screens
Menu Screens
AM/FM/
MW/LW SAT–
Audio HDD–
HardDisc
Drive DISC/
DVD AUX/AUX1/AUX2
Mode
Select Menu Screen
Setup
Mode Show Mode Select Menu Advance
to Next
Mode
Show
Mode
Select Item
Prog Up Next
Preset*Next
Preset*Not
AvailableNot
AvailableNext Disc (if player is
changer) Not
AvailableNot
AvailableNot
Available
Prog
Down Previous
Preset*
Previous
Preset*Not
AvailableNot
AvailablePrevious Disc (if player
is changer) Not
AvailableNot
AvailableNot
Available
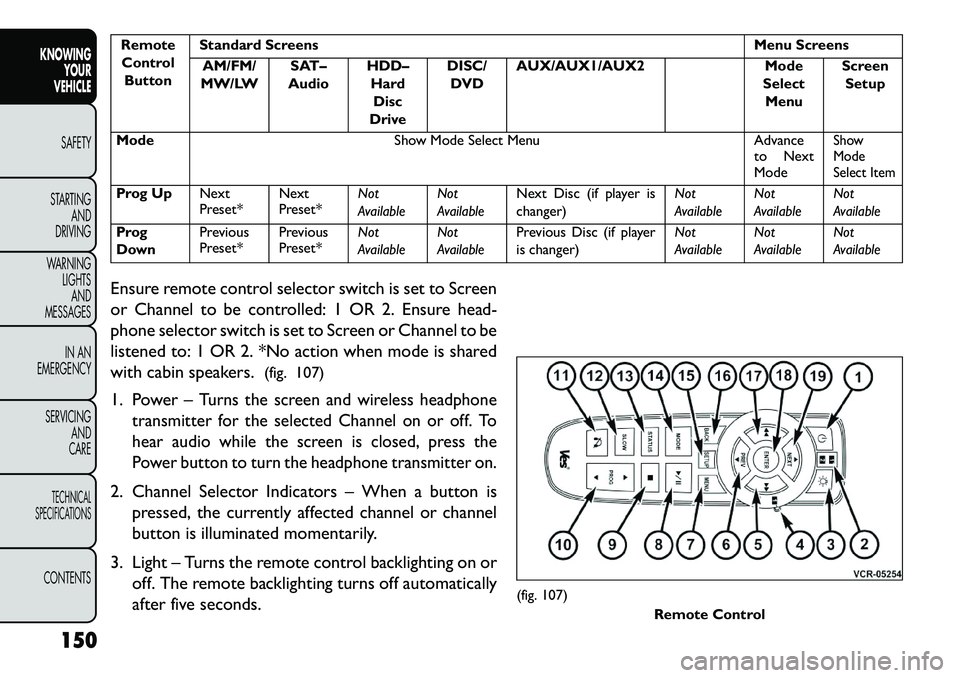
Ensure remote control selector switch is set to Screen
or Channel to be controlled: 1 OR 2. Ensure head-
phone selector switch is set to Screen or Channel to be
listened to: 1 OR 2. *No action when mode is shared
with cabin speakers. (fig. 107)
1. Power –
Turns the screen and wireless headphone
transmitter for the selected Channel on or off. To
hear audio while the screen is closed, press the
Power button to turn the headphone transmitter on.
2. Channel Selector Indicators – When a button is
pressed, the currently affected channel or channel
button is illuminated momentarily.
3. Light – Turns the remote control backlighting on or off. The remote backlighting turns off automatically
after five seconds.
(fig. 107) Remote Control
150
KNOWING YOUR
VEHICLE
SAFETY
S
TARTING AND
DRIVING
WARNING LIGHTSAND
MESSAGES
IN AN
EMERGENCY
SERVICING AND
CARETECHNICAL
SPECIFICATIONSCONTENTS
Page 157 of 352
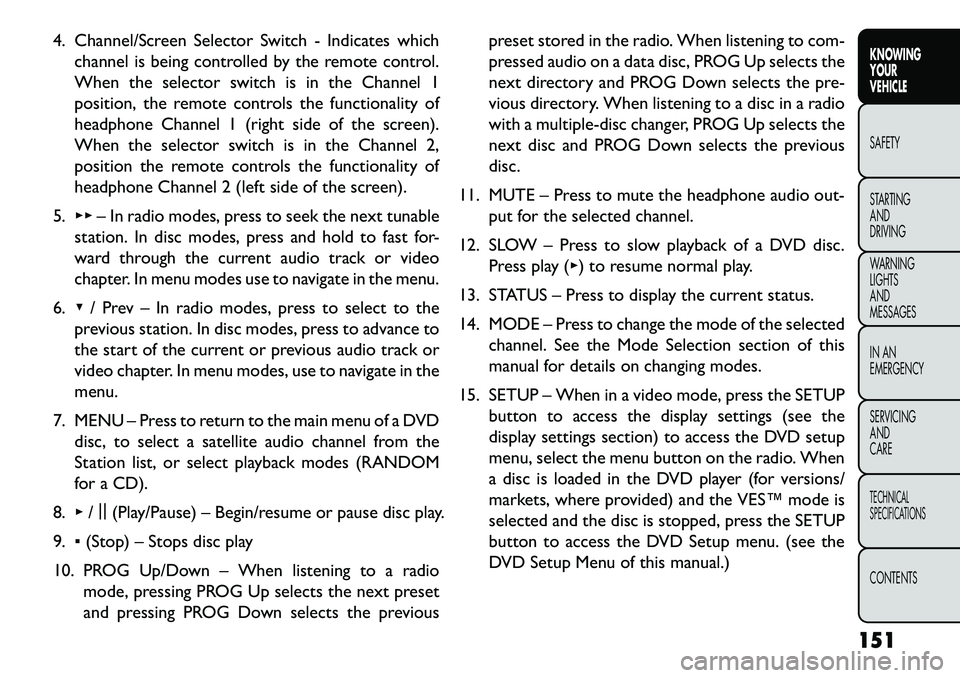
4. Channel/Screen Selector Switch - Indicates whichchannel is being controlled by the remote control.
When the selector switch is in the Channel 1
position, the remote controls the functionality of
headphone Channel 1 (right side of the screen).
When the selector switch is in the Channel 2,
position the remote controls the functionality of
headphone Channel 2 (left side of the screen).
5. ▸▸ – In radio modes, press to seek the next tunable
station. In disc modes, press and hold to fast for-
ward through the current audio track or video
chapter. In menu modes use to navigate in the menu.
6. ▾/ Prev – In radio modes, press to select to the
previous station. In disc modes, press to advance to
the start of the current or previous audio track or
video chapter. In menu modes, use to navigate in the
menu.
7. MENU – Press to return to the main menu of a DVD disc, to select a satellite audio channel from the
Station list, or select playback modes (RANDOM
for a CD).
8. ▸/||
(Play/Pause) – Begin/resume or pause disc play.
9. ▪(Stop) – Stops disc play
10. PROG Up/Down – When listening to a radio mode, pressing PROG Up selects the next preset
and pressing PROG Down selects the previous preset stored in the radio. When listening to com-
pressed audio on a data disc, PROG Up selects the
next directory and PROG Down selects the pre-
vious directory. When listening to a disc in a radio
with a multiple-disc changer, PROG Up selects the
next disc and PROG Down selects the previous
disc.
11. MUTE – Press to mute the headphone audio out- put for the selected channel.
12. SLOW – Press to slow playback of a DVD disc. Press play (▸) to resume normal play.
13. STATUS – Press to display the current status.
14. MODE – Press to change the mode of the selected channel. See the Mode Selection section of this
manual for details on changing modes.
15. SETUP – When in a video mode, press the SETUP button to access the display settings (see the
display settings section) to access the DVD setup
menu, select the menu button on the radio. When
a disc is loaded in the DVD player (for versions/
markets, where provided) and the VES™ mode is
selected and the disc is stopped, press the SETUP
button to access the DVD Setup menu. (see the
DVD Setup Menu of this manual.)
151
KNOWING
YOUR
VEHICLE
SAFETY
STARTING
AND
DRIVING
WARNING
LIGHTS
AND
MESSAGES
IN AN
EMERGENCY
SERVICING
AND
CARETECHNICAL
SPECIFICATIONSCONTENTS
Page 163 of 352
control the radio functions. In this case, VES™ can
share the radio mode, but not change stations until the
radio mode is changed to a mode that is different from
the VES™ selected radio mode. When shared, the
radio has priority over the VES™ or all radio modes
(FM, AM, and SAT). The VES™ has the ability to switch
tuner (AM/FM/MW/LW), SEEK, TUNE, and recall pre-
sets in radio modes as long as it is not in shared mode.
When in shared disc or satellite video mode both the
radio and the VES™ have control of the video func-
tions. The VES™ has the ability to control the follow-
ing video modes:
1. CD: Ability to Fast Forward, Rewind, and TrackUp/Down.
2. CD Changer (in radio): Ability to Disk Up/Down and program all listed CD controls (Fast Forward,
Rewind, and Track Up/Down).
The VES™ can even control radio modes or video
modes while the radio is turned off. The VES™ can
access the radio modes or disc modes by navigating to
those modes on the VES™ and activating a radio mode
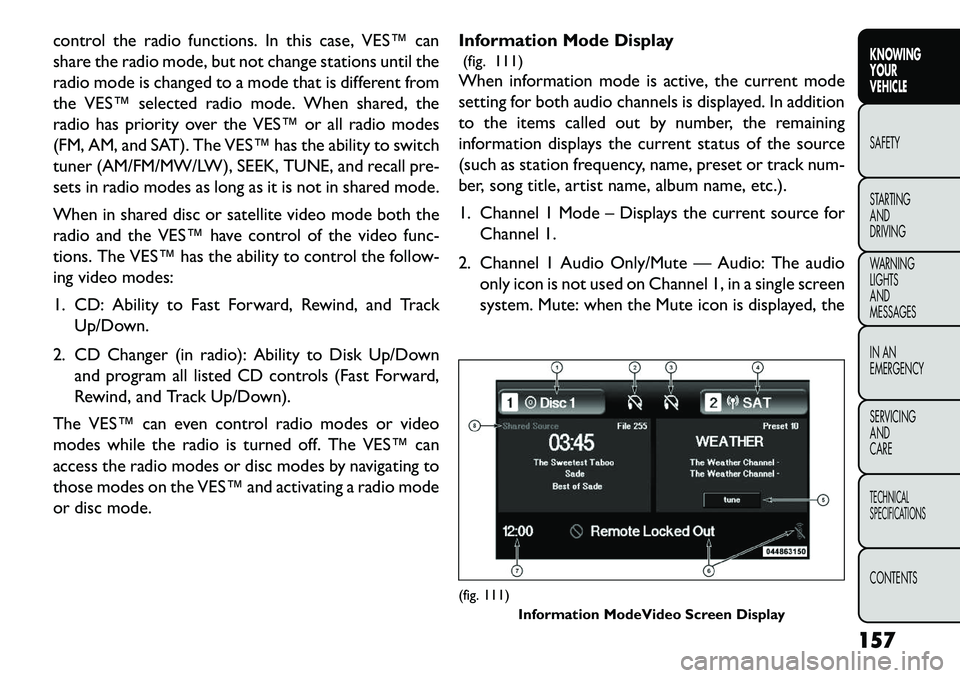
or disc mode. Information Mode Display
(fig. 111)
When information mode is active, the current mode
setting for both audio channels is displayed. In addition
to the items called out by number, the remaining
information displays the current status of the source
(such as station frequency, name, preset or track num-
ber, song title, artist name, album name, etc.).
1. Channel 1 Mode – Displays the current source for
Channel 1.
2. Channel 1 Audio Only/Mute — Audio: The audio only icon is not used on Channel 1, in a single screen
system. Mute: when the Mute icon is displayed, the
(fig. 111) Information ModeVideo Screen Display
157
KNOWING
YOUR
VEHICLE
SAFETY
S
TARTING
AND
DRIVING
WARNING
LIGHTS
AND
MESSAGES
IN AN
EMERGENCY
SERVICING
AND
CARETECHNICAL
SPECIFICATIONSCONTENTS
Page 166 of 352
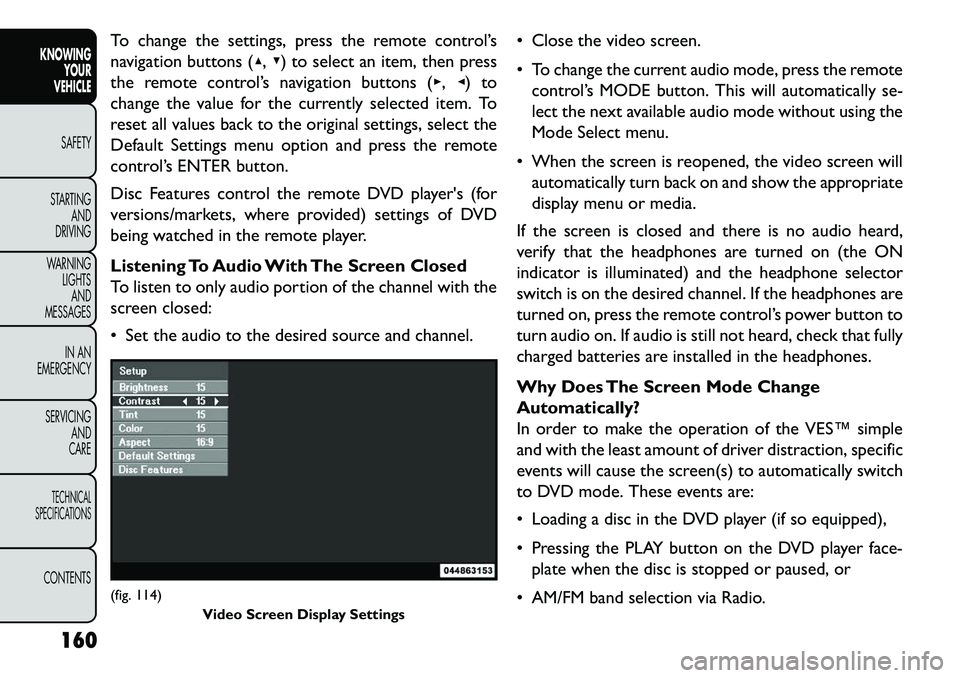
To change the settings, press the remote control’s
navigation buttons (▴,▾) to select an item, then press
the remote control’s navigation buttons (▸, ◂) to
change the value for the currently selected item. To
reset all values back to the original settings, select the
Default Settings menu option and press the remote
control’s ENTER button.
Disc Features control the remote DVD player's (for
versions/markets, where provided) settings of DVD
being watched in the remote player.
Listening To Audio With The Screen Closed
To listen to only audio portion of the channel with the
screen closed:
Set the audio to the desired source and channel. Close the video screen.
To change the current audio mode, press the remote
control’s MODE button. This will automatically se-
lect the next available audio mode without using the
Mode Select menu.
When the screen is reopened, the video screen will automatically turn back on and show the appropriate
display menu or media.
If the screen is closed and there is no audio heard,
verify that the headphones are turned on (the ON
indicator is illuminated) and the headphone selector
switch is on the desired channel. If the headphones are
turned on, press the remote control’s power button to
turn audio on. If audio is still not heard, check that fully
charged batteries are installed in the headphones.
Why Does The Screen Mode Change
Automatically?
In order to make the operation of the VES™ simple
and with the least amount of driver distraction, specific
events will cause the screen(s) to automatically switch
to DVD mode. These events are:
Loading a disc in the DVD player (if so equipped),
Pressing the PLAY button on the DVD player face- plate when the disc is stopped or paused, or
AM/FM band selection via Radio.(fig. 114) Video Screen Display Settings
160
KNOWING YOUR
VEHICLE
SAFETY
S
TARTING AND
DRIVING
WARNING LIGHTSAND
MESSAGES
IN AN
EMERGENCY
SERVICING AND
CARETECHNICAL
SPECIFICATIONSCONTENTS
Page 178 of 352

All occupants, including the driver, should
not operate a vehicle or sit in a vehicle's
seat until the head restraints are placed
in their proper positions in order to minimize the
risk of neck injury in the event of a collision.
NOTE: For more information on properly adjusting
and positioning the head restraint, refer to “Adjusting
Active Head Restraints” in “Knowing Your Vehicle”. Resetting Active Head Restraints (AHR)
If the Active Head Restraints are triggered in a collision,
you must reset the head restraint on the driver’s and
front passenger seat. You can recognize when the
Active Head Restraint has been triggered by the fact
that they have moved forward (as shown in step three
of the resetting procedure).
1. Grasp the deployed AHR from the rear seat.
(fig. 122)
2. Position the hands on the top of the deployed AHR at a comfortable position.
(fig. 121) Active Head Restraint (AHR) Components1 — Head Restraint Front
Half (Soft Foam and Trim) 3 — Head Restraint Back
Half (Decorative Plastic Rear
Cover)
2 — Seatback 4 — Head Restraint Guide
Tubes
(fig. 122)
Hand Positioning Points On AHR
172
KNOWING YOUR
VEHICLE
SAFETY
STARTING AND
DRIVING
W
ARNING LIGHTS AND
MESSAGES
IN AN
EMERGENCY
SERVICING AND
CARETECHNICAL
SPECIFICATIONSCONTENTS
Page 179 of 352
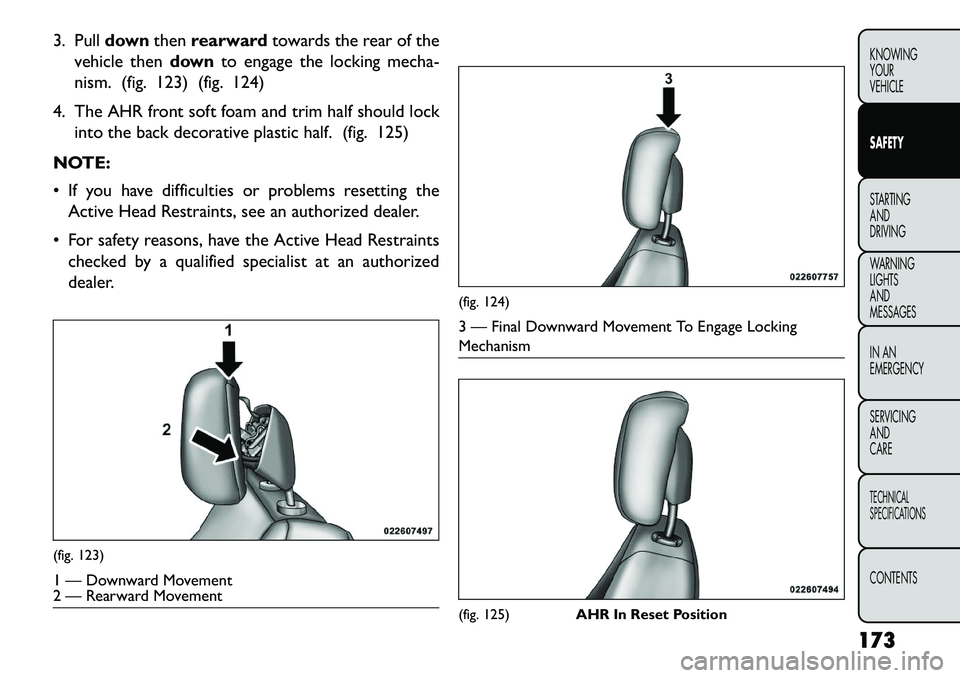
3. Pulldownthenrearward towards the rear of the
vehicle then downto engage the locking mecha-
nism. (fig. 123) (fig. 124)
4. The AHR front soft foam and trim half should lock into the back decorative plastic half. (fig. 125)
NOTE:
If you have difficulties or problems resetting the Active Head Restraints, see an authorized dealer.
For safety reasons, have the Active Head Restraints checked by a qualified specialist at an authorized
dealer.(fig. 123)1 — Downward Movement
2 — Rearward Movement
(fig. 124)3 — Final Downward Movement To Engage Locking
Mechanism(fig. 125) AHR In Reset Position
173
KNOWING
YOUR
VEHICLE
SAFETY
STARTING
AND
DRIVING
W
ARNING
LIGHTS
AND
MESSAGES
IN AN
EMERGENCY
SERVICING
AND
CARETECHNICAL
SPECIFICATIONSCONTENTS