2013 FIAT FREEMONT remote start
[x] Cancel search: remote startPage 153 of 352

RemoteControl Button Standard Screens
Menu Screens
AM/FM/
MW/LW SAT–
Audio HDD–
HardDisc
Drive DISC/
DVD AUX/AUX1/AUX2
Mode
Select Menu Screen
Setup
Right
Arrow FF Tune Up* Next
Channel*Next
ChannelFast
ForwardAudio:
Fast
ForwardNot
AvailableSelection
Right
Selection
Right
Video
Play: Fast
Forward
Video
Menu: Selection
Right
Left
Arrow
RW Tune
Down*
Previous
Channel*Previous
ChannelFast
RewindAudio:
Fast
RewindNot
AvailableSelection
Left
Selection
Left
Video
Play: Fast
Rewind
Video
Menu: Selection
Left
Enter Show
Numeric
Entry
Menu*Show
Numeric
Entry
Menu*Not
Available
Show
Numeric
Entry
MenuAudio:
Show
Numeric
EntryNot
Available
Activate
Selected
ItemNot
Available
Video
Play: Not
Available
Video
Menu: Activate
Selected
Item
147
KNOWING
YOUR
VEHICLE
SAFETY
STARTING
AND
DRIVING
WARNING
LIGHTS
AND
MESSAGES
IN AN
EMERGENCY
SERVICING
AND
CARETECHNICAL
SPECIFICATIONSCONTENTS
Page 155 of 352

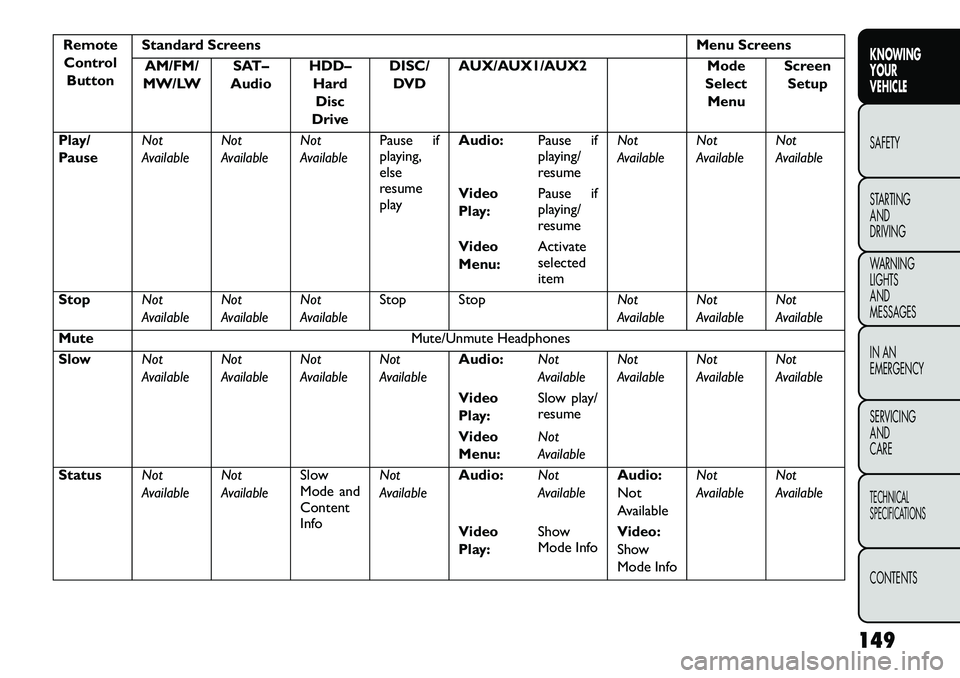
RemoteControl Button Standard Screens
Menu Screens
AM/FM/
MW/LW SAT–
Audio HDD–
HardDisc
Drive DISC/
DVD AUX/AUX1/AUX2
Mode
Select Menu Screen
Setup
Play/
Pause Not
AvailableNot
AvailableNot
AvailablePause if
playing,
else
resume
playAudio:
Pause if
playing/
resumeNot
Available
Not
AvailableNot
Available
Video
Play: Pause if
playing/
resume
Video
Menu: Activate
selected
item
Stop Not
AvailableNot
AvailableNot
AvailableStop Stop
Not
AvailableNot
AvailableNot
Available
Mute Mute/Unmute Headphones
Slow Not
AvailableNot
AvailableNot
AvailableNot
AvailableAudio:
Not
AvailableNot
AvailableNot
AvailableNot
Available
Video
Play: Slow play/
resume
Video
Menu: Not
Available
Status Not
AvailableNot
AvailableSlow
Mode and
Content
InfoNot
Available
Audio:
Not
AvailableAudio:
Not
AvailableNot
Available
Not
Available
Video
Play: Show
Mode Info
Video:
Show
Mode Info
149
KNOWING
YOUR
VEHICLE
SAFETY
STARTING
AND
DRIVING
WARNING
LIGHTS
AND
MESSAGES
IN AN
EMERGENCY
SERVICING
AND
CARETECHNICAL
SPECIFICATIONSCONTENTS
Page 157 of 352

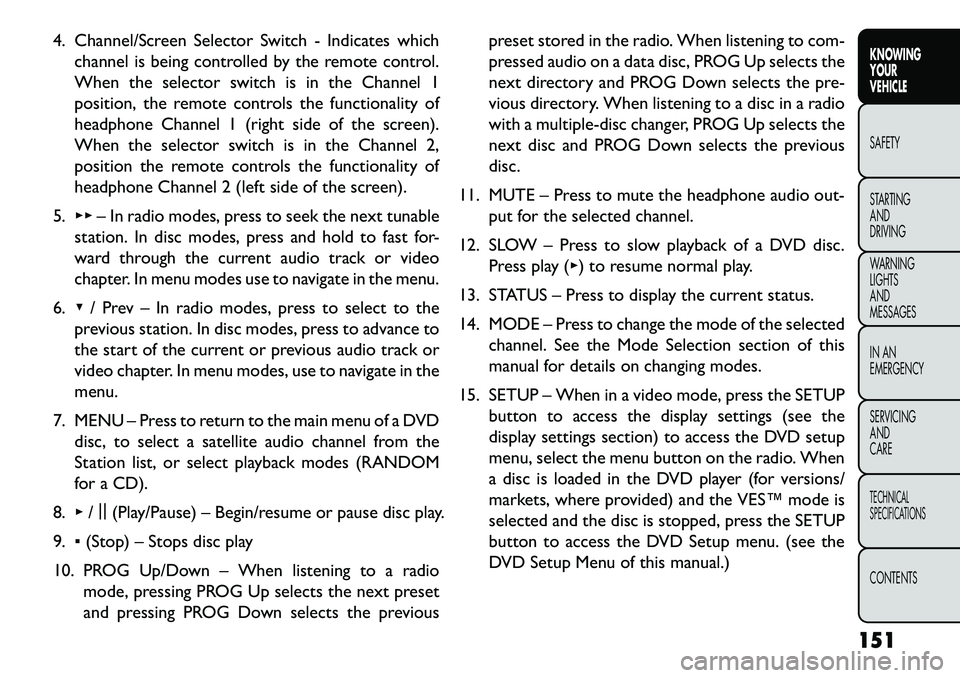
4. Channel/Screen Selector Switch - Indicates whichchannel is being controlled by the remote control.
When the selector switch is in the Channel 1
position, the remote controls the functionality of
headphone Channel 1 (right side of the screen).
When the selector switch is in the Channel 2,
position the remote controls the functionality of
headphone Channel 2 (left side of the screen).
5. ▸▸ – In radio modes, press to seek the next tunable
station. In disc modes, press and hold to fast for-
ward through the current audio track or video
chapter. In menu modes use to navigate in the menu.
6. ▾/ Prev – In radio modes, press to select to the
previous station. In disc modes, press to advance to
the start of the current or previous audio track or
video chapter. In menu modes, use to navigate in the
menu.
7. MENU – Press to return to the main menu of a DVD disc, to select a satellite audio channel from the
Station list, or select playback modes (RANDOM
for a CD).
8. ▸/||
(Play/Pause) – Begin/resume or pause disc play.
9. ▪(Stop) – Stops disc play
10. PROG Up/Down – When listening to a radio mode, pressing PROG Up selects the next preset
and pressing PROG Down selects the previous preset stored in the radio. When listening to com-
pressed audio on a data disc, PROG Up selects the
next directory and PROG Down selects the pre-
vious directory. When listening to a disc in a radio
with a multiple-disc changer, PROG Up selects the
next disc and PROG Down selects the previous
disc.
11. MUTE – Press to mute the headphone audio out- put for the selected channel.
12. SLOW – Press to slow playback of a DVD disc. Press play (▸) to resume normal play.
13. STATUS – Press to display the current status.
14. MODE – Press to change the mode of the selected channel. See the Mode Selection section of this
manual for details on changing modes.
15. SETUP – When in a video mode, press the SETUP button to access the display settings (see the
display settings section) to access the DVD setup
menu, select the menu button on the radio. When
a disc is loaded in the DVD player (for versions/
markets, where provided) and the VES™ mode is
selected and the disc is stopped, press the SETUP
button to access the DVD Setup menu. (see the
DVD Setup Menu of this manual.)
151
KNOWING
YOUR
VEHICLE
SAFETY
STARTING
AND
DRIVING
WARNING
LIGHTS
AND
MESSAGES
IN AN
EMERGENCY
SERVICING
AND
CARETECHNICAL
SPECIFICATIONSCONTENTS
Page 251 of 352

IN AN EMERGENCY
JUMP-STARTING
If your vehicle has a discharged battery it can be
jump-started using a set of jumper cables and a battery
in another vehicle or by using a portable battery
booster pack. Jump-starting can be dangerous if done
improperly so please follow the procedures in this
section carefully.
NOTE: When using a portable battery booster pack
follow the manufacturer's operating instructions and
precautions.
Do not use a portable battery booster
pack or any other booster source with a
system voltage greater than 12 Volts or
damage to the battery, starter motor, alternator
or electrical system may occur.
WARNING!
Do not attempt jump-starting if the bat-
ter
y is frozen. It could rupture or explode
and cause personal injury. PREPARATIONS FOR JUMP-START
The battery in your vehicle is located between the left
front headlight assembly and the left front wheel splash
shield. To allow jump-starting, there are remote bat-
tery posts located on the left side of the engine com-
partment.
(fig. 149)
(fig. 149)
Remote Battery Posts1 — Remote Positive (+) Post (Covered With Protective
Cap)
2 — Remote Negative (-) Post
245
KNOWING
YOUR
VEHICLE
SAFETY
STARTING
AND
DRIVING
WARNING
LIGHTS
AND
MESSAGES
IN AN
EMERGENCY
SERVICING
AND
C ARETECHNICAL
SPECIFICATIONSCONTENTS
Page 252 of 352

WARNING!
T
ake care to avoid the radiator cool-
ing fan whenever the hood is raised. It
can start anytime the ignition switch is ON.You
can be injured by moving fan blades.
Remove any metal jewelry such as watch
bands or bracelets that might make an inadver-
tent electrical contact . You could be seriously
injured.
Batteries contain sulfuric acid that can burn
your skin or eyes and generate hydrogen gas
which is flammable and explosive. Keep open
flames or sparks away from the battery.
1. Set the parking brake, shift the automatic transmis- sion into PARK and the manual transmission into
gear and turn the ignition to LOCK.
2. Turn off the heater, radio, and all unnecessary elec- trical accessories.
3. Remove the protective cover over the remote posi- tive (+)battery post. To remove the cover, press
the locking tab and pull upward on the cover.
4. If using another vehicle to jump-start the battery, park the vehicle within the jumper cables reach, set
the parking brake and make sure the ignition is OFF.
WARNING!
Do not allow vehicles to touch each
ot
her as this could establish a ground
connection and personal injury could result .
JUMP-STARTING PROCEDURE
WARNING!
Failure to follow this procedure could
resul
t in personal injury or property
damage due to battery explosion.Failure to follow these procedures could
result in damage to the charging system
of the booster vehicle or the discharged
vehicle.
1. Connect the positive (+)end of the jumper cable to
the remote positive (+)post of the discharged
vehicle.
2. Connect the opposite end of the positive (+)
jumper cable to the positive (+)post of the booster
battery.
3. Connect the negative end (-)of the jumper cable to
the negative (-)post of the booster battery.
246
KNOWING YOUR
VEHICLE
SAFETY
STARTING AND
DRIVING
WARNING LIGHTSAND
MESSAGES
IN AN
EMERGENC
Y
SERVICING AND
C
ARETECHNICAL
SPECIFICATIONSCONTENTS
Page 253 of 352

4. Connect the opposite end of the negative(-)
jumper cable to the remote negative (-)post of the
vehicle with the discharged battery.
WARNING!
Do not connect the cable to the negative
pos
t(-) of the discharged battery. The
resulting electrical spark could cause the battery
to explode and could result in personal injury.
5. Start the engine in the vehicle that has the booster battery, let the engine idle a few minutes, and then
start the engine in the vehicle with the discharged
battery.
Once the engine is started, remove the jumper
cables in the reverse sequence:
6. Disconnect the negative (-)jumper cable from the
remote negative (-)post of the vehicle with the
discharged battery.
7. Disconnect the negative end (-)of the jumper cable
from the negative (-)post of the booster battery.
8. Disconnect the opposite end of the positive (+)
jumper cable from the positive (+)post of the
booster battery. 9. Disconnect the positive
(+)end of the jumper cable
from the remote positive (+)post of the discharged
vehicle.
10. Reinstall the protective cover over the remote positive (+)battery post of the discharged vehicle.
If frequent jump-starting is required to start your
vehicle, you should have the battery and charging
system inspected at your authorized dealer.
Accessories that can be plugged into the
vehicle power outlets draw power from
the vehicle’s battery, even when not in
use (i.e., cellular phones, etc .). Eventually, if
plugged in long enough, the vehicle’s battery will
discharge sufficiently to degrade battery life
and/or prevent the engine from starting.
247
KNOWING
YOUR
VEHICLE
SAFETY
STARTING
AND
DRIVING
WARNING
LIGHTS
AND
MESSAGES
IN AN
EMERGENCY
SERVICING
AND
C ARETECHNICAL
SPECIFICATIONSCONTENTS
Page 297 of 352

ENGINE COMPARTMENT — 2.4L(fig. 174)(fig. 174)1 — Engine Coolant Reservoir 7 — Totally Integrated Power Module (Fuses)
2 — Power Steering Fluid Reservoir 8 — Automatic Transmission Dipstick
3 — Engine Oil Fill 9 — Washer Fluid Reservoir
4 — Brake Fluid Reservoir 10 — Coolant Pressure Cap
5 — Remote Jump Start (Positive Battery Post) 11 — Engine Oil Dipstick
6 — Remote Jump Start (Negative Battery Post)
291
KNOWING
YOUR
VEHICLE
SAFETY
STARTING
AND
DRIVING
WARNING
LIGHTS
AND
MESSAGES
IN AN
EMERGENCY
SERVICING
AND
CARETECHNICAL
SPECIFICATIONSCONTENTS
Page 302 of 352

Engine Oil Viscosity – 2.0L Diesel Engine
For best performance and maximum protection under
all types of operating conditions, the manufacturer
recommends Fully Synthetic Low Ash 5W-30 engine
oils that meet the requirements of FIAT Qualification
9.55535-S1 and ACEA C2.
Change Engine Oil – Diesel Engine
Refer to the “Maintenance Schedule” for the proper
maintenance intervals.
Materials Added To Engine Oil
Do not add any supplemental materials, other than leak
detection dyes, to the engine oil. Engine oil is an
engineered product and its performance may be im-
paired by supplemental additives.
Disposing Of Used Engine Oil And Oil Filters
Care should be taken in disposing of used engine oil and
oil filters from your vehicle. Used oil and oil filters,
indiscriminately discarded, can present a problem to
the environment. Contact your authorizeddealer,
service station or governmental agency for advice on
how and where used oil and oil filters can be safely
discarded in your area.
ENGINE AIR CLEANER FILTER
Refer to the “Maintenance Schedule” for the proper
maintenance intervals.
WARNING!
The air induction system (air cleaner,
h
oses, etc .) can provide a measure of
protection in the case of engine backfire. Do not
remove the air induction system (air cleaner,
hoses, etc .) unless such removal is necessary for
repair or maintenance. Make sure that no one is
near the engine compartment before starting the
vehicle with the air induction system (air cleaner,
hoses, etc .) removed. Failure to do so can result in
serious personal injury.
Engine Air Cleaner Filter Selection
The quality of replacement engine air cleaner filters
varies considerably. Only high quality filters should be
used to assure most efficient service.
MAINTENANCE-FREE BATTERY
You will never have to add water, and periodic mainte-
nance is not required.
NOTE: The battery is stored in a compartment that
is located behind the left front fender and is accessible
through the wheel well. The wheel and tire assemble
do not need to be removed to access the compart-
ment. Remote battery terminals are located in the
engine compartment for jump-starting.
296
KNOWING YOUR
VEHICLE
SAFETY
STARTING AND
DRIVING
WARNING LIGHTSAND
MESSAGES
IN AN
EMERGENCY
SERVICING AND
C
ARETECHNICAL
SPECIFICATIONSCONTENTS