2013 DODGE VIPER change time
[x] Cancel search: change timePage 4 of 100

WELCOME FROM CHRYSLER GROUP LLC
Congratulations on selecting your new Chrysler Group LLC vehicle. Be assured that it
represents precision workmanship, distinctive styling, and high quality - all essentials that
are traditional to our vehicles.
Your new Chrysler Group LLC vehicle has characteristics to enhance the driver's control
under some driving conditions. These are to assist the driver and are never a substitute for
attentive driving. They can never take the driver's place. Always drive carefully.
Your new vehicle has many features for the comfort and convenience of you and your
passengers. Some of these should not be used when driving because they take your eyes
from the road or your attention from driving. Never text while driving or take your eyes more
than momentarily off the road.
This guide illustrates and describes the operation of features and equipment that are
either standard or optional on this vehicle. This guide may also include a description of
features and equipment that are no longer available or were not ordered on this vehicle.
Please disregard any features and equipment described in this guide that are not available
on this vehicle. Chrysler Group LLC reserves the right to make changes in design and
specifications and/or make additions to or improvements to its products without imposing
any obligation upon itself to install them on products previously manufactured.
This User Guide has been prepared to help you quickly become acquainted with the
important features of your vehicle. It contains most things you will need to operate and
maintain the vehicle, including emergency information.
The DVD includes a computer application containing detailed owner's information which
can be viewed on a personal computer or MAC computer. The multimedia DVD also
includes videos which can be played on any standard DVD player (including the Media
Center Touch-Screen Radios). Additional DVD operational information is located on the
back of the DVD sleeve.
For complete owner information, refer to your Owner's Manual on the DVD in the owner’s
kit provided at the time of new vehicle purchase.For your convenience, the information
contained on the DVD may also be printed and saved for future reference.
Chrysler Group LLC is committed to protecting our environment and natural resources.
By converting from paper to electronic delivery for the majority of the user information for
your vehicle, together we greatly reduce the demand for tree-based products and lessen
the stress on our environment.
INTRODUCTION/WELCOME
2
Page 36 of 100

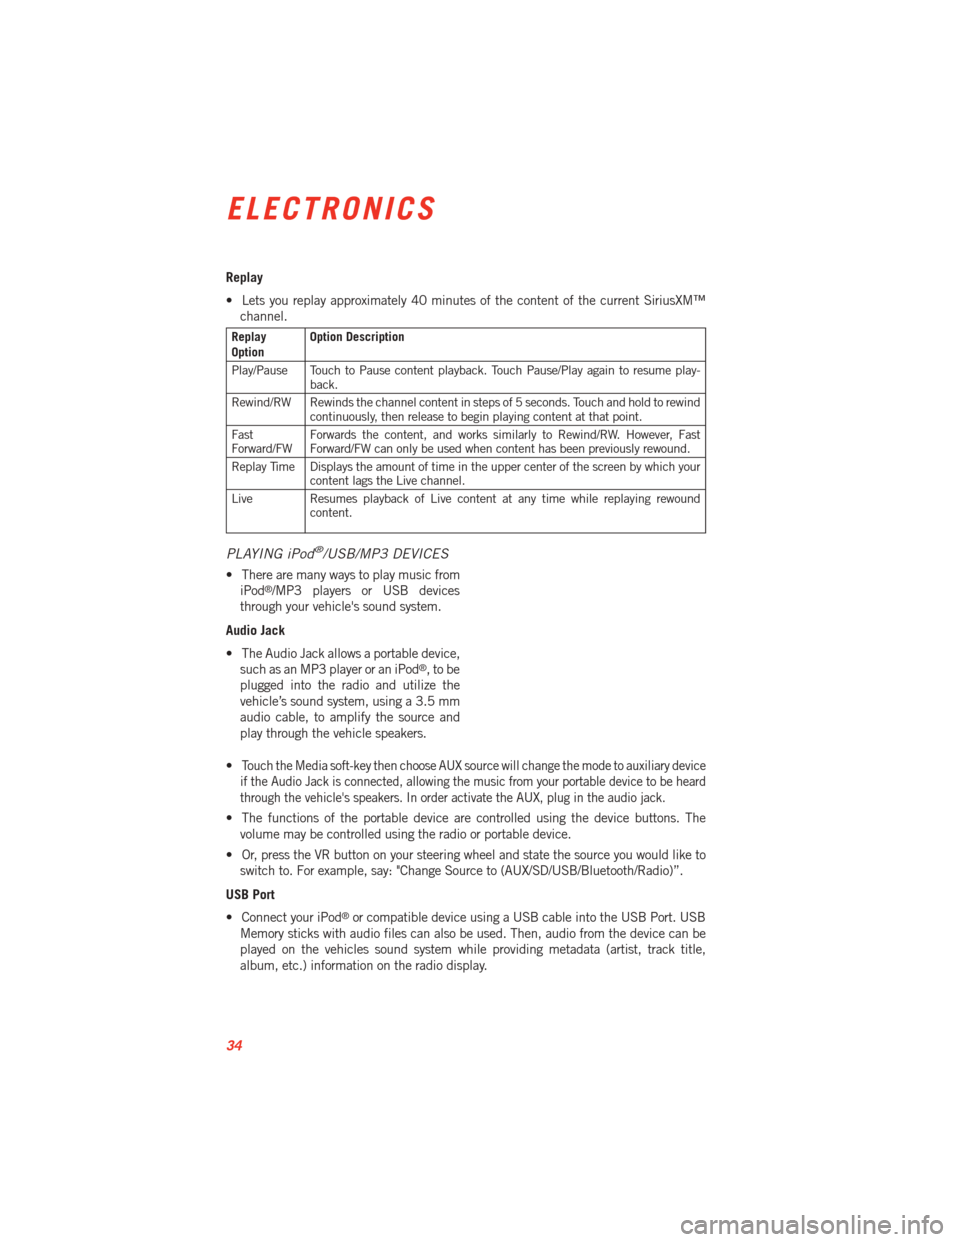
Replay
• Lets you replay approximately 40 minutes of the content of the current SiriusXM™channel.
Replay
Option Option Description
Play/Pause Touch to Pause content playback. Touch Pause/Play again to resume play- back.
Rewind/RW Rewinds the channel content in steps of 5 seconds. Touch and hold to rewind continuously, then release to begin playing content at that point.
Fast
Forward/FW Forwards the content, and works similarly to Rewind/RW. However, Fast
Forward/FW can only be used when content has been previously rewound.
Replay Time Displays the amount of time in the upper center of the screen by which your content lags the Live channel.
Live Resumes playback of Live content at any time while replaying rewound content.
PLAYING iPod®/USB/MP3 DEVICES
• There are many ways to play music from
iPod®/MP3 players or USB devices
through your vehicle's sound system.
Audio Jack
• The Audio Jack allows a portable device, such as an MP3 player or an iPod
®,tobe
plugged into the radio and utilize the
vehicle’s sound system, using a 3.5 mm
audio cable, to amplify the source and
play through the vehicle speakers.
•
Touch the Media soft-key then choose AUX source will change the mode to auxiliary device
if the Audio Jack is connected, allowing the music from your portable device to be heard
through the vehicle's speakers. In order activate the AUX, plug in the audio jack.
• The functions of the portable device are controlled using the device buttons. The volume may be controlled using the radio or portable device.
• Or, press the VR button on your steering wheel and state the source you would like to switch to. For example, say: "Change Source to (AUX/SD/USB/Bluetooth/Radio)”.
USB Port
• Connect your iPod
®or compatible device using a USB cable into the USB Port. USB
Memory sticks with audio files can also be used. Then, audio from the device can be
played on the vehicles sound system while providing metadata (artist, track title,
album, etc.) information on the radio display.
ELECTRONICS
34
Page 37 of 100

• When connected, the iPod®/compatible USB device can be controlled using voice
command, radio touch screen or Steering Wheel Audio controls to play, skip to the next
or previous track, browse, and list the contents.
• The iPod
®battery charges when plugged into the USB port (if supported by the specific
device).
NOTE:
• When connecting your iPod
®device for the first time, the system may take several
minutes to read your music, depending on the number of files. For example, the system
will take approximately 5 minutes for every 1000 songs loaded on the device. Also
during the reading process, the Shuffle and Browse functions will be disabled. This
process is needed to ensure the full use of your iPod
®features and only happens the
first time it is connected. After the first time, the reading process of your iPod®will take
considerably less time unless changes are made or new songs are added to the playlist.
• The USB port supports certain Mini, Classic, Nano, Touch, and iPhone
®devices. The
USB port also supports playing music from compatible external USB Mass Storage
Class memory devices. Some iPod
®software versions may not fully support the USB
port features. Please visit Apple’s website for iPod®software updates.
SD Card
• Play songs stored on an SD card inserted into the SD card slot.
• Song playback can be controlled using the radio or Steering Wheel Audio Controls to play, skip to the next or previous track, browse, and list the contents.
Bluetooth
®Streaming Audio
•
If equipped with Uconnect™ Voice Command, your Bluetooth-equipped iPod®devices,
cell phones or other media players, may also be able to stream music to your vehicle's
sound system. Your connected device must be Bluetooth-compatible, and paired with
your Uconnect™ system (see Uconnect™ Phone for pairing instructions). You can access
the music from your connected Bluetooth
®device by touching the Source soft-key while
in Player mode.
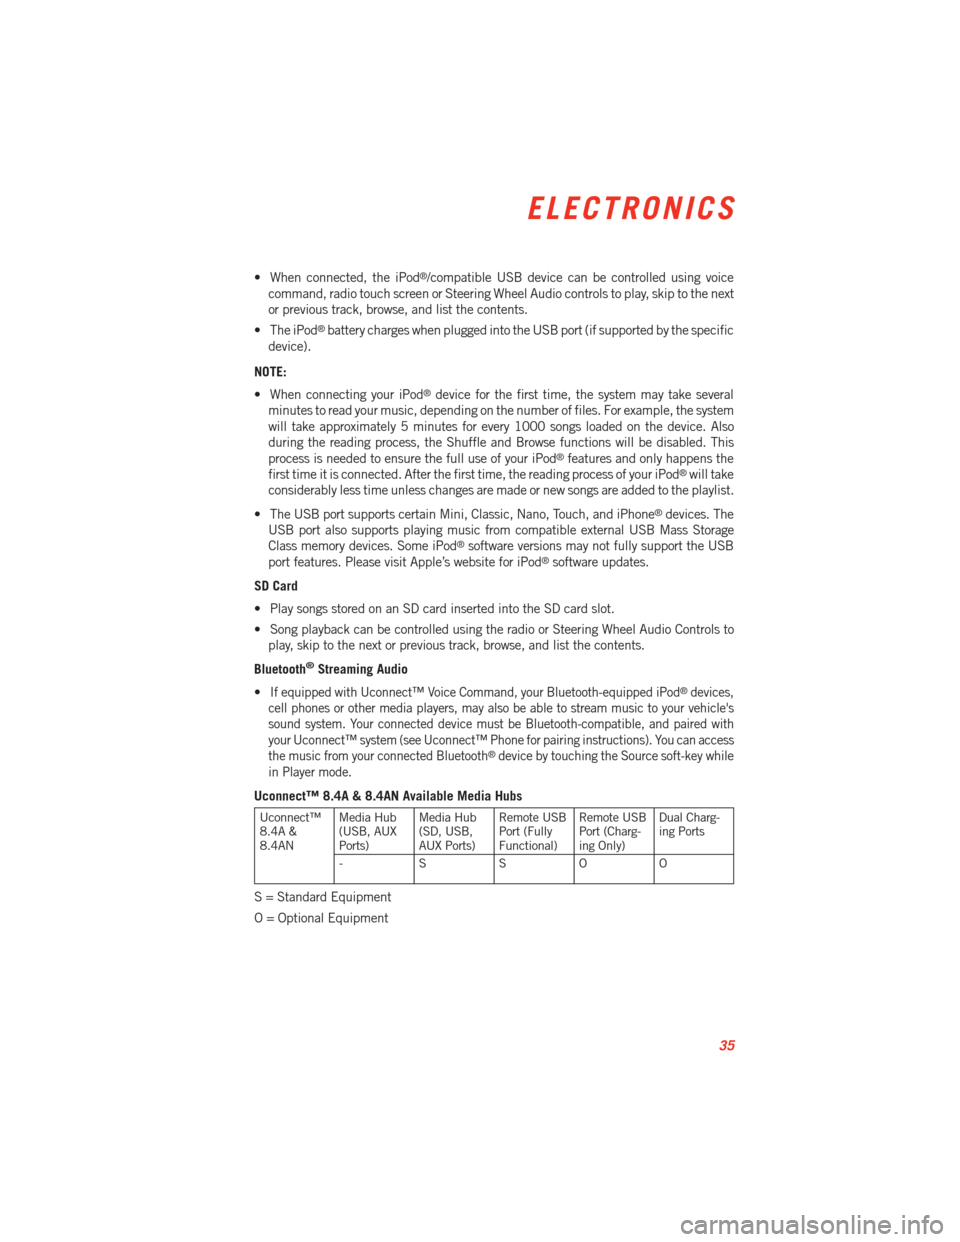
Uconnect™ 8.4A & 8.4AN Available Media Hubs
Uconnect™
8.4A &
8.4AN Media Hub
(USB, AUX
Ports) Media Hub
(SD, USB,
AUX Ports)Remote USB
Port (Fully
Functional)Remote USB
Port (Charg-
ing Only)Dual Charg-
ing Ports
- SSOO
S = Standard Equipment
O = Optional Equipment
ELECTRONICS
35
Page 50 of 100

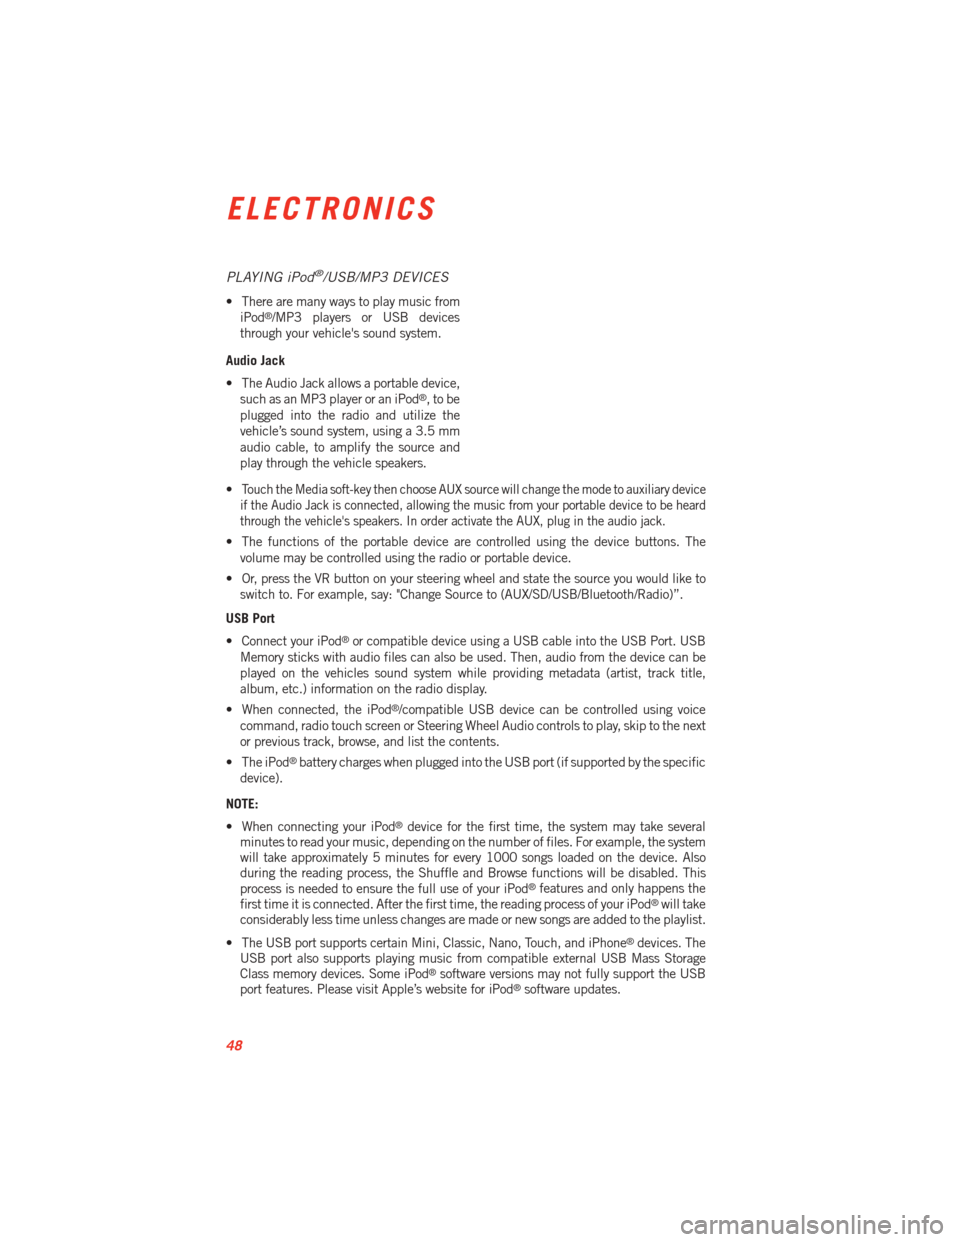
PLAYING iPod®/USB/MP3 DEVICES
• There are many ways to play music fromiPod®/MP3 players or USB devices
through your vehicle's sound system.
Audio Jack
• The Audio Jack allows a portable device, such as an MP3 player or an iPod
®,tobe
plugged into the radio and utilize the
vehicle’s sound system, using a 3.5 mm
audio cable, to amplify the source and
play through the vehicle speakers.
•
Touch the Media soft-key then choose AUX source will change the mode to auxiliary device
if the Audio Jack is connected, allowing the music from your portable device to be heard
through the vehicle's speakers. In order activate the AUX, plug in the audio jack.
• The functions of the portable device are controlled using the device buttons. The volume may be controlled using the radio or portable device.
• Or, press the VR button on your steering wheel and state the source you would like to switch to. For example, say: "Change Source to (AUX/SD/USB/Bluetooth/Radio)”.
USB Port
• Connect your iPod
®or compatible device using a USB cable into the USB Port. USB
Memory sticks with audio files can also be used. Then, audio from the device can be
played on the vehicles sound system while providing metadata (artist, track title,
album, etc.) information on the radio display.
• When connected, the iPod
®/compatible USB device can be controlled using voice
command, radio touch screen or Steering Wheel Audio controls to play, skip to the next
or previous track, browse, and list the contents.
• The iPod
®battery charges when plugged into the USB port (if supported by the specific
device).
NOTE:
• When connecting your iPod
®device for the first time, the system may take several
minutes to read your music, depending on the number of files. For example, the system
will take approximately 5 minutes for every 1000 songs loaded on the device. Also
during the reading process, the Shuffle and Browse functions will be disabled. This
process is needed to ensure the full use of your iPod
®features and only happens the
first time it is connected. After the first time, the reading process of your iPod®will take
considerably less time unless changes are made or new songs are added to the playlist.
• The USB port supports certain Mini, Classic, Nano, Touch, and iPhone
®devices. The
USB port also supports playing music from compatible external USB Mass Storage
Class memory devices. Some iPod
®software versions may not fully support the USB
port features. Please visit Apple’s website for iPod®software updates.
ELECTRONICS
48
Page 64 of 100

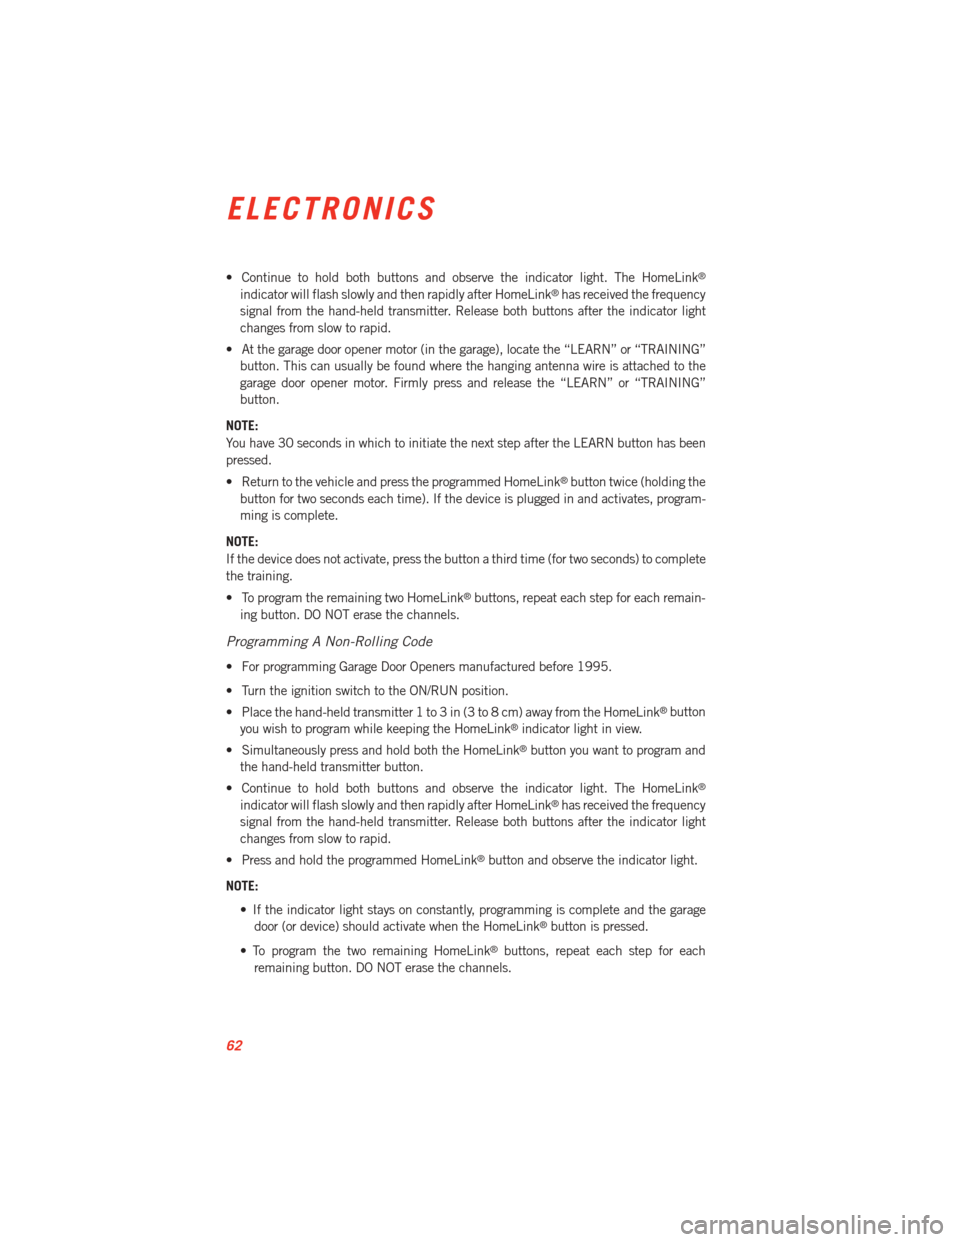
• Continue to hold both buttons and observe the indicator light. The HomeLink®
indicator will flash slowly and then rapidly after HomeLink®has received the frequency
signal from the hand-held transmitter. Release both buttons after the indicator light
changes from slow to rapid.
• At the garage door opener motor (in the garage), locate the “LEARN” or “TRAINING” button. This can usually be found where the hanging antenna wire is attached to the
garage door opener motor. Firmly press and release the “LEARN” or “TRAINING”
button.
NOTE:
You have 30 seconds in which to initiate the next step after the LEARN button has been
pressed.
• Return to the vehicle and press the programmed HomeLink
®button twice (holding the
button for two seconds each time). If the device is plugged in and activates, program-
ming is complete.
NOTE:
If the device does not activate, press the button a third time (for two seconds) to complete
the training.
• To program the remaining two HomeLink
®buttons, repeat each step for each remain-
ing button. DO NOT erase the channels.
Programming A Non-Rolling Code
• For programming Garage Door Openers manufactured before 1995.
• Turn the ignition switch to the ON/RUN position.
• Place the hand-held transmitter 1 to 3 in (3 to 8 cm) away from the HomeLink
®button
you wish to program while keeping the HomeLink®indicator light in view.
• Simultaneously press and hold both the HomeLink
®button you want to program and
the hand-held transmitter button.
• Continue to hold both buttons and observe the indicator light. The HomeLink
®
indicator will flash slowly and then rapidly after HomeLink®has received the frequency
signal from the hand-held transmitter. Release both buttons after the indicator light
changes from slow to rapid.
• Press and hold the programmed HomeLink
®button and observe the indicator light.
NOTE: • If the indicator light stays on constantly, programming is complete and the garagedoor (or device) should activate when the HomeLink
®button is pressed.
• To program the two remaining HomeLink
®buttons, repeat each step for each
remaining button. DO NOT erase the channels.
ELECTRONICS
62